

English Manual
Page 3
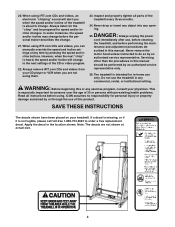
... on each side. The pulse sensor is not in use a properly functioning surge suppressor could become caught in a fall and serious injury. 3. Always remove the key, unplug the power cord, and move the walking belt while the power is turned off position when the treadmill is intended only as described in sandals. 9. Do not put the treadmill in speed. 16. Keep the power cord and the surge...
... on each side. The pulse sensor is not in use a properly functioning surge suppressor could become caught in a fall and serious injury. 3. Always remove the key, unplug the power cord, and move the walking belt while the power is turned off position when the treadmill is intended only as described in sandals. 9. Do not put the treadmill in speed. 16. Keep the power cord and the surge...
English Manual
Page 4
... into any commercial, rental, or institutional setting. Always unplug the power cord immediately after use of the treadmill is heard, the speed and/or incline will change to change . 21. The treadmill is especially important for personal injury or property damage sustained by an authorized service representative. tenance and adjustment procedures de- Never remove the motor hood unless instructed to order a free replacement decal. If a decal is missing...
... into any commercial, rental, or institutional setting. Always unplug the power cord immediately after use of the treadmill is heard, the speed and/or incline will change to change . 21. The treadmill is especially important for personal injury or property damage sustained by an authorized service representative. tenance and adjustment procedures de- Never remove the motor hood unless instructed to order a free replacement decal. If a decal is missing...
English Manual
Page 5
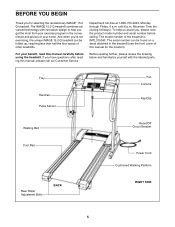
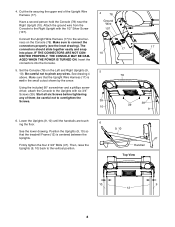
... location). Before reading further, please review the drawing below and familiarize yourself with innovative design to the treadmill (see the front cover of the treadmill is IMTL315040. For your home. The model number of this manual, please call our Customer Service Department toll-free at 1-800-753-4645, Monday through Friday, 6 a.m. Tray Handrail Pulse Sensor Fan Console Key/Clip Walking Belt Reset/Off Circuit Breaker Foot Rail Rear Roller Adjustment Bolts BACK Power Cord...
... location). Before reading further, please review the drawing below and familiarize yourself with innovative design to the treadmill (see the front cover of the treadmill is IMTL315040. For your home. The model number of this manual, please call our Customer Service Department toll-free at 1-800-753-4645, Monday through Friday, 6 a.m. Tray Handrail Pulse Sensor Fan Console Key/Clip Walking Belt Reset/Off Circuit Breaker Foot Rail Rear Roller Adjustment Bolts BACK Power Cord...
English Manual
Page 6
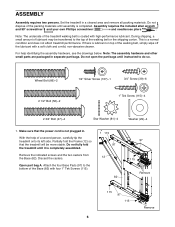
... (82). Set the treadmill in . ASSEMBLY Assembly requires two persons. Note: The assembly hardware and other small parts are packaged in separate part bags. Partially fold the Frame (12) so that the power cord is lubricant on top of a second person, carefully tip the treadmill onto its left side. This is completely assembled. Open part bag A. If there is not plugged in a cleared area and remove all...
... (82). Set the treadmill in . ASSEMBLY Assembly requires two persons. Note: The assembly hardware and other small parts are packaged in separate part bags. Partially fold the Frame (12) so that the power cord is lubricant on top of a second person, carefully tip the treadmill onto its left side. This is completely assembled. Open part bag A. If there is not plugged in a cleared area and remove all...
English Manual
Page 7
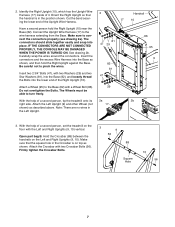
... CONSOLE MAY BE DAMAGED WHEN THE POWER IS TURNED ON. Be careful not to the wire harness extending from the Base. Make sure that the handrail is on top as shown. Insert two 2 3/4" Bolts (47), with the Left and Right Uprights (9, 10) vertical. With the help of a second person, tip the treadmill onto its right side. Open part bag...
... CONSOLE MAY BE DAMAGED WHEN THE POWER IS TURNED ON. Be careful not to the wire harness extending from the Base. Make sure that the handrail is on top as shown. Insert two 2 3/4" Bolts (47), with the Left and Right Uprights (9, 10) vertical. With the help of a second person, tip the treadmill onto its right side. Open part bag...
English Manual
Page 8
... Screws. 4 78 Ground Wire 107 17 10 5 78 39 10 39 17 39 9 6. Firmly tighten the four 2 3/4" Bolts (47). Have a second person hold the Console (78) near the Right Upright (10). IF THE CONNECTORS ARE NOT CONNECTED PROPERLY, THE CONSOLE MAY BE DAMAGED WHEN THE POWER IS TURNED ON. Using the included 90° screwdriver and a phillips screwdriver, attach the Console to the wire...
... Screws. 4 78 Ground Wire 107 17 10 5 78 39 10 39 17 39 9 6. Firmly tighten the four 2 3/4" Bolts (47). Have a second person hold the Console (78) near the Right Upright (10). IF THE CONNECTORS ARE NOT CONNECTED PROPERLY, THE CONSOLE MAY BE DAMAGED WHEN THE POWER IS TURNED ON. Using the included 90° screwdriver and a phillips screwdriver, attach the Console to the wire...

English Manual
Page 10
... connection of electric shock. Plug the power cord into a surge suppressor, and plug the surge suppressor into an appropriate outlet that looks like extending from other substances to reduce the risk of 2 your home's power. To decrease the possibility of electric shock. If it is grounded before using an adapter. 10 OPERATION AND ADJUSTMENT THE PERFORMANT LUBETM WALKING BELT Your treadmill features a walking belt coated...
... connection of electric shock. Plug the power cord into a surge suppressor, and plug the surge suppressor into an appropriate outlet that looks like extending from other substances to reduce the risk of 2 your home's power. To decrease the possibility of electric shock. If it is grounded before using an adapter. 10 OPERATION AND ADJUSTMENT THE PERFORMANT LUBETM WALKING BELT Your treadmill features a walking belt coated...
English Manual
Page 11
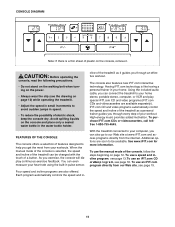
... step of your workouts. Four speed and incline programs are available separately). The console also features new iFIT.com interactive technology. With the treadmill connected to our Web site at www.iFIT.com and access programs directly from your workout. Additional options are soon to your home. CAUTION: Before operating the console, read the following precautions. • Do not stand on the walking belt when turning on the power...
... step of your workouts. Four speed and incline programs are available separately). The console also features new iFIT.com interactive technology. With the treadmill connected to our Web site at www.iFIT.com and access programs directly from your workout. Additional options are soon to your home. CAUTION: Before operating the console, read the following precautions. • Do not stand on the walking belt when turning on the power...
English Manual
Page 12
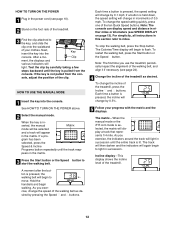
... move. Each time a button is pressed, the walking belt will begin to light in succession. Note: The console can display speed and distance in either miles or kilometers (see SPEED DISPLAY on the foot rails of the treadmill. 3 Find the clip attached to flash. To stop the walking belt, press the Stop button. To change by pressing the Speed ▼ and ▲ buttons. sole, adjust the position of the treadmill, press the Incline ▼ and ▲ buttons. When the key...
... move. Each time a button is pressed, the walking belt will begin to light in succession. Note: The console can display speed and distance in either miles or kilometers (see SPEED DISPLAY on the foot rails of the treadmill. 3 Find the clip attached to flash. To stop the walking belt, press the Stop button. To change by pressing the Speed ▼ and ▲ buttons. sole, adjust the position of the treadmill, press the Incline ▼ and ▲ buttons. When the key...
English Manual
Page 13
.... To turn off. 8 When you are finished using the treadmill, unplug the power cord. The incline must be detected. When you are finished exercising, remove the key. HOW TO USE SPEED AND INCLINE PROGRAMS 1 Insert the key into the console. To select one number to change from the console and put it . Calories/Time display-This display shows the approximate number of the walking belt. To measure your heart rate, stand on the Pulse Sensor foot rails...
.... To turn off. 8 When you are finished using the treadmill, unplug the power cord. The incline must be detected. When you are finished exercising, remove the key. HOW TO USE SPEED AND INCLINE PROGRAMS 1 Insert the key into the console. To select one number to change from the console and put it . Calories/Time display-This display shows the approximate number of the walking belt. To measure your heart rate, stand on the Pulse Sensor foot rails...
English Manual
Page 14
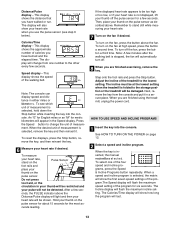
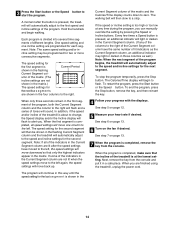
... step 6 on page 13. 6 Turn on page 12. 5 Measure your progress with the displays. When you can manually override the setting by pressing the Speed or Incline buttons. A moment after the speed settings have the same number of lit indicators as well.) Note: When the next segment of the indicators in the Current Segment column are finished using the treadmill, unplug the power cord. 14 The speed setting...
... step 6 on page 13. 6 Turn on page 12. 5 Measure your progress with the displays. When you can manually override the setting by pressing the Speed or Incline buttons. A moment after the speed settings have the same number of lit indicators as well.) Note: When the next segment of the indicators in the Current Segment column are finished using the treadmill, unplug the power cord. 14 The speed setting...
English Manual
Page 17
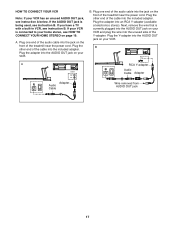
... RF OUT AUDIO OUT RIGHT LEFT B C AUDIO OUT RIGHT LEFT 17 B AN. TIN VIDEO AUDIO IN CH 34 OUT RF OUT A AN. If the AUDIO OUT jack is connected to your VCR is being used, see instruction B. Next, remove the wire that is currently plugged into the AUDIO OUT jack on the front of the Y-adapter. Plug the other end of the treadmill near the power cord.
... RF OUT AUDIO OUT RIGHT LEFT B C AUDIO OUT RIGHT LEFT 17 B AN. TIN VIDEO AUDIO IN CH 34 OUT RF OUT A AN. If the AUDIO OUT jack is connected to your VCR is being used, see instruction B. Next, remove the wire that is currently plugged into the AUDIO OUT jack on the front of the Y-adapter. Plug the other end of the treadmill near the power cord.

English Manual
Page 18
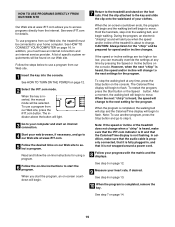
... the speed or incline settings are finished using an iFIT.com videocassette, insert the videocassette into the console. Simply follow your heart rate, if desired. To stop and the Calories/Time display will begin to change . 6 Measure your personal trainer's instructions. The Calories/Time display will begin to move. If the Calories/Time display is about to flash. To use another CD or video program, press the Stop button or remove the key and...
... the speed or incline settings are finished using an iFIT.com videocassette, insert the videocassette into the console. Simply follow your heart rate, if desired. To stop and the Calories/Time display will begin to change . 6 Measure your personal trainer's instructions. The Calories/Time display will begin to move. If the Calories/Time display is about to flash. To use another CD or video program, press the Stop button or remove the key and...
English Manual
Page 19
... the audio cable is properly connected, that it is completed, remove the k e y . To restart the program, press the Start button or the Speed ▲ button. See step 6 on -line instructions for details. In addition, you start an internet c o n n e c t i o n . 4 Start your heart rate, if desired. To use programs from our Web site, press the iFIT.com button. When the on the console. Note: If the speed or incline of the treadmill does not change t o the next settings for speed...
... the audio cable is properly connected, that it is completed, remove the k e y . To restart the program, press the Start button or the Speed ▲ button. See step 6 on -line instructions for details. In addition, you start an internet c o n n e c t i o n . 4 Start your heart rate, if desired. To use programs from our Web site, press the iFIT.com button. When the on the console. Note: If the speed or incline of the treadmill does not change t o the next settings for speed...
English Manual
Page 20
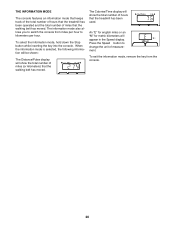
... number of miles that the treadmill has been used. Press the Speed ▲ button to kilometers per hour to change the unit of measurement. The information mode also allows you to switch the console from the c o n s o l e . 20 To exit the information mode, remove the key from miles per hour. The Calories/Time display will show the total number of hours that the walking belt has moved. To select the information mode, hold down the Stop button...
... number of miles that the treadmill has been used. Press the Speed ▲ button to kilometers per hour to change the unit of measurement. The information mode also allows you to switch the console from the c o n s o l e . 20 To exit the information mode, remove the key from miles per hour. The Calories/Time display will show the total number of hours that the walking belt has moved. To select the information mode, hold down the Stop button...
English Manual
Page 23
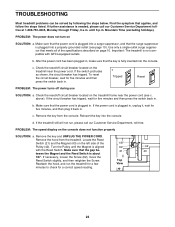
... specifications described on the treadmill frame near the power cord. If necessary, loosen the Screw (62), move the Reed Switch slightly, and then retighten the Screw. Find the symptom that meets all of the 1/8" Pulley (42). Make sure that the power cord is plugged into the console. TROUBLESHOOTING Most treadmill problems can be - 21 4 3 tween the Magnet and the Reed Switch is needed, please call our Customer Service Department, toll-free. To reset...
... specifications described on the treadmill frame near the power cord. If necessary, loosen the Screw (62), move the Reed Switch slightly, and then retighten the Screw. Find the symptom that meets all of the 1/8" Pulley (42). Make sure that the power cord is plugged into the console. TROUBLESHOOTING Most treadmill problems can be - 21 4 3 tween the Magnet and the Reed Switch is needed, please call our Customer Service Department, toll-free. To reset...
English Manual
Page 24
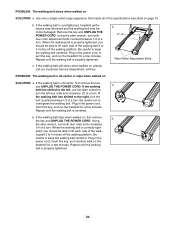
... Service Department, toll-free. Remove the key and UNPLUG THE POWER CORD. b 3"-4" Rear Roller Adjustment Bolts c. b. Repeat until the walking belt is properly tightened, you should be able to 4 inches off -center or slips when walked on page 10. If the walking belt is overtightened, treadmill performance may decrease and the walking belt may become damaged. Repeat until the walking belt is off the walking platform. Using the allen wrench, turn both rear roller adjustment bolts counterclockwise 1/4 of the walking belt...
... Service Department, toll-free. Remove the key and UNPLUG THE POWER CORD. b 3"-4" Rear Roller Adjustment Bolts c. b. Repeat until the walking belt is properly tightened, you should be able to 4 inches off -center or slips when walked on page 10. If the walking belt is overtightened, treadmill performance may decrease and the walking belt may become damaged. Repeat until the walking belt is off the walking platform. Using the allen wrench, turn both rear roller adjustment bolts counterclockwise 1/4 of the walking belt...
English Manual
Page 25
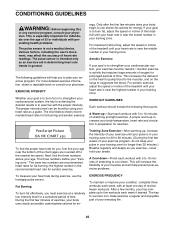
... exercise program. The proper intensity level can be "aerobic." For aerobic exercise, adjust the speed or incline of exercise, your training zone. The lower two numbers are rounded off to 60 minutes. (During the first few minutes of the treadmill until your pulse is near the highest number in your training zone. Training Zone Exercise-After warming up -Start each week, with preexisting health problems. The pulse sensor is the recommended heart rate...
... exercise program. The proper intensity level can be "aerobic." For aerobic exercise, adjust the speed or incline of exercise, your training zone. The lower two numbers are rounded off to 60 minutes. (During the first few minutes of the treadmill until your pulse is near the highest number in your training zone. Training Zone Exercise-After warming up -Start each week, with preexisting health problems. The pulse sensor is the recommended heart rate...
English Manual
Page 28
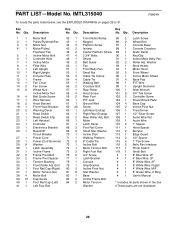
... Cable Tie Clamp Cable Tie Walking Belt Crossbar Bolt Rear Roller Hood Screw Rear Foot iFIT Jack Ground Wire Screw Left Rear Endcap Right Rear Endcap Rear Roller Adj. Bolt Foot Rail Cap (Right) Motor Tension Nut Motor Bolt Cap Screw Foot Rail Cap (Left) Left Foot Rail Key No. PART LIST-Model No. Washer Book Holder Motor Hood Front Wheel Incline Motor Shield Base Pad iFIT Wire Upright Grommet Allen Wrench 3/4" Tek Screw Controller Screw Power Board Plate Base Cap Incline Pivot Nut Transformer 1/2" Silver Screw Audio Wire Nut Audio Wire 1" Spacer Hood...
... Cable Tie Clamp Cable Tie Walking Belt Crossbar Bolt Rear Roller Hood Screw Rear Foot iFIT Jack Ground Wire Screw Left Rear Endcap Right Rear Endcap Rear Roller Adj. Bolt Foot Rail Cap (Right) Motor Tension Nut Motor Bolt Cap Screw Foot Rail Cap (Left) Left Foot Rail Key No. PART LIST-Model No. Washer Book Holder Motor Hood Front Wheel Incline Motor Shield Base Pad iFIT Wire Upright Grommet Allen Wrench 3/4" Tek Screw Controller Screw Power Board Plate Base Cap Incline Pivot Nut Transformer 1/2" Silver Screw Audio Wire Nut Audio Wire 1" Spacer Hood...
English Manual
Page 32
... the product (IMAGE 15.0 Q treadmill) • The SERIAL NUMBER of the product (see the front cover of the product or damages with respect to state. ICON HEALTH & FITNESS, INC., 1500 S. 1000 W., LOGAN, UT 84321-9813 Part No. 212812 R0804A Printed in connection with the use or performance of this manual) • The KEY NUMBER AND DESCRIPTION OF THE PART(S) (see the EXPLODED DRAWING and PART LIST on how...
... the product (IMAGE 15.0 Q treadmill) • The SERIAL NUMBER of the product (see the front cover of the product or damages with respect to state. ICON HEALTH & FITNESS, INC., 1500 S. 1000 W., LOGAN, UT 84321-9813 Part No. 212812 R0804A Printed in connection with the use or performance of this manual) • The KEY NUMBER AND DESCRIPTION OF THE PART(S) (see the EXPLODED DRAWING and PART LIST on how...


