Brochure
Page 2
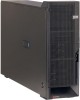
... (2) 350W hot-swap Power supply, hard disk drives (select models) Integrated RAID-1 IBM Director, Diagnostic LEDs, optional Remote Supervisor Adapter, Automatic Server Restart, Alert Standard Format, ServerGuide and optional Remote Deployment Manager Windows 2000®/Advanced Server, Red Hat Linux® Advanced Server 2.1, Red Hat Linux Professional 7.2 and 7.3, SuSE Linux Professional 8.0 and Novell NetWare...
... (2) 350W hot-swap Power supply, hard disk drives (select models) Integrated RAID-1 IBM Director, Diagnostic LEDs, optional Remote Supervisor Adapter, Automatic Server Restart, Alert Standard Format, ServerGuide and optional Remote Deployment Manager Windows 2000®/Advanced Server, Red Hat Linux® Advanced Server 2.1, Red Hat Linux Professional 7.2 and 7.3, SuSE Linux Professional 8.0 and Novell NetWare...

User Manual
Page 7
Table of Contents Chapter 1: Product Overview Features and Benefits 3 Safety Precautions 4 Chapter 2: Installation Getting Started 9 Installing Your LCM 9 Cabling the LCM 12 Chapter 3: Basic Operations Controlling Your System 21 Viewing and Selecting Ports and Servers 21 Configuring OSCAR 24 Resetting Your Keyboard and Mouse 32 Displaying Version Information 33 Scanning Your System 34 Broadcasting to Servers 36 Appendices Appendix A: FLASH Upgrades 41 Appendix B: Technical Specifications 45 Appendix C: Hardware Maintenance Information . . . .46 Appendix D: Notices 47
Table of Contents Chapter 1: Product Overview Features and Benefits 3 Safety Precautions 4 Chapter 2: Installation Getting Started 9 Installing Your LCM 9 Cabling the LCM 12 Chapter 3: Basic Operations Controlling Your System 21 Viewing and Selecting Ports and Servers 21 Configuring OSCAR 24 Resetting Your Keyboard and Mouse 32 Displaying Version Information 33 Scanning Your System 34 Broadcasting to Servers 36 Appendices Appendix A: FLASH Upgrades 41 Appendix B: Technical Specifications 45 Appendix C: Hardware Maintenance Information . . . .46 Appendix D: Notices 47
User Manual
Page 11
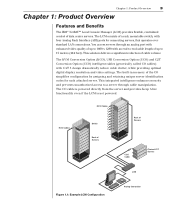
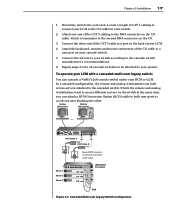
... if the LCM is not powered. The LCM consists of data center servers. This solution delivers a significant reduction of Servers CCO Cable Chained C2T Servers LCM Figure 1.1: Example LCM Configuration Analog Connection Chapter 1: Product Overview 3 Chapter 1: Product Overview Features and Benefits The IBM® NetBAY™ Local Console Manager (LCM) provides flexible, centralized control...
... if the LCM is not powered. The LCM consists of data center servers. This solution delivers a significant reduction of Servers CCO Cable Chained C2T Servers LCM Figure 1.1: Example LCM Configuration Analog Connection Chapter 1: Product Overview 3 Chapter 1: Product Overview Features and Benefits The IBM® NetBAY™ Local Console Manager (LCM) provides flexible, centralized control...

User Manual
Page 17
... • One straight-through serial cable Additional items needed • One KCO cable per attached PS/2 server or switch • One UCO cable per attached USB server or switch • One CCO cable per attached IBM C2T server Installing Your LCM Your LCM ships with the unit as well as other components in the...
... • One straight-through serial cable Additional items needed • One KCO cable per attached PS/2 server or switch • One UCO cable per attached USB server or switch • One CCO cable per attached IBM C2T server Installing Your LCM Your LCM ships with the unit as well as other components in the...
User Manual
Page 20
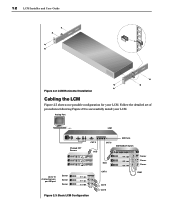
Follow the detailed set of procedures following Figure 2.3 to 16 chained servers per ARI port Server Server Server CAT 5 CAT 5 CAT 5 KVM Figure 2.3: Basic LCM Configuration 12 LCM Installer and User Guide Figure 2.2: LCM Horizontal Installation Cabling the LCM Figure 2.3 shows one possible configuration for your LCM. Analog Port LCM Chained C2T Servers CAT 5 CCO CAT 5 ARI Ports IBM NetBAY Switch KCO Server Server Server Up to successfully install your LCM.
Follow the detailed set of procedures following Figure 2.3 to 16 chained servers per ARI port Server Server Server CAT 5 CAT 5 CAT 5 KVM Figure 2.3: Basic LCM Configuration 12 LCM Installer and User Guide Figure 2.2: LCM Horizontal Installation Cabling the LCM Figure 2.3 shows one possible configuration for your LCM. Analog Port LCM Chained C2T Servers CAT 5 CCO CAT 5 ARI Ports IBM NetBAY Switch KCO Server Server Server Up to successfully install your LCM.

User Manual
Page 22
...Windows 2000/Windows XP: 1. Repeat steps 4-6 for your LCM. 2. To chain servers together using default drivers): 1. Locate the CCO cables and CAT 5 cabling for all attached Microsoft Windows systems attached to an IBM C2T server: 1. Mouse. 2. 14 LCM Installer and User Guide To adjust the mouse ...acceleration: Before a server can be connected to the LCM, an adjustment to mouse acceleration must be accessing the...
...Windows 2000/Windows XP: 1. Repeat steps 4-6 for your LCM. 2. To chain servers together using default drivers): 1. Locate the CCO cables and CAT 5 cabling for all attached Microsoft Windows systems attached to an IBM C2T server: 1. Mouse. 2. 14 LCM Installer and User Guide To adjust the mouse ...acceleration: Before a server can be connected to the LCM, an adjustment to mouse acceleration must be accessing the...

User Manual
Page 23
...connector on the last UCO cable in the chain. When you will connect the first two servers to this cable to the first RJ45 connector on the UCO cable for Server 1. 6. Chapter 2: Installation 15 LCM CAT 5 cable up to the second RJ45 connector on the.... 3. Attach the other end of the chain, attach a terminator to 10 meters (32.8 feet) KCO Cable ARI Port KCO Cable Server 1 KCO Cable Server 2 Terminator Figure 2.4: Chaining Servers Together with KCO Cables Server 3 To chain servers together using UCO cables: 1. Locate the UCO cables and CAT 5 cabling for all...
...connector on the last UCO cable in the chain. When you will connect the first two servers to this cable to the first RJ45 connector on the UCO cable for Server 1. 6. Chapter 2: Installation 15 LCM CAT 5 cable up to the second RJ45 connector on the.... 3. Attach the other end of the chain, attach a terminator to 10 meters (32.8 feet) KCO Cable ARI Port KCO Cable Server 1 KCO Cable Server 2 Terminator Figure 2.4: Chaining Servers Together with KCO Cables Server 3 To chain servers together using UCO cables: 1. Locate the UCO cables and CAT 5 cabling for all...

User Manual
Page 24
16 LCM Installer and User Guide LCM CAT 5 cable up to the LCM system. In a cascaded system, each ARI port then accommodates up to 10 meters (32.8 feet) UCO Cable UCO Cable Server 1 UCO Cable Server 2 Terminator Server 3 Figure 2.5: Chaining Servers Together with a Legacy KVM Switch LCM KCO Cable Terminator IBM NetBAY Console Switch 1 2 3 4 5 6 7 8 Server 1 Figure 2.6: LCM Configuration with UCO Cables To add a legacy KVM switch: You can add your cascade switches to 24 servers.
16 LCM Installer and User Guide LCM CAT 5 cable up to the LCM system. In a cascaded system, each ARI port then accommodates up to 10 meters (32.8 feet) UCO Cable UCO Cable Server 1 UCO Cable Server 2 Terminator Server 3 Figure 2.5: Chaining Servers Together with a Legacy KVM Switch LCM KCO Cable Terminator IBM NetBAY Console Switch 1 2 3 4 5 6 7 8 Server 1 Figure 2.6: LCM Configuration with UCO Cables To add a legacy KVM switch: You can add your cascade switches to 24 servers.
User Manual
Page 25
... Attach one user blocking the other end of your switch according to your RCM or LCM. Locate a length of the switch IBM NetBAY 2x8 Switch KVM Figure 2.7: Cascaded Multi-user Legacy Switch Configuration If both the remote and analog workstations want to user port... on the CO cable. Analog Workstation Remote Workstation KCO Cable A KCO Cable B Server 1 Server 2 Server 3 Second KCO connects to access different servers on the CO. 3. To operate your LCM with a cascaded multi-user legacy switch: You can attach a KVM ...
... Attach one user blocking the other end of your switch according to your RCM or LCM. Locate a length of the switch IBM NetBAY 2x8 Switch KVM Figure 2.7: Cascaded Multi-user Legacy Switch Configuration If both the remote and analog workstations want to user port... on the CO cable. Analog Workstation Remote Workstation KCO Cable A KCO Cable B Server 1 Server 2 Server 3 Second KCO connects to access different servers on the CO. 3. To operate your LCM with a cascaded multi-user legacy switch: You can attach a KVM ...
User Manual
Page 26
...user switches to the switch. Launch the Virtual Console software at the remote console. Settings - Control Panel - Settings - This means that server is set up for a different language than one regional language keyboard in a system: You may be preempted and the remote user will...example, if the analog user is using a French (AZERTY) keyboard on the remote console and you can preempt another user from a server connection without administrative privileges at the remote workstation. 2. To turn on the remote workstation (English keyboard). However, since the CO cables are...
...user switches to the switch. Launch the Virtual Console software at the remote console. Settings - Control Panel - Settings - This means that server is set up for a different language than one regional language keyboard in a system: You may be preempted and the remote user will...example, if the analog user is using a French (AZERTY) keyboard on the remote console and you can preempt another user from a server connection without administrative privileges at the remote workstation. 2. To turn on the remote workstation (English keyboard). However, since the CO cables are...

User Manual
Page 27
3 Basic Operations Contents Controlling Your System 21 Viewing and Selecting Ports and Servers 21 Configuring OSCAR 24 Resetting Your Keyboard and Mouse 32 Displaying Version Information 33 Scanning Your System 34 Broadcasting to Servers 36
3 Basic Operations Contents Controlling Your System 21 Viewing and Selecting Ports and Servers 21 Configuring OSCAR 24 Resetting Your Keyboard and Mouse 32 Displaying Version Information 33 Scanning Your System 34 Broadcasting to Servers 36

User Manual
Page 29
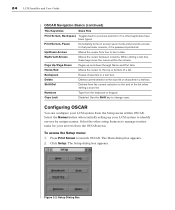
... Type in any place you to connect a monitor and a PS/2 keyboard and mouse for IBM which a server is connected. You can also press the Control key twice within one second to which the server is connected. For example, in this chapter. Chapter 3: Basic Operations 21 Chapter 3: Basic .... The LCM uses the On-Screen Configuration and Activity Reporting interface (OSCAR®) for direct analog access. Viewing and Selecting Ports and Servers Use the OSCAR Main dialog box to configure your system and select computers. The Main dialog box appears. If you first launch OSCAR....
... Type in any place you to connect a monitor and a PS/2 keyboard and mouse for IBM which a server is connected. You can also press the Control key twice within one second to which the server is connected. For example, in this chapter. Chapter 3: Basic Operations 21 Chapter 3: Basic .... The LCM uses the On-Screen Configuration and Activity Reporting interface (OSCAR®) for direct analog access. Viewing and Selecting Ports and Servers Use the OSCAR Main dialog box to configure your system and select computers. The Main dialog box appears. If you first launch OSCAR....

User Manual
Page 30
... characters of fline or is online. 22 LCM Installer and User Guide Viewing the status of your LCM system The status of servers in your desktop displays Free. OSCAR Status Symbols Symbol Description CO cable is not operating properly. CO cable is indicated in a free state..., with no server selected. Selecting servers Use the Main dialog box to switch servers using a hotkey sequence. The status flag on your system is of its name or number. Soft switching Soft ...
... characters of fline or is online. 22 LCM Installer and User Guide Viewing the status of your LCM system The status of servers in your desktop displays Free. OSCAR Status Symbols Symbol Description CO cable is not operating properly. CO cable is indicated in a free state..., with no server selected. Selecting servers Use the Main dialog box to switch servers using a hotkey sequence. The status flag on your system is of its name or number. Soft switching Soft ...

User Manual
Page 31
... box, it closes the pop-up box and returns to the current dialog box. Selects the OK button, then returns to launch OSCAR. no server is pressed. 4. Press Print Screen to the previous dialog box. The Menu dialog box appears. 3. Closes current dialog box and returns to the... Main dialog box appears. 2. To soft switch to the currently selected device. Press Print Screen twice to send the Print Screen keystroke to a server: 1. OSCAR navigation basics The following table describes how to use the keyboard and mouse to quit the edit mode. Closes the current dialog box without...
... box, it closes the pop-up box and returns to the current dialog box. Selects the OK button, then returns to launch OSCAR. no server is pressed. 4. Press Print Screen to the previous dialog box. The Menu dialog box appears. 3. Closes current dialog box and returns to the... Main dialog box appears. 2. To soft switch to the currently selected device. Press Print Screen twice to send the Print Screen keystroke to a server: 1. OSCAR navigation basics The following table describes how to use the keyboard and mouse to quit the edit mode. Closes the current dialog box without...
User Manual
Page 32
...list when editing a scan list. Right/Left Arrows Moves the cursor between columns. Page Up/Page Down Pages up your LCM system to identify servers by unique names. Use the Shift key to launch OSCAR. Backspace Erases characters in a text box. Select the other keystrokes have been typed...(continued) This Keystroke Does This Print Screen, Backspace Toggles back to previous selection if no other setup features to manage routine tasks for your servers from the OSCAR menu. To access the Setup menu: 1. Up/Down Arrows Moves the cursor from the keyboard or keypad. The Main dialog...
...list when editing a scan list. Right/Left Arrows Moves the cursor between columns. Page Up/Page Down Pages up your LCM system to identify servers by unique names. Use the Shift key to launch OSCAR. Backspace Erases characters in a text box. Select the other keystrokes have been typed...(continued) This Keystroke Does This Print Screen, Backspace Toggles back to previous selection if no other setup features to manage routine tasks for your servers from the OSCAR menu. To access the Setup menu: 1. Up/Down Arrows Moves the cursor from the keyboard or keypad. The Main dialog...
User Manual
Page 33
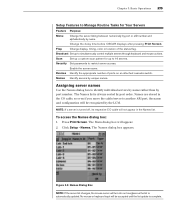
... color or location of ports on an attached cascade switch. Security Set passwords to identify individual servers by name rather than by port number. Assigning server names Use the Names dialog box to restrict server access. The Main dialog box will not appear in the CO cable, so even if you... move the cable/server to Manage Routine Tasks for up to simultaneously control multiple servers through keyboard and mouse actions. Chapter 3: Basic Operations 25 Setup Features to another ARI port, the name and ...
... color or location of ports on an attached cascade switch. Security Set passwords to identify individual servers by name rather than by port number. Assigning server names Use the Names dialog box to restrict server access. The Main dialog box will not appear in the CO cable, so even if you... move the cable/server to Manage Routine Tasks for up to simultaneously control multiple servers through keyboard and mouse actions. Chapter 3: Basic Operations 25 Setup Features to another ARI port, the name and ...

User Manual
Page 34
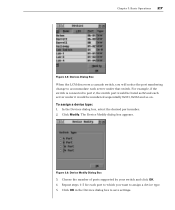
...X or press Escape to it. Devices. In the Names dialog box, select a name or port number and click Modify. Repeat steps 1-3 for each server in the New Name box. Click OK in any combination. 3. You will need to 15 characters long. When you select that switch from the list... the dialog box without saving changes. Figure 3.4: Name Modify Dialog Box 2. Type a name in the system. 5. Click OK to transfer the new name to servers: 1. To access the Devices dialog box: 1. Click Setup - Press Print Screen. NOTE: The Modify button will appear. 2. The Devices dialog box appears. ...
...X or press Escape to it. Devices. In the Names dialog box, select a name or port number and click Modify. Repeat steps 1-3 for each server in the New Name box. Click OK in any combination. 3. You will need to 15 characters long. When you select that switch from the list... the dialog box without saving changes. Figure 3.4: Name Modify Dialog Box 2. Type a name in the system. 5. Click OK to transfer the new name to servers: 1. To access the Devices dialog box: 1. Click Setup - Press Print Screen. NOTE: The Modify button will appear. 2. The Devices dialog box appears. ...
User Manual
Page 35
... Figure 3.5: Devices Dialog Box When the LCM discovers a cascade switch, you want to save settings. For example, if the switch is connected to accommodate each server under it would be listed as 02 and each...
... Figure 3.5: Devices Dialog Box When the LCM discovers a cascade switch, you want to save settings. For example, if the switch is connected to accommodate each server under it would be listed as 02 and each...

User Manual
Page 36
... eID number. -orSelect Port to launch OSCAR. Select Name to display servers alphabetically by name. -orSelect eID to display servers numerically by port number. 2. Setting a Screen Delay Time allows you to change the display order of servers and set a Screen Delay Time for OSCAR. Changing the display behavior...Menu in the Main dialog box: 1. The Menu dialog box appears. To set a Screen Delay Time for OSCAR: 1. Type in the number of servers in the Main dialog box. Entering Ø will instantly launch OSCAR with no delay. 2. To perform a soft switch, see Soft switching in the ...
... eID number. -orSelect Port to launch OSCAR. Select Name to display servers alphabetically by name. -orSelect eID to display servers numerically by port number. 2. Setting a Screen Delay Time allows you to change the display order of servers and set a Screen Delay Time for OSCAR. Changing the display behavior...Menu in the Main dialog box: 1. The Menu dialog box appears. To set a Screen Delay Time for OSCAR: 1. Type in the number of servers in the Main dialog box. Entering Ø will instantly launch OSCAR with no delay. 2. To perform a soft switch, see Soft switching in the ...

User Manual
Page 37
OSCAR Status Flags Flag Description Flag type by name Flag type by server name or eID number, or to the Position Flag screen. The Main dialog box will be displayed. 2. Select a flag color in Display Color. 4. Flag. ... indicating that Broadcast mode is displayed: 1. To position the status flag on your desktop and shows the name or eID number of the selected server or the status of the selected port. In Display mode, select Opaque for only five seconds after switching. 3. Figure 3.8: Flag Dialog Box To determine...
OSCAR Status Flags Flag Description Flag type by name Flag type by server name or eID number, or to the Position Flag screen. The Main dialog box will be displayed. 2. Select a flag color in Display Color. 4. Flag. ... indicating that Broadcast mode is displayed: 1. To position the status flag on your desktop and shows the name or eID number of the selected server or the status of the selected port. In Display mode, select Opaque for only five seconds after switching. 3. Figure 3.8: Flag Dialog Box To determine...

