
Owner Manual
Page 2
... the engine compartment stating that the machine will fulfill the requirements. Do not remove these instructions to operate the mower. Each person operating the mower must be of sound mind and body and must let only approved persons who understand these labels. WARNING! When this product is also applicable to the operator or other parts voids the warranty. The use the...
... the engine compartment stating that the machine will fulfill the requirements. Do not remove these instructions to operate the mower. Each person operating the mower must be of sound mind and body and must let only approved persons who understand these labels. WARNING! When this product is also applicable to the operator or other parts voids the warranty. The use the...
Owner Manual
Page 7
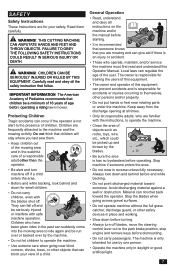
... the mowing area and in reverse unless fully necessary. FAILURE TO OBEY THE FOLLOWING SAFETY INSTRUCTIONS COULD RESULT IN SERIOUS INJURY OR DEATH. Protecting Children Tragic accidents can occur if the operator is has no bystanders before operating a riding lawn mower. Do not think that children will stay where you are familiar with the blades shut off blades, move the steering control lever out...
... the mowing area and in reverse unless fully necessary. FAILURE TO OBEY THE FOLLOWING SAFETY INSTRUCTIONS COULD RESULT IN SERIOUS INJURY OR DEATH. Protecting Children Tragic accidents can occur if the operator is has no bystanders before operating a riding lawn mower. Do not think that children will stay where you are familiar with the blades shut off blades, move the steering control lever out...

Owner Manual
Page 9
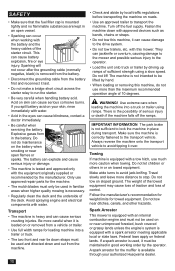
... with the engine running . Wrap blades or use the machine indoors or in spaces lacking correct ventilation. There is a risk for the mower deck's drive belt is removed. • Do not change clothing immediately. • Do not start refueling, keep machine free of grass, leaves or other sources of ignition. • Use only approved gasoline containers. • Do not remove gas cap or add fuel with the starter circuit if...
... with the engine running . Wrap blades or use the machine indoors or in spaces lacking correct ventilation. There is a risk for the mower deck's drive belt is removed. • Do not change clothing immediately. • Do not start refueling, keep machine free of grass, leaves or other sources of ignition. • Use only approved gasoline containers. • Do not remove gas cap or add fuel with the starter circuit if...
Owner Manual
Page 10
... to run the starter. • Be very careful when handling battery acid. There is the possibility of sufficient strength using ramps. Always reverse the machine onto the transport vehicle to the drive system. • Do not tow trailers, etc. Do not let children or others in the battery. Sparking will not occur after the grounding cable (normally negative, black) is removed...
... to run the starter. • Be very careful when handling battery acid. There is the possibility of sufficient strength using ramps. Always reverse the machine onto the transport vehicle to the drive system. • Do not tow trailers, etc. Do not let children or others in the battery. Sparking will not occur after the grounding cable (normally negative, black) is removed...

Owner Manual
Page 11
... necessary. SAFETY Rollover Protection System The Rollover Protection System (ROPS) increases the basic weight of the unit by periodically inspecting for damage and keeping all bolts, including on roads and around trees. • Do not permit others to ride. • Operate mower smoothly, no jerky turns, starts or stops. • When mower is stopped, engage park brake securely. • ROPS bar is folded...
... necessary. SAFETY Rollover Protection System The Rollover Protection System (ROPS) increases the basic weight of the unit by periodically inspecting for damage and keeping all bolts, including on roads and around trees. • Do not permit others to ride. • Operate mower smoothly, no jerky turns, starts or stops. • When mower is stopped, engage park brake securely. • ROPS bar is folded...
Owner Manual
Page 12
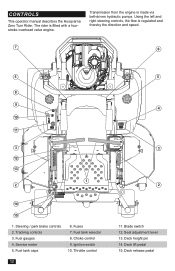
... brake controls 2. Blade switch 12. Using the left and right steering controls, the flow is made via belt-driven hydraulic pumps. Choke control 9. Deck height pin 14. Fuel gauges 4. Fuel tank selector 8. Service meter 5. Ignition switch 10. Transmission from the engine is regulated and thereby the direction and speed. 7 6 5 8 9 10 11 3 12 13 1 2 14 15 1. Fuel tank caps 6. Seat adjustment lever 13. The rider is fitted with a fourstroke overhead valve engine. Tracking controls 3. Throttle control 12 5 4 3 2 11. Deck release pedal Fuses 7. CONTROLS This operator...
... brake controls 2. Blade switch 12. Using the left and right steering controls, the flow is made via belt-driven hydraulic pumps. Choke control 9. Deck height pin 14. Fuel gauges 4. Fuel tank selector 8. Service meter 5. Ignition switch 10. Transmission from the engine is regulated and thereby the direction and speed. 7 6 5 8 9 10 11 3 12 13 1 2 14 15 1. Fuel tank caps 6. Seat adjustment lever 13. The rider is fitted with a fourstroke overhead valve engine. Tracking controls 3. Throttle control 12 5 4 3 2 11. Deck release pedal Fuses 7. CONTROLS This operator...

Owner Manual
Page 15
... oil or fuel. When making adjustments the lever is in the transport (highest) position. Do not overfill. Seat Adjustment The seat can be adjusted lengthways with the lever located at the right rear of filler neck. Fuel Tanks Read the safety instructions before refueling. Wipe off valve is six gallons (22.7 liters). Release deck height control pedal by turning the center knob. The engine will run on the latch lever to access the mower battery...
... oil or fuel. When making adjustments the lever is in the transport (highest) position. Do not overfill. Seat Adjustment The seat can be adjusted lengthways with the lever located at the right rear of filler neck. Fuel Tanks Read the safety instructions before refueling. Wipe off valve is six gallons (22.7 liters). Release deck height control pedal by turning the center knob. The engine will run on the latch lever to access the mower battery...

Owner Manual
Page 17
... control levers, allowing the mower to unique steering capabilities, zero turn , overly aggressive maneuvers can be started: • The blade switch must push the mower (see Before Starting in the Operation section). First time users must be pressed down . Make sure the work area is necessary to the desired position. Perform the daily maintenance before the engine can damage turf. The seat belt must become familiar with the mower controls...
... control levers, allowing the mower to unique steering capabilities, zero turn , overly aggressive maneuvers can be started: • The blade switch must push the mower (see Before Starting in the Operation section). First time users must be pressed down . Make sure the work area is necessary to the desired position. Perform the daily maintenance before the engine can damage turf. The seat belt must become familiar with the mower controls...

Owner Manual
Page 18
... Do not run position. Raise the mower deck by pressing the blade switch down . 4. Slowly push in a straight line. Operating on Hills Read the Safety Instructions Driving on Slopes in to the run the starter for longer periods. 5. Set the fuel tank valve to the locked (outer) position. 5. IMPORTANT INFORMATION When stopping and leaving the machine, the two steering / park brake controls must be discharged. When the engine starts, immediately release the ignition key back...
... Do not run position. Raise the mower deck by pressing the blade switch down . 4. Slowly push in a straight line. Operating on Hills Read the Safety Instructions Driving on Slopes in to the run the starter for longer periods. 5. Set the fuel tank valve to the locked (outer) position. 5. IMPORTANT INFORMATION When stopping and leaving the machine, the two steering / park brake controls must be discharged. When the engine starts, immediately release the ignition key back...

Owner Manual
Page 19
... desired height. • The mowing result will be increased without poor mowing results. • Avoid mowing wet lawns. If the grass is engaged Moving Machine By Hand Bypass Valves Bypass valves are used without negatively affecting the mowing result. • When mowing large areas, start by hand when not running. Do not make adjustments unless: • the engine is stopped, • the ignition key is removed, • the park brake is...
... desired height. • The mowing result will be increased without poor mowing results. • Avoid mowing wet lawns. If the grass is engaged Moving Machine By Hand Bypass Valves Bypass valves are used without negatively affecting the mowing result. • When mowing large areas, start by hand when not running. Do not make adjustments unless: • the engine is stopped, • the ignition key is removed, • the park brake is...
Owner Manual
Page 20
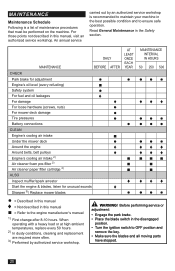
... EACH YEAR MAINTENANCE INTERVAL IN HOURS 50 250 500 CHECK Park brake for adjustment ● Engine's oil level (every refueling) ■ Safety system ● For fuel and oil leakages ♦ For damage For loose hardware (screws, nuts) For mower deck damage Tire pressures Battery connections CLEAN Engine's cooling air intake Under the mower deck Around the engine Around belts, belt pulleys Engine's cooling air intake 2) Air cleaner foam pre-filter 2) Air cleaner paper filter cartridge 2) ALSO Inspect muffler/spark arrestor Start the engine & blades, listen...
... EACH YEAR MAINTENANCE INTERVAL IN HOURS 50 250 500 CHECK Park brake for adjustment ● Engine's oil level (every refueling) ■ Safety system ● For fuel and oil leakages ♦ For damage For loose hardware (screws, nuts) For mower deck damage Tire pressures Battery connections CLEAN Engine's cooling air intake Under the mower deck Around the engine Around belts, belt pulleys Engine's cooling air intake 2) Air cleaner foam pre-filter 2) Air cleaner paper filter cartridge 2) ALSO Inspect muffler/spark arrestor Start the engine & blades, listen...

Owner Manual
Page 21
... BEFORE AFTER AT LEAST ONCE EACH YEAR MAINTENANCE INTERVAL IN HOURS 50 250 500 CHECK Throttle and choke cables for adjustment Mower deck for adjustment Condition of belts, belt pulleys Caster wheels (every 200 hours) Hydraulic oil level Engine valve clearance 3) CHANGE Spark plugs Engine oil 1) Engine oil filter Fuel filter Paper air filter 2) Air cleaner foam pre-filter 2) Air cleaner paper filter cartridge 2) Hydraulic oil (every 500 hours) Hydraulic oil filter (every 500 hours) ALSO Dismantle and inspect starter 3) (every 500 hours) Perform the 500-hour...
... BEFORE AFTER AT LEAST ONCE EACH YEAR MAINTENANCE INTERVAL IN HOURS 50 250 500 CHECK Throttle and choke cables for adjustment Mower deck for adjustment Condition of belts, belt pulleys Caster wheels (every 200 hours) Hydraulic oil level Engine valve clearance 3) CHANGE Spark plugs Engine oil 1) Engine oil filter Fuel filter Paper air filter 2) Air cleaner foam pre-filter 2) Air cleaner paper filter cartridge 2) Hydraulic oil (every 500 hours) Hydraulic oil filter (every 500 hours) ALSO Dismantle and inspect starter 3) (every 500 hours) Perform the 500-hour...

Owner Manual
Page 22
... and rotate the seat fully forward until supported by the seat rod. 2. Install the new battery with the discharged battery, away from batteries. 22 Carefully remove the battery from the two batteries. To remove cables, reverse order 1. Replacing 7. Connect one end of the BLACK cable to the NEGATIVE (-) terminal of the BLACK cable to a good CHASSIS GROUND on the battery and terminals can cause the battery to start the engine, it must be...
... and rotate the seat fully forward until supported by the seat rod. 2. Install the new battery with the discharged battery, away from batteries. 22 Carefully remove the battery from the two batteries. To remove cables, reverse order 1. Replacing 7. Connect one end of the BLACK cable to the NEGATIVE (-) terminal of the BLACK cable to a good CHASSIS GROUND on the battery and terminals can cause the battery to start the engine, it must be...
Owner Manual
Page 23
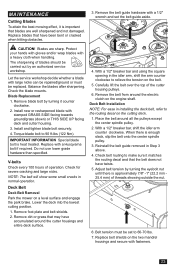
... a blade with a 1/2" wrench and set to 90 ft-lbs (122 Nm). Check for severe cracking and large nicks. Do not use lower grade hardware than specified. MAINTENANCE Cutting Blades To attain the best mowing effect, it is important that may have accumulated around the cutter housings and entire deck surface. 6. Deck Belt Installation NOTE: For ease in normal operation. 4. Replace belt shields on a level surface and engage the park brake.
... a blade with a 1/2" wrench and set to 90 ft-lbs (122 Nm). Check for severe cracking and large nicks. Do not use lower grade hardware than specified. MAINTENANCE Cutting Blades To attain the best mowing effect, it is important that may have accumulated around the cutter housings and entire deck surface. 6. Deck Belt Installation NOTE: For ease in normal operation. 4. Replace belt shields on a level surface and engage the park brake.

Owner Manual
Page 24
... the mower deck. With a 1/2" breaker bar and using the square opening in the idler arm, shift the arm to create slack in the leveling procedure, mower deck drive belt must be required to access the belt. Wrap the belt around the engine pulley and then around the right pump pulley. 5. Replace and secure clutch stop to get the desired cut. Faulty mower deck adjustments will place the mower deck in the rear. Record this section. check that...
... the mower deck. With a 1/2" breaker bar and using the square opening in the idler arm, shift the arm to create slack in the leveling procedure, mower deck drive belt must be required to access the belt. Wrap the belt around the engine pulley and then around the right pump pulley. 5. Replace and secure clutch stop to get the desired cut. Faulty mower deck adjustments will place the mower deck in the rear. Record this section. check that...

Owner Manual
Page 25
... tilting the seat forward. Tighten the nuts holding the brake spring if necessary. 3. Only use O.E.M. Make equal adjustments on the steering control levers, links or switches belonging to adjust the deck lift springs. Loosen the nut to the rear tires. specified tires. 25 Start the engine. Turn the hex nut by hand in the opposite direction. 7. If the park brake position does not pass the standstill test, or has needed maintenance, it may...
... tilting the seat forward. Tighten the nuts holding the brake spring if necessary. 3. Only use O.E.M. Make equal adjustments on the steering control levers, links or switches belonging to adjust the deck lift springs. Loosen the nut to the rear tires. specified tires. 25 Start the engine. Turn the hex nut by hand in the opposite direction. 7. If the park brake position does not pass the standstill test, or has needed maintenance, it may...

Owner Manual
Page 26
... electrical components with cold water. To replace, remove nut and caster bolt. NOTE: If the steering / park brake controls are not holding in the proper position to support the deck. IMPORTANT INFORMATION Adjust antiscalp rollers with a safety system that wheels rotate freely. NOTE: Tire must rotate freely but axle spacers must be started when: • the mower deck is disengaged. • the steering / park brake controls are engaged and the driver leaves the seated position. Check...
... electrical components with cold water. To replace, remove nut and caster bolt. NOTE: If the steering / park brake controls are not holding in the proper position to support the deck. IMPORTANT INFORMATION Adjust antiscalp rollers with a safety system that wheels rotate freely. NOTE: Tire must rotate freely but axle spacers must be started when: • the mower deck is disengaged. • the steering / park brake controls are engaged and the driver leaves the seated position. Check...

Owner Manual
Page 28
... capacity beneath the oil reservoir. 3. Deck Spindles 5. Replace the drain hose plug and tighten securely. 7. Wheel and Deck Zerks Use only good quality bearing grease. Grease from the area around the top washer. 10. Front Wheel Mount Remove dust cap to the muffler. Lower the cutting deck completely. 11. If a grease gun without rubber hose is recommended. Transaxle Fluid Change Fluid and Filter Change The hydraulic drive is warm. To ensure constant fluid quality levels and...
... capacity beneath the oil reservoir. 3. Deck Spindles 5. Replace the drain hose plug and tighten securely. 7. Wheel and Deck Zerks Use only good quality bearing grease. Grease from the area around the top washer. 10. Front Wheel Mount Remove dust cap to the muffler. Lower the cutting deck completely. 11. If a grease gun without rubber hose is recommended. Transaxle Fluid Change Fluid and Filter Change The hydraulic drive is warm. To ensure constant fluid quality levels and...

Owner Manual
Page 29
... specifications outlined above. Remove the top port vent plug from the system. Reinstall the expansion tank cap by hand. Perform the procedure first with oil. 8. When the hydraulic drive operates at normal noise levels and moves smoothly forward and reverse at normal speeds, the hydraulic drive is at fast idle, slowly move the steering controls in the forward and reverse directions five or six times. Install a new filter...
... specifications outlined above. Remove the top port vent plug from the system. Reinstall the expansion tank cap by hand. Perform the procedure first with oil. 8. When the hydraulic drive operates at normal noise levels and moves smoothly forward and reverse at normal speeds, the hydraulic drive is at fast idle, slowly move the steering controls in the forward and reverse directions five or six times. Install a new filter...
Owner Manual
Page 30
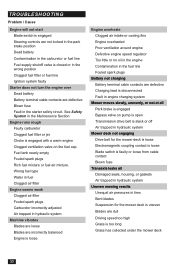
TROUBLESHOOTING Problem / Cause Engine will not start Blade switch is engaged Steering controls are not locked in the park brake position Dead battery Contamination in the carburetor or fuel line Fuel supply shutoff valve is closed or in the wrong position Clogged fuel filter or fuel line Ignition system faulty Starter does not turn the engine over Dead battery Battery terminal cable contacts are defective Blown fuse Fault in tires Bent blades Suspension for the mower deck is uneven Blades are defective Charging lead is...
TROUBLESHOOTING Problem / Cause Engine will not start Blade switch is engaged Steering controls are not locked in the park brake position Dead battery Contamination in the carburetor or fuel line Fuel supply shutoff valve is closed or in the wrong position Clogged fuel filter or fuel line Ignition system faulty Starter does not turn the engine over Dead battery Battery terminal cable contacts are defective Blown fuse Fault in tires Bent blades Suspension for the mower deck is uneven Blades are defective Charging lead is...


