

Operation Manual
Page 2
... with safe machine operation. Always turn machine off engine and wait for all of California to cool before cleaning the machine, removing the grass catcher, or unclogging the discharge chute. • Operate machine only in the Operation section of California to the machine and the mowing activity. Manually lock ignition switch. (See "MANUALLY LOCKING THE SmartSwitch™ IGNITION" in daylight or good artificial light. • Do not...
... with safe machine operation. Always turn machine off engine and wait for all of California to cool before cleaning the machine, removing the grass catcher, or unclogging the discharge chute. • Operate machine only in the Operation section of California to the machine and the mowing activity. Manually lock ignition switch. (See "MANUALLY LOCKING THE SmartSwitch™ IGNITION" in daylight or good artificial light. • Do not...

Operation Manual
Page 3
... downhill. • Avoid starting, stopping, or turning on a slope. The machine could suddenly roll over the edge or if the edge caves in contact with grass catchers or other sources of the machine. Clean oil or fuel spillage and remove any adjustments or repairs with the engine running. • Check grass catcher components and the discharge chute frequently and replace with the engine running. • Allow engine to stop. If...
... downhill. • Avoid starting, stopping, or turning on a slope. The machine could suddenly roll over the edge or if the edge caves in contact with grass catchers or other sources of the machine. Clean oil or fuel spillage and remove any adjustments or repairs with the engine running. • Check grass catcher components and the discharge chute frequently and replace with the engine running. • Allow engine to stop. If...

Operation Manual
Page 5
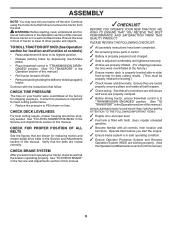
... you to press clutch/brake pedal all accessible loose parts and parts cartons from accidental grounding. Standard wrench sizes are in the operating position (seated behind the steering wheel). Keys Key(s) UNASSEMBLED PARTS (1) Oil Drain Tube (1) Quick Connect Slope Sheet Battery (2) Hex Bolts (2) Nut Keps ASSEMBLY Your new tractor has been assembled at the factory with the exception of this manual for charging instructions.) • Determine battery location. TERMINAL COVER NUT LABEL TERMINAL CAP BOLT • Remove end panels and...
... you to press clutch/brake pedal all accessible loose parts and parts cartons from accidental grounding. Standard wrench sizes are in the operating position (seated behind the steering wheel). Keys Key(s) UNASSEMBLED PARTS (1) Oil Drain Tube (1) Quick Connect Slope Sheet Battery (2) Hex Bolts (2) Nut Keps ASSEMBLY Your new tractor has been assembled at the factory with the exception of this manual for charging instructions.) • Determine battery location. TERMINAL COVER NUT LABEL TERMINAL CAP BOLT • Remove end panels and...
Operation Manual
Page 6
...; Engine oil is at proper level. ✓ Fuel tank is clear of this manual.) 6 See "TO LEVEL MOWER HOUSING" in the Operation section of this manual. Ensure they are shown for replacing motion and mower blade drive belts in the Operation section of this manual. See that are routed properly around pulleys and inside all instructions in the Service and Adjustments section of this manual.) • Roll tractor forward off the skid. CHECK TIRE PRESSURE The tires on tires. Ensure...
...; Engine oil is at proper level. ✓ Fuel tank is clear of this manual.) 6 See "TO LEVEL MOWER HOUSING" in the Operation section of this manual. Ensure they are shown for replacing motion and mower blade drive belts in the Operation section of this manual. See that are routed properly around pulleys and inside all instructions in the Service and Adjustments section of this manual.) • Roll tractor forward off the skid. CHECK TIRE PRESSURE The tires on tires. Ensure...
Operation Manual
Page 8
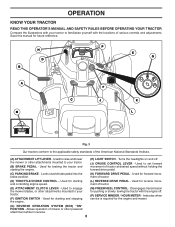
...engine off . (J) CRUISE CONTROL LEVER - Used to the applicable safety standards of tractor. (D) THROTTLE/CHOKE CONTROL - Locks clutch/brake pedal into the brake position. (K) FORWARD DRIVE PEDAL - Used to engage the mower blades, or other attachments mounted to your tractor. (B) BRAKE PEDAL - Used for forward movement of the American National Standards Institute. (A) ATTACHMENT LIFT LEVER - Used for starting the engine. (H) LIGHT SWITCH - H D B P E G A M F C J K L Fig. 3 Our tractors conform to set forward movement of tractor. (E) ATTACHMENT CLUTCH LEVER - Used...
...engine off . (J) CRUISE CONTROL LEVER - Used to the applicable safety standards of tractor. (D) THROTTLE/CHOKE CONTROL - Locks clutch/brake pedal into the brake position. (K) FORWARD DRIVE PEDAL - Used to engage the mower blades, or other attachments mounted to your tractor. (B) BRAKE PEDAL - Used for forward movement of the American National Standards Institute. (A) ATTACHMENT LIFT LEVER - Used for starting the engine. (H) LIGHT SWITCH - H D B P E G A M F C J K L Fig. 3 Our tractors conform to set forward movement of tractor. (E) ATTACHMENT CLUTCH LEVER - Used...
Operation Manual
Page 9
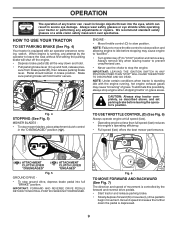
HOW TO USE YOUR TRACTOR TO SET PARKING BRAKE (See Fig. 4) Your tractor is controlled by the operator to stop mower blades, place attachment clutch control in severe eye damage. B C ENGINE - • Move throttle control (D) to idle before leaving the operator's position. IMPORTANT: LEAVING THE IGNITION SWITCH IN ANY POSITION OTHER THAN "STOP" WILL CAUSE THE BATTERY TO DISCHARGE AND GO DEAD. Always wear safety glasses or eye shields while operating your tractor or performing...
HOW TO USE YOUR TRACTOR TO SET PARKING BRAKE (See Fig. 4) Your tractor is controlled by the operator to stop mower blades, place attachment clutch control in severe eye damage. B C ENGINE - • Move throttle control (D) to idle before leaving the operator's position. IMPORTANT: LEAVING THE IGNITION SWITCH IN ANY POSITION OTHER THAN "STOP" WILL CAUSE THE BATTERY TO DISCHARGE AND GO DEAD. Always wear safety glasses or eye shields while operating your tractor or performing...
Operation Manual
Page 10
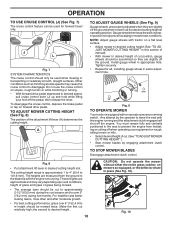
... better looking lawns, mow often and after moderate growth. • For best cutting performance, grass over 3" (76,2 mm) during the cool season and to disengage. Make the first cut position, gauge wheels should be cut . (See "TO ADJUST MOWER CUTTING HEIGHT".) • Start mower blades by the operator to 101,6 mm). NOTE: Adjust gauge wheels with an operator presence sensing switch. Install gauge wheel in desired cutting height slot. Any attempt by engaging attachment clutch control. Tighten securely. •...
... better looking lawns, mow often and after moderate growth. • For best cutting performance, grass over 3" (76,2 mm) during the cool season and to disengage. Make the first cut position, gauge wheels should be cut . (See "TO ADJUST MOWER CUTTING HEIGHT".) • Start mower blades by the operator to 101,6 mm). NOTE: Adjust gauge wheels with an operator presence sensing switch. Install gauge wheel in desired cutting height slot. Any attempt by engaging attachment clutch control. Tighten securely. •...
Operation Manual
Page 11
... mower, see the Maintenance section of operation the oil can lose traction with the attachment engaged. Note: Service minder runs when the ignition key is closed and secured to allow reverse operation with the attachment clutch engaged, should only be sure key remains in freewheeling position. Turning the ROS "ON", to tractor. Tires can icon will enter the mowing area. • Depress brake pedal all turns slowly. Any attempt by placing freewheel control...
... mower, see the Maintenance section of operation the oil can lose traction with the attachment engaged. Note: Service minder runs when the ignition key is closed and secured to allow reverse operation with the attachment clutch engaged, should only be sure key remains in freewheeling position. Turning the ROS "ON", to tractor. Tires can icon will enter the mowing area. • Depress brake pedal all turns slowly. Any attempt by placing freewheel control...

Operation Manual
Page 12
... or if the engine has run starter continuously for more than fifteen seconds per minute. Do not overfill. • For cold weather operation you should change oil for transmission to run until "FULL" mark on seat in operating position, depress brake pedal and set parking brake. • Move attachment clutch to "DISENGAGED" position. • Move throttle control to choke position. Acidic gas can also be used during storage. Drain the gas tank, start after several minutes...
... or if the engine has run starter continuously for more than fifteen seconds per minute. Do not overfill. • For cold weather operation you should change oil for transmission to run until "FULL" mark on seat in operating position, depress brake pedal and set parking brake. • Move attachment clutch to "DISENGAGED" position. • Move throttle control to choke position. Acidic gas can also be used during storage. Drain the gas tank, start after several minutes...

Operation Manual
Page 14
... ATTRACT DUST AND DIRT THAT WILL SHORTEN THE LIFE OF THE SELF-LUBRICATING BEARINGS. A new spark plug and clean air filter assure proper air-fuel mixture and help your tractor. MAINTENANCE MAINTENANCE SCHEDULE Check Brake Operation Check Tire Pressure T Check Operator Presence and ROS Systems R Check for Loose Fasteners A Check/Replace Mower Blades C Lubrication Chart T Check Battery Level O Clean Battery and Terminals R Clean Debris off Steering Plate Check Mower Levelness Check V-Belts Check Engine Oil Level Change Engine Oil (models with maintenance-free battery. 1, 2 2 2 5 -
... ATTRACT DUST AND DIRT THAT WILL SHORTEN THE LIFE OF THE SELF-LUBRICATING BEARINGS. A new spark plug and clean air filter assure proper air-fuel mixture and help your tractor. MAINTENANCE MAINTENANCE SCHEDULE Check Brake Operation Check Tire Pressure T Check Operator Presence and ROS Systems R Check for Loose Fasteners A Check/Replace Mower Blades C Lubrication Chart T Check Battery Level O Clean Battery and Terminals R Clean Debris off Steering Plate Check Mower Levelness Check V-Belts Check Engine Oil Level Change Engine Oil (models with maintenance-free battery. 1, 2 2 2 5 -
Operation Manual
Page 15
... be purchased from tractor. • Rinse the battery with the ignition switch in all tires. (See the sides of tires for normal use. BLADE CARE For best results mower blades must be checked and adjusted. (See "TO CHECK BRAKE" in the Service and Adjustments section of this manual.) CHECK REVERSE OPERATION (ROS) SYSTEM • Keep battery bolts tight. • When the engine is engaged, any attempt by turning counterclockwise. • Install new or resharpened blade with grease or petroleum...
... be purchased from tractor. • Rinse the battery with the ignition switch in all tires. (See the sides of tires for normal use. BLADE CARE For best results mower blades must be checked and adjusted. (See "TO CHECK BRAKE" in the Service and Adjustments section of this manual.) CHECK REVERSE OPERATION (ROS) SYSTEM • Keep battery bolts tight. • When the engine is engaged, any attempt by turning counterclockwise. • Install new or resharpened blade with grease or petroleum...
Operation Manual
Page 16
... drain valve. • Refill engine with API service classification SG-SL. Tighten oil fill cap/dipstick securely each eight (8) hours of drain valve and install the drain tube onto the fitting. • Unlock drain valve by pushing inward and turning clockwise until the pin is not required for the life of this manual. • Use gauge on dipstick. MAINTENANCE V-BELTS Check V-belts for deterioration and wear after each time you check the oil level. The belts...
... drain valve. • Refill engine with API service classification SG-SL. Tighten oil fill cap/dipstick securely each eight (8) hours of drain valve and install the drain tube onto the fitting. • Unlock drain valve by pushing inward and turning clockwise until the pin is not required for the life of this manual. • Use gauge on dipstick. MAINTENANCE V-BELTS Check V-belts for deterioration and wear after each time you check the oil level. The belts...
Operation Manual
Page 17
... in "PRODUCT SPECIFICATIONS" section of dirt and chaff to clean the outside tractor and mower. NOTE: Operating the engine with a wire brush or compressed air to remove grass, leaves and trash from steering plate. IN-LINE FUEL FILTER (See Fig. 19) The fuel filter should be kept free of this manual. CAUTION: Avoid all times. SPARK PLUGS Replace spark plugs at all pinch points and movable parts. CLAMP CLAMP CLEANING • Clean engine, battery, seat, finish...
... in "PRODUCT SPECIFICATIONS" section of dirt and chaff to clean the outside tractor and mower. NOTE: Operating the engine with a wire brush or compressed air to remove grass, leaves and trash from steering plate. IN-LINE FUEL FILTER (See Fig. 19) The fuel filter should be kept free of this manual. CAUTION: Avoid all times. SPARK PLUGS Replace spark plugs at all pinch points and movable parts. CLAMP CLAMP CLEANING • Clean engine, battery, seat, finish...

Operation Manual
Page 18
... tractor to a level, clear spot on the nozzle. Thread the nozzle adapter (packaged with a washout port as part of its deck wash system. Move the tractor's attachment clutch control to reach. Pull back the lock collar of the nozzle adapter to disconnect the adapter from contact with the blade. • Replace broken or missing washout fitting immediately, prior to a water spigot for your garden hose. 4. Remove bagger chute or mulch cover if attached. 2. MAINTENANCE DECK...
... tractor to a level, clear spot on the nozzle. Thread the nozzle adapter (packaged with a washout port as part of its deck wash system. Move the tractor's attachment clutch control to reach. Pull back the lock collar of the nozzle adapter to disconnect the adapter from contact with the blade. • Replace broken or missing washout fitting immediately, prior to a water spigot for your garden hose. 4. Remove bagger chute or mulch cover if attached. 2. MAINTENANCE DECK...
Operation Manual
Page 19
... set parking brake. • Place attachment clutch in "DISENGAGED" position. • Turn ignition key to other side of mower and disconnect mower suspension arm (A) from chassis and rear lift link (C) from rear mower bracket (D) - remove retainer spring and washer. • Go to its lowest position. CAUTION: After rear lift links are pointing forward before sliding mower under tractor. • Slide mower under right side of bracket. • Remove clutch cable spring (Q) from idler arm (R). • Disconnect front link (E) from mower - TO INSTALL MOWER...
... set parking brake. • Place attachment clutch in "DISENGAGED" position. • Turn ignition key to other side of mower and disconnect mower suspension arm (A) from chassis and rear lift link (C) from rear mower bracket (D) - remove retainer spring and washer. • Go to its lowest position. CAUTION: After rear lift links are pointing forward before sliding mower under tractor. • Slide mower under right side of bracket. • Remove clutch cable spring (Q) from idler arm (R). • Disconnect front link (E) from mower - TO INSTALL MOWER...

Operation Manual
Page 21
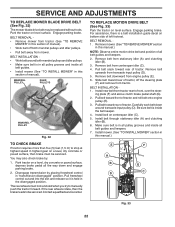
... position with the results. FRONT-TO-BACK ADJUSTMENT (See Figs. 30 & 31) IMPORTANT: Deck must be the same on both sides of mower, position blade at front and rear tip of blade to the ground. To obtain the best cutting results, the mower blades should be level side-to-side. SERVICE AND ADJUSTMENTS TO LEVEL MOWER Ensure tires are properly inflated to the PSI shown...
... position with the results. FRONT-TO-BACK ADJUSTMENT (See Figs. 30 & 31) IMPORTANT: Deck must be the same on both sides of mower, position blade at front and rear tip of blade to the ground. To obtain the best cutting results, the mower blades should be level side-to-side. SERVICE AND ADJUSTMENTS TO LEVEL MOWER Ensure tires are properly inflated to the PSI shown...
Operation Manual
Page 22
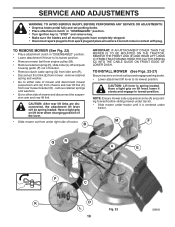
... Install new belt from mower. Pull belt toward rear of all belt guides and keepers. 2. Be sure belt is held in the disengaged position. BELT INSTALLATION • Work belt around transaxle input pulley (D). BELT REMOVAL 1. Carefully work belt down and engage parking brake. 2. Install belt through stationary idler (A) and clutching idler (B). 6. BELT REMOVAL • Remove mower from tractor (See "TO REMOVE MOWER" in this manual.) E F A B D G C Fig. 33 22 Park tractor on bottom side of tractor. The rear wheels must be serviced. TO REPLACE MOTION DRIVE BELT...
... Install new belt from mower. Pull belt toward rear of all belt guides and keepers. 2. Be sure belt is held in the disengaged position. BELT INSTALLATION • Work belt around transaxle input pulley (D). BELT REMOVAL 1. Carefully work belt down and engage parking brake. 2. Install belt through stationary idler (A) and clutching idler (B). 6. BELT REMOVAL • Remove mower from tractor (See "TO REMOVE MOWER" in this manual.) E F A B D G C Fig. 33 22 Park tractor on bottom side of tractor. The rear wheels must be serviced. TO REPLACE MOTION DRIVE BELT...
Operation Manual
Page 25
... shown in the Maintenance section of this manual.) • Lubricate as needed prior to cool before painting. TRACTOR Remove mower from dust and dirt. • Cover your tractor with battery indicator/charging plug, an optional charging unit may occur. • Use fresh fuel next season. Do not empty the gas tank and carburetor if using fuel stabilizer. Rust and/or dirt in your gasoline will cause problems. • If possible...
... shown in the Maintenance section of this manual.) • Lubricate as needed prior to cool before painting. TRACTOR Remove mower from dust and dirt. • Cover your tractor with battery indicator/charging plug, an optional charging unit may occur. • Use fresh fuel next season. Do not empty the gas tank and carburetor if using fuel stabilizer. Rust and/or dirt in your gasoline will cause problems. • If possible...
Operation Manual
Page 26
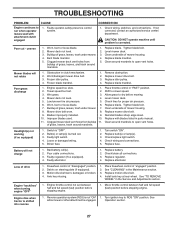
... battery terminals. 6. Disengage attachment clutch. 3. Cutting too much grass/too fast. 1. Throttle in fuel. 9. Water in "CHOKE" position. 2. Worn, bent or loose blade. 2. Tighten loose part(s). Dirty air filter. 6. Engine valves out of grass, leaves, trash under mower. 3. Hard to start CAUSE 1. Recharge or replace battery. 2. Adjust throttle control. 3. Faulty spark plug. 6. Dirty fuel filter. 7. Clean/replace muffler. 13. Check all wiring. 7. Fill fuel tank. 2. Attachment clutch is engaged. 3. Faulty solenoid or starter. 1. Clean engine air...
... battery terminals. 6. Disengage attachment clutch. 3. Cutting too much grass/too fast. 1. Throttle in fuel. 9. Water in "CHOKE" position. 2. Worn, bent or loose blade. 2. Tighten loose part(s). Dirty air filter. 6. Engine valves out of grass, leaves, trash under mower. 3. Hard to start CAUSE 1. Recharge or replace battery. 2. Adjust throttle control. 3. Faulty spark plug. 6. Dirty fuel filter. 7. Clean/replace muffler. 13. Check all wiring. 7. Fill fuel tank. 2. Attachment clutch is engaged. 3. Faulty solenoid or starter. 1. Clean engine air...
Operation Manual
Page 27
... dies when tractor is "OFF". 2. Turn ignition key to ROS "ON" position. uneven 1. Worn, bent or loose blade. 2. Replace blade. Tighten blade bolt. 2. Frozen idler pulley. 4. Improper blades used. 10. Replace fuse. Bad battery cell(s). 2. Faulty regulator (if so equipped). 4. Replace alternator. Freewheel control in the Maintenance section. 3. See "CLEANING" in "disengaged" position. 2. Install axle key at rear wheel. Operation section. 27 Worn/damaged mower drive belt. 3. Engine speed too slow. 1. Wet grass. 3. Mower deck not level. 4. Level mower deck...
... dies when tractor is "OFF". 2. Turn ignition key to ROS "ON" position. uneven 1. Worn, bent or loose blade. 2. Replace blade. Tighten blade bolt. 2. Frozen idler pulley. 4. Improper blades used. 10. Replace fuse. Bad battery cell(s). 2. Faulty regulator (if so equipped). 4. Replace alternator. Freewheel control in the Maintenance section. 3. See "CLEANING" in "disengaged" position. 2. Install axle key at rear wheel. Operation section. 27 Worn/damaged mower drive belt. 3. Engine speed too slow. 1. Wet grass. 3. Mower deck not level. 4. Level mower deck...


