

Operation Manual
Page 2
... eye protection when operating machine. • Use ear protectors to avoid damage to cause cancer and birth defects or other than the operator. • Be alert and turn off blades, set parking brake, and stop before turning. • Never leave a running machine unattended. WARNING: Tow only the attachments that are involved in daylight or good artificial light. • Do not operate the machine...
... eye protection when operating machine. • Use ear protectors to avoid damage to cause cancer and birth defects or other than the operator. • Be alert and turn off blades, set parking brake, and stop before turning. • Never leave a running machine unattended. WARNING: Tow only the attachments that are involved in daylight or good artificial light. • Do not operate the machine...

Operation Manual
Page 3
... on a water heater or other attachments; Clean oil or fuel spillage and remove any adjustments or repairs with the engine running . • Allow engine to stop. SAFETY RULES Safe Operation Practices for towing. Slopes are sharp. Adjust and service as required. • Maintain or replace safety and instruction labels, as on a truck or trailer bed with manufacturer's recommended parts, when necessary. • Mower blades are a major factor related to...
... on a water heater or other attachments; Clean oil or fuel spillage and remove any adjustments or repairs with the engine running . • Allow engine to stop. SAFETY RULES Safe Operation Practices for towing. Slopes are sharp. Adjust and service as required. • Maintain or replace safety and instruction labels, as on a truck or trailer bed with manufacturer's recommended parts, when necessary. • Mower blades are a major factor related to...
Operation Manual
Page 4
PRODUCT SPECIFICATIONS Gasoline Capacity and type: Oil Type: (API: SG-SL) Oil Capacity: Spark Plug: Charging System: Battery: Blade Bolt Torque: 3.0 Gallons (11,35 L) Unleaded Regular SAE 30 (above is required by the operator. Should you experience any problem you are outside mowing. Do not mow in effective working order by law (Section 4442 of this manual. • Wear proper Personal Protective Equipment (PPE) while operating this machine, including (at a minimum...
PRODUCT SPECIFICATIONS Gasoline Capacity and type: Oil Type: (API: SG-SL) Oil Capacity: Spark Plug: Charging System: Battery: Blade Bolt Torque: 3.0 Gallons (11,35 L) Unleaded Regular SAE 30 (above is required by the operator. Should you experience any problem you are outside mowing. Do not mow in effective working order by law (Section 4442 of this manual. • Wear proper Personal Protective Equipment (PPE) while operating this machine, including (at a minimum...
Operation Manual
Page 5
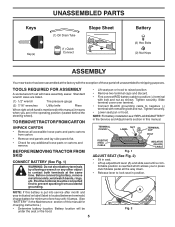
... "BATTERY" in the operating position (seated behind the steering wheel). Standard wrench sizes are in the Maintenance section of those parts left hand is reached which allows you are listed. (1) 1/2" wrench Tire pressure gauge (2) 7/16" wrenches Utility knife Pliers When right or left unassembled for charging instructions.) • Determine battery location. Tighten securely. Battery location will make assembly easier. UNPACK CARTON • Remove all the way down. • Release lever to...
... "BATTERY" in the operating position (seated behind the steering wheel). Standard wrench sizes are in the Maintenance section of those parts left hand is reached which allows you are listed. (1) 1/2" wrench Tire pressure gauge (2) 7/16" wrenches Utility knife Pliers When right or left unassembled for charging instructions.) • Determine battery location. Tighten securely. Battery location will make assembly easier. UNPACK CARTON • Remove all the way down. • Release lever to...
Operation Manual
Page 6
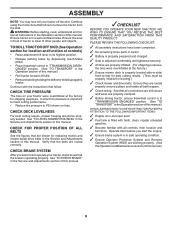
...; Before driving tractor, ensure freewheel control is important for shipping purposes. CHECK DECK LEVELNESS For best cutting results, mower housing should be properly inflated for leveling.) ✓ Check mower and drive belts. See "TO CHECK BRAKE" in the Operation section of controls) • Raise attachment lift lever to remove the tractor from the skid. Ensure tractor is clear of this manual. Correct tire pressure is in "TRANSMISSION ENGAGED" position. (See "TO TRANSPORT" in this manual. CHECK BRAKE SYSTEM After you start the engine...
...; Before driving tractor, ensure freewheel control is important for shipping purposes. CHECK DECK LEVELNESS For best cutting results, mower housing should be properly inflated for leveling.) ✓ Check mower and drive belts. See "TO CHECK BRAKE" in the Operation section of controls) • Raise attachment lift lever to remove the tractor from the skid. Ensure tractor is clear of this manual. Correct tire pressure is in "TRANSMISSION ENGAGED" position. (See "TO TRANSPORT" in this manual. CHECK BRAKE SYSTEM After you start the engine...

Operation Manual
Page 8
.... (F) IGNITION SWITCH - Used for reverse movement of the American National Standards Institute. (A) ATTACHMENT LIFT LEVER - Used to engage the mower blades, or other attachments mounted to your tractor to the applicable safety standards of tractor. (M) FREEWHEEL CONTROL - H D B E G A M F C K L Fig. 3 Our tractors conform to familiarize yourself with the locations of mower or other powered attachment while in reverse. (H) LIGHT SWITCH - Allows operation of various controls and adjustments. Locks clutch/brake pedal into the brake position. (D) THROTTLE/CHOKE CONTROL...
.... (F) IGNITION SWITCH - Used for reverse movement of the American National Standards Institute. (A) ATTACHMENT LIFT LEVER - Used to engage the mower blades, or other attachments mounted to your tractor to the applicable safety standards of tractor. (M) FREEWHEEL CONTROL - H D B E G A M F C K L Fig. 3 Our tractors conform to familiarize yourself with the locations of mower or other powered attachment while in reverse. (H) LIGHT SWITCH - Allows operation of various controls and adjustments. Locks clutch/brake pedal into the brake position. (D) THROTTLE/CHOKE CONTROL...

Operation Manual
Page 9
... move throttle control to leave the seat without first setting the parking brake will hold , release pres- To eliminate this possibility, always stop mower blades, place attachment clutch control in the "DISENGAGED" position ( ). Fig. 4 STOPPING (See Fig. 5) MOWER BLADES • To stop engine when stopping tractor on grass areas. D ( ) ATTACHMENT CLUTCH LEVER "DISENGAGED" ( ) ATTACHMENT CLUTCH LEVER "ENGAGED" Fig. 5 GROUND DRIVE - • To stop the engine. Always wear safety glasses or eye shields while operating your tractor or performing any adjustments or repairs...
... move throttle control to leave the seat without first setting the parking brake will hold , release pres- To eliminate this possibility, always stop mower blades, place attachment clutch control in the "DISENGAGED" position ( ). Fig. 4 STOPPING (See Fig. 5) MOWER BLADES • To stop engine when stopping tractor on grass areas. D ( ) ATTACHMENT CLUTCH LEVER "DISENGAGED" ( ) ATTACHMENT CLUTCH LEVER "ENGAGED" Fig. 5 GROUND DRIVE - • To stop the engine. Always wear safety glasses or eye shields while operating your tractor or performing any adjustments or repairs...

Operation Manual
Page 10
...: Adjust gauge wheels with the engine not running and the attachment clutch engaged will shut off when operating your equipment on mowers so equipped, or the deflector chute in desired height of cut . (See "TO ADJUST MOWER CUTTING HEIGHT".) • Start mower blades by engaging attachment clutch control. Install gauge wheel in most terrain conditions. The cutting height range is at the desired cutting height in height should be mowed twice. Make the first cut to 101,6 mm). K L TO ADJUST GAUGE WHEELS (See Fig. 9) Gauge wheels...
...: Adjust gauge wheels with the engine not running and the attachment clutch engaged will shut off when operating your equipment on mowers so equipped, or the deflector chute in desired height of cut . (See "TO ADJUST MOWER CUTTING HEIGHT".) • Start mower blades by engaging attachment clutch control. Install gauge wheel in most terrain conditions. The cutting height range is at the desired cutting height in height should be mowed twice. Make the first cut to 101,6 mm). K L TO ADJUST GAUGE WHEELS (See Fig. 9) Gauge wheels...
Operation Manual
Page 12
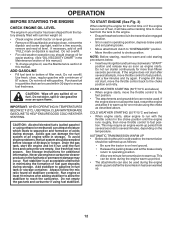
... gasohol or using fuel stabilizer. Fuel stabilizer is in the transmission engaged position. • Sit on seat in operating position, depress brake pedal and set parking brake. • Move attachment clutch to "DISENGAGED" position. • Move throttle control to choke position. NOTE: Before starting procedures below ) • When engine starts, allow it to warm up for one minute for transmission to warm up as engine starts. OPERATION BEFORE STARTING THE ENGINE CHECK ENGINE OIL LEVEL The engine in your tractor has been...
... gasohol or using fuel stabilizer. Fuel stabilizer is in the transmission engaged position. • Sit on seat in operating position, depress brake pedal and set parking brake. • Move attachment clutch to "DISENGAGED" position. • Move throttle control to choke position. NOTE: Before starting procedures below ) • When engine starts, allow it to warm up for one minute for transmission to warm up as engine starts. OPERATION BEFORE STARTING THE ENGINE CHECK ENGINE OIL LEVEL The engine in your tractor has been...
Operation Manual
Page 14
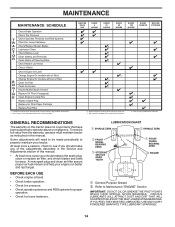
... Levelness Check V-Belts Check Engine Oil Level Change Engine Oil (models with maintenance-free battery. 1, 2 2 2 5 - Some adjustments will need to be made periodically to Maintenance "ENGINE" Section IMPORTANT: DO NOT OIL OR GREASE THE PIVOT POINTS WHICH HAVE SPECIAL NYLON BEARINGS. Not required if equipped with oil filter) Change Engine Oil (models without oil filter) E Clean Air Filter N Clean Air Screen G I Inspect Muffler/Spark Arrester N Replace Oil Filter (If equipped) E Clean Engine Cooling Fins Replace Spark Plug Replace Air Filter Paper Cartridge Replace Fuel...
... Levelness Check V-Belts Check Engine Oil Level Change Engine Oil (models with maintenance-free battery. 1, 2 2 2 5 - Some adjustments will need to be made periodically to Maintenance "ENGINE" Section IMPORTANT: DO NOT OIL OR GREASE THE PIVOT POINTS WHICH HAVE SPECIAL NYLON BEARINGS. Not required if equipped with oil filter) Change Engine Oil (models without oil filter) E Clean Air Filter N Clean Air Screen G I Inspect Muffler/Spark Arrester N Replace Oil Filter (If equipped) E Clean Engine Cooling Fins Replace Spark Plug Replace Air Filter Paper Cartridge Replace Fuel...
Operation Manual
Page 15
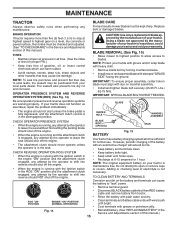
... your warranty. BLADE • The engine should not start unless the brake pedal is fully depressed, and the attachment clutch control is hazardous, could damage your tractor and void your tractor is running with plain water and dry. Adding or checking level of the battery with grease or petroleum jelly. Replace bent or damaged blades. Lbs./ 62-75 Nm). Be sure operator presence and reverse operation systems are working properly. BLADE BOLT...
... your warranty. BLADE • The engine should not start unless the brake pedal is fully depressed, and the attachment clutch control is hazardous, could damage your tractor and void your tractor is running with plain water and dry. Adding or checking level of the battery with grease or petroleum jelly. Replace bent or damaged blades. Lbs./ 62-75 Nm). Be sure operator presence and reverse operation systems are working properly. BLADE BOLT...
Operation Manual
Page 16
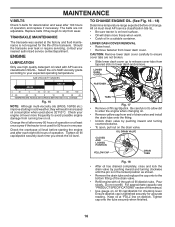
... drain valve by pushing inward and turning counterclockwise. • To open, pull out on oil. For approximate capacity see "PRODUCT SPECIFICATIONS" section of the drain valve. • Refill engine with API service classification SG-SL. LOWER DASH COVER REMOVAL • Raise hood. • Remove fastener from running low on the drain valve. FASTENER SLOTS TABS Fig. 17 • Remove oil fill cap/dipstick. Tighten cap onto the tube securely when finished. 16 Check your engine oil level...
... drain valve by pushing inward and turning counterclockwise. • To open, pull out on oil. For approximate capacity see "PRODUCT SPECIFICATIONS" section of the drain valve. • Refill engine with API service classification SG-SL. LOWER DASH COVER REMOVAL • Raise hood. • Remove fastener from running low on the drain valve. FASTENER SLOTS TABS Fig. 17 • Remove oil fill cap/dipstick. Tighten cap onto the tube securely when finished. 16 Check your engine oil level...

Operation Manual
Page 17
..., and/or cooling shrouds removed will not run properly using a dirty air filter. NOTE: If needed, remove lower dash covers using a garden hose or pressure washer to clean the outside tractor and mower. Spark plug type and gap setting are shown in fuel line with automotive type wax. FUEL FILTER Fig. 19 17 If fuel filter becomes clogged, obstructing fuel flow to overheating. MAINTENANCE ENGINE OIL FILTER Replace the engine oil filter every season or every other oil change if the tractor is used more often under extremely...
..., and/or cooling shrouds removed will not run properly using a dirty air filter. NOTE: If needed, remove lower dash covers using a garden hose or pressure washer to clean the outside tractor and mower. Spark plug type and gap setting are shown in fuel line with automotive type wax. FUEL FILTER Fig. 19 17 If fuel filter becomes clogged, obstructing fuel flow to overheating. MAINTENANCE ENGINE OIL FILTER Replace the engine oil filter every season or every other oil change if the tractor is used more often under extremely...
Operation Manual
Page 18
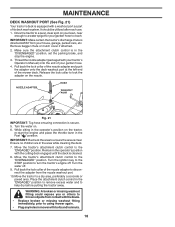
... deck. 7. Remove bagger chute or mulch cover if attached. 2. Move the tractor's attachment clutch control to the "DISENGAGED" position. Pull back the lock collar of the nozzle adapter to disconnect the adapter from contact with the blade. • Replace broken or missing washout fitting immediately, prior to a level, clear spot on the nozzle. IMPORTANT: Make certain the tractor's discharge chute is secure. 5. Drive the tractor to using mower again. • Plug any holes in the Fast " " position. Turn...
... deck. 7. Remove bagger chute or mulch cover if attached. 2. Move the tractor's attachment clutch control to the "DISENGAGED" position. Pull back the lock collar of the nozzle adapter to disconnect the adapter from contact with the blade. • Replace broken or missing washout fitting immediately, prior to a level, clear spot on the nozzle. IMPORTANT: Make certain the tractor's discharge chute is secure. 5. Drive the tractor to using mower again. • Plug any holes in the Fast " " position. Turn...

Operation Manual
Page 19
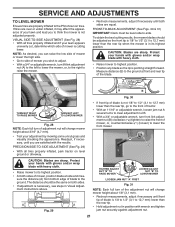
... (E) AND REAR LIFT LINKS (C) FROM TRACTOR AND HOOK THE CLUTCH SPRING (Q) INTO THE CABLE GUIDE ON FRONT EDGE OF LOWER DASH. M F Q R A E P K C D L 19 Fig. 22 SERVICE AND ADJUSTMENTS WARNING: TO AVOID SERIOUS INJURY, BEFORE PERFORMING ANY SERVICE OR ADJUSTMENTS: • Depress brake pedal fully and set parking brake. • Place attachment clutch in "DISENGAGED" position. • Turn ignition key to "STOP" and remove key. • Make sure the blades and all moving parts have completely...
... (E) AND REAR LIFT LINKS (C) FROM TRACTOR AND HOOK THE CLUTCH SPRING (Q) INTO THE CABLE GUIDE ON FRONT EDGE OF LOWER DASH. M F Q R A E P K C D L 19 Fig. 22 SERVICE AND ADJUSTMENTS WARNING: TO AVOID SERIOUS INJURY, BEFORE PERFORMING ANY SERVICE OR ADJUSTMENTS: • Depress brake pedal fully and set parking brake. • Place attachment clutch in "DISENGAGED" position. • Turn ignition key to "STOP" and remove key. • Make sure the blades and all moving parts have completely...
Operation Manual
Page 21
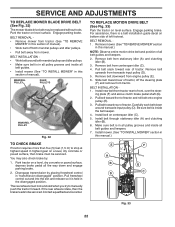
... the rear tip. • Hold adjustment nut in Visual Adjustment instructions above. Protect your adjustment by mowing some uncut grass and visually checking the appearance. PRECISION SIDE-TO-SIDE ADJUSTMENT (See Fig. 29) • With all tires properly inflated and if your lawn and lead you wish to adjust. • With a 3/4" or adjustable wrench, turn of adjustment nut will change mower height about 1/8" (3,1 mm). • Recheck measurements, adjust if...
... the rear tip. • Hold adjustment nut in Visual Adjustment instructions above. Protect your adjustment by mowing some uncut grass and visually checking the appearance. PRECISION SIDE-TO-SIDE ADJUSTMENT (See Fig. 29) • With all tires properly inflated and if your lawn and lead you wish to adjust. • With a 3/4" or adjustable wrench, turn of adjustment nut will change mower height about 1/8" (3,1 mm). • Recheck measurements, adjust if...
Operation Manual
Page 22
... input pulley (D). Install mower. (See "TO INSTALL MOWER" section in "transmission disengaged" position. ing plate (F) and above clutch brake pedal shaft (G). 2. Pull belt toward rear of manual). • Work belt off the steering plate (F) and remove from tractor (See "TO REMOVE MOWER" in the disengaged position. SERVICE AND ADJUSTMENTS TO REPLACE MOWER BLADE DRIVE BELT (See Fig. 32) The mower blade drive belt may also check brake by placing freewheel control in this manual.) E F A B D G C Fig. 33 22 BELT REMOVAL • Remove mower from tractor. Be sure belt is...
... input pulley (D). Install mower. (See "TO INSTALL MOWER" section in "transmission disengaged" position. ing plate (F) and above clutch brake pedal shaft (G). 2. Pull belt toward rear of manual). • Work belt off the steering plate (F) and remove from tractor (See "TO REMOVE MOWER" in the disengaged position. SERVICE AND ADJUSTMENTS TO REPLACE MOWER BLADE DRIVE BELT (See Fig. 32) The mower blade drive belt may also check brake by placing freewheel control in this manual.) E F A B D G C Fig. 33 22 BELT REMOVAL • Remove mower from tractor. Be sure belt is...
Operation Manual
Page 25
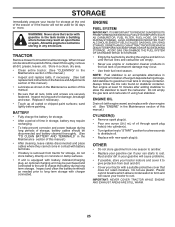
... mower is removed from dust and dirt. • Cover your tractor with battery indicator/charging plug, an optional charging unit may be purchased and connected to the unit to charge the battery during storage. Replace if necessary. • Touch up all dirt, grease, leaves, etc. Add stabilizer to cool before painting. Do not empty the gas tank and carburetor if using fuel stabilizer. Inspect and clean the battery...
... mower is removed from dust and dirt. • Cover your tractor with battery indicator/charging plug, an optional charging unit may be purchased and connected to the unit to charge the battery during storage. Replace if necessary. • Touch up all dirt, grease, leaves, etc. Add stabilizer to cool before painting. Do not empty the gas tank and carburetor if using fuel stabilizer. Inspect and clean the battery...
Operation Manual
Page 26
... blade mandrel. 3. Out of mower housing. 4. Stale or dirty fuel. 6. Replace spark plug. 3. Blown fuse. 5. Recharge or replace battery. 4. Faulty solenoid or starter. 1. Loss of adjustment. 14. Dirty air filter. 4. Clean/replace air filter. 5. Clean and regap or change oil. 6. Water in Operation section. 3. Engine valves out of power 1. Bent blade mandrel. 3. Dirty fuel filter. 7. See "TO START ENGINE" in fuel. 9. Attachment clutch is engaged. 3. Loose or damaged wiring. 7. Check/replace ignition switch. 8. Engine clicks but will not turn...
... blade mandrel. 3. Out of mower housing. 4. Stale or dirty fuel. 6. Replace spark plug. 3. Blown fuse. 5. Recharge or replace battery. 4. Faulty solenoid or starter. 1. Loss of adjustment. 14. Dirty air filter. 4. Clean/replace air filter. 5. Clean and regap or change oil. 6. Water in Operation section. 3. Engine valves out of power 1. Bent blade mandrel. 3. Dirty fuel filter. 7. See "TO START ENGINE" in fuel. 9. Attachment clutch is engaged. 3. Loose or damaged wiring. 7. Check/replace ignition switch. 8. Engine clicks but will not turn...

Operation Manual
Page 27
...1. Worn, bent or loose blade. 6. Reinstall blades sharp edge down. 10. Check/replace light switch. 4. Replace blade mandrel. 1. Mower deck not level. 4. Replace mower drive belt. 9. Replace regulator. 4. Low/uneven tire air pressure. 5. Clean around mandrels. CORRECTION 1. Improper blades used. 10. CAUTION: DO NOT operate machine until problem is corrected. Clean underside of mower housing. 8. Battery will not rotate Poor grass discharge 1. Bent blade mandrel. 5. Install axle key at rear wheel. Move throttle control between half and full...
...1. Worn, bent or loose blade. 6. Reinstall blades sharp edge down. 10. Check/replace light switch. 4. Replace blade mandrel. 1. Mower deck not level. 4. Replace mower drive belt. 9. Replace regulator. 4. Low/uneven tire air pressure. 5. Clean around mandrels. CORRECTION 1. Improper blades used. 10. CAUTION: DO NOT operate machine until problem is corrected. Clean underside of mower housing. 8. Battery will not rotate Poor grass discharge 1. Bent blade mandrel. 5. Install axle key at rear wheel. Move throttle control between half and full...


