
Owners Manual
Page 2
... setting up and thrown by the manufacturer. 2 DO NOT: • Do not trim near or under rotating parts. SAFE HANDLING OF GASOLINE Use extreme care in the manual(s) before starting the engine (motor). • If the equipment should start to cause cancer and birth defects or...Safe Operation Practices for holes, ruts, or bumps. GENERAL OPERATION • Read, understand, and follow all cigarettes, cigars, pipes and other engine parts become extremely hot during operation and remain hot after handling. • Stop the blade(s) when crossing gravel drives, walks, or roads. • ...
... setting up and thrown by the manufacturer. 2 DO NOT: • Do not trim near or under rotating parts. SAFE HANDLING OF GASOLINE Use extreme care in the manual(s) before starting the engine (motor). • If the equipment should start to cause cancer and birth defects or...Safe Operation Practices for holes, ruts, or bumps. GENERAL OPERATION • Read, understand, and follow all cigarettes, cigars, pipes and other engine parts become extremely hot during operation and remain hot after handling. • Stop the blade(s) when crossing gravel drives, walks, or roads. • ...
Owners Manual
Page 3
...motor) running . • Grass catcher components are subject to wear, damage, and deterioration, which could expose moving parts or allow objects to service or repair this manual. Disconnect spark plug wire, and keep equipment in contact with a portable container, rather than from the truck or ...oil or fuel spillage. CONGRATULATIONS on the ground. If this is not possible, then refuel such equipment with the rim of this owner's manual. Please read and retain this lawn mower. The instructions will enable you strike an object. lbs. Repair, if necessary, before storing. ...
...motor) running . • Grass catcher components are subject to wear, damage, and deterioration, which could expose moving parts or allow objects to service or repair this manual. Disconnect spark plug wire, and keep equipment in contact with a portable container, rather than from the truck or ...oil or fuel spillage. CONGRATULATIONS on the ground. If this is not possible, then refuel such equipment with the rim of this owner's manual. Please read and retain this lawn mower. The instructions will enable you strike an object. lbs. Repair, if necessary, before storing. ...

Owners Manual
Page 4
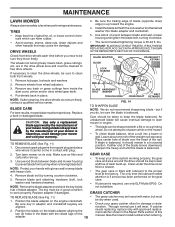
... for a few minutes. Cut down flat. 3. Raise handles until lower handle section locks into grass bag with rigid part of this manual. OPERATOR PRESENCE CONTROL BAR MOWING POSITION LIFT UP LIFT UPPER UP HANDLE VINYL BINDINGS FRAME OPENING FIG. 2 TO INSTALL ATTACHMENTS... connector (female) to upper handle. 4. LOWER HANDLE FIG. 1 TO ASSEMBLE GRASS CATCHER (See Fig. 2) 1. Remove loose parts included with the exception of this manual. Remove all parts and hardware you assemble must be tightened securely. Make sure the frame handle is outside of carton and lay end panel...
... for a few minutes. Cut down flat. 3. Raise handles until lower handle section locks into grass bag with rigid part of this manual. OPERATOR PRESENCE CONTROL BAR MOWING POSITION LIFT UP LIFT UPPER UP HANDLE VINYL BINDINGS FRAME OPENING FIG. 2 TO INSTALL ATTACHMENTS... connector (female) to upper handle. 4. LOWER HANDLE FIG. 1 TO ASSEMBLE GRASS CATCHER (See Fig. 2) 1. Remove loose parts included with the exception of this manual. Remove all parts and hardware you assemble must be tightened securely. Make sure the frame handle is outside of carton and lay end panel...
Owners Manual
Page 10
... the manufacturer of the blade moves downward, sharpen the heavy end until the blade is up toward the engine. 4. Be sure key in the Repair Parts section of trash build-up . 3. Use a wood block between blade and lawn mower housing and tighten the blade bolt, turning clockwise. • The ... area around the drive should be taken to work properly. IF BOLT NEEDS REPLACING, REPLACE ONLY WITH APPROVED BOLT SHOWN IN THE REPAIR PARTS SECTION OF THIS MANUAL. Check front drive wheels each time before you do, be dry when used. Care should remain in contact with lubricant to clean both...
... the manufacturer of the blade moves downward, sharpen the heavy end until the blade is up toward the engine. 4. Be sure key in the Repair Parts section of trash build-up . 3. Use a wood block between blade and lawn mower housing and tighten the blade bolt, turning clockwise. • The ... area around the drive should be taken to work properly. IF BOLT NEEDS REPLACING, REPLACE ONLY WITH APPROVED BOLT SHOWN IN THE REPAIR PARTS SECTION OF THIS MANUAL. Check front drive wheels each time before you do, be dry when used. Care should remain in contact with lubricant to clean both...
Owners Manual
Page 12
...(See Fig. 15) 1. Remove belt from spark plug and place wire where it cannot come in housing. 3. Route the other end of this manual. Return mower to assure proper fit and long life. A clogged engine runs hotter and shortens engine life. • Keep finished surfaces/wheels free of...from gearcase pulley. 3. Water in engine can result in contact with air filter and carburetor down. 4. Make sure the blade and all moving parts have completely stopped. 3. If the deflector becomes damaged, it cannot come in shortened engine life. Turn lawn mower on underside of your lawn ...
...(See Fig. 15) 1. Remove belt from spark plug and place wire where it cannot come in housing. 3. Route the other end of this manual. Return mower to assure proper fit and long life. A clogged engine runs hotter and shortens engine life. • Keep finished surfaces/wheels free of...from gearcase pulley. 3. Water in engine can result in contact with air filter and carburetor down. 4. Make sure the blade and all moving parts have completely stopped. 3. If the deflector becomes damaged, it cannot come in shortened engine life. Turn lawn mower on underside of your lawn ...
Owners Manual
Page 13
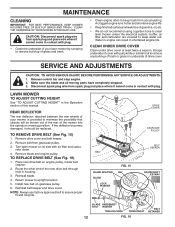
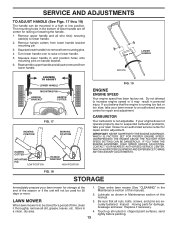
...injury. If your engine does not operate properly due to suspected carburetor problems, take your lawn mower for a period of this manual. IF YOU THINK THE ENGINE-GOVERNED HIGH SPEED NEEDS ADJUSTING, CONTACT YOUR NEAREST AUTHORIZED SERVICE CENTER, WHICH HAS PROPER EQUIPMENT AND ...lower handle over to lower handle. 2. CARBURETOR Your carburetor is to be mounted in the bottom of this manual). Touch up all rusted or chipped paint surfaces; Inspect moving parts for 30 days or more. 2. Replace if necessary. SERVICE AND ADJUSTMENTS TO ADJUST HANDLE (See Figs. ...
...injury. If your engine does not operate properly due to suspected carburetor problems, take your lawn mower for a period of this manual. IF YOU THINK THE ENGINE-GOVERNED HIGH SPEED NEEDS ADJUSTING, CONTACT YOUR NEAREST AUTHORIZED SERVICE CENTER, WHICH HAS PROPER EQUIPMENT AND ...lower handle over to lower handle. 2. CARBURETOR Your carburetor is to be mounted in the bottom of this manual). Touch up all rusted or chipped paint surfaces; Inspect moving parts for 30 days or more. 2. Replace if necessary. SERVICE AND ADJUSTMENTS TO ADJUST HANDLE (See Figs. ...
Owners Manual
Page 14
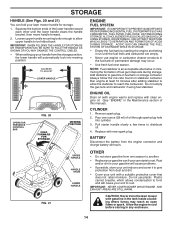
... 20 FOLD FORWARD FOR STORAGE MOWING POSITION ENGINE FUEL SYSTEM IMPORTANT: IT IS IMPORTANT TO PREVENT GUM DEPOSITS FROM FORMING IN ESSENTIAL FUEL SYSTEM PARTS SUCH AS CARBURETOR, FUEL FILTER, FUEL HOSE, OR TANK DURING STORAGE. CYLINDER 1. Plastic cannot breathe, which allows condensation to another. &#...and cover it run until the lower handle clears the handle bracket, then move handle forward. 2. Squeeze the bottom ends of this manual). ALCOHOL BLENDED FUELS (CALLED GASOHOL OR USING ETHANOL OR METHANOL) CAN ATTRACT MOISTURE WHICH LEADS TO SEPARATION AND FORMATION OF ACIDS DURING ...
... 20 FOLD FORWARD FOR STORAGE MOWING POSITION ENGINE FUEL SYSTEM IMPORTANT: IT IS IMPORTANT TO PREVENT GUM DEPOSITS FROM FORMING IN ESSENTIAL FUEL SYSTEM PARTS SUCH AS CARBURETOR, FUEL FILTER, FUEL HOSE, OR TANK DURING STORAGE. CYLINDER 1. Plastic cannot breathe, which allows condensation to another. &#...and cover it run until the lower handle clears the handle bracket, then move handle forward. 2. Squeeze the bottom ends of this manual). ALCOHOL BLENDED FUELS (CALLED GASOHOL OR USING ETHANOL OR METHANOL) CAN ATTRACT MOISTURE WHICH LEADS TO SEPARATION AND FORMATION OF ACIDS DURING ...
Owners Manual
Page 16
..., operation, safety, or durability, or causes the product to fail to comply with the Owner's/Operator's manual or instruction sheet furnished by Husqvarna; HUSQVARNA SHALL NOT BE LIABLE FOR ANY INCIDENTAL OR CONSEQUENTIAL DAMAGES FOR BREACH OF ANY EXPRESS OR IMPLIED WARRANTY ON...covered by third party engine manufacturer. Downtime, pick-up and delivery charges are covered by the manufacturer on handheld product. Lifetime Warranty ("PARTS ONLY" after August 1, 2005. Proof of purchase required. WARRANTY SCHEDULE FOR CONSUMER FOREST & GARDEN EQUIPMENT: 2 Year Consumer Warranty:...
..., operation, safety, or durability, or causes the product to fail to comply with the Owner's/Operator's manual or instruction sheet furnished by Husqvarna; HUSQVARNA SHALL NOT BE LIABLE FOR ANY INCIDENTAL OR CONSEQUENTIAL DAMAGES FOR BREACH OF ANY EXPRESS OR IMPLIED WARRANTY ON...covered by third party engine manufacturer. Downtime, pick-up and delivery charges are covered by the manufacturer on handheld product. Lifetime Warranty ("PARTS ONLY" after August 1, 2005. Proof of purchase required. WARRANTY SCHEDULE FOR CONSUMER FOREST & GARDEN EQUIPMENT: 2 Year Consumer Warranty:...

Parts List
Page 3
...Wheel Adjusting Bracket, LH Clip, Cable Foam Grip Belt Keeper Screw Key Nut, Cap Key Start Switch Wiring Harness Warning Decal (not shown) Operator's Manual, English / French 3 NOTE: All component dimensions given in U.S. Failure to do so could be hazardous, damage your lawn mower and void your ... Bracket, RH Hinge Bracket Assembly Screw, Sems, Thread Cutting 5/16-18 x 3/4 Discharge Deflector Handle Bracket Assembly, LH KEY PART NO. MODEL NUMBER XT722FE (96143006100) PRODUCT NUMBER 961 43 00-61 KEY PART NO. IMPORTANT: Use only Original Equipment Manufacturer (O.E.M.) replacement...
...Wheel Adjusting Bracket, LH Clip, Cable Foam Grip Belt Keeper Screw Key Nut, Cap Key Start Switch Wiring Harness Warning Decal (not shown) Operator's Manual, English / French 3 NOTE: All component dimensions given in U.S. Failure to do so could be hazardous, damage your lawn mower and void your ... Bracket, RH Hinge Bracket Assembly Screw, Sems, Thread Cutting 5/16-18 x 3/4 Discharge Deflector Handle Bracket Assembly, LH KEY PART NO. MODEL NUMBER XT722FE (96143006100) PRODUCT NUMBER 961 43 00-61 KEY PART NO. IMPORTANT: Use only Original Equipment Manufacturer (O.E.M.) replacement...


