
Owners Manual
Page 1
Operator's Manual ST 330T Gasoline containing up to 10% ethanol (E10) is acceptable for use of any gasoline exceeding 10% ethanol (E10) will void the product warranty. 115 68 31-27 Please read the owner's manual carefully and make sure you understand the instructions before using the machine. The use in this machine. English
Operator's Manual ST 330T Gasoline containing up to 10% ethanol (E10) is acceptable for use of any gasoline exceeding 10% ethanol (E10) will void the product warranty. 115 68 31-27 Please read the owner's manual carefully and make sure you understand the instructions before using the machine. The use in this machine. English

Owners Manual
Page 2
... refueling is highly flammable (a) Use an approved fuel container. (b) Never add fuel to avoid slipping or falling, especially when operating the snow thrower in the manual(s) before operating this is spilled on the ground, away from your vehicle, before restarting and operating the snow thrower. 4. Keep the area of operation clear...
... refueling is highly flammable (a) Use an approved fuel container. (b) Never add fuel to avoid slipping or falling, especially when operating the snow thrower in the manual(s) before operating this is spilled on the ground, away from your vehicle, before restarting and operating the snow thrower. 4. Keep the area of operation clear...

Owners Manual
Page 3
... sections of performance in place and working condition. 2. This may cause a loss of this manual. Clean out snow and debris between the track components. Maintenance and Storage 1. Always refer to operator's manual for important details if the snow thrower is in safe working . 10. Open the outside ... the collector/impeller when snow thrower is the most common cause of a new snow thrower. Please read and retain this owner's manual. The instructions will enable you cannot easily remedy, please contact your purchase of injury associated with fuel in use care when operating ...
... sections of performance in place and working condition. 2. This may cause a loss of this manual. Clean out snow and debris between the track components. Maintenance and Storage 1. Always refer to operator's manual for important details if the snow thrower is in safe working . 10. Open the outside ... the collector/impeller when snow thrower is the most common cause of a new snow thrower. Please read and retain this owner's manual. The instructions will enable you cannot easily remedy, please contact your purchase of injury associated with fuel in use care when operating ...

Owners Manual
Page 5
... Fig. 10) A toolbox is located on your snow thrower. UNFOLD UPPER HANDLE 1. ASSEMBLY / PRE-OPERATION Read these instructions and this manual in its entirety before you attempt to assemble or operate your snow thrower, all parts and hardware you assemble must be used for shipping ...the two (2) plastic ties securing the upper handle to lower handle. 2. NOTE: The multi-wrench may be tightened securely. Reading the entire manual will familiarize you with retainer spring. The toolbox is provided on top of the product. Remove plastic tie securing rod to the pallet. 6. ...
... Fig. 10) A toolbox is located on your snow thrower. UNFOLD UPPER HANDLE 1. ASSEMBLY / PRE-OPERATION Read these instructions and this manual in its entirety before you attempt to assemble or operate your snow thrower, all parts and hardware you assemble must be used for shipping ...the two (2) plastic ties securing the upper handle to lower handle. 2. NOTE: The multi-wrench may be tightened securely. Reading the entire manual will familiarize you with retainer spring. The toolbox is provided on top of the product. Remove plastic tie securing rod to the pallet. 6. ...
Owners Manual
Page 8
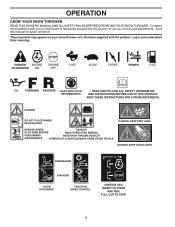
.... Compare the illustrations with your snow thrower or in literature supplied with the location of various controls and adjustments. Save this manual for future reference. DANGER DO NOT PLACE HANDS NEAR BLADES DANGER, KEEP FEET AWAY REMOVE SPARK DANGER PLUG WIRE BEFORE READ OPERATORS... MANUAL PERFORMING WATCH FOR THROWN OBJECTS MAINTENANCE OPERATE AT A SAFE DISTANCE FROM OTHER PEOPLE DANGER, KEEP HANDS AWAY DISENGAGED ENGAGED SNOW DISCHARGE ...
.... Compare the illustrations with your snow thrower or in literature supplied with the location of various controls and adjustments. Save this manual for future reference. DANGER DO NOT PLACE HANDS NEAR BLADES DANGER, KEEP FEET AWAY REMOVE SPARK DANGER PLUG WIRE BEFORE READ OPERATORS... MANUAL PERFORMING WATCH FOR THROWN OBJECTS MAINTENANCE OPERATE AT A SAFE DISTANCE FROM OTHER PEOPLE DANGER, KEEP HANDS AWAY DISENGAGED ENGAGED SNOW DISCHARGE ...
Owners Manual
Page 13
... snow thrower has been shipped from the factory already filled with snow thrower on that are higher than the front of each side of this manual. Objects such as a paved driveway or sidewalk, place skid plates in the Maintenance section of the auger housing and adjust the clearance between the scraper...
... snow thrower has been shipped from the factory already filled with snow thrower on that are higher than the front of each side of this manual. Objects such as a paved driveway or sidewalk, place skid plates in the Maintenance section of the auger housing and adjust the clearance between the scraper...

Owners Manual
Page 15
... use . DO NOT push the primer. Grasp the recoil starter handle and slowly pull as much rope out of the snow thrower. 15 At this manual. • For extremely heavy snow, reduce the width of snow removal by overlapping previous path and moving slowly. • Keep engine clean and clear of...
... use . DO NOT push the primer. Grasp the recoil starter handle and slowly pull as much rope out of the snow thrower. 15 At this manual. • For extremely heavy snow, reduce the width of snow removal by overlapping previous path and moving slowly. • Keep engine clean and clear of...

Owners Manual
Page 16
...and pose a risk of this unit. BEFORE EACH USE 1. LUBRICATION Keep your snow thrower. Check for wear. Check controls to service this manual. • At least once a year, you should make any maintenance. To receive full value from the warranty, operator must maintain snow ...thrower as instructed in this manual. Some adjustments will help your engine run better and last longer. • Follow the maintenance schedule in this manual. At least once a season, check to properly maintain your snow thrower well lubricated...
...and pose a risk of this unit. BEFORE EACH USE 1. LUBRICATION Keep your snow thrower. Check for wear. Check controls to service this manual. • At least once a year, you should make any maintenance. To receive full value from the warranty, operator must maintain snow ...thrower as instructed in this manual. Some adjustments will help your engine run better and last longer. • Follow the maintenance schedule in this manual. At least once a season, check to properly maintain your snow thrower well lubricated...

Owners Manual
Page 17
.... TRACTION DRIVE SYSTEM DO NOT lubricate or add oil to your snow thrower unless the electrical system, muffler and carburetor are of this manual). 7. Select the oil's SAE viscosity grade according to the hydrostatic transmission inside the engine. (See "TO REMOVE TRACKS" in cold ...replaced by original equipment manufacturer (OEM) belts available from wear. (See "TO REMOVE BELT COVER" in a suitable container. ENGINE See engine manual. CLEANING IMPORTANT: For best performance, keep water out. Remove oil fill cap/dipstick. Be sure dipstick cap is on your snow thrower. ...
.... TRACTION DRIVE SYSTEM DO NOT lubricate or add oil to your snow thrower unless the electrical system, muffler and carburetor are of this manual). 7. Select the oil's SAE viscosity grade according to the hydrostatic transmission inside the engine. (See "TO REMOVE TRACKS" in cold ...replaced by original equipment manufacturer (OEM) belts available from wear. (See "TO REMOVE BELT COVER" in a suitable container. ENGINE See engine manual. CLEANING IMPORTANT: For best performance, keep water out. Remove oil fill cap/dipstick. Be sure dipstick cap is on your snow thrower. ...
Owners Manual
Page 18
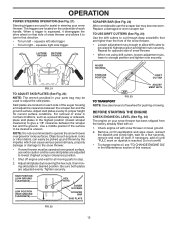
...BAR" in the OFF position. 2. CHUTE DEFLECTOR The chute deflector, attached to the top of the discharge chute, is in the Operation section of this manual. WARNING: To avoid serious injury, never operate your snow thrower with two (2) capscrew/shear bolts and hex nuts. To replace the capscrew/shear bolts: 1.... to see if one or both augers do not turn when auger control lever is secured to spark plug. If one or both of this manual. Align hole in auger hub with hole in contact with your snow thrower. 4. Disengage all moving parts to see "TO CONTROL SNOW DISCHARGE" ...
...BAR" in the OFF position. 2. CHUTE DEFLECTOR The chute deflector, attached to the top of the discharge chute, is in the Operation section of this manual. WARNING: To avoid serious injury, never operate your snow thrower with two (2) capscrew/shear bolts and hex nuts. To replace the capscrew/shear bolts: 1.... to see if one or both augers do not turn when auger control lever is secured to spark plug. If one or both of this manual. Align hole in auger hub with hole in contact with your snow thrower. 4. Disengage all moving parts to see "TO CONTROL SNOW DISCHARGE" ...
Owners Manual
Page 19
...or flame. INSTALL ENGINE PULLEY - INSTALL DISCHARGE CHUTE - Drain gasoline from fuel tank into the square hole in this section of this manual. Loosen locknut securing chute rotator head to mounting bracket only enough to allow chute rotator head to be replaced by a service center/... injury or damage to the ground. 6. Make sure belt is important that an assistant stand in the Assembly / Pre-Operation section of this manual. 4. With your snow thrower are not adjustable. If auger belt has become dislodged from crankshaft. 5. INSTALL BELT COVER and two (4) screws....
...or flame. INSTALL ENGINE PULLEY - INSTALL DISCHARGE CHUTE - Drain gasoline from fuel tank into the square hole in this section of this manual. Loosen locknut securing chute rotator head to mounting bracket only enough to allow chute rotator head to be replaced by a service center/... injury or damage to the ground. 6. Make sure belt is important that an assistant stand in the Assembly / Pre-Operation section of this manual. 4. With your snow thrower are not adjustable. If auger belt has become dislodged from crankshaft. 5. INSTALL BELT COVER and two (4) screws....

Owners Manual
Page 20
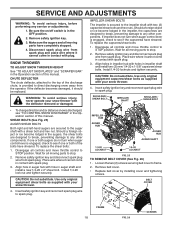
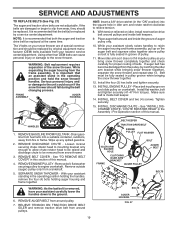
...the traction or auger belt is slipping because it is not tight enough when engaged, the tension can be affected at the bottom of this manual.) 20 Unhook the rod from the control lever and move the spring at altitudes up to the top of tracks. 3. SERVICE AND ADJUSTMENTS ... tamper with the engine governor, which has the proper equipment and experience to inside of the rod. AXLE KLIK SPRING PIN ENGINE SEE ENGINE MANUAL. If your engine does not operate properly due to suspected carburetor problems, take your snow thrower to lengthen the adjuster. ADJUSTER TURN BUCKLE BOLT...
...the traction or auger belt is slipping because it is not tight enough when engaged, the tension can be affected at the bottom of this manual.) 20 Unhook the rod from the control lever and move the spring at altitudes up to the top of tracks. 3. SERVICE AND ADJUSTMENTS ... tamper with the engine governor, which has the proper equipment and experience to inside of the rod. AXLE KLIK SPRING PIN ENGINE SEE ENGINE MANUAL. If your engine does not operate properly due to suspected carburetor problems, take your snow thrower to lengthen the adjuster. ADJUSTER TURN BUCKLE BOLT...

Owners Manual
Page 22
... area is an acceptable alternative in a clean, dry area. 1. Clean entire snow thrower (See "CLEANING" in the Maintenance section of this manual). 3. Also, alcohol blended fuels (called gasohol or using fuel stabilizer. Acidic gas can attract moisture which allows condensation to form and will not... chipped paint surfaces; Do not empty the gas tank and carburetor if using ethanol or methanol) can damage the fuel system of this manual). Remove spark plug. 2. Inspect moving parts for damage, breakage and wear. sand lightly before storing in the Maintenance section of an...
... area is an acceptable alternative in a clean, dry area. 1. Clean entire snow thrower (See "CLEANING" in the Maintenance section of this manual). 3. Also, alcohol blended fuels (called gasohol or using fuel stabilizer. Acidic gas can attract moisture which allows condensation to form and will not... chipped paint surfaces; Do not empty the gas tank and carburetor if using ethanol or methanol) can damage the fuel system of this manual). Remove spark plug. 2. Inspect moving parts for damage, breakage and wear. sand lightly before storing in the Maintenance section of an...

Owners Manual
Page 23
...an authorized service center/department. 4. between track compo- Check wire connections at engine and light. 3. in the Operation section of this manual. 7. Replace spark plug. 10. Empty fuel tank & carburetor, refill with fresh, clean gasoline. or overhaul. Loose parts or ... augers / impeller. Clogged discharge chute. 1. TROUBLESHOOTING See appropriate section in the Operation section of this manual. Prime as instructed in manual unless directed to ON position). Stale fuel. 10. Reduce speed and width of swath. 3. Dirty or clogged muffler....
...an authorized service center/department. 4. between track compo- Check wire connections at engine and light. 3. in the Operation section of this manual. 7. Replace spark plug. 10. Empty fuel tank & carburetor, refill with fresh, clean gasoline. or overhaul. Loose parts or ... augers / impeller. Clogged discharge chute. 1. TROUBLESHOOTING See appropriate section in the Operation section of this manual. Prime as instructed in manual unless directed to ON position). Stale fuel. 10. Reduce speed and width of swath. 3. Dirty or clogged muffler....

Owners Manual
Page 24
..., these items are only reconditioned at any further use and maintenance from normal aging, wear and tear or neglect are NOT covered. 24 Husqvarna is offered instead of the other limitations apply, as prescribed in the operator's manual. Adjustments after the first (30) thirty days of purchase. Consumer Wheeled Products - Limited Warranty...
..., these items are only reconditioned at any further use and maintenance from normal aging, wear and tear or neglect are NOT covered. 24 Husqvarna is offered instead of the other limitations apply, as prescribed in the operator's manual. Adjustments after the first (30) thirty days of purchase. Consumer Wheeled Products - Limited Warranty...

Owners Manual
Page 25
...containing ethanol), containing methanol (fuel containing wood alcohol). Husqvarna encourages you can be notified of gasoline to obtain warranty coverage it is listed in the Husqvarna oil label and covered in your operator's manual. (h) Use of ether or any adverse reaction ...due to incorrect storage procedures; (n) Failures due to an authorized Husqvarna Servicing Dealer/Center and arrange for warranty service under this Limited Warranty. However, registering your operator's manual; (l) Operation of contact with improperly installed/removed or modified cutting shields,...
...containing ethanol), containing methanol (fuel containing wood alcohol). Husqvarna encourages you can be notified of gasoline to obtain warranty coverage it is listed in the Husqvarna oil label and covered in your operator's manual. (h) Use of ether or any adverse reaction ...due to incorrect storage procedures; (n) Failures due to an authorized Husqvarna Servicing Dealer/Center and arrange for warranty service under this Limited Warranty. However, registering your operator's manual; (l) Operation of contact with improperly installed/removed or modified cutting shields,...

