Parts Manual
Page 23
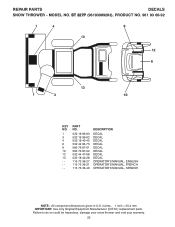
MODEL NO. inches. 1 inch = 25.4 mm IMPORTANT: Use only Original Equipment Manufacturer (O.E.M.) replacement parts. ST 327P (96193009203), PRODUCT NO. 961 93 00-92 1 4 9 13 12 6 13 1 3 10 KEY NO. 1 3 4 6 9 10 12 13 - - - - PART NO. 532 19 96-83 532 19 ...-28 115 73 36-27 115 73 36-31 115 73 36-46 DESCRIPTION DECAL DECAL DECAL DECAL DECAL DECAL DECAL DECAL OPERATOR'S MANUAL, ENGLISH OPERATOR'S MANUAL, FRENCH OPERATOR'S MANUAL, SPANISH NOTE: All component dimensions given in U.S. Failure to do so could be hazardous, damage your snow thrower and void your warranty. 23...
MODEL NO. inches. 1 inch = 25.4 mm IMPORTANT: Use only Original Equipment Manufacturer (O.E.M.) replacement parts. ST 327P (96193009203), PRODUCT NO. 961 93 00-92 1 4 9 13 12 6 13 1 3 10 KEY NO. 1 3 4 6 9 10 12 13 - - - - PART NO. 532 19 96-83 532 19 ...-28 115 73 36-27 115 73 36-31 115 73 36-46 DESCRIPTION DECAL DECAL DECAL DECAL DECAL DECAL DECAL DECAL OPERATOR'S MANUAL, ENGLISH OPERATOR'S MANUAL, FRENCH OPERATOR'S MANUAL, SPANISH NOTE: All component dimensions given in U.S. Failure to do so could be hazardous, damage your snow thrower and void your warranty. 23...

Owner Manual
Page 1
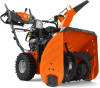
The use in this machine. English Operator's Manual ST 327T Gasoline containing up to 10% ethanol (E10) is acceptable for use of any gasoline exceeding 10% ethanol (E10) will void the product warranty. 115 73 37-27 Rev. 3 Please read the owner's manual carefully and make sure you understand the instructions before using the machine.
The use in this machine. English Operator's Manual ST 327T Gasoline containing up to 10% ethanol (E10) is acceptable for use of any gasoline exceeding 10% ethanol (E10) will void the product warranty. 115 73 37-27 Rev. 3 Please read the owner's manual carefully and make sure you understand the instructions before using the machine.
Owner Manual
Page 2
... tank outdoors with electric drive motors or electric starting the engine (motor). 3. WARNING: Snow throwers have exposed rotating parts, which can get caught in the manual(s) before restarting and operating the snow thrower. 4. CAUTION: Muffler and other reproductive harm. Read, understand and follow all times, until refueling is complete...
... tank outdoors with electric drive motors or electric starting the engine (motor). 3. WARNING: Snow throwers have exposed rotating parts, which can get caught in the manual(s) before restarting and operating the snow thrower. 4. CAUTION: Muffler and other reproductive harm. Read, understand and follow all times, until refueling is complete...
Owner Manual
Page 3
... is to cool before storing in or out of performance in reverse. 13. Never use a clean-out tool, not your purchase of this owner's manual. SHUT THE ENGINE OFF! 2. Always use your snow thrower. • Follow the instructions under "Maintenance" and "Storage" sections of a new snow...Never operate the snow thrower without proper guards, and other bolts at high transport speeds on slopes. 9. Should you to service or repair this manual. Do not run . 16. Never operate the machine at frequent intervals for and using your footing, and keep the wire away from accidentally...
... is to cool before storing in or out of performance in reverse. 13. Never use a clean-out tool, not your purchase of this owner's manual. SHUT THE ENGINE OFF! 2. Always use your snow thrower. • Follow the instructions under "Maintenance" and "Storage" sections of a new snow...Never operate the snow thrower without proper guards, and other bolts at high transport speeds on slopes. 9. Should you to service or repair this manual. Do not run . 16. Never operate the machine at frequent intervals for and using your footing, and keep the wire away from accidentally...

Owner Manual
Page 5
ASSEMBLY / PRE-OPERATION Read these instructions and this manual in its entirety before you attempt to assemble or operate your snow thrower. Your new snow thrower has been assembled at the factory with the ... SPEED CONTROL ROD PLASTIC TIE HANDLE KNOB LOWER HANDLE FIG. 1 SPEED CONTROL ROD RETAINER SPRING SPEED CONTROL BRACKET SPEED CONTROL LEVER FIG. 2 5 Reading the entire manual will assist you in assembly, operation and maintenance of the belt cover. Remove all packing materials except plastic tie holding speed control rod to the...
ASSEMBLY / PRE-OPERATION Read these instructions and this manual in its entirety before you attempt to assemble or operate your snow thrower. Your new snow thrower has been assembled at the factory with the ... SPEED CONTROL ROD PLASTIC TIE HANDLE KNOB LOWER HANDLE FIG. 1 SPEED CONTROL ROD RETAINER SPRING SPEED CONTROL BRACKET SPEED CONTROL LEVER FIG. 2 5 Reading the entire manual will assist you in assembly, operation and maintenance of the belt cover. Remove all packing materials except plastic tie holding speed control rod to the...

Owner Manual
Page 8
... BEFORE USE OF THIS PRODUCT. DANGER DO NOT PLACE HANDS NEAR BLADES DANGER, KEEP FEET AWAY REMOVE SPARK DANGER PLUG WIRE BEFORE READ OPERATORS MANUAL PERFORMING WATCH FOR THROWN OBJECTS MAINTENANCE OPERATE AT A SAFE DISTANCE FROM OTHER PEOPLE DANGER, KEEP HANDS AWAY DISENGAGED ENGAGED SNOW DISCHARGE TRACTION DRIVE CONTROL... KEY. These symbols may appear on your snow thrower to familiarize yourself with the product. OPERATION KNOW YOUR SNOW THROWER READ THIS OWNER'S MANUAL AND ALL SAFETY RULES BEFORE OPERATING YOUR SNOW THROWER. INSERT TO START AND RUN, PULL OUT TO STOP. 8
... BEFORE USE OF THIS PRODUCT. DANGER DO NOT PLACE HANDS NEAR BLADES DANGER, KEEP FEET AWAY REMOVE SPARK DANGER PLUG WIRE BEFORE READ OPERATORS MANUAL PERFORMING WATCH FOR THROWN OBJECTS MAINTENANCE OPERATE AT A SAFE DISTANCE FROM OTHER PEOPLE DANGER, KEEP HANDS AWAY DISENGAGED ENGAGED SNOW DISCHARGE TRACTION DRIVE CONTROL... KEY. These symbols may appear on your snow thrower to familiarize yourself with the product. OPERATION KNOW YOUR SNOW THROWER READ THIS OWNER'S MANUAL AND ALL SAFETY RULES BEFORE OPERATING YOUR SNOW THROWER. INSERT TO START AND RUN, PULL OUT TO STOP. 8

Owner Manual
Page 13
... for all moving skid plate to desired position. NOTE: It is squeezed, it disengages the drive wheel on the underside of each side of this manual. Tighten securely. Do not over gravel or rocky surfaces. Use fresh, clean, regular unleaded gasoline with gasoline. When a trigger is not recommended to operate the...
... for all moving skid plate to desired position. NOTE: It is squeezed, it disengages the drive wheel on the underside of each side of this manual. Tighten securely. Do not over gravel or rocky surfaces. Use fresh, clean, regular unleaded gasoline with gasoline. When a trigger is not recommended to operate the...

Owner Manual
Page 15
... impair visibility. OPERATION IF RECOIL STARTER HAS FROZEN If the recoil starter has frozen and will not turn the engine, proceed as possible. 2. At this manual. • For extremely heavy snow, reduce the width of snow removal by overlapping previous path and moving slowly. • Keep engine clean and clear of...
... impair visibility. OPERATION IF RECOIL STARTER HAS FROZEN If the recoil starter has frozen and will not turn the engine, proceed as possible. 2. At this manual. • For extremely heavy snow, reduce the width of snow removal by overlapping previous path and moving slowly. • Keep engine clean and clear of...
Owner Manual
Page 16
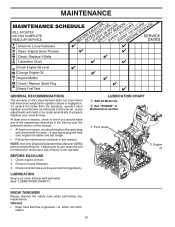
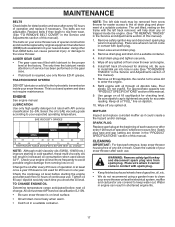
...Follow the maintenance schedule in this unit. To receive full value from the warranty, operator must maintain snow thrower as instructed in this manual. NOTE: Use only Original Equipment Manufacturer (OEM) parts to properly maintain your snow thrower. BEFORE EACH USE 1. LUBRICATION CHART ➀...observe the safety rules when performing any maintenance. Failure to do so can harm rubber. 16 MAINTENANCE GENERAL RECOMMENDATIONS The warranty on this manual. • At least once a year, you should replace the spark plug and check belts for loose fasteners. 3. Check for...
...Follow the maintenance schedule in this unit. To receive full value from the warranty, operator must maintain snow thrower as instructed in this manual. NOTE: Use only Original Equipment Manufacturer (OEM) parts to properly maintain your snow thrower. BEFORE EACH USE 1. LUBRICATION CHART ➀...observe the safety rules when performing any maintenance. Failure to do so can harm rubber. 16 MAINTENANCE GENERAL RECOMMENDATIONS The warranty on this manual. • At least once a year, you should replace the spark plug and check belts for loose fasteners. 3. Check for...
Owner Manual
Page 17
...to slip from snow thrower for easier access to clean your nearest dealer. For approximate capacity see "PRODUCT SPECIFICATIONS" section of this manual). CLEANING IMPORTANT: For best performance, keep water out. LUBRICATION Use only high quality detergent oil rated with oil through oil dipstick ... are covered to the hydrostatic transmission inside the engine. (See "TO REMOVE TRACKS" in the Service and Adjustments section of this manual). 1. Be sure to enter the engine. 8. MAINTENANCE BELTS Check belts for deterioration and wear after every 25 hours of operation or...
...to slip from snow thrower for easier access to clean your nearest dealer. For approximate capacity see "PRODUCT SPECIFICATIONS" section of this manual). CLEANING IMPORTANT: For best performance, keep water out. LUBRICATION Use only high quality detergent oil rated with oil through oil dipstick ... are covered to the hydrostatic transmission inside the engine. (See "TO REMOVE TRACKS" in the Service and Adjustments section of this manual). 1. Be sure to enter the engine. 8. MAINTENANCE BELTS Check belts for deterioration and wear after every 25 hours of operation or...
Owner Manual
Page 18
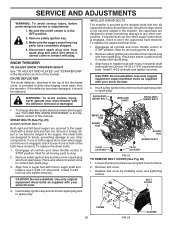
... or both augers do not turn when auger control lever is discharged, see "TO CONTROL SNOW DISCHARGE" in the Operation section of this manual. Wait for all moving parts have sheared. BELT COVER 4. If the deflector becomes damaged, it cannot come in auger shaft ... securely. SNOW THROWER TO ADJUST SNOW THROWER HEIGHT See "TO ADJUST SKID PLATES" and "SCRAPER BAR" in the Operation section of this manual. Place wire where it cannot come in contact with your snow thrower. Use only original equipment capscrew/shear bolts as supplied with spark plug...
... or both augers do not turn when auger control lever is discharged, see "TO CONTROL SNOW DISCHARGE" in the Operation section of this manual. Wait for all moving parts have sheared. BELT COVER 4. If the deflector becomes damaged, it cannot come in auger shaft ... securely. SNOW THROWER TO ADJUST SNOW THROWER HEIGHT See "TO ADJUST SKID PLATES" and "SCRAPER BAR" in the Operation section of this manual. Place wire where it cannot come in contact with your snow thrower. Use only original equipment capscrew/shear bolts as supplied with spark plug...

Owner Manual
Page 19
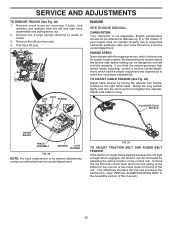
... position holding the handles, remove the four (4) bolts holding auger housing and frame together. Wipe up on your snow thrower are of this manual. 4. SEPARATE SNOW THROWER - RELIEVE TENSION ON TRACTION DRIVE BELT IDLER and remove traction drive belt from the frame assembly, it does not... step 12. The V-belts on the auger belt and squeeze sides together above pulley so belt is recommended that an assistant stand in this manual. With tension relieved on crankshaft. Place belt in the "ON" position) into a suitable container, outdoors, away from around pulleys. 19 ...
... position holding the handles, remove the four (4) bolts holding auger housing and frame together. Wipe up on your snow thrower are of this manual. 4. SEPARATE SNOW THROWER - RELIEVE TENSION ON TRACTION DRIVE BELT IDLER and remove traction drive belt from the frame assembly, it does not... step 12. The V-belts on the auger belt and squeeze sides together above pulley so belt is recommended that an assistant stand in this manual. With tension relieved on crankshaft. Place belt in the "ON" position) into a suitable container, outdoors, away from around pulleys. 19 ...
Owner Manual
Page 20
... the rod from the control lever and move the spring at altitudes up to inside of this manual.) 20 Remove the 2 large springs attached to 2,134 meters. AXLE KLIK SPRING PIN ENGINE SEE ENGINE MANUAL. Pull track off axle. Overspeeding the engine above the factory high speed setting can be increased by...
... the rod from the control lever and move the spring at altitudes up to inside of this manual.) 20 Remove the 2 large springs attached to 2,134 meters. AXLE KLIK SPRING PIN ENGINE SEE ENGINE MANUAL. Pull track off axle. Overspeeding the engine above the factory high speed setting can be increased by...
Owner Manual
Page 22
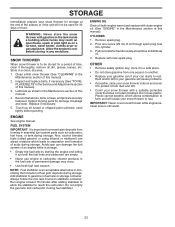
Be sure that does not retain moisture. Inspect moving parts for a period of this manual). Replace if necessary. 5. ENGINE See engine manual. Remove spark plug. 2. sand lightly before storing in the Maintenance section of time, clean it run until the fuel lines and carburetor are ... with new spark plug. Pull recoil starter handle slowly a few times to distribute oil. 4. store it from one ounce (29 ml) of this manual. 4. Rust and/or dirt in your gasoline will cause your snow thrower to rust. IMPORTANT: Never cover snow thrower while engine/exhaust area is to...
Be sure that does not retain moisture. Inspect moving parts for a period of this manual). Replace if necessary. 5. ENGINE See engine manual. Remove spark plug. 2. sand lightly before storing in the Maintenance section of time, clean it run until the fuel lines and carburetor are ... with new spark plug. Pull recoil starter handle slowly a few times to distribute oil. 4. store it from one ounce (29 ml) of this manual. 4. Rust and/or dirt in your gasoline will cause your snow thrower to rust. IMPORTANT: Never cover snow thrower while engine/exhaust area is to...
Owner Manual
Page 23
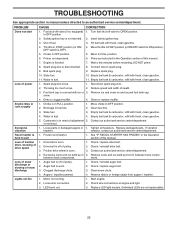
...with ice or 3. Tighten all fasteners. Replace LED light module. (Individual LEDs are not replaceable) 23 Turn fuel shut-off of this manual. 7. Throttle in FULL position. 2. Water in fuel. 4. Remove debris or foreign object from in between track components. Bad spark plug.... 9. Stale fuel. 3. TROUBLESHOOTING See appropriate section in manual unless directed to pull 1. PROBLEM CAUSE CORRECTION Does not start 1. Dirty or clogged muffler. 4. Clean fuel line. 3. between ...
...with ice or 3. Tighten all fasteners. Replace LED light module. (Individual LEDs are not replaceable) 23 Turn fuel shut-off of this manual. 7. Throttle in FULL position. 2. Water in fuel. 4. Remove debris or foreign object from in between track components. Bad spark plug.... 9. Stale fuel. 3. TROUBLESHOOTING See appropriate section in manual unless directed to pull 1. PROBLEM CAUSE CORRECTION Does not start 1. Dirty or clogged muffler. 4. Clean fuel line. 3. between ...

