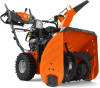
Husqvarna ST 327 Support and Manuals
Get Help and Manuals for this Husqvarna item
View All Support Options Below
Free Husqvarna ST 327 manuals!
Problems with Husqvarna ST 327?
Ask a Question
Free Husqvarna ST 327 manuals!
Problems with Husqvarna ST 327?
Ask a Question
Husqvarna ST 327 Videos

Husqvarna ST300 Series snow blowers (ST324, ST327, ST330)
Duration: 7:52
Total Views: 2,030
Duration: 7:52
Total Views: 2,030
Husqvarna ST327 Snow Blower | Model# 961930124 | Redwater Napa
Duration: 1:25
Total Views: 193
Duration: 1:25
Total Views: 193
Husqvarna ST 327 T snowblower
Duration: 1:41
Total Views: 6,372
Duration: 1:41
Total Views: 6,372
A Look At The Husqvarna ST300 Series Snow Blowers (ST324, ST327, ST330)
Duration: 7:52
Total Views: 32,611
Duration: 7:52
Total Views: 32,611
Popular Husqvarna ST 327 Manual Pages
Parts Manual - Page 3
... and void your warranty.
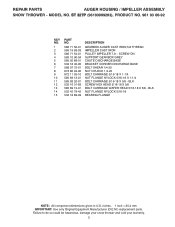
3 ST 327P (96193009203), PRODUCT NO. 961 93 00-92
KEY NO.
1 2 3 4 5 6 7 8 9 10 11 12 13 14 15
PART NO.
586 71 50-01 ...25.4 mm IMPORTANT: Use only Original Equipment Manufacturer (O.E.M.) replacement parts. REPAIR PARTS
AUGER HOUSING / IMPELLER ASSEMBLY
SNOW THROWER - MODEL NO. SCREW ON SUPPORT GEARBOX GREY CHUTE DISCHARGE BASE BRACKET CORNER DISCHARGE BASE ...
Parts Manual - Page 4
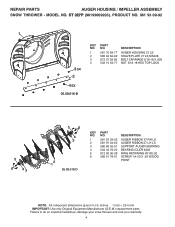
....
4 MODEL NO. ST 327P (96193009203), PRODUCT NO. 961 93 00-92
1
3 5X 2 4 5X
05.09.016-B
KEY NO.
1 2 3 4
PART NO.
...
6
4 3
2 1
05.09.019-D
KEY NO.
1 2 3 4 5 6
PART NO.
581 97 03-02 581 97 04-02 580 85 55-01 532 43 76-22... LS SUPPORT AUGER BEARING BEARING IDLER 6203 RING RETAINING #5100-52 SCREW 1/4-20 X .65 W/DOG POINT
NOTE: All component dimensions given in U.S. REPAIR PARTS
AUGER ...
Parts Manual - Page 7
...SERVICE PARTS ONLY.
2
1
KEY NO.
1 2
PART NO.
532 42 57-99 874 04 10-24
DESCRIPTION
STEER CABLE SCREW 10−24 X 1.50
01.15.013-B
NOTE: All component dimensions given in U.S. inches. 1 inch = 25.4 mm IMPORTANT: Use only Original Equipment Manufacturer (O.E.M.) replacement parts. MODEL NO. ST... and void your warranty.
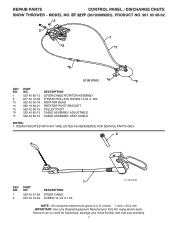
7 REPAIR PARTS
CONTROL PANEL / DISCHARGE CHUTE
SNOW THROWER -
Parts Manual - Page 8

... BAG OF ITEMS SHIPPED LOOSE WITH PRODUCT. 2. ITEMS 16 AND 17 ARE SERVICE PART NUMBERS TO ALLOW PURCHASE OF INDIVIDUAL ITEMS IF NECESSARY. inches. 1 inch = 25.4 mm IMPORTANT: Use only Original Equipment Manufacturer (O.E.M.) replacement parts. REPAIR PARTS
CONTROL PANEL / DISCHARGE CHUTE
SNOW THROWER - MODEL NO. ST 327P (96193009203), PRODUCT NO. 961 93 00-92
5
7
16 3
17
*14
KEY...
Parts Manual - Page 11
...03 LOWER HANDLE
2
532 44 36-17 PIVOT SUPPORT WELDMENT
4
3
817 00 05-10 SCREW 5/...ST 327P (96193009203), PRODUCT NO. 961 93 00-92
10
5
1
10
6
8
7
5
2
39
8
6
7
8 49
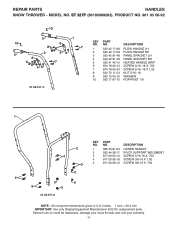
01.08.011-C
KEY NO.
1 2 3 4 5 6 7 8 9 10
PART...PART NO. REPAIR PARTS
HANDLES
SNOW THROWER - NO. inches. 1 inch = 25.4 mm IMPORTANT: Use only Original Equipment Manufacturer (O.E.M.) replacement parts. MODEL NO.
Parts Manual - Page 23
ST 327P (96193009203), PRODUCT NO. 961 93 00-92
1
4
9
13
12 6
13
1
3
10
KEY NO.
1 3 4 6 9 10 12 13 - - - - Failure to do so could be hazardous, damage your snow thrower and void your warranty.
23
inches. 1 inch = 25.4 mm IMPORTANT: Use only Original Equipment Manufacturer (O.E.M.) replacement parts. MODEL NO. PART NO.
532 19 96-83 532 19...
Owner Manual - Page 1

English The use in this machine.
Operator's Manual
ST 327T
Gasoline containing up to 10% ethanol (E10) is acceptable for use of any gasoline exceeding 10% ethanol (E10) will void the product warranty.
115 73 37-27 Rev. 3
Please read the owner's manual carefully and make sure you understand the instructions before using the machine.
Owner Manual - Page 2
... Replace gasoline cap securely and wipe up , transporting, adjusting or making any damage, and repair ...trouble.
5. Training
1. Use ear protectors to avoid damage to clear gravel or crushed rock surface.
7. Thoroughly inspect the area where the equipment is to observe the following safety instructions could result in the manual...have exposed rotating parts, which can get caught in ...
Owner Manual - Page 3
...
THE MODEL AND ...replace safety and instruction labels, as wheel weights, counterweights, or cabs).
15. TABLE OF CONTENTS
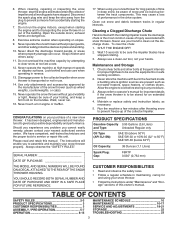
SAFETY RULES 2-3 PRODUCT SPECIFICATIONS 3 CUSTOMER RESPONSIBILITIES 3 ASSEMBLY / PRE-OPERATION 5-7 OPERATION 8-15
MAINTENANCE SCHEDULE 16 MAINTENANCE 16-17 SERVICE AND ADJUSTMENTS 18-21 STORAGE 22 TROUBLESHOOTING... hand to service or repair this manual. Never store...
Owner Manual - Page 16
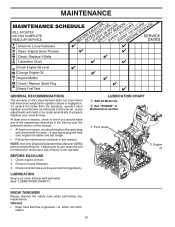
To receive full value from the warranty, operator must maintain snow thrower as instructed in
Maintenance section
➀ Pivot points
➁ Engine
oil
SNOW THROWER
Always observe the safety rules when performing any of the adjustments described in this manual.
Check engine oil level.
2.
Some adjustments will help your snow thrower well lubricated...
Owner Manual - Page 17
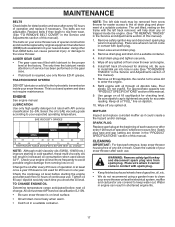
... to enter the engine.
8. For approximate capacity see "PRODUCT SPECIFICATIONS" section of this manual).
1. Spark plug type and gap setting are shown in engine can cause personal injury or damage to ...on oil. Install drain plug and tighten securely.
5. Remove oil fill cap/dipstick. Be sure dipstick cap is if service has been performed on dipstick.
10.
Replace belts if they...
Owner Manual - Page 18
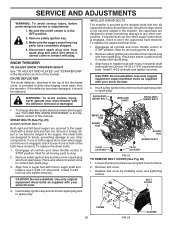
... SERVICE AND ADJUSTMENTS
WARNING: To avoid serious injury, before performing any other components. Make sure the augers and all moving parts ...Install 1/4-20 locknuts and tighten securely. Disengage all moving parts to STOP position.
Remove belt cover.
• Replace belt cover by installing... preventing damage to the top of this manual. Install 1/4-20 lock nut and tighten securely. ...
Owner Manual - Page 20
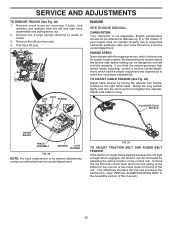
...your engine does not operate properly due to suspected carburetor problems, take your snow thrower to the top of the rod...short section to inside of this manual.)
20 Overspeeding the engine above the factory high speed setting can be increased by removing ...SERVICE AND ADJUSTMENTS
TO REMOVE TRACKS (See Fig. 28)
1. This effectively shortens the rod and increases the belt tension. (See "INSTALL...
Owner Manual - Page 22
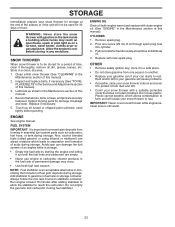
... carburetor cleaner products in essential fuel system parts such as on stabilizer container. Store in...Replace your gasoline can if your snow thrower to rust. Lubricate as shown in the Service and Adjustments section of fuel gum deposits during storage. ENGINE
See engine manual. Run engine at the end of this manual... stabilizer to form and will cause problems.
• If possible, store ...
Owner Manual - Page 23
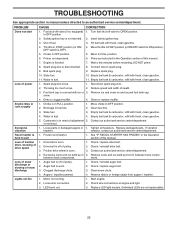
... manual unless directed to pull
1. Reconnect spark plug wire.
2. Move choke to FULL position. 6. Contact an authorized service center/department. remains, contact an authorized service center/department.
Loss of snow discharge or slowing of swath.
3. Lights not On
1. LED burnt out.
3. Replace LED light module. (Individual LEDs are not replaceable)
23 TROUBLESHOOTING...
Husqvarna ST 327 Reviews
We have not received any reviews for Husqvarna yet.