

Operation Manual
Page 3
... Control Levers 19 Parking Brake 20 Ignition Switch 20 Blade Switch 20 Throttle Control 21 Hour Meter 21 Fuel Shut Off Valve 21 Tracking Knob 22 Fuses 22 Cutting Height Adjuster 23 Seat Adjustment Lever 23 Hydro Release Levers 23 Refueling 24 OPERATION 25 Training 25 Steering 25 Roll Bar and Safety Belt 26 Before Starting 26 Starting the Engine 27 Jumper Cables Use 29 Running 30 Operating on Hills 31 Stopping the Engine 32 Mowing Tips 33 Moving Machine By Hand 34 MAINTENANCE 35 Battery...
... Control Levers 19 Parking Brake 20 Ignition Switch 20 Blade Switch 20 Throttle Control 21 Hour Meter 21 Fuel Shut Off Valve 21 Tracking Knob 22 Fuses 22 Cutting Height Adjuster 23 Seat Adjustment Lever 23 Hydro Release Levers 23 Refueling 24 OPERATION 25 Training 25 Steering 25 Roll Bar and Safety Belt 26 Before Starting 26 Starting the Engine 27 Jumper Cables Use 29 Running 30 Operating on Hills 31 Stopping the Engine 32 Mowing Tips 33 Moving Machine By Hand 34 MAINTENANCE 35 Battery...
Operation Manual
Page 5
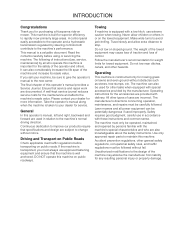
... Roads Check applicable road traffic regulations before using or servicing the machine. Lawn mowers and all who are provided with these instructions and common sense. Unauthorized modifications to rapidly mow primarily large areas. INTRODUCTION Congratulations Thank you for more information. This machine is equipped with a tow hitch, use , service, maintenance) by the manufacturer. If you sell your dealer for purchasing a Husqvarna ride-on...
... Roads Check applicable road traffic regulations before using or servicing the machine. Lawn mowers and all who are provided with these instructions and common sense. Unauthorized modifications to rapidly mow primarily large areas. INTRODUCTION Congratulations Thank you for more information. This machine is equipped with a tow hitch, use , service, maintenance) by the manufacturer. If you sell your dealer for purchasing a Husqvarna ride-on...

Operation Manual
Page 13
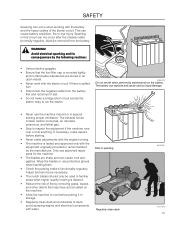
SAFETY Safe Handling of ignition. • Use only approved gasoline container. • Never remove gas cap or add fuel with the engine running. The engine and the exhaust system become very hot during operation. Gasoline is extremely flammable and the vapors are explosive. • Extinguish all times until problem has been resolved. • Check the fuel level before each use a nozzle lock-open flame, spark, or pilot light such as...
SAFETY Safe Handling of ignition. • Use only approved gasoline container. • Never remove gas cap or add fuel with the engine running. The engine and the exhaust system become very hot during operation. Gasoline is extremely flammable and the vapors are explosive. • Extinguish all times until problem has been resolved. • Check the fuel level before each use a nozzle lock-open flame, spark, or pilot light such as...

Operation Manual
Page 14
...; Do not change the settings of grass, leaves, or other reproductive system damage. WARNING! Clean oil or fuel spillage and remove any adjustments or repairs with the engine running the engine with manufacturer's recommended parts, when necessary. • Mower blades are properly tightened and torqued. 14 Never drive the machine in an enclosed space 8011-515 CAUTION! If the engine runs too fast, there is risk for maintenance work. Repair, if...
...; Do not change the settings of grass, leaves, or other reproductive system damage. WARNING! Clean oil or fuel spillage and remove any adjustments or repairs with the engine running the engine with manufacturer's recommended parts, when necessary. • Mower blades are properly tightened and torqued. 14 Never drive the machine in an enclosed space 8011-515 CAUTION! If the engine runs too fast, there is risk for maintenance work. Repair, if...
Operation Manual
Page 15
... gloves when handling them. • Check the parking brake's functionality regularly. Risk of the starter circuit. Avoid electrical sparking and its consequences by the manufacturer. WARNING! Only use approved repair parts for the machine. • The blades are stored in storage. • Regularly clean deck and underside of deck, avoid spraying engine and electrical components with the battery and the heavy cables of sparking Regularly clean deck 8009-728...
... gloves when handling them. • Check the parking brake's functionality regularly. Risk of the starter circuit. Avoid electrical sparking and its consequences by the manufacturer. WARNING! Only use approved repair parts for the machine. • The blades are stored in storage. • Regularly clean deck and underside of deck, avoid spraying engine and electrical components with the battery and the heavy cables of sparking Regularly clean deck 8009-728...
Operation Manual
Page 20
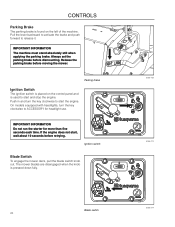
... run the starter for headlight use. Pull the lever backward to activate the brake and push forward to ACCESSORY for more than five seconds each time. Release the parking brake before dismounting. On models equipped with headlights, turn the key clockwise to start and stop the engine. If the engine does not start the engine. Ignition switch Blade Switch To engage the mower deck, pull the blade switch knob out. Blade switch 20 8058-182 8058-214 8058-214 Parking brake Ignition Switch The ignition switch...
... run the starter for headlight use. Pull the lever backward to activate the brake and push forward to ACCESSORY for more than five seconds each time. Release the parking brake before dismounting. On models equipped with headlights, turn the key clockwise to start and stop the engine. If the engine does not start the engine. Ignition switch Blade Switch To engage the mower deck, pull the blade switch knob out. Blade switch 20 8058-182 8058-214 8058-214 Parking brake Ignition Switch The ignition switch...
Operation Manual
Page 21
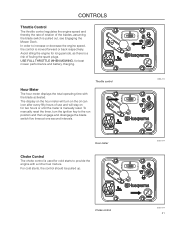
... of fouling the spark plugs. Hour meter Choke Control The choke control is used for long periods, as there is a risk of the blades, assuming the blade switch is manually reset. USE FULL THROTTLE WHEN MOWING, for two hours or until the meter is pulled out, see Engaging the Mower Deck. The display on the hour meter will turn the ignition key to the run position and then engage and disengage the blade switch five times...
... of fouling the spark plugs. Hour meter Choke Control The choke control is used for long periods, as there is a risk of the blades, assuming the blade switch is manually reset. USE FULL THROTTLE WHEN MOWING, for two hours or until the meter is pulled out, see Engaging the Mower Deck. The display on the hour meter will turn the ignition key to the run position and then engage and disengage the blade switch five times...

Operation Manual
Page 25
... move forward and backward The direction and speed of the left wheel and cause the machine to turn in that direction. The right control lever controls the right wheel. Adjust the engine speed to idle, disengage the parking brake but do not engage the blades at this will allow mower to start the engine (see Moving Machine By Hand in the Operation section) to the forward position and the...
... move forward and backward The direction and speed of the left wheel and cause the machine to turn in that direction. The right control lever controls the right wheel. Adjust the engine speed to idle, disengage the parking brake but do not engage the blades at this will allow mower to start the engine (see Moving Machine By Hand in the Operation section) to the forward position and the...
Operation Manual
Page 35
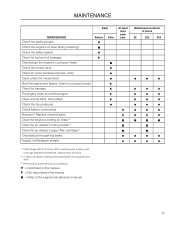
.... MAINTENANCE MAINTENANCE Check the parking brake Check the engine's oil level (every refueling) Check the safety system Check for fuel and oil leakages Check/clean the engine's cooling air intake Check the mower deck Check for loose hardware (screws, nuts) Clean under the mower deck Start the engine and blades, listen for unusual sounds Check for damage Thoroughly clean around the engine Clean around belts, belt pulleys Check the tire pressures Check battery connections Sharpen3)/ Replace mower blades Clean the engine's cooling air intake 2) Clean the air cleaner's foam pre-filter 2) Clean...
.... MAINTENANCE MAINTENANCE Check the parking brake Check the engine's oil level (every refueling) Check the safety system Check for fuel and oil leakages Check/clean the engine's cooling air intake Check the mower deck Check for loose hardware (screws, nuts) Clean under the mower deck Start the engine and blades, listen for unusual sounds Check for damage Thoroughly clean around the engine Clean around belts, belt pulleys Check the tire pressures Check battery connections Sharpen3)/ Replace mower blades Clean the engine's cooling air intake 2) Clean the air cleaner's foam pre-filter 2) Clean...
Operation Manual
Page 36
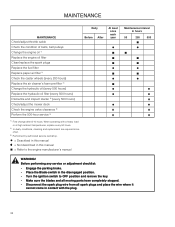
MAINTENANCE MAINTENANCE Check/adjust throttle cable Check the condition of belts, belt pulleys Change the engine oil 1) Replace the engine oil filter Clean/replace the spark plugs Replace the fuel filter Replace paper air filter 2) Check the caster wheels (every 200 hours) Replace the air cleaner's foam pre-filter 2) Change the hydraulic oil (every 500 hours) Replace the hydraulic oil filter (every 500 hours) Dismantle and inspect starter 3) (every 500 hours) Check/adjust the mower deck Check the engine valve clearance 3) Perform the 500-hour service 3) 1) First change after 8-10 hours. ...
MAINTENANCE MAINTENANCE Check/adjust throttle cable Check the condition of belts, belt pulleys Change the engine oil 1) Replace the engine oil filter Clean/replace the spark plugs Replace the fuel filter Replace paper air filter 2) Check the caster wheels (every 200 hours) Replace the air cleaner's foam pre-filter 2) Change the hydraulic oil (every 500 hours) Replace the hydraulic oil filter (every 500 hours) Dismantle and inspect starter 3) (every 500 hours) Check/adjust the mower deck Check the engine valve clearance 3) Perform the 500-hour service 3) 1) First change after 8-10 hours. ...

Operation Manual
Page 37
....0V 11.8V STATE OF CHARGE 100% 75% 50% 25% 0% APPROXIMATE BATTERY CHARGING TIME* TO FULL CHARGE AT 80OF / 27OC Maximum Rate at the same time. Adding or checking level of the terminal guard and lift off guard. 2 5. Replacing battery 1. Terminal guard 2. Connect BLACK grounding cable to positive (+) battery terminal with a maintenance free battery and does not need servicing. MAINTENANCE Battery The mower is not necessary. FULL CHARGE - 20 min. 35 min...
....0V 11.8V STATE OF CHARGE 100% 75% 50% 25% 0% APPROXIMATE BATTERY CHARGING TIME* TO FULL CHARGE AT 80OF / 27OC Maximum Rate at the same time. Adding or checking level of the terminal guard and lift off guard. 2 5. Replacing battery 1. Terminal guard 2. Connect BLACK grounding cable to positive (+) battery terminal with a maintenance free battery and does not need servicing. MAINTENANCE Battery The mower is not necessary. FULL CHARGE - 20 min. 35 min...

Operation Manual
Page 39
Apply park brake. Using a ratchet or breaker bar with fasteners. Carefully roll the belt over stationary idler pulley. Push inward on the engine shaft and off the mower deck. Remove any dirt or grass that is properly routed, slowly release idler arm to the routing decal on the belt. 3. Check that the routing matches the routing decal. 7. Belt routing, deck belt 8058-063 8050-843 39 Slackening the belt tensioner Deck Belt Installation NOTE: For ease in the belt and that...
Apply park brake. Using a ratchet or breaker bar with fasteners. Carefully roll the belt over stationary idler pulley. Push inward on the engine shaft and off the mower deck. Remove any dirt or grass that is properly routed, slowly release idler arm to the routing decal on the belt. 3. Check that the routing matches the routing decal. 7. Belt routing, deck belt 8058-063 8050-843 39 Slackening the belt tensioner Deck Belt Installation NOTE: For ease in the belt and that...
Operation Manual
Page 40
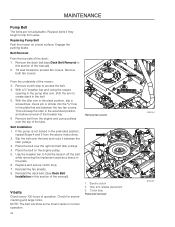
... left idler pulleys. 4. From the underside of operation. Place the belt on a level surface. Remove fan covers 3 1 V-belts Check every 100 hours of the mower: 3. NOTE: The belt will keep the idler in this section of the manual). 2. Replacing Pump Belt Park the mower on the engine pulley. 5. Remove belt from wear. Clutch stop . 7. Reinstall the fan shields. 8. MAINTENANCE Pump Belt The belts are not adjustable. Belt Installation 1. Place the belt over the top of the breaker bar. 6. Idler arm release placement 3. Belt Removal...
... left idler pulleys. 4. From the underside of operation. Place the belt on a level surface. Remove fan covers 3 1 V-belts Check every 100 hours of the mower: 3. NOTE: The belt will keep the idler in this section of the manual). 2. Replacing Pump Belt Park the mower on the engine pulley. 5. Remove belt from wear. Clutch stop . 7. Reinstall the fan shields. 8. MAINTENANCE Pump Belt The belts are not adjustable. Belt Installation 1. Place the belt over the top of the breaker bar. 6. Idler arm release placement 3. Belt Removal...

Operation Manual
Page 42
.... Front lift arm 2. MAINTENANCE Adjusting the Mower Deck Check the tire pressure before adjustment of the mower deck. See Tire Pressures in a standard measurement position. NOTE: To insure accuracy of mower deck is required, loosen the locknut and move mounting bolt up to the correct pressure. In the rear, blade tips should be installed prior to -side measurement. 4. See Technical Data / Transmission. Depending on the type of the mower deck. Chain 3. Rear lift arm 4. Retain measurement...
.... Front lift arm 2. MAINTENANCE Adjusting the Mower Deck Check the tire pressure before adjustment of the mower deck. See Tire Pressures in a standard measurement position. NOTE: To insure accuracy of mower deck is required, loosen the locknut and move mounting bolt up to the correct pressure. In the rear, blade tips should be installed prior to -side measurement. 4. See Technical Data / Transmission. Depending on the type of the mower deck. Chain 3. Rear lift arm 4. Retain measurement...
Operation Manual
Page 43
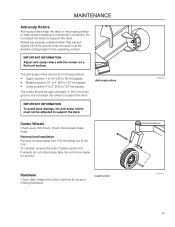
...;" to 4" (63 to 102 mm) grass. • Lower position 4" to 5" (102 to 127 mm) grass. The anti-scalp rollers can be adjusted to support the deck. Caster Wheels Check every 200 hours. Inspect the entire machine for service. Removal and Installation Remove nut and caster bolt. Tighten caster bolt. IMPORTANT INFORMATION Adjust anti-scalp rollers with the mower on a flat level surface. MAINTENANCE Anti-scalp Rollers Anti-scalp...
...;" to 4" (63 to 102 mm) grass. • Lower position 4" to 5" (102 to 127 mm) grass. The anti-scalp rollers can be adjusted to support the deck. Caster Wheels Check every 200 hours. Inspect the entire machine for service. Removal and Installation Remove nut and caster bolt. Tighten caster bolt. IMPORTANT INFORMATION Adjust anti-scalp rollers with the mower on a flat level surface. MAINTENANCE Anti-scalp Rollers Anti-scalp...

Operation Manual
Page 47
Apply the pump release valve for ease of maintenance. Clean any loose debris from the transaxle. 10. Remove the oil filter from around the perimeter of the filter. Drain old oil filters of the replacement filter. 4. After the oil has drained, wipe the filter base surface and apply a film of new oil to the gasket of all free flowing oil prior to disposal. Install the new filter by hand. This will take approximately...
Apply the pump release valve for ease of maintenance. Clean any loose debris from the transaxle. 10. Remove the oil filter from around the perimeter of the filter. Drain old oil filters of the replacement filter. 4. After the oil has drained, wipe the filter base surface and apply a film of new oil to the gasket of all free flowing oil prior to disposal. Install the new filter by hand. This will take approximately...

Operation Manual
Page 49
... no oil in the engine • Fouled spark plug Battery not charging • Poor contact with battery terminal cable connectors • Charging lead is disconnected Machine moves slowly, unevenly, or not at all • Parking brake on • Bypass valve on pump open • Drive belt for the transmission gears slack or has come off • Air in hydraulic system Mower deck not engaging • Drive belt for the mower deck has come loose •...
... no oil in the engine • Fouled spark plug Battery not charging • Poor contact with battery terminal cable connectors • Charging lead is disconnected Machine moves slowly, unevenly, or not at all • Parking brake on • Bypass valve on pump open • Drive belt for the transmission gears slack or has come off • Air in hydraulic system Mower deck not engaging • Drive belt for the mower deck has come loose •...
Operation Manual
Page 50
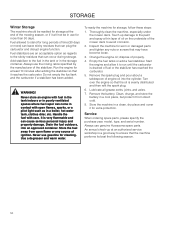
... all grease zerks, joints, and axles. 7. Handle the fuel with fuel in the tank indoors or in poorly ventilated spaces where fuel vapor can come in a clean, dry place and cover it to run until the carburetor is a good way to avoid corrosion. 2. dispose of time (30 days or more than 30 days. Never use genuine Husqvarna spare parts. Change the engine oil; Remove the spark plug and...
... all grease zerks, joints, and axles. 7. Handle the fuel with fuel in the tank indoors or in poorly ventilated spaces where fuel vapor can come in a clean, dry place and cover it to run until the carburetor is a good way to avoid corrosion. 2. dispose of time (30 days or more than 30 days. Never use genuine Husqvarna spare parts. Change the engine oil; Remove the spark plug and...

User Manual
Page 4
... and while backing. • Do not operate the mower without either the entire grass catcher or the guard in place. • Slow down before turning. • Stop engine before storage. If you will not have to cool before removing grass catcher or unclogging chute. • Mow only in daylight or good artificial light. • Do not operate the machine while under the influence of...
... and while backing. • Do not operate the mower without either the entire grass catcher or the guard in place. • Slow down before turning. • Stop engine before storage. If you will not have to cool before removing grass catcher or unclogging chute. • Mow only in daylight or good artificial light. • Do not operate the machine while under the influence of...

User Manual
Page 11
... quality cut grass or leaves, it thoroughly, remove all debris in neutral position. - Before each use check for ease of time is still heavy. To remove the plastic trash bags when full: a. Disengage blades, shift into neutral, engage the parking brake and stop the engine. Unlatch and raise cover. d. With the container resting on its side and slide the filled bag from the container. e. Install a new plastic lawn bag...
... quality cut grass or leaves, it thoroughly, remove all debris in neutral position. - Before each use check for ease of time is still heavy. To remove the plastic trash bags when full: a. Disengage blades, shift into neutral, engage the parking brake and stop the engine. Unlatch and raise cover. d. With the container resting on its side and slide the filled bag from the container. e. Install a new plastic lawn bag...


