Owner Manual
Page 3
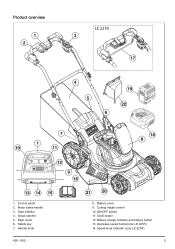
Grass catcher 5. Handle knob 21 20 8. Control panel 2. Rear cover 6. Cutting height control 10. Product overview 1 2 LE 221R 3 17 4 5 19 22 6 7 1 10 11 18 8 12 9 16 13 14 15 1. Battery cover 9. ON/OFF button 11. Decrease speed button(only LE 221R) 14. Motor brake handle 3. Safety key 7. Speed level indicator (only LE 221R) 428 - 002 - 3 Start inhibitor 4. SavE button 12. Battery charge indicator and battery button 13.
Grass catcher 5. Handle knob 21 20 8. Control panel 2. Rear cover 6. Cutting height control 10. Product overview 1 2 LE 221R 3 17 4 5 19 22 6 7 1 10 11 18 8 12 9 16 13 14 15 1. Battery cover 9. ON/OFF button 11. Decrease speed button(only LE 221R) 14. Motor brake handle 3. Safety key 7. Speed level indicator (only LE 221R) 428 - 002 - 3 Start inhibitor 4. SavE button 12. Battery charge indicator and battery button 13.
Owner Manual
Page 4
...start inhibitor, push motor brake handle down. Drip protected (model LE 121P/LE 221R) Do not expose to stop. 4 428 - 002 - Battery charger (Accessory) 19. Discharge chute 22. Slow Fast Scannable code. Warning: Please read the operator's manual carefully and make sure that you do ...for some markets. Discharge chute cover 21. Warning labels Keep persons and animals at a safe distance from the rotating blade. Operator's manual 17. Battery (Accessory) 20. Keep hands and feet away from rotating parts. Drive bail (onlyLE 221R) 18. Look out for thrown objects and ricochets....
...start inhibitor, push motor brake handle down. Drip protected (model LE 121P/LE 221R) Do not expose to stop. 4 428 - 002 - Battery charger (Accessory) 19. Discharge chute 22. Slow Fast Scannable code. Warning: Please read the operator's manual carefully and make sure that you do ...for some markets. Discharge chute cover 21. Warning labels Keep persons and animals at a safe distance from the rotating blade. Operator's manual 17. Battery (Accessory) 20. Keep hands and feet away from rotating parts. Drive bail (onlyLE 221R) 18. Look out for thrown objects and ricochets....
Owner Manual
Page 6
...; Always monitor a person, with care. Inspect the product for best and safest performance. If you get into a situation where you start to "0" and remove the battery. Work area safety • Remove branches, twigs, stones and other objects from cutting area. • Objects struck by the lawn mower blade can cause severe...
...; Always monitor a person, with care. Inspect the product for best and safest performance. If you get into a situation where you start to "0" and remove the battery. Work area safety • Remove branches, twigs, stones and other objects from cutting area. • Objects struck by the lawn mower blade can cause severe...
Owner Manual
Page 7
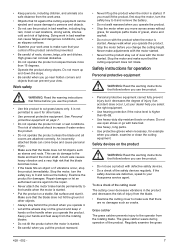
...; Be careful when you select the right equipment. • Use hearing protection if the noise level is not permitted to 0 and remove the battery. Never make sure that follow before you attach, examine or clean the cutting equipment. Stop the motor and make sure that the blade becomes loose...control of the product cannot be ejected and cause damage to the blade and bend the motor shaft. An incorrectly attached blade can prevent your Husqvarna service agent. A bent axle causes heavy vibration and a very high risk that the cutting equipment does not rotate. To do damage to ...
...; Be careful when you select the right equipment. • Use hearing protection if the noise level is not permitted to 0 and remove the battery. Never make sure that follow before you attach, examine or clean the cutting equipment. Stop the motor and make sure that the blade becomes loose...control of the product cannot be ejected and cause damage to the blade and bend the motor shaft. An incorrectly attached blade can prevent your Husqvarna service agent. A bent axle causes heavy vibration and a very high risk that the cutting equipment does not rotate. To do damage to ...
Owner Manual
Page 8
...10°C and 40°C. • Do not clean the battery or the battery charger with conducting materials such as a power supply for related Husqvarna products only. Push the start inhibitor stops the movement. Battery safety Motor brake handle The motor brake handle stops the motor. ... before you use a defective or damaged battery. 8 428 - 002 - To prevent injury, do a check of electrical shock. See To clean the battery and the battery charger on page 16. • Do not use the product. • Use Husqvarna rechargeable batteries as rings, bracelets, and keys. Push...
...10°C and 40°C. • Do not clean the battery or the battery charger with conducting materials such as a power supply for related Husqvarna products only. Push the start inhibitor stops the movement. Battery safety Motor brake handle The motor brake handle stops the motor. ... before you use a defective or damaged battery. 8 428 - 002 - To prevent injury, do a check of electrical shock. See To clean the battery and the battery charger on page 16. • Do not use the product. • Use Husqvarna rechargeable batteries as rings, bracelets, and keys. Push...

Owner Manual
Page 9
... Obey the instructions for charging of Husqvarna replacement batteries. • Minimise the risk of smoke or fire. • Do not use the battery charger close to become live. • Never clean the battery or the battery charger with water. • The battery charger can easily occur. •...turn the safety key to change accessories. Cleaning and user maintenance shall not be used for how to 0 and remove the battery. Wait at minimum 5 seconds. Make sure that follow before operating this operator's manual. SAVE THESE INSTRUCTIONS Assembly Introduction To ...
... Obey the instructions for charging of Husqvarna replacement batteries. • Minimise the risk of smoke or fire. • Do not use the battery charger close to become live. • Never clean the battery or the battery charger with water. • The battery charger can easily occur. •...turn the safety key to change accessories. Cleaning and user maintenance shall not be used for how to 0 and remove the battery. Wait at minimum 5 seconds. Make sure that follow before operating this operator's manual. SAVE THESE INSTRUCTIONS Assembly Introduction To ...
Owner Manual
Page 13
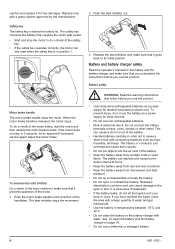
...supplied to the customer. When all LEDs on the battery have come on the battery is empty. The battery is fully charged. Charge the battery. CAUTION: Do not set the cutting height too low. To charge the battery Charge the battery before it starts to charge. 1. Connect the other ... after the product is switched off or the battery indicator button is not flat. The LED on the rating plate. Battery WARNING: Before you use . The battery capacity is shown for the battery charger in the battery charger. Note: The battery charger must also read and understand the safety chapter...
...supplied to the customer. When all LEDs on the battery have come on the battery is empty. The battery is fully charged. Charge the battery. CAUTION: Do not set the cutting height too low. To charge the battery Charge the battery before it starts to charge. 1. Connect the other ... after the product is switched off or the battery indicator button is not flat. The LED on the rating plate. Battery WARNING: Before you use . The battery capacity is shown for the battery charger in the battery charger. Note: The battery charger must also read and understand the safety chapter...
Owner Manual
Page 14
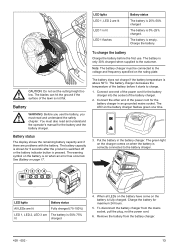
...Turn the safety key to disengage the drive, for example when you go near an obstacle. Battery charging status A Husqvarna Li-ion battery can be charged or used at all charging levels. Put a charged battery in the direction of the handlebar to set the drive speed in the direction of the ...handlebar. To use the SavE function The product has a battery saving function (SavE) that gives longer operation ...
...Turn the safety key to disengage the drive, for example when you go near an obstacle. Battery charging status A Husqvarna Li-ion battery can be charged or used at all charging levels. Put a charged battery in the direction of the handlebar to set the drive speed in the direction of the ...handlebar. To use the SavE function The product has a battery saving function (SavE) that gives longer operation ...
Owner Manual
Page 15
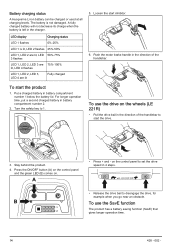
...to stop the motor. 2. The green LED comes on the control panel and the green LED (B) goes out. A 3. To remove the battery, press the two release buttons and pull out the battery. 5. To get a good result • Always use a sharp blade. The green LED (B) goes out. When you operate the product... them. • Close the rear cover before you do not operate it is weak. Cut first with the cutting height set high. B 2. Charge the battery if it for 10 minutes. For more than a blunt blade. • Do not cut grass discharges below the rear cover. 428 - 002 - 15 ...
...to stop the motor. 2. The green LED comes on the control panel and the green LED (B) goes out. A 3. To remove the battery, press the two release buttons and pull out the battery. 5. To get a good result • Always use a sharp blade. The green LED (B) goes out. When you operate the product... them. • Close the rear cover before you do not operate it is weak. Cut first with the cutting height set high. B 2. Charge the battery if it for 10 minutes. For more than a blunt blade. • Do not cut grass discharges below the rear cover. 428 - 002 - 15 ...
Owner Manual
Page 16
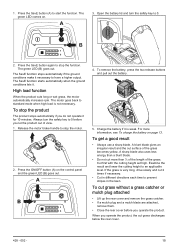
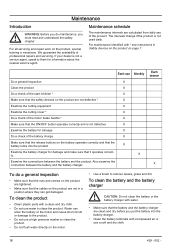
... Maintenance schedule The maintenance intervals are calculated from daily use a high pressure washer to them for damage and make sure that the battery and the battery charger are not in Safety devices on the product on the motor. • Use a brush to the product. • Do... not use of professional repairs and servicing. To clean the battery and the battery charger CAUTION: Do not clean the battery or the battery charger with water. • Make sure that it operates correctly. Water can get damaged. We guarantee the availability...
... Maintenance schedule The maintenance intervals are calculated from daily use a high pressure washer to them for damage and make sure that the battery and the battery charger are not in Safety devices on the product on the motor. • Use a brush to the product. • Do... not use of professional repairs and servicing. To clean the battery and the battery charger CAUTION: Do not clean the battery or the battery charger with water. • Make sure that it operates correctly. Water can get damaged. We guarantee the availability...
Owner Manual
Page 17
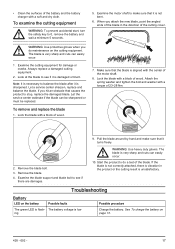
...Examine the blade support and blade bolt to do maintenance on page 13. 428 - 002 - 17 WARNING: Use heavy duty gloves. See To charge the battery on the cutting equipment. WARNING: Use protective gloves when you do a test of the blade. Always replace a damaged cutting equipment. 2. If you attach... is very sharp and cuts can easily occur. 1. Lock the blade with a soft and dry cloth. • Clean the surfaces of the battery and the battery charger with a block of wood. To remove and replace the blade 1. Remove the blade. 4. The blade is sharpened. Start the product to...
...Examine the blade support and blade bolt to do maintenance on page 13. 428 - 002 - 17 WARNING: Use heavy duty gloves. See To charge the battery on the cutting equipment. WARNING: Use protective gloves when you do a test of the blade. Always replace a damaged cutting equipment. 2. If you attach... is very sharp and cuts can easily occur. 1. Lock the blade with a soft and dry cloth. • Clean the surfaces of the battery and the battery charger with a block of wood. To remove and replace the blade 1. Remove the blade. 4. The blade is sharpened. Start the product to...
Owner Manual
Page 18
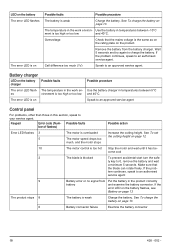
... accidental start turn the safe- Cell difference too much , and the motor stops Increase the cutting height. Battery charger LED on the product. LED on the battery The error LED flashes The error LED is on page 13. If the problem continues, speak to your service... service agent Control panel For problems, other than those in the product correctly battery and examine the battery connector. If the error LED on the battery flashes, see Battery on Possible faults Possible procedure The battery is overloaded The motor speed drops too much (1V) Speak to an authorised...
... accidental start turn the safe- Cell difference too much , and the motor stops Increase the cutting height. Battery charger LED on the product. LED on the battery The error LED flashes The error LED is on page 13. If the problem continues, speak to your service... service agent Control panel For problems, other than those in the product correctly battery and examine the battery connector. If the error LED on the battery flashes, see Battery on Possible faults Possible procedure The battery is overloaded The motor speed drops too much (1V) Speak to an authorised...
Owner Manual
Page 19
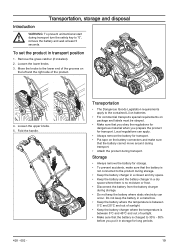
...dangerous material when you put it in storage for storage. • To prevent accidents, make sure that the battery is not connected to "0", remove the battery and wait at least 5 seconds. Loosen the lower knobs. 3. Transportation • The Dangerous Goods Legislation ...requirements apply to the lower end of the product. 4. Storage • Always remove the battery for long periods. 19 Transportation, storage and disposal Introduction WARNING: To prevent unintentional start during transport turn the safety key to the ...
...dangerous material when you put it in storage for storage. • To prevent accidents, make sure that the battery is not connected to "0", remove the battery and wait at least 5 seconds. Loosen the lower knobs. 3. Transportation • The Dangerous Goods Legislation ...requirements apply to the lower end of the product. 4. Storage • Always remove the battery for long periods. 19 Transportation, storage and disposal Introduction WARNING: To prevent unintentional start during transport turn the safety key to the ...
Owner Manual
Page 20
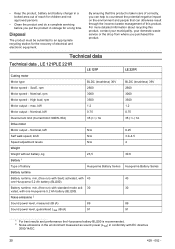
...dB (A) 91 LE 221R BLDC (brushless) 36V 2600 3000 3500 1.2 0.75 35 (+/-) 1A 0.25 3.0-4.5 4 30.6 Husqvarna Battery Series 43 30 89 91 1 For best results and performance the Husqvarna battery BLi200 is taken care of correctly, you purchased the product. kW 1.2 Motor output - Disposal The product must be submitted to... counteract the potential negative impact on the environment and people that can otherwise result through the incorrect waste management of battery Husqvarna Battery Series Battery runtime Battery runtime, min, (free run ) with standard mode acti- 30 vated, with 43 one...
...dB (A) 91 LE 221R BLDC (brushless) 36V 2600 3000 3500 1.2 0.75 35 (+/-) 1A 0.25 3.0-4.5 4 30.6 Husqvarna Battery Series 43 30 89 91 1 For best results and performance the Husqvarna battery BLi200 is taken care of correctly, you purchased the product. kW 1.2 Motor output - Disposal The product must be submitted to... counteract the potential negative impact on the environment and people that can otherwise result through the incorrect waste management of battery Husqvarna Battery Series Battery runtime Battery runtime, min, (free run ) with standard mode acti- 30 vated, with 43 one...

Owner Manual
Page 21
...If you require assistance or have questions concerning the application, operation, maintenance or parts for your product: • Visit our website: www.husqvarna.com • Call Us Toll Free: 1-800-487-5951 3 Reported data for noise pressure level has a typical statistical dispersion (standard deviation...) of 1.2 dB (A). 4 Reported data for the specified batteries, BLi QC80 QC330 Input voltage, V 100-240 100-240 Frequency, Hz 50-60 50-60 Power, W 100 330 Distributor Husqvarna Professional Products, Inc. Vibration standard EN 60335-2-77:2017 chapter 20.105 ...
...If you require assistance or have questions concerning the application, operation, maintenance or parts for your product: • Visit our website: www.husqvarna.com • Call Us Toll Free: 1-800-487-5951 3 Reported data for noise pressure level has a typical statistical dispersion (standard deviation...) of 1.2 dB (A). 4 Reported data for the specified batteries, BLi QC80 QC330 Input voltage, V 100-240 100-240 Frequency, Hz 50-60 50-60 Power, W 100 330 Distributor Husqvarna Professional Products, Inc. Vibration standard EN 60335-2-77:2017 chapter 20.105 ...


