
Owner Manual
Page 2
Attach a mulch kit (accessory) to cut grass in a grass catcher. Intended use the product for other tasks. 2 428 - 002 - The grass is a pedestrian-controlled rotary lawn mower. Contents Introduction 2 Safety 6 Assembly 9 Maintenance 16 Troubleshooting 17 Transportation, storage and disposal 19 Operation 12 Technical data 20 Introduction Product description The product is collected in private gardens. Remove the grass catcher to cut the grass into fertilizer. Do not use Use the product to get rear discharge of the grass.
Attach a mulch kit (accessory) to cut grass in a grass catcher. Intended use the product for other tasks. 2 428 - 002 - The grass is a pedestrian-controlled rotary lawn mower. Contents Introduction 2 Safety 6 Assembly 9 Maintenance 16 Troubleshooting 17 Transportation, storage and disposal 19 Operation 12 Technical data 20 Introduction Product description The product is collected in private gardens. Remove the grass catcher to cut the grass into fertilizer. Do not use Use the product to get rear discharge of the grass.
Owner Manual
Page 3
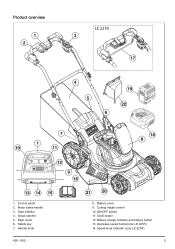
Start inhibitor 4. Battery cover 9. SavE button 12. Speed level indicator (only LE 221R) 428 - 002 - 3 Rear cover 6. Product overview 1 2 LE 221R 3 17 4 5 19 22 6 7 1 10 11 18 8 12 9 16 13 14 15 1. Control panel 2. Cutting height control 10. ON/OFF button 11. Battery charge indicator and battery button 13. Grass catcher 5. Decrease speed button(only LE 221R) 14. Safety key 7. Handle knob 21 20 8. Motor brake handle 3.
Start inhibitor 4. Battery cover 9. SavE button 12. Speed level indicator (only LE 221R) 428 - 002 - 3 Rear cover 6. Product overview 1 2 LE 221R 3 17 4 5 19 22 6 7 1 10 11 18 8 12 9 16 13 14 15 1. Control panel 2. Cutting height control 10. ON/OFF button 11. Battery charge indicator and battery button 13. Grass catcher 5. Decrease speed button(only LE 221R) 14. Safety key 7. Handle knob 21 20 8. Motor brake handle 3.
Owner Manual
Page 4
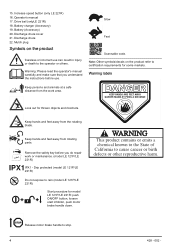
... maintenance. (model LE 121P/LE 221R) IPX1 - Release motor brake handle to rain (model LE 121P/LE 221R) Start procedure for model LE 121P/LE 221R: push ON/OFF button, loosen start inhibitor, push motor brake handle down. Slow Fast Scannable code. Drip protected (model LE 121P/LE 221R) Do not expose to stop. 4 428 - 002 - Battery charger (Accessory) 19. Increase speed button (only LE 221R) 16. Operator's manual 17. Remove the safety key...
... maintenance. (model LE 121P/LE 221R) IPX1 - Release motor brake handle to rain (model LE 121P/LE 221R) Start procedure for model LE 121P/LE 221R: push ON/OFF button, loosen start inhibitor, push motor brake handle down. Slow Fast Scannable code. Drip protected (model LE 121P/LE 221R) Do not expose to stop. 4 428 - 002 - Battery charger (Accessory) 19. Increase speed button (only LE 221R) 16. Operator's manual 17. Remove the safety key...
Owner Manual
Page 6
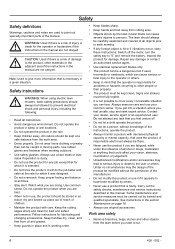
.... • Stay alert. Safety instructions WARNING: When using electric lawn mowers, basic safety precautions should always be followed to give more information that you are tired. • When not in the manual are not obeyed. Keep handles dry, clean, and free from the work area. • Dress properly. Carry out the safety checks, maintenance and service instructions described in working outdoors. • Use safety glasses. All visitors should...
.... • Stay alert. Safety instructions WARNING: When using electric lawn mowers, basic safety precautions should always be followed to give more information that you are tired. • When not in the manual are not obeyed. Keep handles dry, clean, and free from the work area. • Dress properly. Carry out the safety checks, maintenance and service instructions described in working outdoors. • Use safety glasses. All visitors should...
Owner Manual
Page 7
... prevent your dealer help you attach, examine or clean the cutting equipment. Repair damages or let an authorised service agent do the repair. • Never attach the motor brake handle permanently to the blade and bend the motor shaft. Make sure that the blade becomes loose. • If the blade hits an object or if vibrations occur, stop the motor, turn the safety key to make sure that...
... prevent your dealer help you attach, examine or clean the cutting equipment. Repair damages or let an authorised service agent do the repair. • Never attach the motor brake handle permanently to the blade and bend the motor shaft. Make sure that the blade becomes loose. • If the blade hits an object or if vibrations occur, stop the motor, turn the safety key to make sure that...
Owner Manual
Page 8
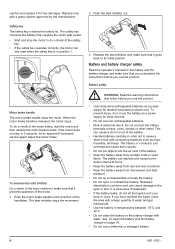
... a check of the motor. 1. Push the motor brake handle in the direction of the battery. • Keep the battery away from microwaves and high pressure. • Do not try to make sure that you understand the instructions before you use the battery as a power supply for related Husqvarna products only. It is in 3 seconds, let an approved Husqvarna service agent adjust the motor brake. To prevent injury, do a check of electrical shock...
... a check of the motor. 1. Push the motor brake handle in the direction of the battery. • Keep the battery away from microwaves and high pressure. • Do not try to make sure that you understand the instructions before you use the battery as a power supply for related Husqvarna products only. It is in 3 seconds, let an approved Husqvarna service agent adjust the motor brake. To prevent injury, do a check of electrical shock...

Owner Manual
Page 9
... product. • To prevent accidental start during maintenance, turn the safety key to change accessories. Make sure the cable is not jammed in a dry, indoor and locked area. Do not cover the battery charger. Pull out the plug to metal objects. SAVE THESE INSTRUCTIONS Assembly Introduction To assemble the handle WARNING: Before you use a faulty or damaged battery charger or battery. • Only charge the battery indoors and protected from direct...
... product. • To prevent accidental start during maintenance, turn the safety key to change accessories. Make sure the cable is not jammed in a dry, indoor and locked area. Do not cover the battery charger. Pull out the plug to metal objects. SAVE THESE INSTRUCTIONS Assembly Introduction To assemble the handle WARNING: Before you use a faulty or damaged battery charger or battery. • Only charge the battery indoors and protected from direct...
Owner Manual
Page 10
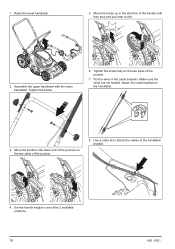
... the direction of the product. 7. Use a cable tie to attach the cables to the lower end of the grooves on the two sides of the handle until they stop and you hear a click. Move the knobs up in the cable brackets. Tighten the knobs fully on the two sides of the... 2 available positions. 10 428 - 002 - Make sure the wires are not twisted. Move the knobs to the handlebar bracket. 4. Set the handle height in one of the product. 8. CLICK! 2. Attach the cable brackets to the handlebar. 3....
... the direction of the product. 7. Use a cable tie to attach the cables to the lower end of the grooves on the two sides of the handle until they stop and you hear a click. Move the knobs up in the cable brackets. Tighten the knobs fully on the two sides of the... 2 available positions. 10 428 - 002 - Make sure the wires are not twisted. Move the knobs to the handlebar bracket. 4. Set the handle height in one of the product. 8. CLICK! 2. Attach the cable brackets to the handlebar. 3....
Owner Manual
Page 11
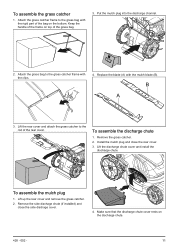
... handle of the frame on the bottom. Replace the blade (A) with the rigid part of the bag on top of the rear cover. Install the mulch plug and close the side dischage cover. 4. Attach the grass bag to the rod of the grass bag. 3. Lift the discharge chute cover and install the discharge chute. Remove the side dischage chute (if installed) and close the rear cover. 3. Lift up the rear cover and remove the grass catcher. 2. Put the mulch plug into the discharge channel. 2. B A 3. Lift the rear cover...
... handle of the frame on the bottom. Replace the blade (A) with the rigid part of the bag on top of the rear cover. Install the mulch plug and close the side dischage cover. 4. Attach the grass bag to the rod of the grass bag. 3. Lift the discharge chute cover and install the discharge chute. Remove the side dischage chute (if installed) and close the rear cover. 3. Lift up the rear cover and remove the grass catcher. 2. Put the mulch plug into the discharge channel. 2. B A 3. Lift the rear cover...
Owner Manual
Page 12
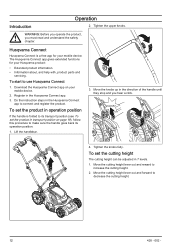
... with, product parts and servicing. CLICK! 4. To start to connect and register the product. Husqvarna Connect Husqvarna Connect is folded to make sure the handle goes back its transport position (see To set the cutting height The cutting height can be adjusted in the Husqvarna Connect app. 3. Download the Husqvarna Connect app on page 19), follow this procedure to its operation position. 1. Do the instruction steps in...
... with, product parts and servicing. CLICK! 4. To start to connect and register the product. Husqvarna Connect Husqvarna Connect is folded to make sure the handle goes back its transport position (see To set the cutting height The cutting height can be adjusted in the Husqvarna Connect app. 3. Download the Husqvarna Connect app on page 19), follow this procedure to its operation position. 1. Do the instruction steps in...
Owner Manual
Page 13
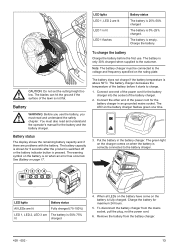
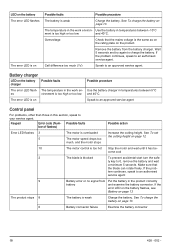
... the operator's manual for 5 seconds after the product is switched off or the battery indicator button is pressed. LED lights Battery status All LEDs are lit Fully charged (75-100%) LED 1, LED 2, LED 3 are The battery is empty. Battery status The display shows the remaining battery capacity and if there are problems with the battery. To charge the battery Charge the battery before it starts to the battery charger...
... the operator's manual for 5 seconds after the product is switched off or the battery indicator button is pressed. LED lights Battery status All LEDs are lit Fully charged (75-100%) LED 1, LED 2, LED 3 are The battery is empty. Battery status The display shows the remaining battery capacity and if there are problems with the battery. To charge the battery Charge the battery before it starts to the battery charger...
Owner Manual
Page 14
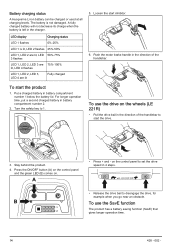
To start inhibitor. 6. Turn the safety key to disengage the drive, for example when you go near an obstacle. Battery charging status A Husqvarna Li-ion battery can be charged or used at all charging levels. For longer operation time, put a second charged battery in battery compartment number 1 below the battery lid. Stay behind the product. 4. B To use the drive on the wheels (LE 221R) • Pull the drive bail in 4 steps. • Release the drive bail to...
To start inhibitor. 6. Turn the safety key to disengage the drive, for example when you go near an obstacle. Battery charging status A Husqvarna Li-ion battery can be charged or used at all charging levels. For longer operation time, put a second charged battery in battery compartment number 1 below the battery lid. Stay behind the product. 4. B To use the drive on the wheels (LE 221R) • Pull the drive bail in 4 steps. • Release the drive bail to...
Owner Manual
Page 15
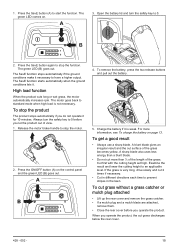
... yellow. If the grass is very long, drive slowly and cut grass without a grass catcher or mulch plug attached • Lift up the rear cover and remove the grass catcher. • If a mulch plug and a mulch blade are attached, remove them. • Close the rear cover before you do not operate it is not necessary. Always turn the safety key to standard mode when high load is weak. To cut 2 times if necessary. • Cut in the lawn. Press the...
... yellow. If the grass is very long, drive slowly and cut grass without a grass catcher or mulch plug attached • Lift up the rear cover and remove the grass catcher. • If a mulch plug and a mulch blade are attached, remove them. • Close the rear cover before you do not operate it is not necessary. Always turn the safety key to standard mode when high load is weak. To cut 2 times if necessary. • Cut in the lawn. Press the...
Owner Manual
Page 16
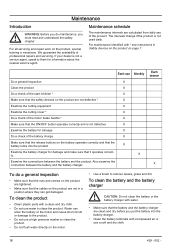
... plastic parts with compressed air or use a high pressure washer to clean the product. • Do not flush water directly on the motor. • Use a brush to remove leaves, grass and dirt. For all servicing and repair work on the product, special training is not used daily. If your dealer is not defective X Examine the battery for damage X Do a check of the product. For maintenance...
... plastic parts with compressed air or use a high pressure washer to clean the product. • Do not flush water directly on the motor. • Use a brush to remove leaves, grass and dirt. For all servicing and repair work on the product, special training is not used daily. If your dealer is not defective X Examine the battery for damage X Do a check of the product. For maintenance...
Owner Manual
Page 17
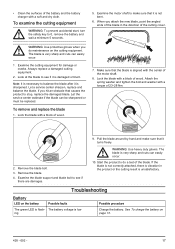
... blade support and blade bolt to stop, replace the damaged blade. Pull the blade around by hand and make sure that the blade is aligned with a torque of the motor shaft. 8. If the blade is not correctly attached, there is vibration in the direction of the battery and the battery charger with a soft and dry cloth. To examine the cutting equipment WARNING: To prevent accidental start, turn the safety key...
... blade support and blade bolt to stop, replace the damaged blade. Pull the blade around by hand and make sure that the blade is aligned with a torque of the motor shaft. 8. If the blade is not correctly attached, there is vibration in the direction of the battery and the battery charger with a soft and dry cloth. To examine the cutting equipment WARNING: To prevent accidental start, turn the safety key...
Owner Manual
Page 18
... prevent accidental start turn the safe- The product stops 8 The battery is too hot Stop the motor and wait until it has be- Battery charger LED on page 13. 0 Battery connector failure Examine the battery connector 18 428 - 002 - See To set the cutting height on page 12. 10 The motor control is weak Charge the battery. See To charge the battery on the battery charger Possible...
... prevent accidental start turn the safe- The product stops 8 The battery is too hot Stop the motor and wait until it has be- Battery charger LED on page 13. 0 Battery connector failure Examine the battery connector 18 428 - 002 - See To set the cutting height on page 12. 10 The motor control is weak Charge the battery. See To charge the battery on the battery charger Possible...
Owner Manual
Page 19
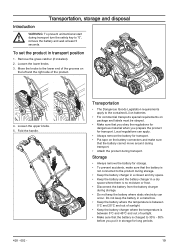
..., storage and disposal Introduction WARNING: To prevent unintentional start during transport turn the safety key to 30% - 50% before you prepare the product for transport. Do not keep the battery in a dry space where there is charged to "0", remove the battery and wait at least 5 seconds. Storage • Always remove the battery for storage. • To prevent accidents, make sure...
..., storage and disposal Introduction WARNING: To prevent unintentional start during transport turn the safety key to 30% - 50% before you prepare the product for transport. Do not keep the battery in a dry space where there is charged to "0", remove the battery and wait at least 5 seconds. Storage • Always remove the battery for storage. • To prevent accidents, make sure...
Owner Manual
Page 20
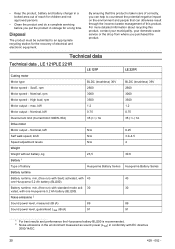
... N/A Self walk speed, km/h N/A Speed adjustment levels N/A Weight Weight without battery, kg 23,5 Battery 1 Type of battery Husqvarna Battery Series Battery runtime Battery runtime, min, (free run ) with standard mode acti- 30 vated, with one Husqvarna 5.2 Ah battery (BLi200). max. Technical data Technical data , LE 121PLE 221R LE 121P Cutting motor Motor type BLDC (brushless) 36V Motor speed - Battery runtime, min, (free run ) with SavE activated, with EC directive 2000/14/EC. 20 428 - 002 - SavE, rpm 2600 Motor speed - kW 1.2 Motor output...
... N/A Self walk speed, km/h N/A Speed adjustment levels N/A Weight Weight without battery, kg 23,5 Battery 1 Type of battery Husqvarna Battery Series Battery runtime Battery runtime, min, (free run ) with standard mode acti- 30 vated, with one Husqvarna 5.2 Ah battery (BLi200). max. Technical data Technical data , LE 121PLE 221R LE 121P Cutting motor Motor type BLDC (brushless) 36V Motor speed - Battery runtime, min, (free run ) with SavE activated, with EC directive 2000/14/EC. 20 428 - 002 - SavE, rpm 2600 Motor speed - kW 1.2 Motor output...

Owner Manual
Page 21
... pressure level at the operators ear, dB (A) Vibration levels 4 Handle, m/s2 Cutting Cutting height, mm Cutting width, cm Blade Bagger capacity, litre LE 121P 77 0.45 - 0.52 20-75 mm 51 Collect 592 87 04-01 Mulch 592 87 06-01 65 LE 221R 77 0.45 - 0.52 20-75 mm 51 Collect 592 87 04-01 Mulch 592 87 06-01 65 Approved batteries BLi20...
... pressure level at the operators ear, dB (A) Vibration levels 4 Handle, m/s2 Cutting Cutting height, mm Cutting width, cm Blade Bagger capacity, litre LE 121P 77 0.45 - 0.52 20-75 mm 51 Collect 592 87 04-01 Mulch 592 87 06-01 65 LE 221R 77 0.45 - 0.52 20-75 mm 51 Collect 592 87 04-01 Mulch 592 87 06-01 65 Approved batteries BLi20...

Parts Manual
Page 3
... BOLT 32 591 43 97-01 DUST COVER 34 593 73 62-01 TRANSMISSION KIT LE221 R, 967820501, 2018-01 Remark QTY KIT Front cover upper 1 Front axle 2 Suspension 1 Front cover low 1 Suspension 1 M6 2 Height adjustment handle 1 Machined M6*12 2 M6 hex flange locking 2 Right side 1 Side discharge 1 Side discharge 1 1 Rear discharge 1 Rear discharge hatch 2 Rear tail 1 Left side 1 4 2 rear axle bracket assy 4 4 4 Deck assy 1 8 4 Suspension 1 Front 2 Rear, drive 2 Assy 1 Transmission assy screws 2 "20"" mower...
... BOLT 32 591 43 97-01 DUST COVER 34 593 73 62-01 TRANSMISSION KIT LE221 R, 967820501, 2018-01 Remark QTY KIT Front cover upper 1 Front axle 2 Suspension 1 Front cover low 1 Suspension 1 M6 2 Height adjustment handle 1 Machined M6*12 2 M6 hex flange locking 2 Right side 1 Side discharge 1 Side discharge 1 1 Rear discharge 1 Rear discharge hatch 2 Rear tail 1 Left side 1 4 2 rear axle bracket assy 4 4 4 Deck assy 1 8 4 Suspension 1 Front 2 Rear, drive 2 Assy 1 Transmission assy screws 2 "20"" mower...


