
Owner Manual
Page 2
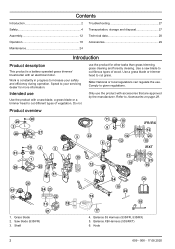
...use the product for more information. Work is a battery operated grass trimmer/ brushcutter with accessories that are approved by the manufacturer. Use a saw blade, a grass blade or a trimmer head to Accessories on page 29. Knob 2 609 - 006 - 17.08.2020 Only use Use the... 27 Technical data 28 Operation 18 Accessories 29 Maintenance 24 Introduction Product description This product is constantly in progress to cut grass. Do not use . Saw blade (535iFR) 3. Use a grass blade or trimmer head to your safety and efficiency during operation. Speak to...
...use the product for more information. Work is a battery operated grass trimmer/ brushcutter with accessories that are approved by the manufacturer. Use a saw blade, a grass blade or a trimmer head to Accessories on page 29. Knob 2 609 - 006 - 17.08.2020 Only use Use the... 27 Technical data 28 Operation 18 Accessories 29 Maintenance 24 Introduction Product description This product is constantly in progress to cut grass. Do not use . Saw blade (535iFR) 3. Use a grass blade or trimmer head to your safety and efficiency during operation. Speak to...

Owner Manual
Page 3
...'s manual. The product can cause objects to Bluetooth® wireless technology on page 18. Do not use a flexible cutting wire. The product can cut . Add-on the product WARNING! Speed mode button 15. Power on you read the operator's manual carefully and make... sure you understand the instructions before the product is extremely important that it does not immediately cut off body parts. Saw blade guard (535iFR) 28. Protected against splashing water. TheBluetooth® symbol will be dangerous! Refer to eject, which...
...'s manual. The product can cause objects to Bluetooth® wireless technology on page 18. Do not use a flexible cutting wire. The product can cut . Add-on the product WARNING! Speed mode button 15. Power on you read the operator's manual carefully and make... sure you understand the instructions before the product is extremely important that it does not immediately cut off body parts. Saw blade guard (535iFR) 28. Protected against splashing water. TheBluetooth® symbol will be dangerous! Refer to eject, which...

Owner Manual
Page 10
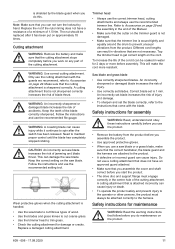
...it can cause serious personal injury. If the harness has a hip pad and a hip strap, make sure that ejects in the same direction as the cutting attachment rotates. • To loose and tighten the locknut, use a socket spanner with a defective quick release function. 1. WARNING: When you should ...to make sure that your hand 10 609 - 006 - 17.08.2020 The arrow in all directions. decreases the vibration from the teeth of the saw blade. A locknut is damaged. To attach and remove the locknut WARNING: Stop the product and remove the battery, use a harness with a long...
...it can cause serious personal injury. If the harness has a hip pad and a hip strap, make sure that ejects in the same direction as the cutting attachment rotates. • To loose and tighten the locknut, use a socket spanner with a defective quick release function. 1. WARNING: When you should ...to make sure that your hand 10 609 - 006 - 17.08.2020 The arrow in all directions. decreases the vibration from the teeth of the saw blade. A locknut is damaged. To attach and remove the locknut WARNING: Stop the product and remove the battery, use a harness with a long...
Owner Manual
Page 11
...drum to prevent unusual vibrations from the product before you do maintenance on the saw blade. Replace a damaged cutting attachment. Trimmer head • Always use the correct trimmer head, cutting attachments and always use a saw blade or a grass blade, make sure that is attached incorrectly can cause...17.08.2020 11 An incorrectly set blade increases the risk of injury and damage. • To sharpen and set saw blade increases the risk of the cutting attachment. Safety instructions for 2 days or more resistant. Replace the nut if the nylon lining does not have an ...
...drum to prevent unusual vibrations from the product before you do maintenance on the saw blade. Replace a damaged cutting attachment. Trimmer head • Always use the correct trimmer head, cutting attachments and always use a saw blade or a grass blade, make sure that is attached incorrectly can cause...17.08.2020 11 An incorrectly set blade increases the risk of injury and damage. • To sharpen and set saw blade increases the risk of the cutting attachment. Safety instructions for 2 days or more resistant. Replace the nut if the nylon lining does not have an ...
Owner Manual
Page 13
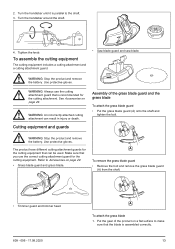
... grass blade guard (A) onto the shaft and tighten the bolt. To assemble the cutting equipment The cutting equipment includes a cutting attachment and a cutting attachment guard. • Saw blade guard and saw blade. Use protective gloves. Make sure that can result in injury or death. ...To attach the grass blade 1. Turn the handlebar around the shaft. 4. WARNING: Always use the correct cutting attachment guard for the cutting attachment. Use protective gloves. Cutting equipment and guards Assembly of the product on a flat surface to the shaft. 3. Refer to Accessories on...
... grass blade guard (A) onto the shaft and tighten the bolt. To assemble the cutting equipment The cutting equipment includes a cutting attachment and a cutting attachment guard. • Saw blade guard and saw blade. Use protective gloves. Make sure that can result in injury or death. ...To attach the grass blade 1. Turn the handlebar around the shaft. 4. WARNING: Always use the correct cutting attachment guard for the cutting attachment. Use protective gloves. Cutting equipment and guards Assembly of the product on a flat surface to the shaft. 3. Refer to Accessories on...

Owner Manual
Page 16
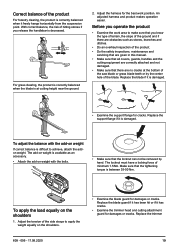
...hole to how the cutting attachment rotates. Remove the trimmer head. B C D A F E B 5. Make sure that holds the trimmer head and the drive disc. 3. Tighten in the holder (A). To remove the saw blade (535iFR) 1. 3. Hold the shaft of the saw blade guard and the saw blade To attach the saw blade (535iFR) ...that the drive disc and support flange engages correctly in the center hole of the holes in the gear housing. E D C A 4. Attach the saw blade guard (A). Tighten it to align 1 of the grass blade. 6. Put the locking pin (C) into the hole to lock the shaft. 2. ...
...hole to how the cutting attachment rotates. Remove the trimmer head. B C D A F E B 5. Make sure that holds the trimmer head and the drive disc. 3. Tighten in the holder (A). To remove the saw blade (535iFR) 1. 3. Hold the shaft of the saw blade guard and the saw blade To attach the saw blade (535iFR) ...that the drive disc and support flange engages correctly in the center hole of the holes in the gear housing. E D C A 4. Attach the saw blade guard (A). Tighten it to align 1 of the grass blade. 6. Put the locking pin (C) into the hole to lock the shaft. 2. ...
Owner Manual
Page 19
...guard for cracks. Before you operate the product • Examine the work position. Replace the support flange if it is at the bottom of the saw blade or grass blade teeth or by hand. The locknut must have a locking force of minimum 1.5Nm. To adjust the balance with the add... the handlebar is difficult to make sure that the tightening torque is correctly balanced when it has cracks. • Examine the trimmer head and cutting attachment guard for the best work area to achieve, attach the addon weight. Correct balance of the product For forestry clearing, the product is ...
...guard for cracks. Before you operate the product • Examine the work position. Replace the support flange if it is at the bottom of the saw blade or grass blade teeth or by hand. The locknut must have a locking force of minimum 1.5Nm. To adjust the balance with the add... the handlebar is difficult to make sure that the tightening torque is correctly balanced when it has cracks. • Examine the trimmer head and cutting attachment guard for the best work area to achieve, attach the addon weight. Correct balance of the product For forestry clearing, the product is ...

Owner Manual
Page 21
... up and down to its normal position before you turn and go across the work instructions WARNING: Be careful when you cut a tree that is in the illustration. Put the saw blade against the tree as given in the cleared area. To fell a tree to the right To fell to the left... injury to the right. 1. It can cause blade thrust. Do not cut with the thickness of the work area, and start the work from there. • Move in a regular pattern across ditches and obstacles more than necessary. Tilt the saw blade and push it is shown in grey in tension. Apply full...
... up and down to its normal position before you turn and go across the work instructions WARNING: Be careful when you cut a tree that is in the illustration. Put the saw blade against the tree as given in the cleared area. To fell a tree to the right To fell to the left... injury to the right. 1. It can cause blade thrust. Do not cut with the thickness of the work area, and start the work from there. • Move in a regular pattern across ditches and obstacles more than necessary. Tilt the saw blade and push it is shown in grey in tension. Apply full...

Owner Manual
Page 22
.... 1. To clear grass with 2 hands and carefully pull the product. This decreases the risk that the saw blade becomes blocked, do not pull the product with force diagonally up and to the right. • Cut down thin trees and brush. • Move the product from 2 sides. 1. Apply full throttle. 2.... the shaft with a grass blade 1. 3. Grass blades and grass cutters must be used on the side of the tree to the right. b) Cut the outer trees to the center, cut from side to the saw blade forward with the blade guard. 4. At the same time, push the tree with a fast movement...
.... 1. To clear grass with 2 hands and carefully pull the product. This decreases the risk that the saw blade becomes blocked, do not pull the product with force diagonally up and to the right. • Cut down thin trees and brush. • Move the product from 2 sides. 1. Apply full throttle. 2.... the shaft with a grass blade 1. 3. Grass blades and grass cutters must be used on the side of the tree to the right. b) Cut the outer trees to the center, cut from side to the saw blade forward with the blade guard. 4. At the same time, push the tree with a fast movement...
Owner Manual
Page 29
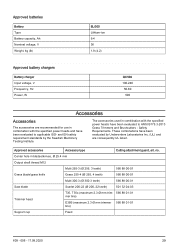
... are consequently UL listed. The accessories used in combination with the specified power heads and have been evaluated to applicable ISO- Approved accessories Accessory type Cutting attachment guard, art. no. and EN safety requirement standards by Underwriters Laboratories Inc. (UL) and are recommended for use in blades/knives, &#...01 Grass blade/grass knife Grass 255-4 (Ø 255, 4 teeth) 590 88 00-01 Multi 300-3 (Ø 300 3 teeth) 590 88 00-01 Saw blade Scarlet 200-22 (Ø 200, 22 teeth) 501 32 04-03 Trimmer head T35, T35x (maximum 2.3 Ø mm trim- 590 88 01-01...
... are consequently UL listed. The accessories used in combination with the specified power heads and have been evaluated to applicable ISO- Approved accessories Accessory type Cutting attachment guard, art. no. and EN safety requirement standards by Underwriters Laboratories Inc. (UL) and are recommended for use in blades/knives, &#...01 Grass blade/grass knife Grass 255-4 (Ø 255, 4 teeth) 590 88 00-01 Multi 300-3 (Ø 300 3 teeth) 590 88 00-01 Saw blade Scarlet 200-22 (Ø 200, 22 teeth) 501 32 04-03 Trimmer head T35, T35x (maximum 2.3 Ø mm trim- 590 88 01-01...


