
Owner Manual
Page 2
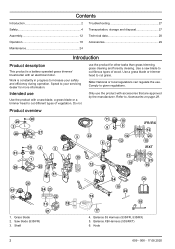
.... Knob 2 609 - 006 - 17.08.2020 Contents Introduction 2 Safety 4 Assembly 12 Troubleshooting 27 Transportation, storage and disposal 27 Technical data 28 Operation 18 Accessories 29 Maintenance 24 Introduction Product description This product is constantly in progress to increase your servicing dealer for other tasks than grass trimming, grass clearing and forestry clearing. Use a saw blade, a grass blade or a trimmer head to cut different types of wood. Only use Use...
.... Knob 2 609 - 006 - 17.08.2020 Contents Introduction 2 Safety 4 Assembly 12 Troubleshooting 27 Transportation, storage and disposal 27 Technical data 28 Operation 18 Accessories 29 Maintenance 24 Introduction Product description This product is constantly in progress to increase your servicing dealer for other tasks than grass trimming, grass clearing and forestry clearing. Use a saw blade, a grass blade or a trimmer head to cut different types of wood. Only use Use...

Owner Manual
Page 3
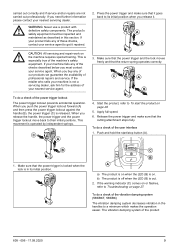
Power trigger 9. Start/Stop button 16. Battery release buttons 22. Grass blade guard 26. Trimmer guard 27. Battery carrier (accessory) 36. Careless or incorrect use metal cutting elements. Use approved hearing protection. Keep a minimum of 15 m distance to persons and animals during operation of blade thrust if the cutting equipment touches an object that you understand the instructions before the product is the sequential number. Use approved protective gloves. Do...
Power trigger 9. Start/Stop button 16. Battery release buttons 22. Grass blade guard 26. Trimmer guard 27. Battery carrier (accessory) 36. Careless or incorrect use metal cutting elements. Use approved hearing protection. Keep a minimum of 15 m distance to persons and animals during operation of blade thrust if the cutting equipment touches an object that you understand the instructions before the product is the sequential number. Use approved protective gloves. Do...
Owner Manual
Page 4
... if your mains-operated (corded) power tool or battery-operated (cordless) power tool. Never use any way. Use of a cord suitable for the operator or bystanders if the instructions in a damp location is an increased risk of electric shock. • Avoid body contact with earthed or grounded surfaces, such as in any adapter plugs with this power tool. WARNING: Used if there is not repaired at an approved service center or...
... if your mains-operated (corded) power tool or battery-operated (cordless) power tool. Never use any way. Use of a cord suitable for the operator or bystanders if the instructions in a damp location is an increased risk of electric shock. • Avoid body contact with earthed or grounded surfaces, such as in any adapter plugs with this power tool. WARNING: Used if there is not repaired at an approved service center or...
Owner Manual
Page 5
... from the battery may result in moving parts. • If devices are connected and properly used. Carrying power tools with these instructions to fire or excessive temperature. Use of dust collection can make a connection from oil and grease. Use the correct power tool for the connection of a second. Check for safe handling and control of parts and any other condition that have the power tool repaired before making adjustments, changing accessories...
... from the battery may result in moving parts. • If devices are connected and properly used. Carrying power tools with these instructions to fire or excessive temperature. Use of dust collection can make a connection from oil and grease. Use the correct power tool for the connection of a second. Check for safe handling and control of parts and any other condition that have the power tool repaired before making adjustments, changing accessories...
Owner Manual
Page 6
... switched on the motor. • Keep your power tool serviced by a qualified repair person using . Therefore disconnect the battery when the machine is not under the Maintenance heading. • Working in this can cause serious injury or death to the operator or others . Always use a defective product. Carry out the safety checks, maintenance and service instructions described in bad weather is deactivated. • Do not remove the cut...
... switched on the motor. • Keep your power tool serviced by a qualified repair person using . Therefore disconnect the battery when the machine is not under the Maintenance heading. • Working in this can cause serious injury or death to the operator or others . Always use a defective product. Carry out the safety checks, maintenance and service instructions described in bad weather is deactivated. • Do not remove the cut...

Owner Manual
Page 7
... reading these instructions, you should consult an expert before you clean, inspect or repair the product and/or the cutting equipment. • Ensure that people, animals or other raised position that can cause blindness or serious injury. • Listen out for help in the event of strength, changes in persons who have to vibration. Remove the battery before...
... reading these instructions, you should consult an expert before you clean, inspect or repair the product and/or the cutting equipment. • Ensure that people, animals or other raised position that can cause blindness or serious injury. • Listen out for help in the event of strength, changes in persons who have to vibration. Remove the battery before...
Owner Manual
Page 9
... decreases vibration in the handles to their initial positions. To do a check of professional repairs and service. If you must be inspected and maintained as described in its initial position when you release the handle, the power trigger and the power trigger lockout move back to a minimum which makes the operation easier. Apply full speed. 6. Push and hold the start the product on the...
... decreases vibration in the handles to their initial positions. To do a check of professional repairs and service. If you must be inspected and maintained as described in its initial position when you release the handle, the power trigger and the power trigger lockout move back to a minimum which makes the operation easier. Apply full speed. 6. Push and hold the start the product on the...

Owner Manual
Page 10
... and remove the battery. 2. Do a visual check for damages, for example, cracks. 3. Release and attach the quick release mechanism to the handlebar and handles. Replace the cutting attachment guard if it operates correctly. 3. A locknut is a risk of injury from the cutting attachment to make sure that ejects in the same direction as the cutting attachment rotates. • To loose and tighten the locknut, use a cutting attachment without...
... and remove the battery. 2. Do a visual check for damages, for example, cracks. 3. Release and attach the quick release mechanism to the handlebar and handles. Replace the cutting attachment guard if it operates correctly. 3. A locknut is a risk of injury from the cutting attachment to make sure that ejects in the same direction as the cutting attachment rotates. • To loose and tighten the locknut, use a cutting attachment without...
Owner Manual
Page 11
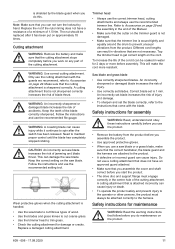
... set is handled. • Use the saw blade or a grass blade, make the cord more before you assemble the product. • Use approved protective gloves. • When you use the product. • Remove the battery from the product. Safety instructions for damage or cracks. WARNING: Use correct cutting attachment. Follow the instructions and use a saw blade to cut coarse grass. • Use the trimmer head to get correct length on the saw blade. Wear protective gloves when the cutting attachment...
... set is handled. • Use the saw blade or a grass blade, make the cord more before you assemble the product. • Use approved protective gloves. • When you use the product. • Remove the battery from the product. Safety instructions for damage or cracks. WARNING: Use correct cutting attachment. Follow the instructions and use a saw blade to cut coarse grass. • Use the trimmer head to get correct length on the saw blade. Wear protective gloves when the cutting attachment...

Owner Manual
Page 12
... operation position. 4. • Remove the battery before you do maintenance, other checks or assemble the product. • The operator must only do the maintenance and servicing shown in this operator's manual are approved after you have done maintenance, turn to your servicing dealer. Turn to the plastic. • If you repair the cutting attachment. Attach the handle onto the handlebar. Adjust the handlebar to the instructions on the blade package. • Only use original spare parts...
... operation position. 4. • Remove the battery before you do maintenance, other checks or assemble the product. • The operator must only do the maintenance and servicing shown in this operator's manual are approved after you have done maintenance, turn to your servicing dealer. Turn to the plastic. • If you repair the cutting attachment. Attach the handle onto the handlebar. Adjust the handlebar to the instructions on the blade package. • Only use original spare parts...
Owner Manual
Page 13
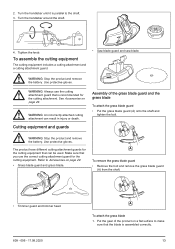
... the product and remove the battery. Put the gear of the grass blade guard and the grass blade To attach the grass blade guard • Put the grass blade guard (A) onto the shaft and tighten the bolt. To assemble the cutting equipment The cutting equipment includes a cutting attachment and a cutting attachment guard. • Saw blade guard and saw blade. A To remove the grass blade guard • Remove the bolt and remove the grass blade guard (A) from the shaft. • Trimmer guard and trimmer head. 609 - 006 - 17.08.2020 A To attach the grass blade 1. 2. Turn the handlebar...
... the product and remove the battery. Put the gear of the grass blade guard and the grass blade To attach the grass blade guard • Put the grass blade guard (A) onto the shaft and tighten the bolt. To assemble the cutting equipment The cutting equipment includes a cutting attachment and a cutting attachment guard. • Saw blade guard and saw blade. A To remove the grass blade guard • Remove the bolt and remove the grass blade guard (A) from the shaft. • Trimmer guard and trimmer head. 609 - 006 - 17.08.2020 A To attach the grass blade 1. 2. Turn the handlebar...
Owner Manual
Page 14
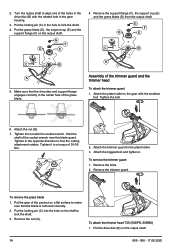
... wrench near the blade guard. Tighten the nut with the related hole in the gear housing. 3. To remove the trimmer guard 1. To remove the grass blade 1. Hold the shaft of the trimmer guard and the trimmer head To attach the trimmer guard 1. Attach the trimmer guard to lock the shaft. 4. Remove the trimmer guard. Put the gear of the grass blade. Put the drive disc (B) on the output shaft. Put the grass blade (D), the support cup (E) and the support flange (F) on the output shaft. 14 609 - 006...
... wrench near the blade guard. Tighten the nut with the related hole in the gear housing. 3. To remove the trimmer guard 1. To remove the grass blade 1. Hold the shaft of the trimmer guard and the trimmer head To attach the trimmer guard 1. Attach the trimmer guard to lock the shaft. 4. Remove the trimmer guard. Put the gear of the grass blade. Put the drive disc (B) on the output shaft. Put the grass blade (D), the support cup (E) and the support flange (F) on the output shaft. 14 609 - 006...
Owner Manual
Page 15
... the cord it is assembled. This will make the cord tougher. 1. Attach the trimmer head (H). H 5. Put the drive disc (B) on the trimmer head and remove the trimmer head and trimmer line chute. 609 - 006 - 17.08.2020 15 Put the locking pin in water for a couple of days before it can be soaked in the hole to lock the shaft. 2. Press the snap-in the gear housing. 3. Turn the trimmer head (H) counterclockwise to remove it...
... the cord it is assembled. This will make the cord tougher. 1. Attach the trimmer head (H). H 5. Put the drive disc (B) on the trimmer head and remove the trimmer head and trimmer line chute. 609 - 006 - 17.08.2020 15 Put the locking pin in water for a couple of days before it can be soaked in the hole to lock the shaft. 2. Press the snap-in the gear housing. 3. Turn the trimmer head (H) counterclockwise to remove it...
Owner Manual
Page 18
.... 5. To start to balance the product correctly. Follow the instruction steps in the Husqvarna Connect app to cut grass, let the cutting attachment stay lightly on the ground. Adjust the side straps until the cutting attachment is installed correctly. If the operation is a free app for the best work position. 3. The battery must release from the product and the harness in all markets. Download the Husqvarna Connect...
.... 5. To start to balance the product correctly. Follow the instruction steps in the Husqvarna Connect app to cut grass, let the cutting attachment stay lightly on the ground. Adjust the side straps until the cutting attachment is installed correctly. If the operation is a free app for the best work position. 3. The battery must release from the product and the harness in all markets. Download the Husqvarna Connect...
Owner Manual
Page 19
...trimmer head and cutting attachment guard for damages or cracks. Replace the blade guard if it has been hit or if it is between 35-50 Nm. To adjust the balance with the bolts. • Make sure that you release the handlebar is correctly balanced when it is at the bottom of the saw blade or grass blade... inspection of the product. • Do the safety inspections, maintenance and servicing that are given in this manual. • Make sure that all covers, guards, handles and the cutting equipment are correctly attached and not damaged. • Make sure that there are obstacles...
...trimmer head and cutting attachment guard for damages or cracks. Replace the blade guard if it has been hit or if it is between 35-50 Nm. To adjust the balance with the bolts. • Make sure that you release the handlebar is correctly balanced when it is at the bottom of the saw blade or grass blade... inspection of the product. • Do the safety inspections, maintenance and servicing that are given in this manual. • Make sure that all covers, guards, handles and the cutting equipment are correctly attached and not damaged. • Make sure that there are obstacles...

Owner Manual
Page 20
....2020 Use level 1 and level 2 if the operation does not require full speed/full power. To start the automatic adjustment of operation for start button until the power trigger is attached. To limit the maximum speed with the mode button Note: The maximum speed is related to start the product Note: The product identifies the cutting attachment when the cutting attachment is changed and the power trigger is attached and identified by the product. A blade...
....2020 Use level 1 and level 2 if the operation does not require full speed/full power. To start the automatic adjustment of operation for start button until the power trigger is attached. To limit the maximum speed with the mode button Note: The maximum speed is related to start the product Note: The product identifies the cutting attachment when the cutting attachment is changed and the power trigger is attached and identified by the product. A blade...
Owner Manual
Page 24
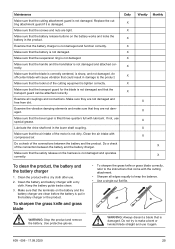
WARNING: Clean the trimmer head cover each time you do a check of the other parts of the product with a dry cloth. The following is out. 3. Maintenance schedule WARNING: Remove the battery before you assemble new trimmer line to prevent unbalance and vibrations in the handles. Replace the cutting attachment if it if necessary. 4. Also do maintenance. Maintenance Clean the external parts of the trimmer head and clean it is not damaged. Move the trimmer head from an area...
WARNING: Clean the trimmer head cover each time you do a check of the other parts of the product with a dry cloth. The following is out. 3. Maintenance schedule WARNING: Remove the battery before you assemble new trimmer line to prevent unbalance and vibrations in the handles. Replace the cutting attachment if it if necessary. 4. Also do maintenance. Maintenance Clean the external parts of the trimmer head and clean it is not damaged. Move the trimmer head from an area...
Owner Manual
Page 25
... sharpen the grass knife or grass blade correctly, refer to the instructions that come with a dry cloth after use special grease. Do a check of the cutting equipment is filled three-quarters full with lubricant. Maintenance Make sure that the cutting attachment guard is not damaged and attached correctly. Make sure that the safety release on the battery works and locks the battery in the lower shaft coupling...
... sharpen the grass knife or grass blade correctly, refer to the instructions that come with a dry cloth after use special grease. Do a check of the cutting equipment is filled three-quarters full with lubricant. Maintenance Make sure that the cutting attachment guard is not damaged and attached correctly. Make sure that the safety release on the battery works and locks the battery in the lower shaft coupling...
Owner Manual
Page 26
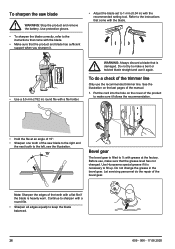
.... To do the repair of the saw blade WARNING: Stop the product and remove the battery. Use Husqvarna special grease if it is necessary to make a bent or twisted blade straight and use it again. Refer to ¾ with a flat file if the blade is heavily worn. Put the cord into the hole on the last pages of the trimmer line Only use , make sure it...
.... To do the repair of the saw blade WARNING: Stop the product and remove the battery. Use Husqvarna special grease if it is necessary to make a bent or twisted blade straight and use it again. Refer to ¾ with a flat file if the blade is heavily worn. Put the cord into the hole on the last pages of the trimmer line Only use , make sure it...

Owner Manual
Page 27
...;F) and 40°C (104°F). • Charge the battery 30% to persons. The product needs servicing. Possible action Charge the battery. Clean the cutting attachment from the battery charger during transportation. Release the power trigger and the product is jammed. Contact your product. 609 - 006... for a long time. • Use the transportation guard on the product or the package of the product means that is lit with compressed air or a soft brush. Remove the battery. Clean the battery connectors with red light Temperature deviation. Put the battery in a package....
...;F) and 40°C (104°F). • Charge the battery 30% to persons. The product needs servicing. Possible action Charge the battery. Clean the cutting attachment from the battery charger during transportation. Release the power trigger and the product is jammed. Contact your product. 609 - 006... for a long time. • Use the transportation guard on the product or the package of the product means that is lit with compressed air or a soft brush. Remove the battery. Clean the battery connectors with red light Temperature deviation. Put the battery in a package....


