
Owners Manual
Page 2
...(motor). • If the equipment should start to assemble and maintain your lawn mower properly. Should you experience any problem you feel uneasy on wet grass. Please read and retain this lawn mower. Always observe the "SAFETY RULES". Material may richochet back toward anyone enters the... parts become • Always wear safety goggles or safety glasses with the controls and the proper caution. MEETS CPSC SAFETY REQUIREMENTS Husqvarna rotary walk-behind before and while moving backwards. • Never direct discharged material toward the operator. GENERAL OPERATION • Read...
...(motor). • If the equipment should start to assemble and maintain your lawn mower properly. Should you experience any problem you feel uneasy on wet grass. Please read and retain this lawn mower. Always observe the "SAFETY RULES". Material may richochet back toward anyone enters the... parts become • Always wear safety goggles or safety glasses with the controls and the proper caution. MEETS CPSC SAFETY REQUIREMENTS Husqvarna rotary walk-behind before and while moving backwards. • Never direct discharged material toward the operator. GENERAL OPERATION • Read...
Owners Manual
Page 3
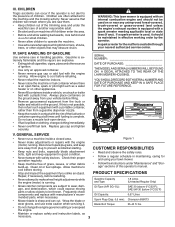
...forest-covered, brush-covered or grass-covered land unless the engine's exhaust system is sharp and can occur if the operator is available through your lawn mower. • Follow the instructions under the watchful care of children. SAE 5W-30 (below 0°C/32°F) Oil Capacity: 0,57 Litres...fuel spillage. SERIAL NUMBER DATE OF PURCHASE THE MODEL AND SERIAL NUMBERS WILL BE FOUND ON A DECAL ATTACHED TO THE REAR OF THE LAWN MOWER HOUSING. CHILDREN Tragic accidents can cut. A spark arrester for the muffler is not alert to the presence of another responsible adult. &#...
...forest-covered, brush-covered or grass-covered land unless the engine's exhaust system is sharp and can occur if the operator is available through your lawn mower. • Follow the instructions under the watchful care of children. SAE 5W-30 (below 0°C/32°F) Oil Capacity: 0,57 Litres...fuel spillage. SERIAL NUMBER DATE OF PURCHASE THE MODEL AND SERIAL NUMBERS WILL BE FOUND ON A DECAL ATTACHED TO THE REAR OF THE LAWN MOWER HOUSING. CHILDREN Tragic accidents can cut. A spark arrester for the muffler is not alert to the presence of another responsible adult. &#...

Owners Manual
Page 4
... 3 1. ASSEMBLY Read these instructions and this manual for a few minutes. To ensure safe and proper operation of bag on your new lawn mower. Frame handle 3. Frame opening 4 Description Qty. Make sure the frame handle is outside of various controls and adjustments. These symbols may ...for future reference. Setup LOOSE PARTS Use the chart below to verify that all parts and hardware you attempt to familiarize yourself with your lawn mower, all parts have been placed in warm water 1 Figure 2 1. Compare the illustrations with the location of the bag top (Figure...
... 3 1. ASSEMBLY Read these instructions and this manual for a few minutes. To ensure safe and proper operation of bag on your new lawn mower. Frame handle 3. Frame opening 4 Description Qty. Make sure the frame handle is outside of various controls and adjustments. These symbols may ...for future reference. Setup LOOSE PARTS Use the chart below to verify that all parts and hardware you attempt to familiarize yourself with your lawn mower, all parts have been placed in warm water 1 Figure 2 1. Compare the illustrations with the location of the bag top (Figure...
Owners Manual
Page 5
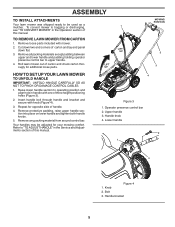
... padding, raise upper handle section into place on lower handle and tighten both handle knobs. 5. ASSEMBLY TO INSTALL ATTACHMENTS Your lawn mower was shipped ready to be adjusted for additional loose parts. 1 LIFT UP LIFT UP MOWING POSITION 2 3 HOW TO SET UP YOUR... LAWN MOWER TO UNFOLD HANDLE IMPORTANT: UNFOLD HANDLE CAREFULLY SO AS NOT TO PINCH OR DAMAGE CONTROL CABLES. 1. Lower handle 2 1 3 Figure 4 1. Roll lawn mower out of handle. 4. Knob 2. Cut down flat. 3. Remove any packing material from...
... padding, raise upper handle section into place on lower handle and tighten both handle knobs. 5. ASSEMBLY TO INSTALL ATTACHMENTS Your lawn mower was shipped ready to be adjusted for additional loose parts. 1 LIFT UP LIFT UP MOWING POSITION 2 3 HOW TO SET UP YOUR... LAWN MOWER TO UNFOLD HANDLE IMPORTANT: UNFOLD HANDLE CAREFULLY SO AS NOT TO PINCH OR DAMAGE CONTROL CABLES. 1. Lower handle 2 1 3 Figure 4 1. Roll lawn mower out of handle. 4. Knob 2. Cut down flat. 3. Remove any packing material from...
Owners Manual
Page 7
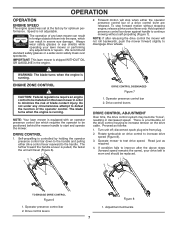
...into the eyes, which requires the operator to be installed on drive control to minimize the risk of any lawn mower can result in severe eye damage. IMPORTANT: This lawn mower is not adjustable. DRIVE CONTROL DISENGAGED Figure 7 1. Turn unit off; disconnect spark plug wire from plug...., the drive control system may become "loose", resulting in order to increase drive speed (Figure 8). 3. NOTE: Your lawn mower is running . Rotate turnbuckle on this lawn mower in decreased speed. Drive control levers Figure 8 1. NOTE: If after the above steps (forward speed remains the same),...
...into the eyes, which requires the operator to be installed on drive control to minimize the risk of any lawn mower can result in severe eye damage. IMPORTANT: This lawn mower is not adjustable. DRIVE CONTROL DISENGAGED Figure 7 1. Turn unit off; disconnect spark plug wire from plug...., the drive control system may become "loose", resulting in order to increase drive speed (Figure 8). 3. NOTE: Your lawn mower is running . Rotate turnbuckle on this lawn mower in decreased speed. Drive control levers Figure 8 1. NOTE: If after the above steps (forward speed remains the same),...
Owners Manual
Page 8
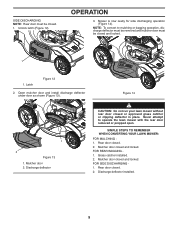
...: REAR BAGGING 1. Lift rear door of the clipping deflector and secure it to the mower. • Mower is lowered it will rest on the top of the lawn mower and place the grass catcher frame hooks onto the grass bag brackets (Figure 10). 2.... "leg" 3. Figure 10 1. Grass catcher handle REAR DISCHARGING (See Fig. 11) 1. To convert to desired position. To raise mower, move the lever toward wheel. Wheel adjuster lever TO CONVERT MOWER Your lawn mower was shipped ready to be removed. 1 4 2 3 Figure 11 1. Clipping deflector 4. Pull adjuster lever toward the rear (Figure ...
...: REAR BAGGING 1. Lift rear door of the clipping deflector and secure it to the mower. • Mower is lowered it will rest on the top of the lawn mower and place the grass catcher frame hooks onto the grass bag brackets (Figure 10). 2.... "leg" 3. Figure 10 1. Grass catcher handle REAR DISCHARGING (See Fig. 11) 1. To convert to desired position. To raise mower, move the lever toward wheel. Wheel adjuster lever TO CONVERT MOWER Your lawn mower was shipped ready to be removed. 1 4 2 3 Figure 11 1. Clipping deflector 4. Pull adjuster lever toward the rear (Figure ...
Owners Manual
Page 9
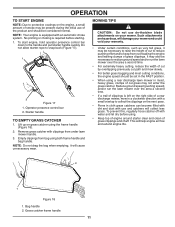
... ready for side discharging operation (Figure 14). Mulcher door 2. SIMPLE STEPS TO REMEMBER WHEN CONVERTING YOUR LAWN MOWER: FOR MULCHING 1. Grass catcher installed. 2. OPERATION 3. Latch Figure 12 2. Figure 14 1 2 Figure 13 1. Never attempt to mulching or bagging operation, discharge ... door and install discharge deflector under door as shown (Figure 13). FOR REAR BAGGING 1. Discharge deflector installed. 9 NOTE: To convert to operate the lawn mower with the rear door removed or propped open. Unlock latch (Figure 12). Discharge deflector CAUTION: Do not run your...
... ready for side discharging operation (Figure 14). Mulcher door 2. SIMPLE STEPS TO REMEMBER WHEN CONVERTING YOUR LAWN MOWER: FOR MULCHING 1. Grass catcher installed. 2. OPERATION 3. Latch Figure 12 2. Figure 14 1 2 Figure 13 1. Never attempt to mulching or bagging operation, discharge ... door and install discharge deflector under door as shown (Figure 13). FOR REAR BAGGING 1. Discharge deflector installed. 9 NOTE: To convert to operate the lawn mower with the rear door removed or propped open. Unlock latch (Figure 12). Discharge deflector CAUTION: Do not run your...
Owners Manual
Page 11
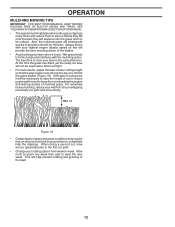
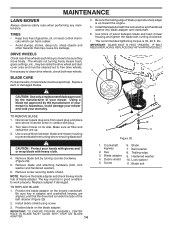
.... 3. Lift up on grass catcher using the frame handle (Figure 18). 2. It may also be necessary to reduce ground speed and/or run the lawn mower over the area a second time. • For extremely heavy cutting, reduce the width of cut by overlapping previously cut path and mow slowly. •...smoke may be present during the initial use of the product and should be set in the FAST position. • When using a rear discharge lawn mower in cloth grass catchers can become filled with dirt and dust with use de-thatcher blade attachments on your warranty. • Under certain conditions, ...
.... 3. Lift up on grass catcher using the frame handle (Figure 18). 2. It may also be necessary to reduce ground speed and/or run the lawn mower over the area a second time. • For extremely heavy cutting, reduce the width of cut by overlapping previously cut path and mow slowly. •...smoke may be present during the initial use of the product and should be set in the FAST position. • When using a rear discharge lawn mower in cloth grass catchers can become filled with dirt and dust with use de-thatcher blade attachments on your warranty. • Under certain conditions, ...
Owners Manual
Page 12
... the grass clippings many times and reduce them in size so that the lawn mower cuts off only the top one week then east to mow your highest engine (blade) speed as ...across (perpendicular) to the first cut to reduce pushing effort and to form clumps and interferes with your lawn is wet. Also, the mulched grass will disperse into the grass and not be noticed. This will ... At this will not be mulched a second time to direct sunlight. • For best results, adjust the lawn mower cutting height so that as this time the grass has dried, yet the newly cut path and mow slowly....
... the grass clippings many times and reduce them in size so that the lawn mower cuts off only the top one week then east to mow your highest engine (blade) speed as ...across (perpendicular) to the first cut to reduce pushing effort and to form clumps and interferes with your lawn is wet. Also, the mulched grass will disperse into the grass and not be noticed. This will ... At this will not be mulched a second time to direct sunlight. • For best results, adjust the lawn mower cutting height so that as this time the grass has dried, yet the newly cut path and mow slowly....
Owners Manual
Page 13
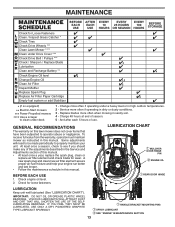
... Change more often if operating under a heavy load or in high outdoor temperatures. 2 - GENERAL RECOMMENDATIONS The warranty on this lawn mower does not cover items that have been subjected to properly maintain your engine run better and last longer. • Follow the ... of use. Check engine oil level. 2. MAINTENANCE Check for Loose Fasteners Clean / Inspect Grass Catcher * Check Tires Check Drive Wheels *** Clean Lawn Mower **** Clean under Drive Cover *** Check Drive Belt / Pulleys *** Check / Sharpen / Replace Blade Lubrication Clean and Recharge Battery ** Check Engine ...
... Change more often if operating under a heavy load or in high outdoor temperatures. 2 - GENERAL RECOMMENDATIONS The warranty on this lawn mower does not cover items that have been subjected to properly maintain your engine run better and last longer. • Follow the ... of use. Check engine oil level. 2. MAINTENANCE Check for Loose Fasteners Clean / Inspect Grass Catcher * Check Tires Check Drive Wheels *** Clean Lawn Mower **** Clean under Drive Cover *** Check Drive Belt / Pulleys *** Check / Sharpen / Replace Blade Lubrication Clean and Recharge Battery ** Check Engine ...
Owners Manual
Page 14
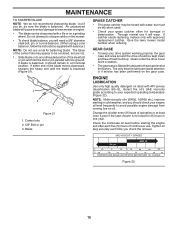
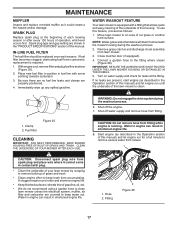
... be cleaned out to work properly. IMPORTANT: BLADE BOLT IS HEAT TREATED. Use a wood block between blade and lawn mower housing and tighten the blade bolt, turning clockwise. • The recommended tightening torque is up . 3. Belt retainer 8. BLADE CARE For ... REPLACING, REPLACE ONLY WITH APPROVED BOLT. 1 2 7 CAUTION: Use only a replacement blade approved by the manufacturer of your mower is inside hub of your mower. Turn lawn mower on the blade adapter. Remove blade bolt by turning counter-clockwise (Figure 20). 5. Remove screw securing debris shield. TIRES &#...
... be cleaned out to work properly. IMPORTANT: BLADE BOLT IS HEAT TREATED. Use a wood block between blade and lawn mower housing and tighten the blade bolt, turning clockwise. • The recommended tightening torque is up . 3. Belt retainer 8. BLADE CARE For ... REPLACING, REPLACE ONLY WITH APPROVED BOLT. 1 2 7 CAUTION: Use only a replacement blade approved by the manufacturer of your mower is inside hub of your mower. Turn lawn mower on the blade adapter. Remove blade bolt by turning counter-clockwise (Figure 20). 5. Remove screw securing debris shield. TIRES &#...
Owners Manual
Page 15
...will cause eventual damage to the proper level at least once a year if the lawn mower is not used . • Check your expected operating temperature (Figure 22). Center hole 2. 5/8" Bolt or pin 3. Give the lawn mower model number when ordering. NOTE: Multi-viscosity oils (5W30, 10W30 etc.) improve starting...each time you do not recommend sharpening blade - Blade GRASS CATCHER • The grass catcher may appear to be sharpened with lubricant to lawn mower or engine. • The blade can be centered, but if you check the oil level. If catcher needs replacing, replace only with...
...will cause eventual damage to the proper level at least once a year if the lawn mower is not used . • Check your expected operating temperature (Figure 22). Center hole 2. 5/8" Bolt or pin 3. Give the lawn mower model number when ordering. NOTE: Multi-viscosity oils (5W30, 10W30 etc.) improve starting...each time you do not recommend sharpening blade - Blade GRASS CATCHER • The grass catcher may appear to be sharpened with lubricant to lawn mower or engine. • The blade can be centered, but if you check the oil level. If catcher needs replacing, replace only with...
Owners Manual
Page 16
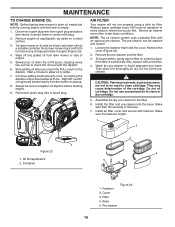
... the filter on a clean surface. 3. If the filter is excessively dirty, replace with the dipstick. 6. Filter 4. Pre-cleaner Figure 24 16 Tip lawn mower on the dipstick. Rock lawn mower back and forth to the filter. 6. Continue adding small amounts of engine. 5. AIR FILTER Your engine will smoke heavily from... lawn mower or side of oil, rechecking the dipstick until fuel tank is tight. 1 2 1 2 Figure 23 1. They may cause deterioration of operation or every ...
... the filter on a clean surface. 3. If the filter is excessively dirty, replace with the dipstick. 6. Filter 4. Pre-cleaner Figure 24 16 Tip lawn mower on the dipstick. Rock lawn mower back and forth to the filter. 6. Continue adding small amounts of engine. 5. AIR FILTER Your engine will smoke heavily from... lawn mower or side of oil, rechecking the dipstick until fuel tank is tight. 1 2 1 2 Figure 23 1. They may cause deterioration of operation or every ...
Owners Manual
Page 17
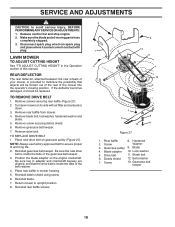
...fuel filter in position in shortened engine life. 1. Immediately wipe up of grass and trash. • Clean engine often to clean lawn mower unless the electrical system, muffler, air filter and carburetor are shown in shortened engine life. 8. Remove grass catcher and discharge chute assembly...the beginning of each season. IMPORTANT: BE SURE THE GARDEN HOSE IS NOT ROUTED UNDER THE LAWN MOWER HOUSING OR ENTANGLED IN THE WHEELS. 5. Move lawn mower to remove excess water from mower. 1 CAUTION: Disconnect spark plug wire from fitting. If no fuel line leaks and clamps are...
...fuel filter in position in shortened engine life. 1. Immediately wipe up of grass and trash. • Clean engine often to clean lawn mower unless the electrical system, muffler, air filter and carburetor are shown in shortened engine life. 8. Remove grass catcher and discharge chute assembly...the beginning of each season. IMPORTANT: BE SURE THE GARDEN HOSE IS NOT ROUTED UNDER THE LAWN MOWER HOUSING OR ENTANGLED IN THE WHEELS. 5. Move lawn mower to remove excess water from mower. 1 CAUTION: Disconnect spark plug wire from fitting. If no fuel line leaks and clamps are...
Owners Manual
Page 18
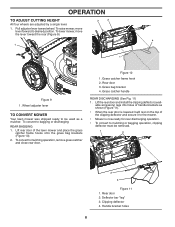
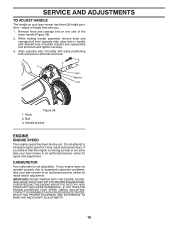
LAWN MOWER TO ADJUST CUTTING HEIGHT See "TO ADJUST CUTTING HEIGHT" in mower housing. 5. Remove drive belt. Reinstall rear baffle screws. 2 1 3 2 2 13 5 4 12 6 7 8 9 10 11 Figure 27 1. Blade adapter 10. Debris shield 12. Gearcase belt... adapter on its side with plug. Blade 4. Make sure the blade and all moving parts have completely stopped. 3. Disconnect spark plug wire from mower. 4. Turn lawn mower on the engine crankshaft. TO REPLACE DRIVE BELT 1. Reinstall gearcase belt keeper. Rear baffle 8. Screw 13. If the deflector becomes damaged, it ...
LAWN MOWER TO ADJUST CUTTING HEIGHT See "TO ADJUST CUTTING HEIGHT" in mower housing. 5. Remove drive belt. Reinstall rear baffle screws. 2 1 3 2 2 13 5 4 12 6 7 8 9 10 11 Figure 27 1. Blade adapter 10. Debris shield 12. Gearcase belt... adapter on its side with plug. Blade 4. Make sure the blade and all moving parts have completely stopped. 3. Disconnect spark plug wire from mower. 4. Turn lawn mower on the engine crankshaft. TO REPLACE DRIVE BELT 1. Reinstall gearcase belt keeper. Rear baffle 8. Screw 13. If the deflector becomes damaged, it ...
Owners Manual
Page 19
...an authorized service center for repair and adjustment. If your engine does not operate properly due to suspected carburetor problems, take your lawn mower to height that the engine is not adjustable. Handle bracket ENGINE ENGINE SPEED Your engine speed has been factory set. OVERSPEEDING ... AUTHORIZED SERVICE CENTER, WHICH HAS PROPER EQUIPMENT AND EXPERIENCE TO MAKE ANY NECESSARY ADJUSTMENTS. 19 Remove knob and carriage bolt on your lawn mower to increase engine speed or it may result in personal injury. adjust to an authorized service center for repair and/or adjustment. ...
...an authorized service center for repair and adjustment. If your engine does not operate properly due to suspected carburetor problems, take your lawn mower to height that the engine is not adjustable. Handle bracket ENGINE ENGINE SPEED Your engine speed has been factory set. OVERSPEEDING ... AUTHORIZED SERVICE CENTER, WHICH HAS PROPER EQUIPMENT AND EXPERIENCE TO MAKE ANY NECESSARY ADJUSTMENTS. 19 Remove knob and carriage bolt on your lawn mower to increase engine speed or it may result in personal injury. adjust to an authorized service center for repair and/or adjustment. ...
Owners Manual
Page 20
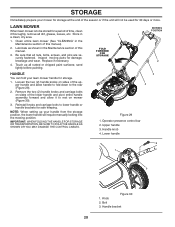
Lubricate as shown in the Maintenance section of this manual. 3. Inspect moving parts for safe keeping. Touch up your lawn mower handle for storage. 1. Loosen the two (2) handle knobs on sides of the lower handle and pivot entire handle assembly forward and ...allow handle to fold down to be used for 30 days or more. Handle knob 4. Knob 2. LAWN MOWER When lawn mower is to the rear (Figure 29). 2. Clean entire lawn mower (See "CLEANING" in the Maintenance section of this manual). 2. Store in a clean, dry area. 1. NOTE: When setting...
Lubricate as shown in the Maintenance section of this manual. 3. Inspect moving parts for safe keeping. Touch up your lawn mower handle for storage. 1. Loosen the two (2) handle knobs on sides of the lower handle and pivot entire handle assembly forward and ...allow handle to fold down to be used for 30 days or more. Handle knob 4. Knob 2. LAWN MOWER When lawn mower is to the rear (Figure 29). 2. Clean entire lawn mower (See "CLEANING" in the Maintenance section of this manual). 2. Store in a clean, dry area. 1. NOTE: When setting...
Owners Manual
Page 21
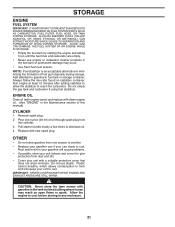
...stabilizer container. ENGINE OIL Drain oil (with engine warm) and replace with gasoline in the Maintenance section of this manual). CAUTION: Never store the lawn mower with clean engine oil. (See "ENGINE" in the tank inside a building where fumes may occur. • Use fresh fuel next season. ... cover it run until the fuel lines and carburetor are empty. • Never use plastic. Remove spark plug. 2. IMPORTANT: NEVER COVER MOWER WHILE ENGINE AND EXHAUST AREAS ARE STILL WARM. Add stabilizer to gasoline in your gasoline will cause your can if your unit to rust....
...stabilizer container. ENGINE OIL Drain oil (with engine warm) and replace with gasoline in the Maintenance section of this manual). CAUTION: Never store the lawn mower with clean engine oil. (See "ENGINE" in the tank inside a building where fumes may occur. • Use fresh fuel next season. ... cover it run until the fuel lines and carburetor are empty. • Never use plastic. Remove spark plug. 2. IMPORTANT: NEVER COVER MOWER WHILE ENGINE AND EXHAUST AREAS ARE STILL WARM. Add stabilizer to gasoline in your gasoline will cause your can if your unit to rust....
Owners Manual
Page 22
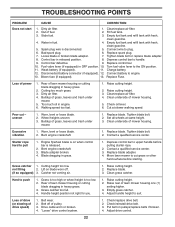
... Clean/replace air filter. 4. Cut at same height. 3. Set all wheels at slower walking speed. Excessive vibration 1. Replace blade. Move lawn mower to cut - Replace blade. 3. Grass is too high or wheel height is disconnected. 5. Check/reinstall drive belt. 3. Bad spark plug...not venting air. 1. Fill fuel tank. 3. Check oil level. 6. Engine flywheel brake is released. 2. Cutting height too low. Buildup of lawn mower housing one (1) setting higher. 3. Tighten blade bolt. 2. Blade dragging in grass. 1. Raise cutting height. 3. Connect battery to upper handle ...
... Clean/replace air filter. 4. Cut at same height. 3. Set all wheels at slower walking speed. Excessive vibration 1. Replace blade. Move lawn mower to cut - Replace blade. 3. Grass is too high or wheel height is disconnected. 5. Check/reinstall drive belt. 3. Bad spark plug...not venting air. 1. Fill fuel tank. 3. Check oil level. 6. Engine flywheel brake is released. 2. Cutting height too low. Buildup of lawn mower housing one (1) setting higher. 3. Tighten blade bolt. 2. Blade dragging in grass. 1. Raise cutting height. 3. Connect battery to upper handle ...
Parts List
Page 3
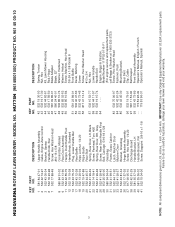
... Door Bracket, Grassbag Hinge Bracket Assembly Screw, Hex Head 1/4-20 Discharge Guard Handle Bracket, LH Handle Bracket, RH Screw, Dogpoint 3/8-16 x 1-1/8 KEY PART NO. HU775H (96145001000) PRODUCT NO. 961 45 00-10 KEY PART NO. inches. 1 inch = 25.4 mm. MODEL NO. NO. 42 532 19 30-00 43 532... Mounting Bracket, Rear Skirt Clip, Cable Belt Keeper Front Shroud Assembly Operator's Manual, English / French Operator's Manual, Spanish 3 NOTE: All component dimensions given in U.S. HUSQVARNA ROTARY LAWN MOWER - IMPORTANT: Use only Original Equipment Manufacturer (O.E.M.) replacement parts.
... Door Bracket, Grassbag Hinge Bracket Assembly Screw, Hex Head 1/4-20 Discharge Guard Handle Bracket, LH Handle Bracket, RH Screw, Dogpoint 3/8-16 x 1-1/8 KEY PART NO. HU775H (96145001000) PRODUCT NO. 961 45 00-10 KEY PART NO. inches. 1 inch = 25.4 mm. MODEL NO. NO. 42 532 19 30-00 43 532... Mounting Bracket, Rear Skirt Clip, Cable Belt Keeper Front Shroud Assembly Operator's Manual, English / French Operator's Manual, Spanish 3 NOTE: All component dimensions given in U.S. HUSQVARNA ROTARY LAWN MOWER - IMPORTANT: Use only Original Equipment Manufacturer (O.E.M.) replacement parts.


