
Operation Manual
Page 2
... stop engine before turning. • Never leave a running machine unattended. Too heavy of a child. GENERAL OPERATION • Read, understand, and follow all instructions on the machine and in the watchful care of a responsible adult other than the operator. • Be alert and turn off blades, set parking brake, and stop before operating a riding lawn mower. Avoid discharging material against a wall or obstruction. Clean any oil or fuel spillage...
... stop engine before turning. • Never leave a running machine unattended. Too heavy of a child. GENERAL OPERATION • Read, understand, and follow all instructions on the machine and in the watchful care of a responsible adult other than the operator. • Be alert and turn off blades, set parking brake, and stop before operating a riding lawn mower. Avoid discharging material against a wall or obstruction. Clean any oil or fuel spillage...

Operation Manual
Page 3
...; Avoid starting, stopping, or turning on it, do not exceed the maximum recommended operation angle of ignition. • Use only approved gasoline container. • Never remove gas cap or add fuel with the engine running . • Check grass catcher components and the discharge chute frequently and replace with a safety device that you feel uneasy on a slope. Check there proper operation regularly. NEVER operate a machine with manufacturer's recommended parts, when necessary. • Mower blades are...
...; Avoid starting, stopping, or turning on it, do not exceed the maximum recommended operation angle of ignition. • Use only approved gasoline container. • Never remove gas cap or add fuel with the engine running . • Check grass catcher components and the discharge chute frequently and replace with a safety device that you feel uneasy on a slope. Check there proper operation regularly. NEVER operate a machine with manufacturer's recommended parts, when necessary. • Mower blades are...
Operation Manual
Page 5
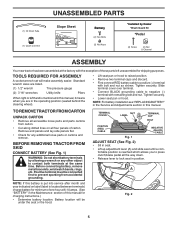
... shown. Before connecting battery, remove metal bracelets, wristwatch bands, rings, etc. Battery location will make assembly easier. Tighten securely. TERMINAL COVER NUT LABEL TERMINAL CAP BOLT POSITIVE (RED) CABLE 02605 NEGATIVE (BLACK) CABLE Fig. 1 ADJUST SEAT (See Fig. 2) • Sit in seat. • Lift up adjustment lever (A) and slide seat until a comfortable position is mentioned in this manual for charging instructions.) • Determine battery location. Standard wrench sizes are listed. (1) 1/2" wrench Tire pressure gauge (2) 7/16" wrenches...
... shown. Before connecting battery, remove metal bracelets, wristwatch bands, rings, etc. Battery location will make assembly easier. Tighten securely. TERMINAL COVER NUT LABEL TERMINAL CAP BOLT POSITIVE (RED) CABLE 02605 NEGATIVE (BLACK) CABLE Fig. 1 ADJUST SEAT (See Fig. 2) • Sit in seat. • Lift up adjustment lever (A) and slide seat until a comfortable position is mentioned in this manual for charging instructions.) • Determine battery location. Standard wrench sizes are listed. (1) 1/2" wrench Tire pressure gauge (2) 7/16" wrenches...
Operation Manual
Page 6
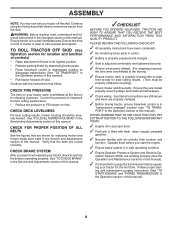
... for replacing motion and mower blade drive belts in the Operation section of this manual). • Roll tractor forward off the skid. WARNING: Before starting and transmission purging instructions (See "TO START ENGINE" and "PURGE TRANSMISSION" in the Operation section of this manual). CHECK DECK LEVELNESS For best cutting results, mower housing should be properly inflated for location and function of controls) • Raise attachment lift lever to its highest position. • Release parking brake by depressing brake pedal...
... for replacing motion and mower blade drive belts in the Operation section of this manual). • Roll tractor forward off the skid. WARNING: Before starting and transmission purging instructions (See "TO START ENGINE" and "PURGE TRANSMISSION" in the Operation section of this manual). CHECK DECK LEVELNESS For best cutting results, mower housing should be properly inflated for location and function of controls) • Raise attachment lift lever to its highest position. • Release parking brake by depressing brake pedal...

Operation Manual
Page 8
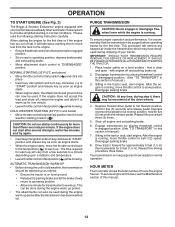
... of tractor. (L) REVERSE DRIVE PEDAL - Used to engage the mower blades, or other powered attachment while in reverse. (H) LIGHT SWITCH - Used for future reference. Used for starting and stopping the engine. (G) REVERSE OPERATION SYSTEM (ROS) "ON" POSITION - Z H D S Y G P F E B A Q C M K J L Fig. 3 Our tractors conform to familiarize yourself with the locations of various controls and adjustments. Used for 12 volt accessories. (S) BATTERY INDICATOR/CHARGING PLUG - OPERATION KNOW YOUR TRACTOR READ THIS MANUAL AND SAFETY RULES BEFORE OPERATING YOUR TRACTOR Compare...
... of tractor. (L) REVERSE DRIVE PEDAL - Used to engage the mower blades, or other powered attachment while in reverse. (H) LIGHT SWITCH - Used for future reference. Used for starting and stopping the engine. (G) REVERSE OPERATION SYSTEM (ROS) "ON" POSITION - Z H D S Y G P F E B A Q C M K J L Fig. 3 Our tractors conform to familiarize yourself with the locations of various controls and adjustments. Used for 12 volt accessories. (S) BATTERY INDICATOR/CHARGING PLUG - OPERATION KNOW YOUR TRACTOR READ THIS MANUAL AND SAFETY RULES BEFORE OPERATING YOUR TRACTOR Compare...
Operation Manual
Page 9
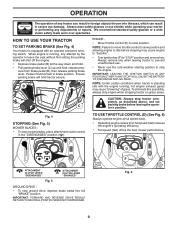
... tractor is running , hot engine exhaust gases may cause engine to "backfire". • Turn ignition key (F) to stop engine when stopping tractor on grass areas. IMPORTANT: LEAVING THE IGNITION SWITCH IN ANY POSITION OTHER THAN "STOP" WILL CAUSE THE BATTERY TO DISCHARGE AND GO DEAD. sure from brake pedal (B), then release parking brake lever. OPERATION The operation of grass. IMPORTANT: FORWARD AND REVERSE DRIVE PEDALS RETURN TO NEUTRAL POSITION WHEN NOT DEPRESSED. TO USE THROTTLE CONTROL...
... tractor is running , hot engine exhaust gases may cause engine to "backfire". • Turn ignition key (F) to stop engine when stopping tractor on grass areas. IMPORTANT: LEAVING THE IGNITION SWITCH IN ANY POSITION OTHER THAN "STOP" WILL CAUSE THE BATTERY TO DISCHARGE AND GO DEAD. sure from brake pedal (B), then release parking brake lever. OPERATION The operation of grass. IMPORTANT: FORWARD AND REVERSE DRIVE PEDALS RETURN TO NEUTRAL POSITION WHEN NOT DEPRESSED. TO USE THROTTLE CONTROL...
Operation Manual
Page 10
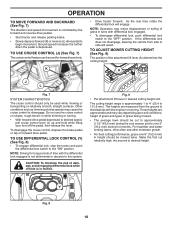
... or turning. • With forward drive pedal depressed to the blade tip with the engine not running. OPERATION TO MOVE FORWARD AND BACKWARD (See Fig. 7) The direction and speed of movement is depressed. Other conditions such as trimming at slow speeds may vary depending upon soil conditions, height of grass and types of grass being mowed. • The average lawn should be used while mowing or...
... or turning. • With forward drive pedal depressed to the blade tip with the engine not running. OPERATION TO MOVE FORWARD AND BACKWARD (See Fig. 7) The direction and speed of movement is depressed. Other conditions such as trimming at slow speeds may vary depending upon soil conditions, height of grass and types of grass being mowed. • The average lawn should be used while mowing or...
Operation Manual
Page 11
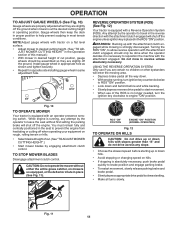
... engine unless ignition key is placed in most terrain conditions. Install gauge wheel in appropriate hole as shown and tighten securely. • Repeat for opposite side installing gauge wheel in desired height of cut . (See "TO ADJUST MOWER CUTTING HEIGHT".) • Start mower blades by the operator to leave the seat without either the entire grass catcher, on mowers so equipped, or the deflector chute in reverse unless absolutely necessary. TO STOP MOWER BLADES Disengage attachment clutch control. JUST MOWER CUTTING HEIGHT" in the Operation...
... engine unless ignition key is placed in most terrain conditions. Install gauge wheel in appropriate hole as shown and tighten securely. • Repeat for opposite side installing gauge wheel in desired height of cut . (See "TO ADJUST MOWER CUTTING HEIGHT".) • Start mower blades by the operator to leave the seat without either the entire grass catcher, on mowers so equipped, or the deflector chute in reverse unless absolutely necessary. TO STOP MOWER BLADES Disengage attachment clutch control. JUST MOWER CUTTING HEIGHT" in the Operation...
Operation Manual
Page 14
... mowing. HOUR METER The hourmeter shows the total number of this section of the drive wheels. 4. OPERATION TO START ENGINE (See Fig. 3) The Briggs & Stratton Endurance engine equipped with engine off engine and set . 2. off and parking brake set parking brake. 6. After the engine is running . Repeat this procedure three (3) times. 5. AUTOMATIC TRANSMISSION WARM UP • Before driving the unit in normal conditions. To service engine and mower, see the Maintenance section of hours the engine...
... mowing. HOUR METER The hourmeter shows the total number of this section of the drive wheels. 4. OPERATION TO START ENGINE (See Fig. 3) The Briggs & Stratton Endurance engine equipped with engine off engine and set . 2. off and parking brake set parking brake. 6. After the engine is running . Repeat this procedure three (3) times. 5. AUTOMATIC TRANSMISSION WARM UP • Before driving the unit in normal conditions. To service engine and mower, see the Maintenance section of hours the engine...
Operation Manual
Page 16
... The warranty on this tractor does not cover items that have been subjected to see if you should replace the spark plug, clean or replace air filter, and check blades and belts for Loose Fasteners A Check/Replace Mower Blades C Lubrication Chart T Check Battery Level O Clean Battery and Terminals R Clean Debris off Steering Plate Check Transaxle Cooling Check Mower Levelness Check V-Belts Check Engine Oil Level Change Engine Oil (models with maintenance-free battery. 1, 2 2 2 5 - MAINTENANCE MAINTENANCE SCHEDULE Check Brake Operation Check Tire Pressure T Check Operator Presence...
... The warranty on this tractor does not cover items that have been subjected to see if you should replace the spark plug, clean or replace air filter, and check blades and belts for Loose Fasteners A Check/Replace Mower Blades C Lubrication Chart T Check Battery Level O Clean Battery and Terminals R Clean Debris off Steering Plate Check Transaxle Cooling Check Mower Levelness Check V-Belts Check Engine Oil Level Change Engine Oil (models with maintenance-free battery. 1, 2 2 2 5 - MAINTENANCE MAINTENANCE SCHEDULE Check Brake Operation Check Tire Pressure T Check Operator Presence...
Operation Manual
Page 17
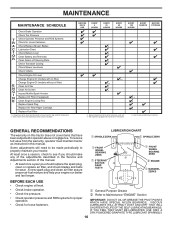
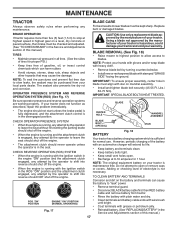
... sure operator presence and reverse operation systems are working properly. CHECK REVERSE OPERATION (ROS) SYSTEM BLADE BOLT (SPECIAL) STAR BATTERY Fig. 18 Your tractor has a battery charging system which can cause the battery to "leak" power. • Remove terminal guard. • Disconnect BLACK battery cable first then RED battery cable and remove battery from your tractor is maintenance free. However, periodic charging of this manual.) TIRES • Maintain proper air pressure in all tires. (See the sides of tires for 1 hour. BRAKE OPERATION If tractor...
... sure operator presence and reverse operation systems are working properly. CHECK REVERSE OPERATION (ROS) SYSTEM BLADE BOLT (SPECIAL) STAR BATTERY Fig. 18 Your tractor has a battery charging system which can cause the battery to "leak" power. • Remove terminal guard. • Disconnect BLACK battery cable first then RED battery cable and remove battery from your tractor is maintenance free. However, periodic charging of this manual.) TIRES • Maintain proper air pressure in all tires. (See the sides of tires for 1 hour. BRAKE OPERATION If tractor...
Operation Manual
Page 18
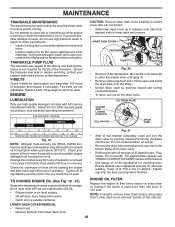
..., grass clippings and other oil change . Ensure dipstick cap is hot. ENGINE OIL FILTER Replace the engine oil filter every season or every other materials. To prevent possible damage to seals, do not use compressed air or high pressure sprayer to release cover tabs from lower dash cover. 18 Select the oil's SAE viscosity grade according to ensure fan blades are intact and clean. • Inspect cooling fins for checking level. OIL DRAIN VALVE...
..., grass clippings and other oil change . Ensure dipstick cap is hot. ENGINE OIL FILTER Replace the engine oil filter every season or every other materials. To prevent possible damage to seals, do not use compressed air or high pressure sprayer to release cover tabs from lower dash cover. 18 Select the oil's SAE viscosity grade according to ensure fan blades are intact and clean. • Inspect cooling fins for checking level. OIL DRAIN VALVE...

Operation Manual
Page 19
... engine, battery, seat, finish, etc. NOTE: Operating the engine with a wire brush or compressed air to clean the outside tractor and mower. MAINTENANCE AIR FILTER Your engine will shorten the useful life of operation, whichever occurs first. CLEAN AIR SCREEN The air screen is required. • With engine cool, remove filter and plug fuel line sections. • Place new fuel filter in position in fuel line with automotive type wax. The air screen must be replaced once each mowing season...
... engine, battery, seat, finish, etc. NOTE: Operating the engine with a wire brush or compressed air to clean the outside tractor and mower. MAINTENANCE AIR FILTER Your engine will shorten the useful life of operation, whichever occurs first. CLEAN AIR SCREEN The air screen is required. • With engine cool, remove filter and plug fuel line sections. • Place new fuel filter in position in fuel line with automotive type wax. The air screen must be replaced once each mowing season...
Operation Manual
Page 20
... "ENGAGED" position to remove excess water and to using mower again. 20 Turn the water off . Remove bagger chute or mulch cover if attached. 2. Turn the water on the tractor, re-start the engine and place the throttle lever in the operator's position with the blade. • Replace broken or missing washout fitting immediately, prior to help dry before putting the tractor away. Shut engine off . 9. Place the attachment clutch control in the "DISENGAGED" position, set the parking brake, and...
... "ENGAGED" position to remove excess water and to using mower again. 20 Turn the water off . Remove bagger chute or mulch cover if attached. 2. Turn the water on the tractor, re-start the engine and place the throttle lever in the operator's position with the blade. • Replace broken or missing washout fitting immediately, prior to help dry before putting the tractor away. Shut engine off . 9. Place the attachment clutch control in the "DISENGAGED" position, set the parking brake, and...
Operation Manual
Page 21
... in contact with plug. See Mower Drive Belt Removal in "TO REPLACE MOWER BLADE DRIVE BELT" in this section. • Disconnect front link (E) from mower - TO INSTALL MOWER (See Fig. 25 - 32) Ensure tractor is spring loaded. Have a tight grip on level surface and engage parking brake. • Lower attachment lift lever to either side of tractor. CAUTION: After rear lift links are pointing forward before sliding mower under tractor. • Slide mower under tractor until it is...
... in contact with plug. See Mower Drive Belt Removal in "TO REPLACE MOWER BLADE DRIVE BELT" in this section. • Disconnect front link (E) from mower - TO INSTALL MOWER (See Fig. 25 - 32) Ensure tractor is spring loaded. Have a tight grip on level surface and engage parking brake. • Lower attachment lift lever to either side of tractor. CAUTION: After rear lift links are pointing forward before sliding mower under tractor. • Slide mower under tractor until it is...

Operation Manual
Page 23
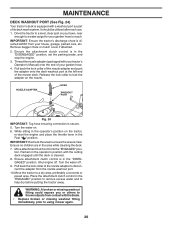
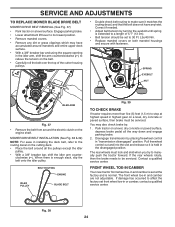
... are equal. A B TIGHTEN ADJUST NUT B TO RAISE MOWER LOOSEN ADJUST NUT B TO LOWER MOWER LOOSEN JAM NUT A FIRST Fig. 36 NOTE: Each full turn of the adjustment nut will change mower height about 3/16" (4,7 mm). • Test your adjustment by mowing some uncut grass and visually checking the appearance. VISUAL SIDE-TO-SIDE ADJUSTMENT (See Fig. 33) • With all tires properly inflated, park tractor on level ground or...
... are equal. A B TIGHTEN ADJUST NUT B TO RAISE MOWER LOOSEN ADJUST NUT B TO LOWER MOWER LOOSEN JAM NUT A FIRST Fig. 36 NOTE: Each full turn of the adjustment nut will change mower height about 3/16" (4,7 mm). • Test your adjustment by mowing some uncut grass and visually checking the appearance. VISUAL SIDE-TO-SIDE ADJUSTMENT (See Fig. 33) • With all tires properly inflated, park tractor on level ground or...
Operation Manual
Page 24
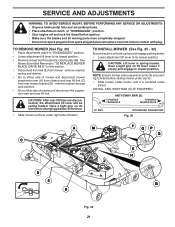
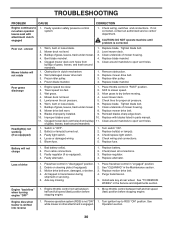
... the rear wheels rotate, then the brake needs to be set to manually push the tractor forward. The front wheel toe-in or camber, contact a qualified service center. If damage has occurred to affect the factory set at highest speed in installing the deck belt, refer to its lowest position. • Remove mandrel covers. • Remove any dirt or grass clippings which may also check brake by: 1. Disengage transmission by turning the eyebolt until spring...
... the rear wheels rotate, then the brake needs to be set to manually push the tractor forward. The front wheel toe-in or camber, contact a qualified service center. If damage has occurred to affect the factory set at highest speed in installing the deck belt, refer to its lowest position. • Remove mandrel covers. • Remove any dirt or grass clippings which may also check brake by: 1. Disengage transmission by turning the eyebolt until spring...
Operation Manual
Page 28
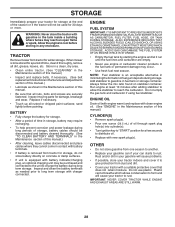
... 30 days or more. Run engine at the end of oil through spark plug hole(s) into cylinder(s). • Turn ignition key to charge the battery during storage. BATTERY • Fully charge the battery for a period of fuel gum deposits during long term storage. Rust and/or dirt in any enclosure. Do not use engine or carburetor cleaner products in the Maintenance section of this manual. • Be sure that...
... 30 days or more. Run engine at the end of oil through spark plug hole(s) into cylinder(s). • Turn ignition key to charge the battery during storage. BATTERY • Fully charge the battery for a period of fuel gum deposits during long term storage. Rust and/or dirt in any enclosure. Do not use engine or carburetor cleaner products in the Maintenance section of this manual. • Be sure that...

Operation Manual
Page 29
... 6. Empty fuel tank and carburetor, refill tank with fresh gasoline and replace fuel filter. 10. Dirty air filter. 2. Loose or damaged wiring. 7. Empty fuel tank and refill tank with fresh, clean gas. 9. Cutting too much grass/too fast. 1. Build-up of mower housing. 4. Replace fuel filter. 6. Replace spark plug. 3. Blown fuse. 5. Corroded battery terminals. 3. Recharge or replace battery. 2. Dirty/clogged muffler. 12. Engine valves out of fuel. 2. Out of adjustment. 14. Stale or dirty fuel. 6. Disengage attachment clutch. 3. Low oil level/dirty oil...
... 6. Empty fuel tank and carburetor, refill tank with fresh gasoline and replace fuel filter. 10. Dirty air filter. 2. Loose or damaged wiring. 7. Empty fuel tank and refill tank with fresh, clean gas. 9. Cutting too much grass/too fast. 1. Build-up of mower housing. 4. Replace fuel filter. 6. Replace spark plug. 3. Blown fuse. 5. Corroded battery terminals. 3. Recharge or replace battery. 2. Dirty/clogged muffler. 12. Engine valves out of fuel. 2. Out of adjustment. 14. Stale or dirty fuel. 6. Disengage attachment clutch. 3. Low oil level/dirty oil...
Operation Manual
Page 30
... light switch. 4. Faulty operator-safety presence control system. Poor cut - uneven Mower blades will not charge 1. Clogged mower deck vent holes from buildup 11. Replace blade mandrel. Mower deck not level. 4. Replace with attachment clutch engaged 1. Replace fuse. Faulty regulator (if so equipped). 4. Faulty alternator. 1. Check/clean all connections. 3. See "CLEANING" in the Service and Adjustments section. See "TO REMOVE WHEEL" in the Maintenance section. 3. Check wiring, switches and connections. Worn, bent or loose blade...
... light switch. 4. Faulty operator-safety presence control system. Poor cut - uneven Mower blades will not charge 1. Clogged mower deck vent holes from buildup 11. Replace blade mandrel. Mower deck not level. 4. Replace with attachment clutch engaged 1. Replace fuse. Faulty regulator (if so equipped). 4. Faulty alternator. 1. Check/clean all connections. 3. See "CLEANING" in the Service and Adjustments section. See "TO REMOVE WHEEL" in the Maintenance section. 3. Check wiring, switches and connections. Worn, bent or loose blade...


