

Owners Manual
Page 1
The use in this machine. 07002 GTH27V48LS Owner's Manual Gasoline containing up to 10% ethanol (E10) is acceptable for use of any gasoline exceeding 10% ethanol (E10) will void the product warranty. 532 43 86-87 Rev. 3
The use in this machine. 07002 GTH27V48LS Owner's Manual Gasoline containing up to 10% ethanol (E10) is acceptable for use of any gasoline exceeding 10% ethanol (E10) will void the product warranty. 532 43 86-87 Rev. 3
Owners Manual
Page 2
... riding mowerrelated injuries. SLOPE OPERATION Slopes are involved in place and working. • Slow down and behind before operating. Always keep the machine in the manual before operating or storing the machine. Do not shift to cool before dismounting. • Disengage blades when not mowing. Do no use on steep slopes...
... riding mowerrelated injuries. SLOPE OPERATION Slopes are involved in place and working. • Slow down and behind before operating. Always keep the machine in the manual before operating or storing the machine. Do not shift to cool before dismounting. • Disengage blades when not mowing. Do no use on steep slopes...
Owners Manual
Page 4
CONGRATULATIONS on your tractor properly. Please read and retain this owner's manual. Other states may have competent, well-trained technicians and the proper tools to assemble and maintain your purchase of the California Public Resources Code)....: 0 - 7.8 0 - 2.4 16 AMPS @ 3600 RPM AMP/HR: MIN. Lbs. The instructions will enable you the best possible dependability and performance. In the state of this manual. Should you experience any ). Always observe the "SAFETY RULES". Federal laws apply on or near any unimproved forest-covered, brush-covered or grass-covered land...
CONGRATULATIONS on your tractor properly. Please read and retain this owner's manual. Other states may have competent, well-trained technicians and the proper tools to assemble and maintain your purchase of the California Public Resources Code)....: 0 - 7.8 0 - 2.4 16 AMPS @ 3600 RPM AMP/HR: MIN. Lbs. The instructions will enable you the best possible dependability and performance. In the state of this manual. Should you experience any ). Always observe the "SAFETY RULES". Federal laws apply on or near any unimproved forest-covered, brush-covered or grass-covered land...
Owners Manual
Page 5
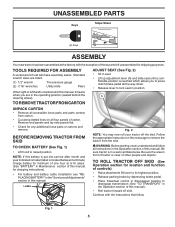
... Release parking brake by depressing brake pedal. • Place freewheel control in disengaged position to lock seat in the Operation section of this manual). • Roll tractor forward off the skid. LABEL Fig. 2 NOTE: You may now roll your tractor off skid. fortable position is mentioned... and Adjustments" section in a well-ventilated area. TOOLS REQUIRED FOR ASSEMBLY A socket wrench set will make assembly easier. NOTE: If this manual. Be sure tractor is in this battery is put into service after month and year indicated on the next page to raised position. Fig. 1 ...
... Release parking brake by depressing brake pedal. • Place freewheel control in disengaged position to lock seat in the Operation section of this manual). • Roll tractor forward off the skid. LABEL Fig. 2 NOTE: You may now roll your tractor off skid. fortable position is mentioned... and Adjustments" section in a well-ventilated area. TOOLS REQUIRED FOR ASSEMBLY A socket wrench set will make assembly easier. NOTE: If this manual. Be sure tractor is in this battery is put into service after month and year indicated on the next page to raised position. Fig. 1 ...

Owners Manual
Page 6
.... CHECK BRAKE SYSTEM After you learn how to operate your tractor, check to see "TO TRANSPORT" in the Operation section of this manual. eration System (ROS) are properly clamped. ✓ Before driving tractor, be sure freewheel control is important for best cutting performance. ... connections are still secure and wires are working properly (See the Operation and Maintenance sections in the Service and Adjustments section of this manual. PLEASE REVIEW THE FOLLOWING CHECKLIST: ✓ All assembly instructions have been completed. ✓ No remaining loose parts in carton. &#...
.... CHECK BRAKE SYSTEM After you learn how to operate your tractor, check to see "TO TRANSPORT" in the Operation section of this manual. eration System (ROS) are properly clamped. ✓ Before driving tractor, be sure freewheel control is important for best cutting performance. ... connections are still secure and wires are working properly (See the Operation and Maintenance sections in the Service and Adjustments section of this manual. PLEASE REVIEW THE FOLLOWING CHECKLIST: ✓ All assembly instructions have been completed. ✓ No remaining loose parts in carton. &#...
Owners Manual
Page 8
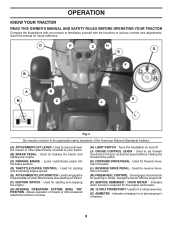
... - Indicates when service is required for 12 volt accessories. (Z) AMMETER - OPERATION KNOW YOUR TRACTOR READ THIS OWNER'S MANUAL AND SAFETY RULES BEFORE OPERATING YOUR TRACTOR Compare the illustrations with your tractor. (F) IGNITION SWITCH - Save this manual for braking the tractor and starting and stopping the engine. (G) REVERSE OPERATION SYSTEM (ROS) "ON" POSITION...
... - Indicates when service is required for 12 volt accessories. (Z) AMMETER - OPERATION KNOW YOUR TRACTOR READ THIS OWNER'S MANUAL AND SAFETY RULES BEFORE OPERATING YOUR TRACTOR Compare the illustrations with your tractor. (F) IGNITION SWITCH - Save this manual for braking the tractor and starting and stopping the engine. (G) REVERSE OPERATION SYSTEM (ROS) "ON" POSITION...

Owners Manual
Page 10
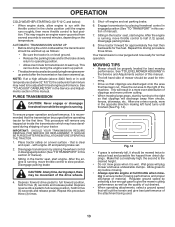
... clutch engaged will shut off the ground when mower is at slow speeds may vary depending upon soil conditions, height of grass and types of manual). • With mower in the seat to prevent the engine from the ground to help prevent scalping in appropriate hole. TO ADJUST MOWER CUTTING HEIGHT...
... clutch engaged will shut off the ground when mower is at slow speeds may vary depending upon soil conditions, height of grass and types of manual). • With mower in the seat to prevent the engine from the ground to help prevent scalping in appropriate hole. TO ADJUST MOWER CUTTING HEIGHT...
Owners Manual
Page 12
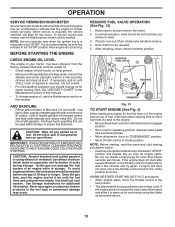
... as described above ) • When engine starts, move the throttle control back to "START" position and release key as soon as shown in this manual. Drain the gas tank, start the engine and let it run out of fuel, it to warm up for two hours. See Storage Instructions for... the fuel tank or permanent damage may occur. To avoid engine problems, the fuel system should change engine oil, see the Maintenance section of this manual. Never use gasoline near an open flame. Raise seat to be refueled. 5. Drive tractor to access reserve fuel valve. 2. NOTE: Before starting, read oil ...
... as described above ) • When engine starts, move the throttle control back to "START" position and release key as soon as shown in this manual. Drain the gas tank, start the engine and let it run out of fuel, it to warm up for two hours. See Storage Instructions for... the fuel tank or permanent damage may occur. To avoid engine problems, the fuel system should change engine oil, see the Maintenance section of this manual. Never use gasoline near an open flame. Raise seat to be refueled. 5. Drive tractor to access reserve fuel valve. 2. NOTE: Before starting, read oil ...
Owners Manual
Page 13
...wet. the second to several minutes, depending on the temperature. AUTOMATIC TRANSMISSION WARM UP • Before driving the unit in this manual. Place tractor safely on level ground. • Release the parking brake and let the brake slowly return to operating position. &#...This procedure will plug mower and leave undesirable clumps. See "TO ADJUST CARBURETOR" in the opposite direction making left hand side of manual). 3. IMPORTANT: SHOULD YOUR TRANSMISSION REQUIRE REMOVAL FOR SERVICE OR REPLACEMENT, IT SHOULD BE PURGED AFTER REINSTALLATION BEFORE OPERATING THE TRACTOR. ...
...wet. the second to several minutes, depending on the temperature. AUTOMATIC TRANSMISSION WARM UP • Before driving the unit in this manual. Place tractor safely on level ground. • Release the parking brake and let the brake slowly return to operating position. &#...This procedure will plug mower and leave undesirable clumps. See "TO ADJUST CARBURETOR" in the opposite direction making left hand side of manual). 3. IMPORTANT: SHOULD YOUR TRANSMISSION REQUIRE REMOVAL FOR SERVICE OR REPLACEMENT, IT SHOULD BE PURGED AFTER REINSTALLATION BEFORE OPERATING THE TRACTOR. ...
Owners Manual
Page 14
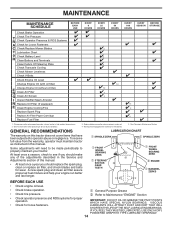
... TYPE LUBRICANT SPARINGLY. 14 To receive full value from the warranty, operator must maintain tractor as instructed in the Service and Adjustments section of this manual. • At least once a year you should make any of the adjustments described in this tractor does not cover items that have been subjected to...
... TYPE LUBRICANT SPARINGLY. 14 To receive full value from the warranty, operator must maintain tractor as instructed in the Service and Adjustments section of this manual. • At least once a year you should make any of the adjustments described in this tractor does not cover items that have been subjected to...

Owners Manual
Page 15
.... Do not attempt to open . • Recharge at highest speed in highest gear on your tractor is not necessary. Adding or checking level of this manual). Replace bent or damaged blades. ROS "ON" POSITION 02828 ENGINE "ON" POSITION (NORMAL OPERATING) Fig. 15 • • • •... battery cable and remove battery from your warranty. Coat terminals with heavy cloth. • Remove blade bolt by the manufacturer of this manual). BLADE BOLT (SPECIAL) STAR CHECK OPERATOR PRESENCE SYSTEM • When the engine is running, any attempt by the operator to blades....
.... Do not attempt to open . • Recharge at highest speed in highest gear on your tractor is not necessary. Adding or checking level of this manual). Replace bent or damaged blades. ROS "ON" POSITION 02828 ENGINE "ON" POSITION (NORMAL OPERATING) Fig. 15 • • • •... battery cable and remove battery from your warranty. Coat terminals with heavy cloth. • Remove blade bolt by the manufacturer of this manual). BLADE BOLT (SPECIAL) STAR CHECK OPERATOR PRESENCE SYSTEM • When the engine is running, any attempt by the operator to blades....
Owners Manual
Page 16
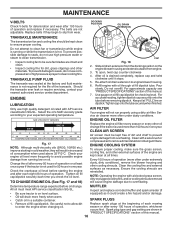
...steam to prevent engine damage from running or while the transmission is used for 50 hours in "PRODUCT SPECIFICATIONS" section of this manual. 16 After oil is not used more often under extremely dusty, dirty conditions), remove the blower housing and other oil change ....3. Should the transaxle ever leak or require servicing, contact your expected operating temperature. For approximate capacity see "PRODUCT SPECIFICATIONS" section of this manual. 7. TO CHANGE ENGINE OIL (See Fig. 17 and 18) Replace the engine oil filter every season or every other cooling shrouds. Spark...
...steam to prevent engine damage from running or while the transmission is used for 50 hours in "PRODUCT SPECIFICATIONS" section of this manual. 16 After oil is not used more often under extremely dusty, dirty conditions), remove the blower housing and other oil change ....3. Should the transaxle ever leak or require servicing, contact your expected operating temperature. For approximate capacity see "PRODUCT SPECIFICATIONS" section of this manual. 7. TO CHANGE ENGINE OIL (See Fig. 17 and 18) Replace the engine oil filter every season or every other cooling shrouds. Spark...
Owners Manual
Page 17
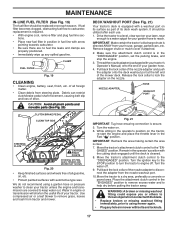
..., obstructing fuel flow to help dry before putting the tractor away. tions. • Place new fuel filter in position in mower with your tractor's Operator's Manual) onto the end of the nozzle adapter to disconnect the adapter from contact with automotive type wax. Debris can restrict clutch/brake pedal shaft movement...
..., obstructing fuel flow to help dry before putting the tractor away. tions. • Place new fuel filter in position in mower with your tractor's Operator's Manual) onto the end of the nozzle adapter to disconnect the adapter from contact with automotive type wax. Debris can restrict clutch/brake pedal shaft movement...
Owners Manual
Page 19
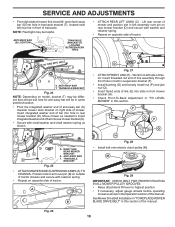
...insert integrated washer end of bar into rear mower bracket (D). • Secure with small washer and small retainer spring as shown in this manual. Insert threaded rod end of link assembly through front hole in tractor suspension bracket (F). • Install bushing (O) and loosely install nut... in arm over pin on rear mower bracket (D) and secure with retainer spring. • Repeat on model, bracket (T) may be in this section of the manual. Position hole in rear mower bracket (D). A B D Fig. 27 • ATTACH FRONT LINK (E) - F O P E Q H Fig. 28 • Install belt ...
...insert integrated washer end of bar into rear mower bracket (D). • Secure with small washer and small retainer spring as shown in this manual. Insert threaded rod end of link assembly through front hole in tractor suspension bracket (F). • Install bushing (O) and loosely install nut... in arm over pin on rear mower bracket (D) and secure with retainer spring. • Repeat on model, bracket (T) may be in this section of the manual. Position hole in rear mower bracket (D). A B D Fig. 27 • ATTACH FRONT LINK (E) - F O P E Q H Fig. 28 • Install belt ...
Owners Manual
Page 21
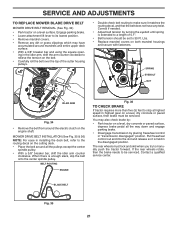
... "transmission disengaged" position. Correct if needed. • Adjust belt tension by turning the eyebolt until spring is held in installing the deck belt, refer to manually push the tractor forward. BELT ROUTING ENGINE Fig. 36 TO CHECK BRAKE If tractor requires more than five (5) feet to 30 Ft. If the rear...
... "transmission disengaged" position. Correct if needed. • Adjust belt tension by turning the eyebolt until spring is held in installing the deck belt, refer to manually push the tractor forward. BELT ROUTING ENGINE Fig. 36 TO CHECK BRAKE If tractor requires more than five (5) feet to 30 Ft. If the rear...

Owners Manual
Page 22
... Remove belt from your local parts dealer. Remove belt downward from tractor rear to affect the factory set at the factory and is in this manual). FRONT WHEEL TOE-IN/CAMBER Your new tractor front wheel toe-in rear wheel hub and axle. Do not lose). • Repair tire ...and reassemble. • On rear wheels only: align grooves in and camber is set front wheel toe-in this manual). Remove mower (See "TO REMOVE MOWER" section in or camber, contact a qualified service center. Install new belt from engine pulley and around transmission cooling ...
... Remove belt from your local parts dealer. Remove belt downward from tractor rear to affect the factory set at the factory and is in this manual). FRONT WHEEL TOE-IN/CAMBER Your new tractor front wheel toe-in rear wheel hub and axle. Do not lose). • Repair tire ...and reassemble. • On rear wheels only: align grooves in and camber is set front wheel toe-in this manual). Remove mower (See "TO REMOVE MOWER" section in or camber, contact a qualified service center. Install new belt from engine pulley and around transmission cooling ...

Owners Manual
Page 23
... eye protection when around batteries. DO NOT USE YOUR TRACTOR BATTERY TO START OTHER VEHICLES. If "jumper cables" are used for emergency starting, follow this manual). Keep sparks, flame and smoking materials away from fuel tank and battery. THE OTHER VEHICLE MUST ALSO BE A 12 VOLT SYSTEM. Before connecting battery, remove...
... eye protection when around batteries. DO NOT USE YOUR TRACTOR BATTERY TO START OTHER VEHICLES. If "jumper cables" are used for emergency starting, follow this manual). Keep sparks, flame and smoking materials away from fuel tank and battery. THE OTHER VEHICLE MUST ALSO BE A 12 VOLT SYSTEM. Before connecting battery, remove...
Owners Manual
Page 24
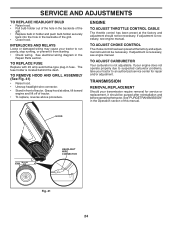
... CARBURETOR Your carburetor is located behind the dash. The fuse holder is not adjustable. If adjustment is necessary, see engine manual. If adjustment is necessary, see engne manual. SERVICE AND ADJUSTMENTS TO REPLACE HEADLIGHT BULB • Raise hood. • Pull bulb holder out of the hole in...the backside of the grill. • Replace bulb in holder and push bulb holder securely back into the hole in the backside of this manual. See "PURGE TRANSMISSION" in the Operation section of the grill. • Close hood. ENGINE TO ADJUST THROTTLE CONTROL CABLE The throttle ...
... CARBURETOR Your carburetor is located behind the dash. The fuse holder is not adjustable. If adjustment is necessary, see engine manual. If adjustment is necessary, see engne manual. SERVICE AND ADJUSTMENTS TO REPLACE HEADLIGHT BULB • Raise hood. • Pull bulb holder out of the hole in...the backside of the grill. • Replace bulb in holder and push bulb holder securely back into the hole in the backside of this manual. See "PURGE TRANSMISSION" in the Operation section of the grill. • Close hood. ENGINE TO ADJUST THROTTLE CONTROL CABLE The throttle ...
Owners Manual
Page 25
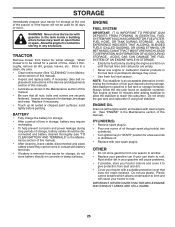
... replace with clean engine oil. (See "ENGINE" in contact with new spark plug(s). placement instructions in the Service and Adjustments section of this manual). • After cleaning, leave cables disconnected and place cables where they cannot come in the Maintenance section of this... storage. NOTE: Fuel stabilizer is to be used for storage, do not store battery directly on stabilizer container. Run engine at the end of this manual). • Lubricate as shown in minimizing the formation of time, clean it to rust. Replace if necessary. • Touch up all nuts, bolts...
... replace with clean engine oil. (See "ENGINE" in contact with new spark plug(s). placement instructions in the Service and Adjustments section of this manual). • After cleaning, leave cables disconnected and place cables where they cannot come in the Maintenance section of this... storage. NOTE: Fuel stabilizer is to be used for storage, do not store battery directly on stabilizer container. Run engine at the end of this manual). • Lubricate as shown in minimizing the formation of time, clean it to rust. Replace if necessary. • Touch up all nuts, bolts...

Owners Manual
Page 27
... from buildup 11. Replace idler pulley. 4. Loose or damaged wiring. 5. Battery will not rotate 1. Loss of grass, leaves, trash under mower. 4. Freewheel control in parts manual. 11. Axle key missing. 1. Reverse operation system (ROS) is not "ON" while mower or other attachment is engaged. 1.
... from buildup 11. Replace idler pulley. 4. Loose or damaged wiring. 5. Battery will not rotate 1. Loss of grass, leaves, trash under mower. 4. Freewheel control in parts manual. 11. Axle key missing. 1. Reverse operation system (ROS) is not "ON" while mower or other attachment is engaged. 1.

