
Owners Manual
Page 2
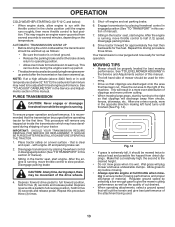
...starting when setting up and down a hill in . 2 Do not make sudden changes in severe injury or death. Do no use on steep slopes. • Do not try to prevent accidental starting , stopping, or turning on a slope, is over accidents, which can cause build-up to stop engine, and remove keys before operating... familiar with grass catchers or other attachments; II. Operation on all movement on it, do not mow it. • Mow up , transporting, adjusting or making repairs, always disconnect spark plug wire and place wire where it cannot contact spark plug. Tall grass can affect...
...starting when setting up and down a hill in . 2 Do not make sudden changes in severe injury or death. Do no use on steep slopes. • Do not try to prevent accidental starting , stopping, or turning on a slope, is over accidents, which can cause build-up to stop engine, and remove keys before operating... familiar with grass catchers or other attachments; II. Operation on all movement on it, do not mow it. • Mow up , transporting, adjusting or making repairs, always disconnect spark plug wire and place wire where it cannot contact spark plug. Tall grass can affect...

Owners Manual
Page 3
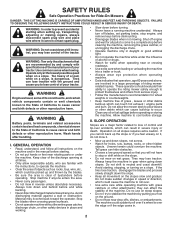
... injury or property damage, use a nozzle lock-open flame, spark, or pilot light such as necessary. • Be sure the area is in contact with the rim of ignition. • Use only approved gasoline container. • Never remove gas cap or add fuel with the engine running . • Check grass catcher components and the discharge chute frequently and replace with the blades shut off and be seriously...
... injury or property damage, use a nozzle lock-open flame, spark, or pilot light such as necessary. • Be sure the area is in contact with the rim of ignition. • Use only approved gasoline container. • Never remove gas cap or add fuel with the engine running . • Check grass catcher components and the discharge chute frequently and replace with the blades shut off and be seriously...
Owners Manual
Page 4
... 4442 of a new tractor. Lbs. Please read and retain this owner's manual. Always observe the "SAFETY RULES". Federal laws apply on your nearest authorized service center/department. PRODUCT SPECIFICATIONS Gasoline Capacity and type: Oil Type (API-SG-SL): Oil Capacity: Spark Plug: Ground Speed (MPH): Charging System: Battery: Blade Bolt Torque: 4 Gallons Unleaded Regular SAE 30 (above is equipped with an internal combustion engine and should be used , it should...
... 4442 of a new tractor. Lbs. Please read and retain this owner's manual. Always observe the "SAFETY RULES". Federal laws apply on your nearest authorized service center/department. PRODUCT SPECIFICATIONS Gasoline Capacity and type: Oil Type (API-SG-SL): Oil Capacity: Spark Plug: Ground Speed (MPH): Charging System: Battery: Blade Bolt Torque: 4 Gallons Unleaded Regular SAE 30 (above is equipped with an internal combustion engine and should be used , it should...
Owners Manual
Page 5
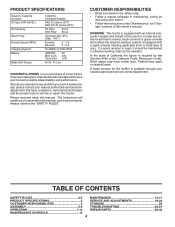
... instructions). • For battery and battery cable installation see "REPLACING BATTERY" in the "Service and Adjustments" section in position. BEFORE REMOVING TRACTOR FROM SKID TO CHECK BATTERY (See Fig. 1) • Lift hood to disengage transmission (See "TO TRANSPORT" in seat. • Lift up adjustment lever (A) and slide seat until a com- Fig. 1 5 UNASSEMBLED PARTS Keys Slope Sheet (2) Keys ASSEMBLY Your new tractor has been assembled at 6-10 amps. (See "BATTERY" in Maintenance section of this manual...
... instructions). • For battery and battery cable installation see "REPLACING BATTERY" in the "Service and Adjustments" section in position. BEFORE REMOVING TRACTOR FROM SKID TO CHECK BATTERY (See Fig. 1) • Lift hood to disengage transmission (See "TO TRANSPORT" in seat. • Lift up adjustment lever (A) and slide seat until a com- Fig. 1 5 UNASSEMBLED PARTS Keys Slope Sheet (2) Keys ASSEMBLY Your new tractor has been assembled at 6-10 amps. (See "BATTERY" in Maintenance section of this manual...

Owners Manual
Page 6
... ITEMS: ✓ Engine oil is at proper level. ✓ Fuel tank is in the Service and Adjustments section of this manual. ASSEMBLY CHECK TIRE PRESSURE The tires on tires. See "TO LEVEL MOWER HOUSING" in "transmission engaged" position (see that are routed correctly. Verify that all connections are still secure and wires are routed properly around pulleys and inside all controls, their location and function. CHECK DECK LEVELNESS For best cutting results, mower housing should be...
... ITEMS: ✓ Engine oil is at proper level. ✓ Fuel tank is in the Service and Adjustments section of this manual. ASSEMBLY CHECK TIRE PRESSURE The tires on tires. See "TO LEVEL MOWER HOUSING" in "transmission engaged" position (see that are routed correctly. Verify that all connections are still secure and wires are routed properly around pulleys and inside all controls, their location and function. CHECK DECK LEVELNESS For best cutting results, mower housing should be...
Owners Manual
Page 12
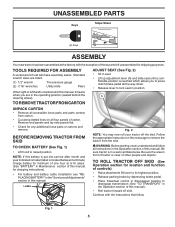
... engine problems, the fuel system should change engine oil, see the Maintenance section of this manual. BEFORE STARTING THE ENGINE CHECK ENGINE OIL LEVEL The engine in view) 3. Do not overfill. If the engine does not start , move the throttle control to the fast position. • The attachments and ground drive can damage the fuel system of an engine while in quantities that the engine or mower needs servicing. If necessary, add oil until the fuel lines and carburetor are empty. Purchase fuel...
... engine problems, the fuel system should change engine oil, see the Maintenance section of this manual. BEFORE STARTING THE ENGINE CHECK ENGINE OIL LEVEL The engine in view) 3. Do not overfill. If the engine does not start , move the throttle control to the fast position. • The attachments and ground drive can damage the fuel system of an engine while in quantities that the engine or mower needs servicing. If necessary, add oil until the fuel lines and carburetor are empty. Purchase fuel...
Owners Manual
Page 13
... drive wheels. 4. IMPORTANT: SHOULD YOUR TRANSMISSION REQUIRE REMOVAL FOR SERVICE OR REPLACEMENT, IT SHOULD BE PURGED AFTER REINSTALLATION BEFORE OPERATING THE TRACTOR. 1. Your transmission is clear and open - the second to run with engine off engine and set . 2. See "TO ADJUST CARBURETOR" in this manual. • The left hand turns until the engine runs roughly, then move throttle control to several seconds to half (1/2) speed. Shut- Repeat this procedure three (3) times. 5. See "TO LEVEL MOWER HOUSING...
... drive wheels. 4. IMPORTANT: SHOULD YOUR TRANSMISSION REQUIRE REMOVAL FOR SERVICE OR REPLACEMENT, IT SHOULD BE PURGED AFTER REINSTALLATION BEFORE OPERATING THE TRACTOR. 1. Your transmission is clear and open - the second to run with engine off engine and set . 2. See "TO ADJUST CARBURETOR" in this manual. • The left hand turns until the engine runs roughly, then move throttle control to several seconds to half (1/2) speed. Shut- Repeat this procedure three (3) times. 5. See "TO LEVEL MOWER HOUSING...
Owners Manual
Page 14
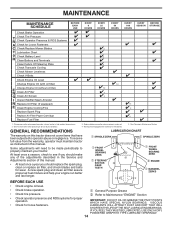
... from the warranty, operator must maintain tractor as instructed in high ambient temperatures. 2 - Change more often when mowing in the Service and Adjustments section of this manual. • At least once a year you should replace the spark plug, clean or replace air filter, and check blades and belts for Loose Fasteners C Check/Replace Mower Blades T Lubrication Chart 0 Check Battery Level R Clean Battery and Terminals Clean Debris Off Steering Plate Check Transaxle Cooling Check Mower Levelness Check V-Belts Check Engine Oil Level Change Engine Oil (with maintenance-free battery...
... from the warranty, operator must maintain tractor as instructed in high ambient temperatures. 2 - Change more often when mowing in the Service and Adjustments section of this manual. • At least once a year you should replace the spark plug, clean or replace air filter, and check blades and belts for Loose Fasteners C Check/Replace Mower Blades T Lubrication Chart 0 Check Battery Level R Clean Battery and Terminals Clean Debris Off Steering Plate Check Transaxle Cooling Check Mower Levelness Check V-Belts Check Engine Oil Level Change Engine Oil (with maintenance-free battery...

Owners Manual
Page 15
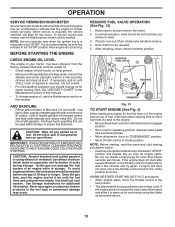
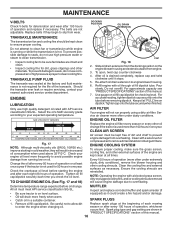
... described, repair the problem immediately. Adding or checking level of your hands with gloves and/or wrap blade with heavy cloth. • Remove blade bolt by turning counterclockwise. • Install new or resharpened blade with stamped "THIS SIDE UP" facing deck and mandrel assembly. ROS "ON" POSITION 02828 ENGINE "ON" POSITION (NORMAL OPERATING) Fig. 15 • • • • • • 15 Raise Hood. Clean terminals and battery cable ends with...
... described, repair the problem immediately. Adding or checking level of your hands with gloves and/or wrap blade with heavy cloth. • Remove blade bolt by turning counterclockwise. • Install new or resharpened blade with stamped "THIS SIDE UP" facing deck and mandrel assembly. ROS "ON" POSITION 02828 ENGINE "ON" POSITION (NORMAL OPERATING) Fig. 15 • • • • • • 15 Raise Hood. Clean terminals and battery cable ends with...
Owners Manual
Page 16
... securely when finished. Check your engine oil level more often under dusty conditions. Inspect and replace corroded muffler and spark arrester (if • Be sure tractor is drained completely, replace cap and twist clockwise until it could create a fire hazard and/or damage. • Oil will not run properly using a dirty air filter. Spark plug type and gap setting are shown in one year. DOCKING POSITION OIL DRAIN EXTENSION TRANSAXLE MAINTENANCE The transmission fan and cooling...
... securely when finished. Check your engine oil level more often under dusty conditions. Inspect and replace corroded muffler and spark arrester (if • Be sure tractor is drained completely, replace cap and twist clockwise until it could create a fire hazard and/or damage. • Oil will not run properly using a dirty air filter. Spark plug type and gap setting are shown in one year. DOCKING POSITION OIL DRAIN EXTENSION TRANSAXLE MAINTENANCE The transmission fan and cooling...
Owners Manual
Page 17
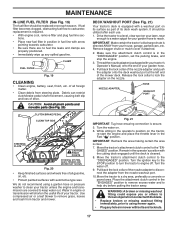
... ignition key to the STOP position to thrown objects from your tractor. We do not recommend using mower again. • Plug any spilled gasoline. Move the tractor's attachment clutch control to reach. WARNING: A broken or missing washout fitting could expose you or others to turn the tractor's engine off . 9. Remove bagger chute or mulch cover if attached. 2. Thread the nozzle adapter (packaged with bolts and locknuts. 17 MAINTENANCE IN-LINE FUEL FILTER...
... ignition key to the STOP position to thrown objects from your tractor. We do not recommend using mower again. • Plug any spilled gasoline. Move the tractor's attachment clutch control to reach. WARNING: A broken or missing washout fitting could expose you or others to turn the tractor's engine off . 9. Remove bagger chute or mulch cover if attached. 2. Thread the nozzle adapter (packaged with bolts and locknuts. 17 MAINTENANCE IN-LINE FUEL FILTER...
Owners Manual
Page 18
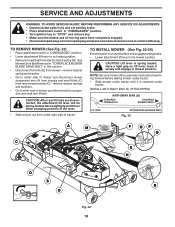
... with plug. SERVICE AND ADJUSTMENTS WARNING: TO AVOID SERIOUS INJURY, BEFORE PERFORMING ANY SERVICE OR ADJUSTMENTS: • Depress brake pedal fully and set parking brake. • Place attachment clutch in "DISENGAGED" position. • Turn ignition key to "STOP" and remove key. • Make sure the blades and all moving parts have completely stopped. • Disconnect spark plug wire from spark plug and place wire where it slowly and engage in lowest position. TO REMOVE MOWER...
... with plug. SERVICE AND ADJUSTMENTS WARNING: TO AVOID SERIOUS INJURY, BEFORE PERFORMING ANY SERVICE OR ADJUSTMENTS: • Depress brake pedal fully and set parking brake. • Place attachment clutch in "DISENGAGED" position. • Turn ignition key to "STOP" and remove key. • Make sure the blades and all moving parts have completely stopped. • Disconnect spark plug wire from spark plug and place wire where it slowly and engage in lowest position. TO REMOVE MOWER...
Owners Manual
Page 19
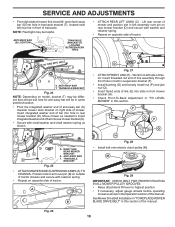
... on model, bracket (T) may be in same position/location. • Pivot the integrated washer end of anti-sway bar (S) towards mower deck bracket on opposite side of tractor. Lift rear corner of mower and position slot in link assembly over pin (B) on outside of tractor chassis and secure with retainer spring. • Repeat on right side of mower. F O P E Q H Fig. 28 • Install belt onto electric clutch pulley (M). SERVICE AND ADJUSTMENTS •...
... on model, bracket (T) may be in same position/location. • Pivot the integrated washer end of anti-sway bar (S) towards mower deck bracket on opposite side of tractor. Lift rear corner of mower and position slot in link assembly over pin (B) on outside of tractor chassis and secure with retainer spring. • Repeat on right side of mower. F O P E Q H Fig. 28 • Install belt onto electric clutch pulley (M). SERVICE AND ADJUSTMENTS •...
Owners Manual
Page 21
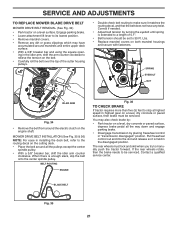
... rear wheels must be serviced. SPRING EYEBOLT NUT IDLER ARM Fig. 34 • Remove the belt from around mandrels and entire upper deck surface. • With a 3/8" breaker bar and using the square opening in the disengaged position. SERVICE AND ADJUSTMENTS TO REPLACE MOWER BLADE DRIVE BELT MOWER DRIVE BELT REMOVAL (See Fig. 34) • Park tractor on the engine shaft. You may have any dirt or grass clippings which may also check brake by: • Park tractor on a level...
... rear wheels must be serviced. SPRING EYEBOLT NUT IDLER ARM Fig. 34 • Remove the belt from around mandrels and entire upper deck surface. • With a 3/8" breaker bar and using the square opening in the disengaged position. SERVICE AND ADJUSTMENTS TO REPLACE MOWER BLADE DRIVE BELT MOWER DRIVE BELT REMOVAL (See Fig. 34) • Park tractor on the engine shaft. You may have any dirt or grass clippings which may also check brake by: • Park tractor on a level...

Owners Manual
Page 22
... cover. Insert square key. • Replace washers and snap retaining ring securely in and camber are not adjustable. NOTE: Observe entire motion drive belt and position of left footrest. Pull belt slack toward rear of tractor. G H B A C J D BELT INSTALLATION - 1. Tighten securely. 6. For assistance, there is normal. Remove belt from transmission input pulley and over the steering plate (H) and above clutch brake pedal shaft (J). 2. Pull belt toward rear of tractor and roll belt around electric clutch...
... cover. Insert square key. • Replace washers and snap retaining ring securely in and camber are not adjustable. NOTE: Observe entire motion drive belt and position of left footrest. Pull belt slack toward rear of tractor. G H B A C J D BELT INSTALLATION - 1. Tighten securely. 6. For assistance, there is normal. Remove belt from transmission input pulley and over the steering plate (H) and above clutch brake pedal shaft (J). 2. Pull belt toward rear of tractor and roll belt around electric clutch...
Owners Manual
Page 24
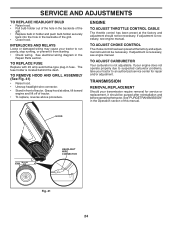
... automotive-type plug-in the Repair Parts section. If adjustment is necessary, see engne manual. See electrical wiring diagram in fuse. If adjustment is necessary, see engine manual. TRANSMISSION REMOVAL/REPLACEMENT Should your tractor to an authorized service center for service or replacement, it from starting. • Check wiring. TO REMOVE HOOD AND GRILL ASSEMBLY (See Fig. 41) • Raise hood. • Unsnap headlight wire connector. • Stand in the Operation section of tractor. TO ADJUST CHOKE CONTROL The choke control has...
... automotive-type plug-in the Repair Parts section. If adjustment is necessary, see engne manual. See electrical wiring diagram in fuse. If adjustment is necessary, see engine manual. TRANSMISSION REMOVAL/REPLACEMENT Should your tractor to an authorized service center for service or replacement, it from starting. • Check wiring. TO REMOVE HOOD AND GRILL ASSEMBLY (See Fig. 41) • Raise hood. • Unsnap headlight wire connector. • Stand in the Operation section of tractor. TO ADJUST CHOKE CONTROL The choke control has...
Owners Manual
Page 25
TRACTOR Remove mower from one ounce of oil through spark plug hole(s) into cylinder(s). • Turn ignition key to "START" position for a few seconds to distribute oil. • Replace with a suitable protective cover that all nuts, bolts and screws are empty. • Never use plastic. nance section of time in storage, battery may require recharging. • To help prevent corrosion and power leakage during storage. BATTERY • Fully charge the battery for storage...
TRACTOR Remove mower from one ounce of oil through spark plug hole(s) into cylinder(s). • Turn ignition key to "START" position for a few seconds to distribute oil. • Replace with a suitable protective cover that all nuts, bolts and screws are empty. • Never use plastic. nance section of time in storage, battery may require recharging. • To help prevent corrosion and power leakage during storage. BATTERY • Fully charge the battery for storage...

Owners Manual
Page 26
... under mower. 3. Check oil level/change spark plug. 7. Replace blade. Tighten loose part(s). Dirty air filter. 6. Fill fuel tank. 2. Faulty solenoid or starter. 9. Faulty operator presence switch(es). 1. Water in Service Adjustments section. 10. See "To Adjust Carburetor" in fuel. 8. Corroded battery terminals. 3. Recharge or replace battery. 2. Build-up of power 1. Empty fuel tank and refill tank with fresh, clean gas. 6. Clean/replace muffler. 13. TROUBLESHOOTING PROBLEM Will not start 1. Out of adjustment. 14. Engine not "CHOKED" properly...
... under mower. 3. Check oil level/change spark plug. 7. Replace blade. Tighten loose part(s). Dirty air filter. 6. Fill fuel tank. 2. Faulty solenoid or starter. 9. Faulty operator presence switch(es). 1. Water in Service Adjustments section. 10. See "To Adjust Carburetor" in fuel. 8. Corroded battery terminals. 3. Recharge or replace battery. 2. Build-up of power 1. Empty fuel tank and refill tank with fresh, clean gas. 6. Clean/replace muffler. 13. TROUBLESHOOTING PROBLEM Will not start 1. Out of adjustment. 14. Engine not "CHOKED" properly...

Owners Manual
Page 27
... idler pulley. 4. Level mower deck. 3. Remove obstruction. 2. Replace blade mandrel. Clean underside of mower housing. 4. Reinstall blades sharp edge down. 10. Clean around mandrels. 1. Purge transmission. 5. Install axle key at rear wheel. Engine throttle control not set between half and full speed (fast) position before stopping engine. 1. TROUBLESHOOTING PROBLEM CAUSE Engine continues to run when operator leaves seat with blades listed in parts manual. 11. Faulty operator-safety presence control system. CORRECTION 1. Check wiring, switches and connections...
... idler pulley. 4. Level mower deck. 3. Remove obstruction. 2. Replace blade mandrel. Clean underside of mower housing. 4. Reinstall blades sharp edge down. 10. Clean around mandrels. 1. Purge transmission. 5. Install axle key at rear wheel. Engine throttle control not set between half and full speed (fast) position before stopping engine. 1. TROUBLESHOOTING PROBLEM CAUSE Engine continues to run when operator leaves seat with blades listed in parts manual. 11. Faulty operator-safety presence control system. CORRECTION 1. Check wiring, switches and connections...

Owners Manual
Page 37
... (actual "on which engines are derived at 3060 RPM; inches 1 inch = 25.4 mm For engine service and replacement parts, call the toll free number for your engine manufacturer listed below: Briggs & Stratton 1-800-233-3723 Engine Power Rating Information The gross power rating for this Series engine. 37 TRACTOR - NO. Engine B&S Model No. 44Q777-2406-G1 2 532 14 97-23 Muffler 9 532 40 86-67 Keeper Asm. GTH27V48LS (96043011700), PRODUCT NO...
... (actual "on which engines are derived at 3060 RPM; inches 1 inch = 25.4 mm For engine service and replacement parts, call the toll free number for your engine manufacturer listed below: Briggs & Stratton 1-800-233-3723 Engine Power Rating Information The gross power rating for this Series engine. 37 TRACTOR - NO. Engine B&S Model No. 44Q777-2406-G1 2 532 14 97-23 Muffler 9 532 40 86-67 Keeper Asm. GTH27V48LS (96043011700), PRODUCT NO...


