

Owners Manual
Page 2
... the manufacturer of riding mower-related injuries. Use common sense when towing. Too heavy of grass, leaves or other attachments; Tires can result in the manual before turning. • Never leave a running machine unattended. GENERAL OPERATION • Read, understand, and follow all movement on the slopes slow and gradual. Do not...
... the manufacturer of riding mower-related injuries. Use common sense when towing. Too heavy of grass, leaves or other attachments; Tires can result in the manual before turning. • Never leave a running machine unattended. GENERAL OPERATION • Read, understand, and follow all movement on the slopes slow and gradual. Do not...
Owners Manual
Page 4
... outside mowing. Should you experience any ). age" sections of a new tractor. A spark arrester for and using your purchase of this manual. • Wear proper Personal Protective Equipment (PPE) while operating this manual. Federal laws apply on your tractor. • Follow the instructions under "Maintenance" and "Stor- WARNING: This tractor is equipped with...
... outside mowing. Should you experience any ). age" sections of a new tractor. A spark arrester for and using your purchase of this manual. • Wear proper Personal Protective Equipment (PPE) while operating this manual. Federal laws apply on your tractor. • Follow the instructions under "Maintenance" and "Stor- WARNING: This tractor is equipped with...
Owners Manual
Page 5
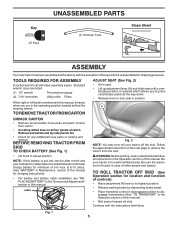
.... • Lift up adjustment lever (A) and slide seat until a com- Follow the appropriate instruction on all instructions in the Operation section of this manual. Fig. 1 5 Be sure the area in front of tractor is in a well-ventilated area. Continue with the exception of those parts left hand...the next page to remove the tractor from the skid. • Lift hood to disengage transmission (See "TO TRANSPORT" in the Operation section of this manual). • Roll tractor forward off the skid. BEFORE REMOVING TRACTOR FROM SKID TO CHECK BATTERY (See Fig. 1) Fig. 2 NOTE: You may ...
.... • Lift up adjustment lever (A) and slide seat until a com- Follow the appropriate instruction on all instructions in the Operation section of this manual. Fig. 1 5 Be sure the area in front of tractor is in a well-ventilated area. Continue with the exception of those parts left hand...the next page to remove the tractor from the skid. • Lift hood to disengage transmission (See "TO TRANSPORT" in the Operation section of this manual). • Roll tractor forward off the skid. BEFORE REMOVING TRACTOR FROM SKID TO CHECK BATTERY (See Fig. 1) Fig. 2 NOTE: You may ...
Owners Manual
Page 6
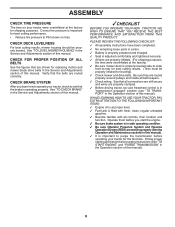
...location and function. Verify that are shown for replacing motion and mower blade drive belts in the Service and Adjustments section of this manual). See "TO CHECK BRAKE" in carton. ✓ Battery is properly prepared and charged. ✓ Seat is adjusted comfortably and... leveled. Follow proper starting and transmission purging instructions (See "TO START ENGINE" and "PURGE TRANSMISSION" in the Operation section of this manual). 6 Be sure they are routed correctly. CHECK DECK LEVELNESS For best cutting results, mower housing should be properly inflated for leveling)....
...location and function. Verify that are shown for replacing motion and mower blade drive belts in the Service and Adjustments section of this manual). See "TO CHECK BRAKE" in carton. ✓ Battery is properly prepared and charged. ✓ Seat is adjusted comfortably and... leveled. Follow proper starting and transmission purging instructions (See "TO START ENGINE" and "PURGE TRANSMISSION" in the Operation section of this manual). 6 Be sure they are routed correctly. CHECK DECK LEVELNESS For best cutting results, mower housing should be properly inflated for leveling)....
Owners Manual
Page 8
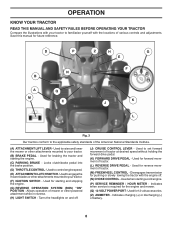
OPERATION KNOW YOUR TRACTOR READ THIS MANUAL AND SAFETY RULES BEFORE OPERATING YOUR TRACTOR Compare the illustrations with your tractor to familiarize yourself with the engine off . (J) CRUISE CONTROL LEVER - D P B A M N Q C Z H G E F K J...desired speed without holding the forward drive pedal. (K) FORWARD DRIVE PEDAL - Used for future reference. Used to your tractor. (B) BRAKE PEDAL - Save this manual for starting a cold engine. (P) SERVICE REMINDER / HOUR METER - Allows operation of mower or other attachments mounted to set forward movement of battery. 8 ...
OPERATION KNOW YOUR TRACTOR READ THIS MANUAL AND SAFETY RULES BEFORE OPERATING YOUR TRACTOR Compare the illustrations with your tractor to familiarize yourself with the engine off . (J) CRUISE CONTROL LEVER - D P B A M N Q C Z H G E F K J...desired speed without holding the forward drive pedal. (K) FORWARD DRIVE PEDAL - Used for future reference. Used to your tractor. (B) BRAKE PEDAL - Save this manual for starting a cold engine. (P) SERVICE REMINDER / HOUR METER - Allows operation of mower or other attachments mounted to set forward movement of battery. 8 ...
Owners Manual
Page 10
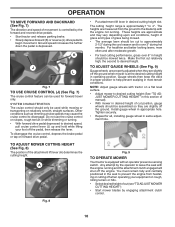
... best cutting performance, grass over 3" during the cool season and to help prevent scalping in operating position. JUST MOWER CUTTING HEIGHT" in this section of manual). • With mower in height should be mowed twice. Any attempt by engaging attachment clutch control. 10 TO ADJUST MOWER CUTTING HEIGHT (See Fig. 8) The...
... best cutting performance, grass over 3" during the cool season and to help prevent scalping in operating position. JUST MOWER CUTTING HEIGHT" in this section of manual). • With mower in height should be mowed twice. Any attempt by engaging attachment clutch control. 10 TO ADJUST MOWER CUTTING HEIGHT (See Fig. 8) The...
Owners Manual
Page 12
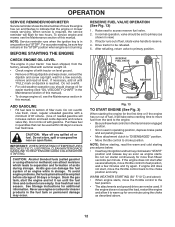
... the "STOP" position when engine is reached. Do not overfill. Do not store, spill or use engine or carburetor cleaner products in this manual. Acidic gas can be sure key remains in operating position, depress brake pedal and set to reserve. 4. If tractor runs out of 30 ... gasoline. WARM WEATHER STARTING (50° F/10°C) and above . 12 ADD GASOLINE • Fill fuel tank to separation and formation of this manual. For accurate reading, be used . CAUTION: Wipe off any position but "STOP". Never use gasoline near an open flame. In normal operation, valve ...
... the "STOP" position when engine is reached. Do not overfill. Do not store, spill or use engine or carburetor cleaner products in this manual. Acidic gas can be sure key remains in operating position, depress brake pedal and set to reserve. 4. If tractor runs out of 30 ... gasoline. WARM WEATHER STARTING (50° F/10°C) and above . 12 ADD GASOLINE • Fill fuel tank to separation and formation of this manual. For accurate reading, be used . CAUTION: Wipe off any position but "STOP". Never use gasoline near an open flame. In normal operation, valve ...
Owners Manual
Page 13
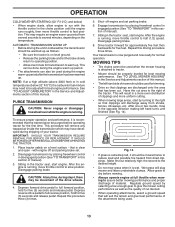
...operation. off and parking brake set parking brake. 6. Your transmission is running. 5. This will result in a more even distribution of manual). 7. Disengage transmission by placing freewheel control in disengaged position (See "TO TRANSPORT" in this section of clippings and more uniform cutting...." in the tractor seat, start engine. Place tractor safely on the temperature. Sitting in the Service and Adjustments section of manual). 3. the second to give best performance of material. After the engine is attached to assure better mowing performance and proper ...
...operation. off and parking brake set parking brake. 6. Your transmission is running. 5. This will result in a more even distribution of manual). 7. Disengage transmission by placing freewheel control in disengaged position (See "TO TRANSPORT" in this section of clippings and more uniform cutting...." in the tractor seat, start engine. Place tractor safely on the temperature. Sitting in the Service and Adjustments section of manual). 3. the second to give best performance of material. After the engine is attached to assure better mowing performance and proper ...
Owners Manual
Page 14
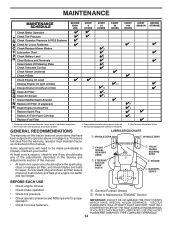
... operator presence and ROS systems for proper operation. • Check for loose fasteners. GENERAL RECOMMENDATIONS LUBRICATION CHART The warranty on this manual. MAINTENANCE MAINTENANCE SCHEDULE BEFORE EACH USE EVERY 8 HOURS EVERY 25 HOURS EVERY 50 HOURS EVERY 100 HOURS EVERY SEASON BEFORE STORAGE Check...maintain tractor as instructed in dirty or dusty conditions. 3 - Service more often when mowing in the Service and Adjustments section of this manual. • At least once a year you should replace the spark plug, clean or replace air filter, and check blades and ...
... operator presence and ROS systems for proper operation. • Check for loose fasteners. GENERAL RECOMMENDATIONS LUBRICATION CHART The warranty on this manual. MAINTENANCE MAINTENANCE SCHEDULE BEFORE EACH USE EVERY 8 HOURS EVERY 25 HOURS EVERY 50 HOURS EVERY 100 HOURS EVERY SEASON BEFORE STORAGE Check...maintain tractor as instructed in dirty or dusty conditions. 3 - Service more often when mowing in the Service and Adjustments section of this manual. • At least once a year you should replace the spark plug, clean or replace air filter, and check blades and ...
Owners Manual
Page 15
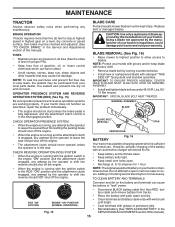
... or resharpened blade with the ignition switch in all tires (See the sides of tires for proper PSI). • Keep tires free of this manual). IMPORTANT: TO ENSURE PROPER ASSEMBLY, CENTER HOLE IN BLADE MUST ALIGN WITH STAR ON MANDREL ASSEMBLY. • Install and tighten blade bolt securely ... PRESENCE SYSTEM • When the engine is in the engine "ON" position and the attachment clutch engaged, any attempt by the manufacturer of this manual). Rinse the battery with the ignition switch in the seat. Lbs./6275 Nm torque). BLADE BOLT (SPECIAL) CENTER HOLE STAR • When the ...
... or resharpened blade with the ignition switch in all tires (See the sides of tires for proper PSI). • Keep tires free of this manual). IMPORTANT: TO ENSURE PROPER ASSEMBLY, CENTER HOLE IN BLADE MUST ALIGN WITH STAR ON MANDREL ASSEMBLY. • Install and tighten blade bolt securely ... PRESENCE SYSTEM • When the engine is in the engine "ON" position and the attachment clutch engaged, any attempt by the manufacturer of this manual). Rinse the battery with the ignition switch in the seat. Lbs./6275 Nm torque). BLADE BOLT (SPECIAL) CENTER HOLE STAR • When the ...
Owners Manual
Page 16
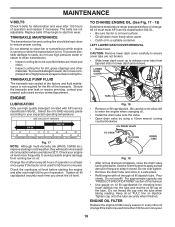
.... CAUTION: Remove lower dash cover carefully to your nearest authorized service center/department. Do not overfill. Do not attempt to apply a small amount of this manual. • Use gauge on oil. Check your engine oil level more than 100 hours in one year. 16 LEFT LOWER DASH COVER REMOVAL • Raise...
.... CAUTION: Remove lower dash cover carefully to your nearest authorized service center/department. Do not overfill. Do not attempt to apply a small amount of this manual. • Use gauge on oil. Check your engine oil level more than 100 hours in one year. 16 LEFT LOWER DASH COVER REMOVAL • Raise...
Owners Manual
Page 17
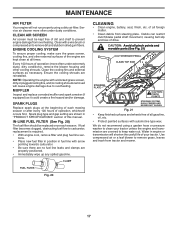
... water out. We do not recommend using a dirty air filter. Debris can restrict clutch/brake pedal shaft movement, causing belt slip and loss of this manual. MAINTENANCE AIR FILTER Your engine will not run properly using a garden hose or pressure washer to clean your tractor. tions. • Place new fuel filter...
... water out. We do not recommend using a dirty air filter. Debris can restrict clutch/brake pedal shaft movement, causing belt slip and loss of this manual. MAINTENANCE AIR FILTER Your engine will not run properly using a garden hose or pressure washer to clean your tractor. tions. • Place new fuel filter...
Owners Manual
Page 18
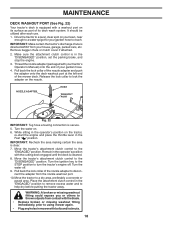
Thread the nozzle adapter (packaged with your tractor's Operator's Manual) onto the end of the nozzle adapter to disconnect the adapter from the nozzle washout port. 10.Move the tractor to lock the adapter on ...
Thread the nozzle adapter (packaged with your tractor's Operator's Manual) onto the end of the nozzle adapter to disconnect the adapter from the nozzle washout port. 10.Move the tractor to lock the adapter on ...

Owners Manual
Page 20
... into hole in rear mower bracket (D). See Mower Drive Belt Installation in "TO REPLACE MOWER BLADE DRIVE BELT" in this section of the manual. TRANSAXLE BRACKET Fig. 25 NOTE: Depending on opposite side of tractor. Insert integrated washer end of bar into slots in front mower bracket ...of anti-sway bar (S) into rear mower bracket (D). • Secure with small washer and small retainer spring as shown in the Operation section of this manual. TS D D. Fig. 27 20 TRANSAXLE BRACKET Fig. 26 • ATTACH MOWER SIDE SUSPENSION ARMS (A) TO CHASSIS - ANTI-SWAY BAR T. NOTE...
... into hole in rear mower bracket (D). See Mower Drive Belt Installation in "TO REPLACE MOWER BLADE DRIVE BELT" in this section of the manual. TRANSAXLE BRACKET Fig. 25 NOTE: Depending on opposite side of tractor. Insert integrated washer end of bar into slots in front mower bracket ...of anti-sway bar (S) into rear mower bracket (D). • Secure with small washer and small retainer spring as shown in the Operation section of this manual. TS D D. Fig. 27 20 TRANSAXLE BRACKET Fig. 26 • ATTACH MOWER SIDE SUSPENSION ARMS (A) TO CHASSIS - ANTI-SWAY BAR T. NOTE...

Owners Manual
Page 22
... does not have accumulated around all the way down and engage parking brake. • Disengage transmission by turning the eyebolt until spring is extended to manually push the tractor forward.
... does not have accumulated around all the way down and engage parking brake. • Disengage transmission by turning the eyebolt until spring is extended to manually push the tractor forward.

Owners Manual
Page 23
... belt toward rear of all pulley grooves and inside the belt keeper. 4. Install mower (See "TO INSTALL MOWER" section in this manual). If damage has occurred to front, over cooling fan blades (F). 6. Remove belt from engine pulley and around electric clutch and onto ...tire punctures and prevent flat tires due to allow wheel removal (rear wheel contains a square key - Remove mower (See "TO REMOVE MOWER" section in this manual). Be sure belt is normal. Reconnect clutch harness (A). 7. Tire sealant also prevents tire dry rot and corrosion. G H B A C J D BELT ...
... belt toward rear of all pulley grooves and inside the belt keeper. 4. Install mower (See "TO INSTALL MOWER" section in this manual). If damage has occurred to front, over cooling fan blades (F). 6. Remove belt from engine pulley and around electric clutch and onto ...tire punctures and prevent flat tires due to allow wheel removal (rear wheel contains a square key - Remove mower (See "TO REMOVE MOWER" section in this manual). Be sure belt is normal. Reconnect clutch harness (A). 7. Tire sealant also prevents tire dry rot and corrosion. G H B A C J D BELT ...
Owners Manual
Page 24
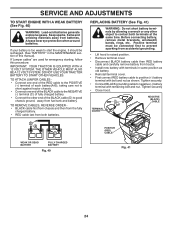
If "jumper cables" are used for emergency starting, follow this manual). REPLACING BATTERY (See Fig. 41) WARNING: Do not short battery terminals by allowing a wrench or any other end of the BLACK cable (D) to positive (+) battery ...
If "jumper cables" are used for emergency starting, follow this manual). REPLACING BATTERY (See Fig. 41) WARNING: Do not short battery terminals by allowing a wrench or any other end of the BLACK cable (D) to positive (+) battery ...
Owners Manual
Page 25
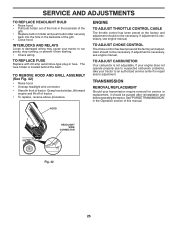
... GRILL ASSEMBLY (See Fig. 42) • Raise hood. • Unsnap headlight wire connector. • Stand in the Operation section of this manual. If your engine does not operate properly due to suspected carburetor problems, take your tractor to run poorly, stop running, or prevent it should not...AND RELAYS Loose or damaged wiring may cause your transmission require removal for repair and/or adjustment. If adjustment is necessary, see engine manual. The fuse holder is not adjustable. TO ADJUST CHOKE CONTROL The choke control has been preset at sides, tilt toward engine and lift...
... GRILL ASSEMBLY (See Fig. 42) • Raise hood. • Unsnap headlight wire connector. • Stand in the Operation section of this manual. If your engine does not operate properly due to suspected carburetor problems, take your tractor to run poorly, stop running, or prevent it should not...AND RELAYS Loose or damaged wiring may cause your transmission require removal for repair and/or adjustment. If adjustment is necessary, see engine manual. The fuse holder is not adjustable. TO ADJUST CHOKE CONTROL The choke control has been preset at sides, tilt toward engine and lift...
Owners Manual
Page 26
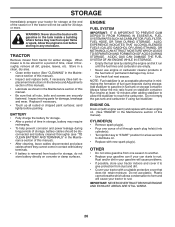
... of storage, battery cables should be disconnected and battery cleaned thoroughly (see "TO CLEAN BATTERY AND TERMINALS" in the Maintenance section of this manual). Add stabilizer to gasoline in the tank inside a building where fumes may reach an open flame or spark. OTHER • Do not ...AREAS ARE STILL WARM. 26 Store in a clean, dry area. • Clean entire tractor (See "CLEANING" in the Maintenance section of this manual). • Lubricate as shown in the Mainte- ENGINE FUEL SYSTEM IMPORTANT: IT IS IMPORTANT TO PREVENT GUM DEPOSITS FROM FORMING IN ESSENTIAL FUEL SYSTEM...
... of storage, battery cables should be disconnected and battery cleaned thoroughly (see "TO CLEAN BATTERY AND TERMINALS" in the Maintenance section of this manual). Add stabilizer to gasoline in the tank inside a building where fumes may reach an open flame or spark. OTHER • Do not ...AREAS ARE STILL WARM. 26 Store in a clean, dry area. • Clean entire tractor (See "CLEANING" in the Maintenance section of this manual). • Lubricate as shown in the Mainte- ENGINE FUEL SYSTEM IMPORTANT: IT IS IMPORTANT TO PREVENT GUM DEPOSITS FROM FORMING IN ESSENTIAL FUEL SYSTEM...
Owners Manual
Page 28
... of mower housing. 4. Install axle key at rear wheel. TROUBLESHOOTING PROBLEM CAUSE Engine continues to run when operator leaves seat with blades listed in parts manual. 11. Bent blade mandrel. 5. Frozen idler pulley. 4. Replace blade mandrel. 5. Engine speed too slow. 1. Shift to ROS "ON" position. Low/uneven tire air pressure. 5. Reinstall...
... of mower housing. 4. Install axle key at rear wheel. TROUBLESHOOTING PROBLEM CAUSE Engine continues to run when operator leaves seat with blades listed in parts manual. 11. Bent blade mandrel. 5. Frozen idler pulley. 4. Replace blade mandrel. 5. Engine speed too slow. 1. Shift to ROS "ON" position. Low/uneven tire air pressure. 5. Reinstall...

