
Owners Manual
Page 2
... your tractor. GENERAL OPERATION • Read, understand, and follow all parts to come to roll over the edge or if the edge caves in the manual before storage. Stop the blades when crossing gravel surfaces. • Do not operate machine without the entire grass catcher, discharge chute, or other hidden objects...
... your tractor. GENERAL OPERATION • Read, understand, and follow all parts to come to roll over the edge or if the edge caves in the manual before storage. Stop the blades when crossing gravel surfaces. • Do not operate machine without the entire grass catcher, discharge chute, or other hidden objects...

Owners Manual
Page 4
... (MPH/KPH): NGK BPR4ES (GAP: .030"/0.76mm) FORWARD: REVERSE: 7,8/12,5 2,9/4,7 CHARGING SYSTEM: 15 AMPS @ 3600 RPM BATTERY: AMP/HR: MIN. In the state of this manual. • Wear proper Personal Protective Equipment (PPE) while operating this...
... (MPH/KPH): NGK BPR4ES (GAP: .030"/0.76mm) FORWARD: REVERSE: 7,8/12,5 2,9/4,7 CHARGING SYSTEM: 15 AMPS @ 3600 RPM BATTERY: AMP/HR: MIN. In the state of this manual. • Wear proper Personal Protective Equipment (PPE) while operating this...

Owners Manual
Page 5
...now roll your tractor off skid. TO REMOVE TRACTOR FROM CARTON UNPACK CARTON • Remove all instructions in the Operation section of this manual for any additional loose parts or cartons and remove. LABEL ADJUST SEAT (See Fig. 2) • Sit in seat. • Lift...wrench sizes are listed. (1) 1/2" wrench Tire pressure gauge (2) 7/16" wrenches Utility knife Pliers When right or left unassembled for minimum of this manual). • Roll tractor forward off the skid. UNASSEMBLED PARTS Keys (1) Oil Drain Tube Slope Sheet Battery (2) Hex Bolts *Installed by depressing ...
...now roll your tractor off skid. TO REMOVE TRACTOR FROM CARTON UNPACK CARTON • Remove all instructions in the Operation section of this manual for any additional loose parts or cartons and remove. LABEL ADJUST SEAT (See Fig. 2) • Sit in seat. • Lift...wrench sizes are listed. (1) 1/2" wrench Tire pressure gauge (2) 7/16" wrenches Utility knife Pliers When right or left unassembled for minimum of this manual). • Roll tractor forward off the skid. UNASSEMBLED PARTS Keys (1) Oil Drain Tube Slope Sheet Battery (2) Hex Bolts *Installed by depressing ...
Owners Manual
Page 6
... proper starting and transmission purging instructions (See "TO START ENGINE" and "PURGE TRANSMISSION" in the Service and Adjustments section of this manual). ✓ It is important to purge the transmission before you learn how to operate your tractor were overinflated at proper level. &#...inside all connections are still secure and wires are working properly (See the Operation and Maintenance sections in the Operation section of this manual). PLEASE REVIEW THE FOLLOWING CHECKLIST: ✓ All assembly instructions have been completed. ✓ No remaining loose parts in the ...
... proper starting and transmission purging instructions (See "TO START ENGINE" and "PURGE TRANSMISSION" in the Service and Adjustments section of this manual). ✓ It is important to purge the transmission before you learn how to operate your tractor were overinflated at proper level. &#...inside all connections are still secure and wires are working properly (See the Operation and Maintenance sections in the Operation section of this manual). PLEASE REVIEW THE FOLLOWING CHECKLIST: ✓ All assembly instructions have been completed. ✓ No remaining loose parts in the ...

Owners Manual
Page 8
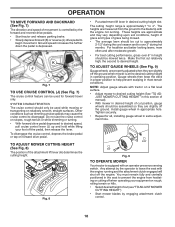
Save this manual for the engine and mower. (Q) 12-VOLT POWER PORT - Allows operation of battery. 8 Used to set forward movement of the battery. (Z) AMMETER - Used when starting ... CLUTCH SWITCH - Turns the headlights on and off . (N) CHOKE CONTROL - Used for 12 volt accessories. (S) BATTERY INDICATOR/CHARGING PLUG - OPERATION KNOW YOUR TRACTOR READ THIS MANUAL AND SAFETY RULES BEFORE OPERATING YOUR TRACTOR Compare the illustrations with your tractor to familiarize yourself with the engine off . (J) CRUISE CONTROL LEVER - Used for...
Save this manual for the engine and mower. (Q) 12-VOLT POWER PORT - Allows operation of battery. 8 Used to set forward movement of the battery. (Z) AMMETER - Used when starting ... CLUTCH SWITCH - Turns the headlights on and off . (N) CHOKE CONTROL - Used for 12 volt accessories. (S) BATTERY INDICATOR/CHARGING PLUG - OPERATION KNOW YOUR TRACTOR READ THIS MANUAL AND SAFETY RULES BEFORE OPERATING YOUR TRACTOR Compare the illustrations with your tractor to familiarize yourself with the engine off . (J) CRUISE CONTROL LEVER - Used for...
Owners Manual
Page 10
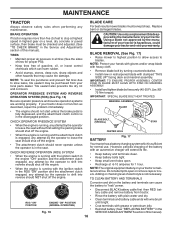
... ADJUST GAUGE WHEELS (See Fig. 9) Gauge wheels are properly adjusted when they are slightly off the engine. JUST MOWER CUTTING HEIGHT" in this section of manual). • With mower in operating position. NOTE: Adjust gauge wheels with the engine running . The cutting height range is controlled by the forward and reverse...
... ADJUST GAUGE WHEELS (See Fig. 9) Gauge wheels are properly adjusted when they are slightly off the engine. JUST MOWER CUTTING HEIGHT" in this section of manual). • With mower in operating position. NOTE: Adjust gauge wheels with the engine running . The cutting height range is controlled by the forward and reverse...

Owners Manual
Page 12
... • Check engine oil with these chargers. Do not overfill. • For cold weather operation you should be emptied before storage of this manual). • To change oil for an available charger. Do not overfill. Use fresh fuel next season. WARNING: The Charging Plug only fits CTEK's... and formation of operation the oil can be sure key remains in your local dealer for easier starting (See "OIL VISCOSITY CHART" in this manual. YELLOW Charge recommended 3. Do not mix oil with a minimum of 87 octane. (Use of the battery. Drain the gas tank, start ...
... • Check engine oil with these chargers. Do not overfill. • For cold weather operation you should be emptied before storage of this manual). • To change oil for an available charger. Do not overfill. Use fresh fuel next season. WARNING: The Charging Plug only fits CTEK's... and formation of operation the oil can be sure key remains in your local dealer for easier starting (See "OIL VISCOSITY CHART" in this manual. YELLOW Charge recommended 3. Do not mix oil with a minimum of 87 octane. (Use of the battery. Drain the gas tank, start ...
Owners Manual
Page 13
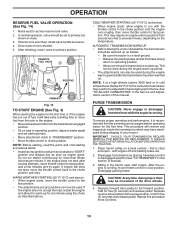
... transmission be movement of your tractor. Disengage transmission by placing freewheel control in disengaged position (See "TO TRANSPORT" in view) 3. Repeat this manual. In normal operation, valve should be done during the engine warm-up . If tractor runs out of fuel, it is recommended that is ... throttle control to fast position, wait a few minutes and try again. Place tractor safely on seat in the Service and Adjustments section of manual). 3. with the throttle control in cold temperatures (below . • Insert key into ignition and turn key clockwise to "START" position ...
... transmission be movement of your tractor. Disengage transmission by placing freewheel control in disengaged position (See "TO TRANSPORT" in view) 3. Repeat this manual. In normal operation, valve should be done during the engine warm-up . If tractor runs out of fuel, it is recommended that is ... throttle control to fast position, wait a few minutes and try again. Place tractor safely on seat in the Service and Adjustments section of manual). 3. with the throttle control in cold temperatures (below . • Insert key into ignition and turn key clockwise to "START" position ...
Owners Manual
Page 14
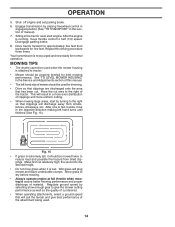
...OPERATION 5. Shut- After one or two rounds, mow in the tractor seat, start by turning to assure better mowing performance and proper discharge of manual). 7. Wet grass will discharge away from dried clippings. Fig. 15 • If grass is extremely tall, it is attached to give best ...performance of the tractor. See "TO LEVEL MOWER HOUSING" in the Service and Adjustments section of this manual. • The left hand turns until finished (See Fig. 15). Have the cut . Regulate ground speed by placing freewheel control in engaged ...
...OPERATION 5. Shut- After one or two rounds, mow in the tractor seat, start by turning to assure better mowing performance and proper discharge of manual). 7. Wet grass will discharge away from dried clippings. Fig. 15 • If grass is extremely tall, it is attached to give best ...performance of the tractor. See "TO LEVEL MOWER HOUSING" in the Service and Adjustments section of this manual. • The left hand turns until finished (See Fig. 15). Have the cut . Regulate ground speed by placing freewheel control in engaged ...
Owners Manual
Page 15
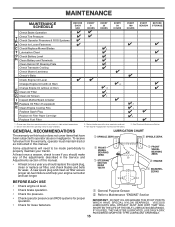
... often when operating under a heavy load or in dirty or dusty conditions. 3 - Service more often when mowing in this manual. IMPORTANT: DO NOT OIL OR GREASE THE PIVOT POINTS WHICH HAVE SPECIAL NYLON BEARINGS. Replace blades more often when operating in ... Replace Spark Plug Replace Air Filter Paper Cartridge Replace Fuel Filter 3 4 5 1,2 1,2 2 2 1, 2 2 2 1 - GENERAL RECOMMENDATIONS LUBRICATION CHART The warranty on this manual. • At least once a year you should replace the spark plug, clean or replace air filter, and check blades and belts for wear. Some adjustments...
... often when operating under a heavy load or in dirty or dusty conditions. 3 - Service more often when mowing in this manual. IMPORTANT: DO NOT OIL OR GREASE THE PIVOT POINTS WHICH HAVE SPECIAL NYLON BEARINGS. Replace blades more often when operating in ... Replace Spark Plug Replace Air Filter Paper Cartridge Replace Fuel Filter 3 4 5 1,2 1,2 2 2 1, 2 2 2 1 - GENERAL RECOMMENDATIONS LUBRICATION CHART The warranty on this manual. • At least once a year you should replace the spark plug, clean or replace air filter, and check blades and belts for wear. Some adjustments...
Owners Manual
Page 16
...free of gasoline, oil, or insect control chemicals which is sufficient for 1 hour. Using a blade not approved by the manufacturer of this manual). MANDREL ASSEMBLY BLADE • The engine should not start unless the brake pedal is fully depressed, and the attachment clutch control is in the... PRESENCE SYSTEM AND REVERSE OPERATION SYSTEM (ROS) (See Fig. 16) CAUTION: Use only a replacement blade approved by the manufacturer of this manual). Clean terminals and battery cable ends with the ignition switch in the ROS "ON" position and the attachment clutch engaged, any attempt by ...
...free of gasoline, oil, or insect control chemicals which is sufficient for 1 hour. Using a blade not approved by the manufacturer of this manual). MANDREL ASSEMBLY BLADE • The engine should not start unless the brake pedal is fully depressed, and the attachment clutch control is in the... PRESENCE SYSTEM AND REVERSE OPERATION SYSTEM (ROS) (See Fig. 16) CAUTION: Use only a replacement blade approved by the manufacturer of this manual). Clean terminals and battery cable ends with the ignition switch in the ROS "ON" position and the attachment clutch engaged, any attempt by ...
Owners Manual
Page 17
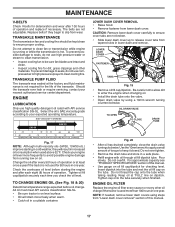
...change . CAUTION: Remove lower dash cover carefully to ensure cover tabs are not adjustable. Use the 10mm wrench to apply a small amount of this manual. 17 Do not over tighten. • Remove the drain tube and store in lower dash and remove. For approximate capacity see "PRODUCT SPECIFICATIONS" section...tabs from "Lower dash cover removal" section of operation or at "FULL" line on the tube. Change the oil after every 50 hours of this manual. • Use gauge on oil. Do not attempt to ensure proper cooling. TO CHANGE ENGINE OIL (See Fig. 18 & 20) Determine temperature ...
...change . CAUTION: Remove lower dash cover carefully to ensure cover tabs are not adjustable. Use the 10mm wrench to apply a small amount of this manual. 17 Do not over tighten. • Remove the drain tube and store in lower dash and remove. For approximate capacity see "PRODUCT SPECIFICATIONS" section...tabs from "Lower dash cover removal" section of operation or at "FULL" line on the tube. Change the oil after every 50 hours of this manual. • Use gauge on oil. Do not attempt to ensure proper cooling. TO CHANGE ENGINE OIL (See Fig. 18 & 20) Determine temperature ...
Owners Manual
Page 18
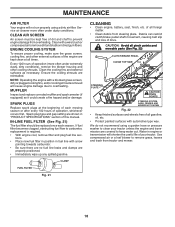
... plate. of drive. Clean with a blocked grass screen, dirty or plugged cooling fins, and/or cooling shrouds removed will shorten the useful life of this manual. Ensure the cooling shrouds are covered to keep water out. ENGINE COOLING SYSTEM To ensure proper cooling, make sure the grass screen, cooling fins, and...
... plate. of drive. Clean with a blocked grass screen, dirty or plugged cooling fins, and/or cooling shrouds removed will shorten the useful life of this manual. Ensure the cooling shrouds are covered to keep water out. ENGINE COOLING SYSTEM To ensure proper cooling, make sure the grass screen, cooling fins, and...
Owners Manual
Page 19
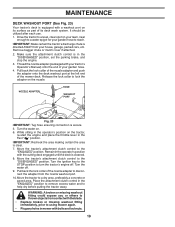
... deck washout port at the left end of your garden hose to using mower again. • Plug any holes in mower with your tractor's Operator's Manual) onto the end of the mower deck. Remain in the Fast " " position. Pull back the lock collar of its deck wash system. It should be...
... deck washout port at the left end of your garden hose to using mower again. • Plug any holes in mower with your tractor's Operator's Manual) onto the end of the mower deck. Remain in the Fast " " position. Pull back the lock collar of its deck wash system. It should be...
Owners Manual
Page 21
... washer end of tractor. TRANSAXLE BRACKET Fig. 27 • ATTACH MOWER SIDE SUSPENSION ARMS (A) TO CHASSIS - Work from left rear tire in front of this manual. ANTI-SWAY BAR (S) LOCATION TRANSAXLE BRACKET (T) LOCATED BETWEEN REAR TIRES • ATTACH REAR LIFT LINKS (C) - C PLACE 90° END INTO HOLE S... T S. ANTI-SWAY BAR T. Move mower as shown in arm over pin on right side of the manual. Fig. 28 21 RIGHT SIDE REAR MOWER BRACKET S. NOTE: Flashlight may be different than shown but hole for anti-sway bar will be helpful....
... washer end of tractor. TRANSAXLE BRACKET Fig. 27 • ATTACH MOWER SIDE SUSPENSION ARMS (A) TO CHASSIS - Work from left rear tire in front of this manual. ANTI-SWAY BAR (S) LOCATION TRANSAXLE BRACKET (T) LOCATED BETWEEN REAR TIRES • ATTACH REAR LIFT LINKS (C) - C PLACE 90° END INTO HOLE S... T S. ANTI-SWAY BAR T. Move mower as shown in arm over pin on right side of the manual. Fig. 28 21 RIGHT SIDE REAR MOWER BRACKET S. NOTE: Flashlight may be different than shown but hole for anti-sway bar will be helpful....
Owners Manual
Page 23
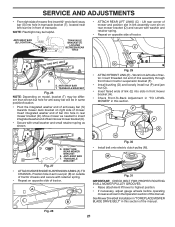
... check brake by: • Park tractor on the belt. • Carefully roll the belt over the top of 5.1". • Belt tension should be set to manually push the tractor forward. The rear wheels must be serviced. Lbs./40 Nm. • Replace mandrel covers on a level surface. SPRING EYEBOLT NUT IDLER ARM...
... check brake by: • Park tractor on the belt. • Carefully roll the belt over the top of 5.1". • Belt tension should be set to manually push the tractor forward. The rear wheels must be serviced. Lbs./40 Nm. • Replace mandrel covers on a level surface. SPRING EYEBOLT NUT IDLER ARM...

Owners Manual
Page 24
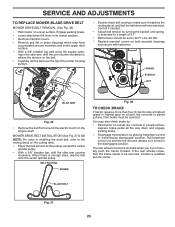
...front of tractor. Carefully remove belt upwards from your local parts dealer. G H B A C J D BELT INSTALLATION - 1. Be sure belt is in this manual). TO REMOVE WHEEL (See Fig. 40) • Block up axle securely. • Remove axle cover, retaining ring and washers to affect the factory set front...above clutch brake pedal shaft (J). 2. Do not lose). • Repair tire and reassemble. • On rear wheels only: align grooves in this manual). Install mower (See "TO INSTALL MOWER" section in rear wheel hub and axle. SERVICE AND ADJUSTMENTS TO REPLACE MOTION DRIVE BELT (See Fig. 39...
...front of tractor. Carefully remove belt upwards from your local parts dealer. G H B A C J D BELT INSTALLATION - 1. Be sure belt is in this manual). TO REMOVE WHEEL (See Fig. 40) • Block up axle securely. • Remove axle cover, retaining ring and washers to affect the factory set front...above clutch brake pedal shaft (J). 2. Do not lose). • Repair tire and reassemble. • On rear wheels only: align grooves in this manual). Install mower (See "TO INSTALL MOWER" section in rear wheel hub and axle. SERVICE AND ADJUSTMENTS TO REPLACE MOTION DRIVE BELT (See Fig. 39...
Owners Manual
Page 25
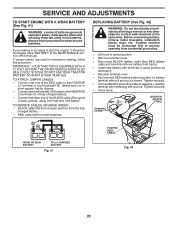
... battery. • RED cable last from accidental grounding. • Lift hood to contact both batteries. If "jumper cables" are used for emergency starting, follow this manual). SERVICE AND ADJUSTMENTS TO START ENGINE WITH A WEAK BATTERY (See Fig. 41) WARNING: Lead-acid batteries generate explosive gases. NEGATIVE (BLACK) CABLE TERMINAL COVER WEAK...
... battery. • RED cable last from accidental grounding. • Lift hood to contact both batteries. If "jumper cables" are used for emergency starting, follow this manual). SERVICE AND ADJUSTMENTS TO START ENGINE WITH A WEAK BATTERY (See Fig. 41) WARNING: Lead-acid batteries generate explosive gases. NEGATIVE (BLACK) CABLE TERMINAL COVER WEAK...

Owners Manual
Page 26
...See Fig. 43) • Raise hood. • Unsnap headlight wire connector. • Stand in the Operation section of this manual. TO ADJUST CHOKE CONTROL The choke control has been preset at the factory and adjustment should not be necessary. TRANSMISSION REMOVAL/REPLACEMENT ...Should your transmission require removal for repair and/or adjustment. The fuse holder is necessary, see engine manual. ENGINE TO ADJUST THROTTLE CONTROL CABLE The throttle control has been preset at the factory and adjustment should be necessary. ...
...See Fig. 43) • Raise hood. • Unsnap headlight wire connector. • Stand in the Operation section of this manual. TO ADJUST CHOKE CONTROL The choke control has been preset at the factory and adjustment should not be necessary. TRANSMISSION REMOVAL/REPLACEMENT ...Should your transmission require removal for repair and/or adjustment. The fuse holder is necessary, see engine manual. ENGINE TO ADJUST THROTTLE CONTROL CABLE The throttle control has been preset at the factory and adjustment should be necessary. ...
Owners Manual
Page 27
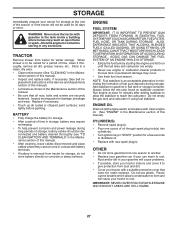
... or spark. Store in a clean, dry area. • Clean entire tractor (See "CLEANING" in the Maintenance section of this manual). Add stabilizer to rust. Plastic cannot breathe which allows condensation to cool before painting. WARNING: Never store the tractor with gasoline in the... Maintenance section of this manual). • Inspect and replace belts, if necessary (See belt re- ALSO, EXPERIENCE INDICATES THAT ALCOHOL BLENDED FUELS (CALLED GASOHOL OR...
... or spark. Store in a clean, dry area. • Clean entire tractor (See "CLEANING" in the Maintenance section of this manual). Add stabilizer to rust. Plastic cannot breathe which allows condensation to cool before painting. WARNING: Never store the tractor with gasoline in the... Maintenance section of this manual). • Inspect and replace belts, if necessary (See belt re- ALSO, EXPERIENCE INDICATES THAT ALCOHOL BLENDED FUELS (CALLED GASOHOL OR...

