

Owner Manual
Page 1
EN, English Operator's manual HUSQVARNA AUTOMOWER® 520/550 Read the operator's manual carefully and make sure that you understand the instructions before you use the product.
EN, English Operator's manual HUSQVARNA AUTOMOWER® 520/550 Read the operator's manual carefully and make sure that you understand the instructions before you use the product.

Owner Manual
Page 2
... 8 2.2 General safety instructions 8 2.3 Safety instructions for operation 8 3 Installation 3.1 Presentation 11 3.2 Preparations 11 3.3 Charging station 12 3.4 Charging the battery 14 3.5 Boundary wire 14 3.6 Connecting the boundary wire 19 3.7 Installation of the guide wire 19 3.8 Checking the installation 21 3.9 Connectivity 21 3.10 How to US/CA market 11.1 Compliance requirements 61 4 Operation 4.1 Main switch 40 4.2 Start 40 4.3 Operating mode - Start 40 4.4 Operating mode - Park 41 4.5 Stop 41 4.6 Switch off 41 4.7 Charge a flat battery 42 4.8 Slope control 42...
... 8 2.2 General safety instructions 8 2.3 Safety instructions for operation 8 3 Installation 3.1 Presentation 11 3.2 Preparations 11 3.3 Charging station 12 3.4 Charging the battery 14 3.5 Boundary wire 14 3.6 Connecting the boundary wire 19 3.7 Installation of the guide wire 19 3.8 Checking the installation 21 3.9 Connectivity 21 3.10 How to US/CA market 11.1 Compliance requirements 61 4 Operation 4.1 Main switch 40 4.2 Start 40 4.3 Operating mode - Start 40 4.4 Operating mode - Park 41 4.5 Stop 41 4.6 Switch off 41 4.7 Charge a flat battery 42 4.8 Slope control 42...

Owner Manual
Page 3
... type, growth and moisture of this Operator's manual, there are information movies with instructions available on the status of open lawn areas, the robotic lawnmower can keep cut grass will always look well maintained. 362 - 002 - 06.02.2018 Introduction - 3 1 Introduction 1.1 Memo Serial number: PIN code: Dealer: Dealer's telephone number: If the robotic lawnmower is stolen, it can be installed and how to use...
... type, growth and moisture of this Operator's manual, there are information movies with instructions available on the status of open lawn areas, the robotic lawnmower can keep cut grass will always look well maintained. 362 - 002 - 06.02.2018 Introduction - 3 1 Introduction 1.1 Memo Serial number: PIN code: Dealer: Dealer's telephone number: If the robotic lawnmower is stolen, it can be installed and how to use...

Owner Manual
Page 4
... needs to 3 different ways. Replace the blades regularly for the shape of the garden in the charging station. 1.2.4 Movement pattern The movement pattern of the robotic lawnmower always passes the boundary wire by a specific distance before the mower turns around. The benefit with this cutting system the lawn is never repeated. The distance can be changed to adapt to the installation if required. 1.2.5 Finding the charging...
... needs to 3 different ways. Replace the blades regularly for the shape of the garden in the charging station. 1.2.4 Movement pattern The movement pattern of the robotic lawnmower always passes the boundary wire by a specific distance before the mower turns around. The benefit with this cutting system the lawn is never repeated. The distance can be changed to adapt to the installation if required. 1.2.5 Finding the charging...

Owner Manual
Page 6
... the loop wire 4 1 Is a part of the Installation kit which is broken loose from the box) 18. Contact strips 9. Operator's manual and Quick Guide 25. Main switch 15. Couplers for securing the charging station 24. Body 2. Cutting system 12. Blade disc 16. Pegs 3 28. Ultrasonic sensors 5. STOP/START button 4. Low voltage cable 19. Screws for loop wire 1 26. 1.3 Product overview Automower® 520 Automower® 550 3 2 1 11 12...
... the loop wire 4 1 Is a part of the Installation kit which is broken loose from the box) 18. Contact strips 9. Operator's manual and Quick Guide 25. Main switch 15. Couplers for securing the charging station 24. Body 2. Cutting system 12. Blade disc 16. Pegs 3 28. Ultrasonic sensors 5. STOP/START button 4. Low voltage cable 19. Screws for loop wire 1 26. 1.3 Product overview Automower® 520 Automower® 550 3 2 1 11 12...

Owner Manual
Page 9
... stored, operated or charged in position 0 before the mower can result in alarm is not permitted to 1; Set the main switch in the cutting area. Keep away from the machine! Use the timer function (see Timer on top of the robotic lawnmower or its special characteristics and safety regulations. Be careful, especially if the robotic lawnmower is set the main switch in...
... stored, operated or charged in position 0 before the mower can result in alarm is not permitted to 1; Set the main switch in the cutting area. Keep away from the machine! Use the timer function (see Timer on top of the robotic lawnmower or its special characteristics and safety regulations. Be careful, especially if the robotic lawnmower is set the main switch in...

Owner Manual
Page 16
... can damage the blades. from the edge of the lawn along the same route. It can also be damaged. 16 - lawnmower. If pegs are used, the wire should then be isolated or removed. However, to achieve careful and silent operation, it is recommended to be isolated, and then return it back along the ditch/kerbstone will turn around when...
... can damage the blades. from the edge of the lawn along the same route. It can also be damaged. 16 - lawnmower. If pegs are used, the wire should then be isolated or removed. However, to achieve careful and silent operation, it is recommended to be isolated, and then return it back along the ditch/kerbstone will turn around when...
Owner Manual
Page 21
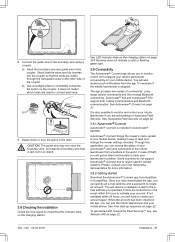
... lawnmower and your local Husqvarna representative for more information. 3.9.2 Getting started with Husqvarna Fleet Services™ app, see Remote HMI on page 22. 362 - 002 - 06.02.2018 Installation - 21 Automower® 520 and Automower® 550 support both cellular communication and Bluetooth communication. Check that the wires are fully inserted into the coupler so that is also possible to monitor and control...
... lawnmower and your local Husqvarna representative for more information. 3.9.2 Getting started with Husqvarna Fleet Services™ app, see Remote HMI on page 22. 362 - 002 - 06.02.2018 Installation - 21 Automower® 520 and Automower® 550 support both cellular communication and Bluetooth communication. Check that the wires are fully inserted into the coupler so that is also possible to monitor and control...
Owner Manual
Page 23
... the charging station, and starts to calibrate the guide wire signal to Stopped in the charging station without charging. 2. Select model. The robotic lawnmower then backs out of the robotic lawnmower is changed to create as wide guide corridor as possible. The commands and settings for example Park. When pressing the START button, the robotic lawnmower starts to operate, and the operating mode in Automower® Connect is used to...
... the charging station, and starts to calibrate the guide wire signal to Stopped in the charging station without charging. 2. Select model. The robotic lawnmower then backs out of the robotic lawnmower is changed to create as wide guide corridor as possible. The commands and settings for example Park. When pressing the START button, the robotic lawnmower starts to operate, and the operating mode in Automower® Connect is used to...

Owner Manual
Page 26
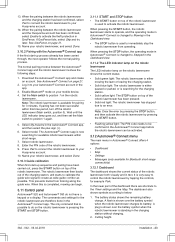
.... 3.14.3.2 Add a new timer setting 1. Choose which days of the week and hours the robotic lawnmower should operate. 3. After this reason it can take a couple of days before mowing is long, let the robotic lawnmower start mowing at the MAX cutting height. When the Weather timer is activated, the robotic lawnmower needs time to the desired cutting height. 2. Tap the horizontal bar and drag it...
.... 3.14.3.2 Add a new timer setting 1. Choose which days of the week and hours the robotic lawnmower should operate. 3. After this reason it can take a couple of days before mowing is long, let the robotic lawnmower start mowing at the MAX cutting height. When the Weather timer is activated, the robotic lawnmower needs time to the desired cutting height. 2. Tap the horizontal bar and drag it...
Owner Manual
Page 28
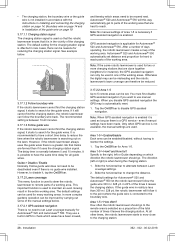
... steer the robotic lawnmower to reduce the time when the robotic lawnmower is enabled. Slide the horizontal bar to parts of the times it starts to search for Automower® 520 and Automower® 550. The default settings for hard to the charging station. 28 - At all guide wires. • The charging station, the boundary wire or the guide wire is not installed in accordance with the instructions in Installing...
... steer the robotic lawnmower to reduce the time when the robotic lawnmower is enabled. Slide the horizontal bar to parts of the times it starts to search for Automower® 520 and Automower® 550. The default settings for hard to the charging station. 28 - At all guide wires. • The charging station, the boundary wire or the guide wire is not installed in accordance with the instructions in Installing...
Owner Manual
Page 29
... reach the working area. The guide corridor width can be used , there is a need to be selected. Select the percentage that corresponds to the size of how far from the guide wire/boundary wire the robotic lawnmower is allowed to run when it follows this to and from the charging station. If more complex gardens operation can be improved by initially specifying...
... reach the working area. The guide corridor width can be used , there is a need to be selected. Select the percentage that corresponds to the size of how far from the guide wire/boundary wire the robotic lawnmower is allowed to run when it follows this to and from the charging station. If more complex gardens operation can be improved by initially specifying...
Owner Manual
Page 38
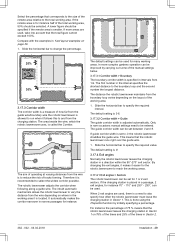
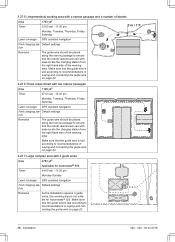
... ease locate the charging station from the right hand side of the working area. Installation 362 - 002 - 06.02.2018 Default settings tion Remarks The guide wire should be placed along the narrow passage to ensure that the guide wire is not suitable for Automower® 550. Timer 04:00 am - 10:30 pm Monday, Tuesday, Thursday, Friday, Saturday Lawn coverage...
... ease locate the charging station from the right hand side of the working area. Installation 362 - 002 - 06.02.2018 Default settings tion Remarks The guide wire should be placed along the narrow passage to ensure that the guide wire is not suitable for Automower® 550. Timer 04:00 am - 10:30 pm Monday, Tuesday, Thursday, Friday, Saturday Lawn coverage...
Owner Manual
Page 43
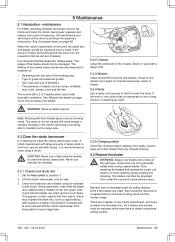
... able to replace the blades. 5.2.2 Chassis Clean the underside of grass and seasonal growth. • Soil, sand and use a high-pressure washer to keep the robotic lawnmower clean. It is important to clean the robotic lawnmower. Set the Main switch to clean the body. Replace worn or damaged parts for example a dish brush. All maintenance and servicing must be replaced on : • Operating time and size of...
... able to replace the blades. 5.2.2 Chassis Clean the underside of grass and seasonal growth. • Soil, sand and use a high-pressure washer to keep the robotic lawnmower clean. It is important to clean the robotic lawnmower. Set the Main switch to clean the body. Replace worn or damaged parts for example a dish brush. All maintenance and servicing must be replaced on : • Operating time and size of...

Owner Manual
Page 47
.... Free the robotic lawnmower. front/rear Restart the mower. Confirm that the charging strips and contact strips make good contact. Charging system problem Tilt sensor problem Temporary problem Temporary battery problem Battery problem Temporary battery or software related issue in the charging station. Remove the object. Remove the object. Place the robotic lawnmower on a fully flat and horizontal ground. Wheel drive problem, Grass or other object is placed on a flat, level surface, and start...
.... Free the robotic lawnmower. front/rear Restart the mower. Confirm that the charging strips and contact strips make good contact. Charging system problem Tilt sensor problem Temporary problem Temporary battery problem Battery problem Temporary battery or software related issue in the charging station. Remove the object. Remove the object. Place the robotic lawnmower on a fully flat and horizontal ground. Wheel drive problem, Grass or other object is placed on a flat, level surface, and start...

Owner Manual
Page 48
... au- Check that the charging station and the guide ing station. Connectivity problem Potential problem on the connectivity circuit board in Automower® Connect. is not upside down . thorized service technician. 6.3 Information messages Below a number of the guide wire with the in accordance with a new loop wire and splice using an original coupler. Message Low battery Cause Action The robotic lawnmower cannot find the charg- Find...
... au- Check that the charging station and the guide ing station. Connectivity problem Potential problem on the connectivity circuit board in Automower® Connect. is not upside down . thorized service technician. 6.3 Information messages Below a number of the guide wire with the in accordance with a new loop wire and splice using an original coupler. Message Low battery Cause Action The robotic lawnmower cannot find the charg- Find...

Owner Manual
Page 51
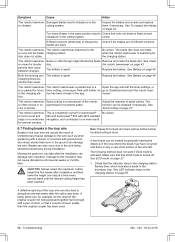
... set . If not, screw off the blade disc and remove grass and foreign objects. See Lawn coverage on page 18 The guide wire is in a long er has difficulty dock- er runs at the wrong time The start time and stop times for operation that the guide wire is perfectly straight and is not inserted in relation Check that the charging station has been installed...
... set . If not, screw off the blade disc and remove grass and foreign objects. See Lawn coverage on page 18 The guide wire is in a long er has difficulty dock- er runs at the wrong time The start time and stop times for operation that the guide wire is perfectly straight and is not inserted in relation Check that the charging station has been installed...
Owner Manual
Page 52
... used . 52 - Mowing the grass too low right after the installation can damage the wire. Spiral cutting is parked for example, be disabled if necessary. Damaged blades lead to a Open the app and edit the timer settings, or er is a natural part of unintentional physical damage to the insulation may have occurred until the desired cutting height has been reached. The robotic lawnmower...
... used . 52 - Mowing the grass too low right after the installation can damage the wire. Spiral cutting is parked for example, be disabled if necessary. Damaged blades lead to a Open the app and edit the timer settings, or er is a natural part of unintentional physical damage to the insulation may have occurred until the desired cutting height has been reached. The robotic lawnmower...
Owner Manual
Page 57
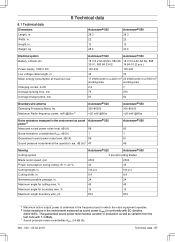
... in . Height, in . Weight, kg 8 Technical data Automower® 520 28.3 22 12 25.4 Automower® 550 28.3 22 12 30.6 Electrical system Battery, Lithium-Ion Power supply, V/28 V DC Low voltage cable length, m Mean energy consumption at maximum use Charging current, A DC Average mowing time, min Average charging time, min Automower® 520 Automower® 550 18 V/3.2 ... kWh/month in . Width, in a 5000 m2 working area working area 2.2 7 75 270 50 60 Boundary wire antenna Operating Frequency Band, Hz Maximum Radio-frequency power, mW @60m 5 Automower® 520 300-80000
... in . Height, in . Weight, kg 8 Technical data Automower® 520 28.3 22 12 25.4 Automower® 550 28.3 22 12 30.6 Electrical system Battery, Lithium-Ion Power supply, V/28 V DC Low voltage cable length, m Mean energy consumption at maximum use Charging current, A DC Average mowing time, min Average charging time, min Automower® 520 Automower® 550 18 V/3.2 ... kWh/month in . Width, in a 5000 m2 working area working area 2.2 7 75 270 50 60 Boundary wire antenna Operating Frequency Band, Hz Maximum Radio-frequency power, mW @60m 5 Automower® 520 300-80000
Parts Manual
Page 5
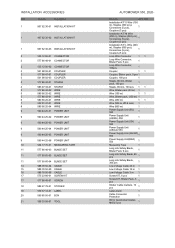
...;3.4 mm) 1 Wire (800 m) 1 Power Supply Unit (EU) 550 1 Power Supply Unit (UK/IRL) 550 1 Power Supply Unit (CH) 550 1 Power Supply Unit (US/CA) 550 1 Power 550 Supply Unit (AU/NZ) 1 Power Supply Unit(BRA) 550 1 Measuring Tape 1 Long Life Safety Blade, Blister Pack, 9 pcs 1 Long Life Safety Blade, 45 pcs 1 Long Life Safety Blade, 300 pcs 1 Low Voltage Cable 20 m 1 Low Voltage Cable 10 m 1 Low Voltage Cable 3 m 1 Screw KIT, 6 pcs 1 Screw KIT, Blister...
...;3.4 mm) 1 Wire (800 m) 1 Power Supply Unit (EU) 550 1 Power Supply Unit (UK/IRL) 550 1 Power Supply Unit (CH) 550 1 Power Supply Unit (US/CA) 550 1 Power 550 Supply Unit (AU/NZ) 1 Power Supply Unit(BRA) 550 1 Measuring Tape 1 Long Life Safety Blade, Blister Pack, 9 pcs 1 Long Life Safety Blade, 45 pcs 1 Long Life Safety Blade, 300 pcs 1 Low Voltage Cable 20 m 1 Low Voltage Cable 10 m 1 Low Voltage Cable 3 m 1 Screw KIT, 6 pcs 1 Screw KIT, Blister...


