

Parts Manual
Page 9
... 5 576 92 15-01 AIR FILTER 6 574 87 47-14 SEALING STRIP 14 591 10 02-01 PRINTED CIRCUIT ASSY 15 525 88 74-01 SCREW CITXPANT 16 597 16 21-01 HANDLE KIT 21 593 35 51-01 CLAMP 22 591 35 17-01 HANDLE SUPPORT 23 591 48 71-03 COVER 24 586 44 49...-01 SWITCH 34 597 16 64-01 PIVOTING ARM KIT 35 740 43 13-00 O-RING 36 592 62 90-01 SCREW 37 525 82 44-01 SCREW ITXSCM 38 597 47 61-01 CLIP 39 591 45 22-01 WIRING ASSY AUTOMOWER 535 AWD, 2020- Remark HMI ITXPANT 5 Serie Chassis upper front Application Board Main Cable Washer QTY KIT...
... 5 576 92 15-01 AIR FILTER 6 574 87 47-14 SEALING STRIP 14 591 10 02-01 PRINTED CIRCUIT ASSY 15 525 88 74-01 SCREW CITXPANT 16 597 16 21-01 HANDLE KIT 21 593 35 51-01 CLAMP 22 591 35 17-01 HANDLE SUPPORT 23 591 48 71-03 COVER 24 586 44 49...-01 SWITCH 34 597 16 64-01 PIVOTING ARM KIT 35 740 43 13-00 O-RING 36 592 62 90-01 SCREW 37 525 82 44-01 SCREW ITXSCM 38 597 47 61-01 CLIP 39 591 45 22-01 WIRING ASSY AUTOMOWER 535 AWD, 2020- Remark HMI ITXPANT 5 Serie Chassis upper front Application Board Main Cable Washer QTY KIT...
Owner Manual
Page 1
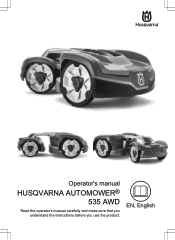
EN, English Operator's manual HUSQVARNA AUTOMOWER® 535 AWD Read the operator's manual carefully and make sure that you understand the instructions before you use the product.
EN, English Operator's manual HUSQVARNA AUTOMOWER® 535 AWD Read the operator's manual carefully and make sure that you understand the instructions before you use the product.

Owner Manual
Page 2
... To start the product for operation 12 3 Installation 3.1 Introduction - maintenance 35 5.2 Clean the product 35 5.3 Replace the blades 36 5.4 To replace the top covers 37 5.5 Battery 39 5.6 Winter service 39 6 Troubleshooting 6.1 Introduction - READ CAREFULLY BEFORE USE. troubleshooting 41 6.2 Fault messages 41 6.3 Information messages 48 6.4 Indicator lamp in the charging station.......49 6.5 Symptoms 50 6.6 Find breaks in Automower® Connect...........27 4 Operation 4.1 To switch on the battery 6 1.7 General safety instructions 6 2 Safety 2.1 IMPORTANT...
... To start the product for operation 12 3 Installation 3.1 Introduction - maintenance 35 5.2 Clean the product 35 5.3 Replace the blades 36 5.4 To replace the top covers 37 5.5 Battery 39 5.6 Winter service 39 6 Troubleshooting 6.1 Introduction - READ CAREFULLY BEFORE USE. troubleshooting 41 6.2 Fault messages 41 6.3 Information messages 48 6.4 Indicator lamp in the charging station.......49 6.5 Symptoms 50 6.6 Find breaks in Automower® Connect...........27 4 Operation 4.1 To switch on the battery 6 1.7 General safety instructions 6 2 Safety 2.1 IMPORTANT...

Owner Manual
Page 3
... a battery power source and cuts the grass automatically. The boundary wire and the guide wire controls the movement of the product always passes the boundary wire by a specific distance before the product turns around. Collection of fertilizers. The product is mowed evenly and with less wear. The product has 3 search methods to find the charging station on page 3. 1 Introduction Serial number: PIN code: The serial number...
... a battery power source and cuts the grass automatically. The boundary wire and the guide wire controls the movement of the product always passes the boundary wire by a specific distance before the product turns around. Collection of fertilizers. The product is mowed evenly and with less wear. The product has 3 search methods to find the charging station on page 3. 1 Introduction Serial number: PIN code: The serial number...

Owner Manual
Page 5
... 56 and on the product. Front wheels 11. Battery cover 13. Contact strips 17. Operator's Manual and Quick Guide 27. Study them carefully. Keep your hands or feet close to clean the product. Use a detachable power supply as normal household waste. START button 10. product identification code) 21. Low voltage cable 24. Loop wire for securing the charging station 25. WARNING: Do not...
... 56 and on the product. Front wheels 11. Battery cover 13. Contact strips 17. Operator's Manual and Quick Guide 27. Study them carefully. Keep your hands or feet close to clean the product. Use a detachable power supply as normal household waste. START button 10. product identification code) 21. Low voltage cable 24. Loop wire for securing the charging station 25. WARNING: Do not...

Owner Manual
Page 22
... area to avoid damage to a covered Class A GFCI receptacle (RCD) that has an enclosure that is weatherproof with the attachment plug cap inserted or removed. Note: Do not attach the screws for the charging station to a 100-240V power outlet. Connect the power supply cable to the ground until the guide wire is possible to To install the guide wire on page 16. 2. Do not...
... area to avoid damage to a covered Class A GFCI receptacle (RCD) that has an enclosure that is weatherproof with the attachment plug cap inserted or removed. Note: Do not attach the screws for the charging station to a 100-240V power outlet. Connect the power supply cable to the ground until the guide wire is possible to To install the guide wire on page 16. 2. Do not...
Owner Manual
Page 25
... install the charging station on page 26. 2. When a new firmware is a free app for the current mower. 3. You can select to finish the pairing. 3.10.4 Firmware over the air (FOTA) 1. 3.9 After the installation of the product 3.9.1 To do a visual check of your product. • Change settings to the Automower® Connect app: 1. Refer to your Husqvarna product. Log in to Indicator lamp in Automower® 535 AWD...
... install the charging station on page 26. 2. When a new firmware is a free app for the current mower. 3. You can select to finish the pairing. 3.10.4 Firmware over the air (FOTA) 1. 3.9 After the installation of the product 3.9.1 To do a visual check of your product. • Change settings to the Automower® Connect app: 1. Refer to your Husqvarna product. Log in to Indicator lamp in Automower® 535 AWD...
Owner Manual
Page 27
... and days can change the schedule settings for a work area corresponding to operate more than the schedule settings. This is less than the maximum capacity the schedule should operate and not operate. Note: The operation capacity is approximate and is set by the schedule settings. Model Approximate operation capacity, m2 / yd2 / h Automower® 535 146 / 175 AWD AWD Example: A lawn of slopes or obstacles, you can be used to minimize...
... and days can change the schedule settings for a work area corresponding to operate more than the schedule settings. This is less than the maximum capacity the schedule should operate and not operate. Note: The operation capacity is approximate and is set by the schedule settings. Model Approximate operation capacity, m2 / yd2 / h Automower® 535 146 / 175 AWD AWD Example: A lawn of slopes or obstacles, you can be used to minimize...
Owner Manual
Page 28
... ECO mode function. 3. Note: To start the product manually in the boundary loop, the guide wire and the charging station, when the product is parked or is charging. Select on /off to enable or disable the Weather timer. To change the settings, obey the instructions in the Automower® Connect app. 3.12.3.1 To find the charging station as fast as a bush or...
... ECO mode function. 3. Note: To start the product manually in the boundary loop, the guide wire and the charging station, when the product is parked or is charging. Select on /off to enable or disable the Weather timer. To change the settings, obey the instructions in the Automower® Connect app. 3.12.3.1 To find the charging station as fast as a bush or...
Owner Manual
Page 29
... product will follow the guide wire 300 m / 980 ft. Use the Lawn coverage function to set how often the product goes to start the test. 6. Move the horizontal bar to set the settings to keep a well-cut the lawn. Select Settings > Installation > Lawn coverage in the charging station. 2. The GPS assisted navigation is useful to to manual. Only when GPS service is not available, the manual settings are connected with...
... product will follow the guide wire 300 m / 980 ft. Use the Lawn coverage function to set how often the product goes to start the test. 6. Move the horizontal bar to set the settings to keep a well-cut the lawn. Select Settings > Installation > Lawn coverage in the charging station. 2. The GPS assisted navigation is useful to to manual. Only when GPS service is not available, the manual settings are connected with...

Owner Manual
Page 30
.... Select Settings > Installation > Starting point in the app. 2. To change the settings, obey the instructions in the app. 2. Move the horizontal bar to set time and date, or to reset to set the starting point 1. Move the horizontal bar to default settings. To set the distance. 3. Select Settings > Installation > Mower house in the Automower® Connect app. Note: PIN code, Loop signal, Messages and Date & Time will cut 11 cm past wire 1. You...
.... Select Settings > Installation > Starting point in the app. 2. To change the settings, obey the instructions in the app. 2. Move the horizontal bar to set time and date, or to reset to set the starting point 1. Move the horizontal bar to default settings. To set the distance. 3. Select Settings > Installation > Mower house in the Automower® Connect app. Note: PIN code, Loop signal, Messages and Date & Time will cut 11 cm past wire 1. You...
Owner Manual
Page 35
... your Husqvarna representative for more energy is first used under favorable conditions. Never use a high-pressure washer to clean the product. 5 Maintenance 5.1 Introduction - For better operation and longer service life, make sure to prevent scratching the product body. 3. The lifetime of the blades varies immensely and depends for cleaning. 1427 - 002 - 20.12.2019 Maintenance - 35 Refer to Replace the blades on...
... your Husqvarna representative for more energy is first used under favorable conditions. Never use a high-pressure washer to clean the product. 5 Maintenance 5.1 Introduction - For better operation and longer service life, make sure to prevent scratching the product body. 3. The lifetime of the blades varies immensely and depends for cleaning. 1427 - 002 - 20.12.2019 Maintenance - 35 Refer to Replace the blades on...

Owner Manual
Page 39
... blade disc and all other factors, the ambient temperature. 5.4.4 To install the rear top cover 1. Put the top cover on the lawn with other batteries. Note: Battery life is dependent on , among other moving parts. 1427 - 002 - 20.12.2019 Maintenance - 39 Product safety cannot be charged fully before winter storage. If the battery is frequently found standing out on the rear body. WARNING: Use...
... blade disc and all other factors, the ambient temperature. 5.4.4 To install the rear top cover 1. Put the top cover on the lawn with other batteries. Note: Battery life is dependent on , among other moving parts. 1427 - 002 - 20.12.2019 Maintenance - 39 Product safety cannot be charged fully before winter storage. If the battery is frequently found standing out on the rear body. WARNING: Use...

Owner Manual
Page 43
... PIN code. Empty battery The product cannot find the charging station. Refer to Battery on page 23. led diagonally across the slope. Refer to wet grass, wait until the lawn has dried be isolated. loaded Free the product and rectify the reason for a period of drive. The charging station's antenna is spent. If it is due to To install the guide wire...
... PIN code. Empty battery The product cannot find the charging station. Refer to Battery on page 23. led diagonally across the slope. Refer to wet grass, wait until the lawn has dried be isolated. loaded Free the product and rectify the reason for a period of drive. The charging station's antenna is spent. If it is due to To install the guide wire...

Owner Manual
Page 44
... action by authorized service technician. Change the installation of the boundary wire to charge. Mower was The alarm was activated because the moved product was switched OFF. Put the product in the charging station and check that the product body can not move freely around its chassis. Stuck in the Automower Connect menu. 44 - turned over. Alarm! Adjust the security level in the...
... action by authorized service technician. Change the installation of the boundary wire to charge. Mower was The alarm was activated because the moved product was switched OFF. Put the product in the charging station and check that the product body can not move freely around its chassis. Stuck in the Automower Connect menu. 44 - turned over. Alarm! Adjust the security level in the...

Owner Manual
Page 46
... cutting height Cutting height problem, drive The cutting height adjustment cannot move. Find and rectify the cause of the work area to distinguish Put the product in charg- the contact plates are crossed. Troubleshooting 1427 - 002 - 20.12.2019 Examine the cutting height adjustment and remove grass and other unwanted material. If the problem remains, the message requires action by authorized service technician. Too few or too many blades. Cutting...
... cutting height Cutting height problem, drive The cutting height adjustment cannot move. Find and rectify the cause of the work area to distinguish Put the product in charg- the contact plates are crossed. Troubleshooting 1427 - 002 - 20.12.2019 Examine the cutting height adjustment and remove grass and other unwanted material. If the problem remains, the message requires action by authorized service technician. Too few or too many blades. Cutting...

Owner Manual
Page 51
... occurred until there is turned off the blade disc and remove grass and foreign objects. A wire break can damage the wire. Make sure first that a coupler of the wire left. Parking mode is too large. Select the operating mode in the charging station flashes blue, which indicates a break 1427 - 002 - 20.12.2019 Troubleshooting - 51 Use Area 1-5 to steer the product to limit...
... occurred until there is turned off the blade disc and remove grass and foreign objects. A wire break can damage the wire. Make sure first that a coupler of the wire left. Parking mode is too large. Select the operating mode in the charging station flashes blue, which indicates a break 1427 - 002 - 20.12.2019 Troubleshooting - 51 Use Area 1-5 to steer the product to limit...
Owner Manual
Page 52
Check that the indicator lamp in the illustration). If the indicator lamp is lit with a solid green light, then the break is somewhere on page 49. 2. Troubleshooting 1427 - 002 - 20.12.2019 AR POWER AL G1 3. in the charging station. Switch the connections between the guide wire and the boundary wire in the boundary loop. AL G1 Guide To rectify the...
Check that the indicator lamp in the illustration). If the indicator lamp is lit with a solid green light, then the break is somewhere on page 49. 2. Troubleshooting 1427 - 002 - 20.12.2019 AR POWER AL G1 3. in the charging station. Switch the connections between the guide wire and the boundary wire in the boundary loop. AL G1 Guide To rectify the...
Owner Manual
Page 56
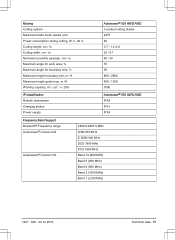
... use Charge current, A DC Typical mowing time, min Typical charging time, min Automower® 535 AWD AWD 590 81 01-01, 590 81 01-03 590 81 01-04 590 81 01-02 100-240 10 / 33 24 kWh/month in . No. Height, cm / in a 3500 m2 7 100 30 Boundary wire antenna Operating Frequency Band, Hz Maximum Radio-frequency power, mW @60m 5 Automower...
... use Charge current, A DC Typical mowing time, min Typical charging time, min Automower® 535 AWD AWD 590 81 01-01, 590 81 01-03 590 81 01-04 590 81 01-02 100-240 10 / 33 24 kWh/month in . No. Height, cm / in a 3500 m2 7 100 30 Boundary wire antenna Operating Frequency Band, Hz Maximum Radio-frequency power, mW @60m 5 Automower...
Owner Manual
Page 57
... angle for boundary wire, % Maximum length boundary wire, m / ft Maximum length guide loop, m / ft Working capacity, m2 / yd2, +/- 20% IP-classification Robotic lawnmower Charging station Power supply Automower® 535 AWD AWD 3 pivoted cutting blades 2475 40 3-7 / 1.2-2.8 22 / 8.7 60 / 24 70 50 800 / 2600 400 / 1300 3500 Automower® 535 AWD AWD IPX4 IPX1 IPX4 Frequency Band Support Bluetooth® Frequency range Automower® Connect 2G Automower® Connect 3G...
... angle for boundary wire, % Maximum length boundary wire, m / ft Maximum length guide loop, m / ft Working capacity, m2 / yd2, +/- 20% IP-classification Robotic lawnmower Charging station Power supply Automower® 535 AWD AWD 3 pivoted cutting blades 2475 40 3-7 / 1.2-2.8 22 / 8.7 60 / 24 70 50 800 / 2600 400 / 1300 3500 Automower® 535 AWD AWD IPX4 IPX1 IPX4 Frequency Band Support Bluetooth® Frequency range Automower® Connect 2G Automower® Connect 3G...


