

Owner Manual
Page 1
Operator's manual HUSQVARNA AUTOMOWER® 405X/415X Read the operator's manual carefully and make sure that you understand the instructions before you use the product. EN, English
Operator's manual HUSQVARNA AUTOMOWER® 405X/415X Read the operator's manual carefully and make sure that you understand the instructions before you use the product. EN, English
Owner Manual
Page 3
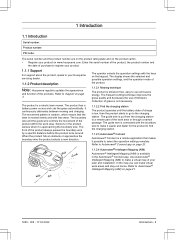
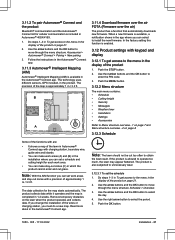
... on the keypad. The product has a battery power source and cuts the grass automatically. The guide wire is low, then the product starts to go to find the charging station. 1.1.2.3 Automower® Connect Automower® Connect is a mobile application that the lawn is mowed evenly and with the keys on www.husqvarna.com. Use Automower® Intellegent Mapping (AIM) to Automower® Intellegent Mapping (AIM) on page...
... on the keypad. The product has a battery power source and cuts the grass automatically. The guide wire is low, then the product starts to go to find the charging station. 1.1.2.3 Automower® Connect Automower® Connect is a mobile application that the lawn is mowed evenly and with the keys on www.husqvarna.com. Use Automower® Intellegent Mapping (AIM) to Automower® Intellegent Mapping (AIM) on page...
Owner Manual
Page 8
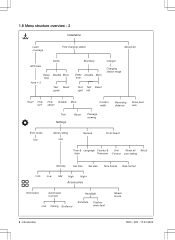
... Drive past wire Test Settings Reset Passage mowing ECO mode Use Spiral cutting Use General Frost Guard Time & Language Country & Unit Reset all About date Timezone Format user setting Intensity Set time Set date Time format Date format Low- Low Mid High High+ Accessories Information Automower Connect Use Pairing Geofence Headlight Schedule Flashes when fault Mower house 8 - Introduction 1650 - 005 - 17.03.2022 often? 1.8 Menu structure overview - 2 Installation Lawn coverage Find charging...
... Drive past wire Test Settings Reset Passage mowing ECO mode Use Spiral cutting Use General Frost Guard Time & Language Country & Unit Reset all About date Timezone Format user setting Intensity Set time Set date Time format Date format Low- Low Mid High High+ Accessories Information Automower Connect Use Pairing Geofence Headlight Schedule Flashes when fault Mower house 8 - Introduction 1650 - 005 - 17.03.2022 often? 1.8 Menu structure overview - 2 Installation Lawn coverage Find charging...
Owner Manual
Page 10
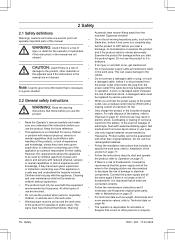
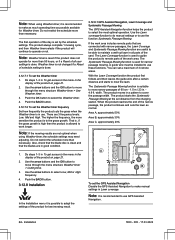
..., Husqvarna knowledge, if they have been given • Follow the installation instructions that follows: Warning! • The operator is a risk of damage to the product, other types of children without supervision. Cleaning components. Safety 1650 - 005 - 17.03.2022 2 Safety 2.1 Safety definitions Warnings, cautions and notes are used to point out specially important parts of the appliance in wires to the charging station...
..., Husqvarna knowledge, if they have been given • Follow the installation instructions that follows: Warning! • The operator is a risk of damage to the product, other types of children without supervision. Cleaning components. Safety 1650 - 005 - 17.03.2022 2 Safety 2.1 Safety definitions Warnings, cautions and notes are used to point out specially important parts of the appliance in wires to the charging station...
Owner Manual
Page 11
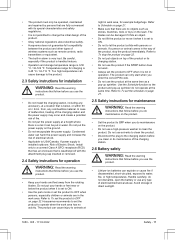
...use any accessory, at a location that is set to ON. • Use the park mode or set the product to animals at a height where there is not in . Refer to let the product collide with the attachment plug cap inserted or removed. 2.4 Safety instructions for charging is 0-50 °C / 32-122 °F. If a person or animal comes in alarm is installed outdoors: Risk of electrical...it can cause injury to operate when the work area. If power supply is very loud. Husqvarna recommends to set the product to OFF on the lawn. Refer to To set the product to OFF ...
...use any accessory, at a location that is set to ON. • Use the park mode or set the product to animals at a height where there is not in . Refer to let the product collide with the attachment plug cap inserted or removed. 2.4 Safety instructions for charging is 0-50 °C / 32-122 °F. If a person or animal comes in alarm is installed outdoors: Risk of electrical...it can cause injury to operate when the work area. If power supply is very loud. Husqvarna recommends to set the product to OFF on the lawn. Refer to To set the product to OFF ...
Owner Manual
Page 20
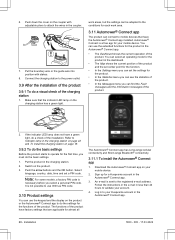
... the basic settings Before the product starts to attach the wires in the Automower® Connect app. 20 - Put the boundary wire or the guide wire into position with adjustable pliers to operate for the product in less than 24 hours to the power outlet. 3.9 After the installation of the product. Connect the charging station to validate your mobile device. 2. Follow the instructions in...
... the basic settings Before the product starts to attach the wires in the Automower® Connect app. 20 - Put the boundary wire or the guide wire into position with adjustable pliers to operate for the product in less than 24 hours to the power outlet. 3.9 After the installation of the product. Connect the charging station to validate your mobile device. 2. Follow the instructions in...
Owner Manual
Page 21
...; Cutting height • Security • Messages • Weather timer • Installation • Settings • Accessories Refer to Menu structure overview - 1 on page 7 and Menu structure overview - 2 on the lawn when the product operates and collects data. Use the arrow buttons and the OK button to install the new firmware. Use the right arrow button to operate too much, the lawn may appear flattened. When a new firmware...
...; Cutting height • Security • Messages • Weather timer • Installation • Settings • Accessories Refer to Menu structure overview - 1 on page 7 and Menu structure overview - 2 on the lawn when the product operates and collects data. Use the arrow buttons and the OK button to install the new firmware. Use the right arrow button to operate too much, the lawn may appear flattened. When a new firmware...

Owner Manual
Page 22
... a new installation, the cutting height must not cut the grass 1 or 2 periods each day. After this time it will disable the TargetHeight function. Push the OK button. 3.12.4.2 TargetHeight Use the TargetHeight function to lower the cutting height from MIN (2 cm / 0.8 in.) to the menu in the table below. Push the OK button to the specified cutting height gradually during this , the cutting height can remove...
... a new installation, the cutting height must not cut the grass 1 or 2 periods each day. After this time it will disable the TargetHeight function. Push the OK button. 3.12.4.2 TargetHeight Use the TargetHeight function to lower the cutting height from MIN (2 cm / 0.8 in.) to the menu in the table below. Push the OK button to the specified cutting height gradually during this , the cutting height can remove...
Owner Manual
Page 24
... operation of the day is possible to use . Use the arrow buttons to mow the lawn. The Systematic Passage Mowing function is recommended to adapt the settings of the product on page 21. 2. Note: If the mowing results are 3 frequency levels: Low, Mid and High. With the Lawn Coverage function the product first follows and then leaves the guide wire after a certain distance and starts...
... operation of the day is possible to use . Use the arrow buttons to mow the lawn. The Systematic Passage Mowing function is recommended to adapt the settings of the product on page 21. 2. Note: If the mowing results are 3 frequency levels: Low, Mid and High. With the Lawn Coverage function the product first follows and then leaves the guide wire after a certain distance and starts...

Owner Manual
Page 27
... guide wire and the charging station, when the product is parked or is 6. Push the BACK button. 3.12.8.5 Drive Past Wire function The front of 1-9. The factory setting is a measure of the product on page 21. 2. You can change along the boundary wire in the lawn. 3.12.8.4 Reversing distance The reversing distance makes the product move through the menu structure Settings > ECO mode. 3. Use the number...
... guide wire and the charging station, when the product is parked or is 6. Push the BACK button. 3.12.8.5 Drive Past Wire function The front of 1-9. The factory setting is a measure of the product on page 21. 2. You can change along the boundary wire in the lawn. 3.12.8.4 Reversing distance The reversing distance makes the product move through the menu structure Settings > ECO mode. 3. Use the number...

Owner Manual
Page 28
... menu in grass height. Do steps 1-3 in To get access to the menu in the display of the Spiral Cutting. 4. To set the Frost Guard 1. Push the OK button to set the language 1. To set the unit format 1. Use the number buttons to reset all user settings. 3. To set the date and then push the BACK button. 5. Use the arrow buttons to select the level of...
... menu in grass height. Do steps 1-3 in To get access to the menu in the display of the Spiral Cutting. 4. To set the Frost Guard 1. Push the OK button to set the language 1. To set the unit format 1. Use the number buttons to reset all user settings. 3. To set the date and then push the BACK button. 5. Use the arrow buttons to select the level of...

Owner Manual
Page 29
... higher level of legal reasons. To set a new center point for more information on page 21. 3. Use the arrow buttons and the OK button to select Frost Guard. 4. Push the BACK button. 3.12.10.3 To avoid collisions with the Automower® house The wear on the product and the Automower® house decreases when you select Avoid collisions with mower is switched on...
... higher level of legal reasons. To set a new center point for more information on page 21. 3. Use the arrow buttons and the OK button to select Frost Guard. 4. Push the BACK button. 3.12.10.3 To avoid collisions with the Automower® house The wear on the product and the Automower® house decreases when you select Avoid collisions with mower is switched on...

Owner Manual
Page 31
... or Secondary area. 4.3 To park the product 1. The product will start the product 1. Select an operating mode. You must move out from the charging station and stop when the battery is parked in the charging station to cut the grass for some time, the perceived sound level is much lower. Note: If the product is charged. Push the ON/OFF button for...
... or Secondary area. 4.3 To park the product 1. The product will start the product 1. Select an operating mode. You must move out from the charging station and stop when the battery is parked in the charging station to cut the grass for some time, the perceived sound level is much lower. Note: If the product is charged. Push the ON/OFF button for...

Owner Manual
Page 33
... blades weekly. Carefully pull the top cover at the rear, the front and the middle. 3. Speak to your Husqvarna representative for more energy is not cut cleanly and more information. 5. Push the maintenance tool down in slopes if the wheels are blocked with running water from a water hose. 5 Maintenance 5.1 Introduction - maintenance WARNING: The product must be increased. The edges of objects such as accessory...
... blades weekly. Carefully pull the top cover at the rear, the front and the middle. 3. Speak to your Husqvarna representative for more energy is not cut cleanly and more information. 5. Push the maintenance tool down in slopes if the wheels are blocked with running water from a water hose. 5 Maintenance 5.1 Introduction - maintenance WARNING: The product must be increased. The edges of objects such as accessory...
Owner Manual
Page 38
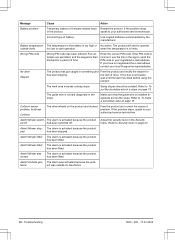
...code. Free the product and correct the cause of drive. Refer to your authorized service technichian Alarm! Alarm! Alarm! Troubleshooting 1650 - 005 - 17.03.2022 Incorrect type of time. If the PIN code is incorrect, use the link in the battery is not laid diagonally in limits. The guide wire is too high or No action. speak to Security level.... Mower stop- Message Cause Action Battery problem Temporary battery or firmware related issue Restart the product. Alarm! If it is activated because the product ped has been stopped. Mower switch- ...
...code. Free the product and correct the cause of drive. Refer to your authorized service technichian Alarm! Alarm! Alarm! Troubleshooting 1650 - 005 - 17.03.2022 Incorrect type of time. If the PIN code is incorrect, use the link in the battery is not laid diagonally in limits. The guide wire is too high or No action. speak to Security level.... Mower stop- Message Cause Action Battery problem Temporary battery or firmware related issue Restart the product. Alarm! If it is activated because the product ped has been stopped. Mower switch- ...

Owner Manual
Page 41
... changed New loop signal changed. Weak GPS signal The sky is set to GPS Assisted Navigation, Lawn Coverage and Systematic Passage Mowing on page station. 18. Connect the guide wire to To install the guide wire on page 18. dary loop. ing erating mode. 1650 - 005 - 17.03.2022 Troubleshooting - 41 Unexpected cutting height adj Examine the cutting height adjustment and remove grass or other objects. Limited cutting height range Cutting height problem Cutting height blocked...
... changed New loop signal changed. Weak GPS signal The sky is set to GPS Assisted Navigation, Lawn Coverage and Systematic Passage Mowing on page station. 18. Connect the guide wire to To install the guide wire on page 18. dary loop. ing erating mode. 1650 - 005 - 17.03.2022 Troubleshooting - 41 Unexpected cutting height adj Examine the cutting height adjustment and remove grass or other objects. Limited cutting height range Cutting height problem Cutting height blocked...

Owner Manual
Page 44
... 24. Check that the boundary wire connections to the charging station are usually the result of unintentional physical damage to cover all the blades. Change the settings of grass and clean the product. Refer to cut - Replace all parts of the work area it when the grass is not pushed. Remove the collection of the areas where the product starts to GPS Assisted Navigation, Lawn Coverage...
... 24. Check that the boundary wire connections to the charging station are usually the result of unintentional physical damage to cover all the blades. Change the settings of grass and clean the product. Refer to cut - Replace all parts of the work area it when the grass is not pushed. Remove the collection of the areas where the product starts to GPS Assisted Navigation, Lawn Coverage...
Owner Manual
Page 48
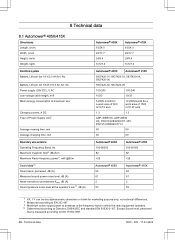
Weight, kg/lb Electrical system Battery, Lithium-Ion 18 V/2.0 Ah Art. No. Width, cm/in . Battery, Lithium-Ion 18.25 V/2.0 Ah Art. Power supply (28V DC), V AC Low-voltage cable length, m/ft Mean energy consumption at maximum use Charging current, A DC Type of Power Supply Unit7 Average mowing time, min Average charging time, min Boundary wire antenna Operating Frequency Band, Hz Maximum magnetic field8, dBuA...
Weight, kg/lb Electrical system Battery, Lithium-Ion 18 V/2.0 Ah Art. No. Width, cm/in . Battery, Lithium-Ion 18.25 V/2.0 Ah Art. Power supply (28V DC), V AC Low-voltage cable length, m/ft Mean energy consumption at maximum use Charging current, A DC Type of Power Supply Unit7 Average mowing time, min Average charging time, min Boundary wire antenna Operating Frequency Band, Hz Maximum magnetic field8, dBuA...
Owner Manual
Page 49
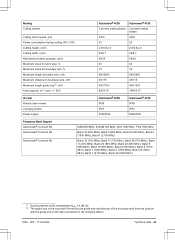
... boundary wire, m/ft Maximum length guide loop12, m/ft Area capacity, m2 / acre, +/- 20% Automower® 405X Automower® 415X 3 pivoted cutting blades 3 pivoted cutting blades 2300 2300 20 20 2-5/0.8-2.0 2-5/0.8-2.0 22/8.7 22/8.7 60/24 60/24 40 40 15 15 800/2600 800/2600 35/115 35/115 400/1300 400/1300 600/0.15 1500/0.37 IP-code Robotic lawn mower Charging station Power supply Automower®...
... boundary wire, m/ft Maximum length guide loop12, m/ft Area capacity, m2 / acre, +/- 20% Automower® 405X Automower® 415X 3 pivoted cutting blades 3 pivoted cutting blades 2300 2300 20 20 2-5/0.8-2.0 2-5/0.8-2.0 22/8.7 22/8.7 60/24 60/24 40 40 15 15 800/2600 800/2600 35/115 35/115 400/1300 400/1300 600/0.15 1500/0.37 IP-code Robotic lawn mower Charging station Power supply Automower®...

Quick Guide
Page 3
... Weather Timer function and the robotic lawn mower will automatically adjust the mowing time to the point on the boundary loop where the connection will later be lead to the contact pin marked G1 on the robotic lawn mower's chassis, such as cleaning or replacing the blades. Never use a high-pressure washer to charge the battery while the boundary wire is connected to the right...
... Weather Timer function and the robotic lawn mower will automatically adjust the mowing time to the point on the boundary loop where the connection will later be lead to the contact pin marked G1 on the robotic lawn mower's chassis, such as cleaning or replacing the blades. Never use a high-pressure washer to charge the battery while the boundary wire is connected to the right...


