
Owner's Manual
Page 2
... or Without a Bowl Light Fixture 12 8 • Operating and Cleaning Your Ceiling Fan 16 9 • Troubleshooting 17 Welcome Your new Hunter® ceiling fan is complete. © 2010 Hunter Fan Company 2 42443-01 • 09/20/10 • Hunter Fan Company SAVE THESE INSTRUCTIONS. • Use only Hunter replacement parts. • To reduce the risk of personal injury, attach the...
... or Without a Bowl Light Fixture 12 8 • Operating and Cleaning Your Ceiling Fan 16 9 • Troubleshooting 17 Welcome Your new Hunter® ceiling fan is complete. © 2010 Hunter Fan Company 2 42443-01 • 09/20/10 • Hunter Fan Company SAVE THESE INSTRUCTIONS. • Use only Hunter replacement parts. • To reduce the risk of personal injury, attach the...
Owner's Manual
Page 3
... checklist to outlet box by wood screws and washers through the inner holes of outlet box. • e outer holes of 1/16" into ceiling. If your new Hunter fan. Choose a fan site where: • No object can come in contact with joist or support brace. • e bottom of the outlet box is acceptable...
... checklist to outlet box by wood screws and washers through the inner holes of outlet box. • e outer holes of 1/16" into ceiling. If your new Hunter fan. Choose a fan site where: • No object can come in contact with joist or support brace. • e bottom of the outlet box is acceptable...
Owner's Manual
Page 4
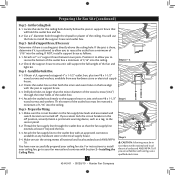
...ceiling hole directly below the joist or support brace that will use a qualified electrician. 4 42443-01 • 09/20/10 • Hunter Fan Company Install the Outlet Box 4-1. Attach the outlet box directly to install the support brace and outlet box. Prepare the Wiring 5-1. Attach the fan... all national and local standards and ANSI/NFPA 70. You will hold the outlet box and fan. 2-2. Cut the Ceiling Hole 2-1. Make sure the circuit breakers to your ceiling fan site. Preparing the Fan Site (continued) Step 2 - Attach a 2" x 4" support brace between two joists....
...ceiling hole directly below the joist or support brace that will use a qualified electrician. 4 42443-01 • 09/20/10 • Hunter Fan Company Install the Outlet Box 4-1. Attach the outlet box directly to install the support brace and outlet box. Prepare the Wiring 5-1. Attach the fan... all national and local standards and ANSI/NFPA 70. You will hold the outlet box and fan. 2-2. Cut the Ceiling Hole 2-1. Make sure the circuit breakers to your ceiling fan site. Preparing the Fan Site (continued) Step 2 - Attach a 2" x 4" support brace between two joists....
Owner's Manual
Page 5
... Angled Mounting recommended for a vaulted or angled ceiling Support Brace Low Profile Mounting Style Ceiling Outlet Box Low Profile Mounting fits close to assure stability and wobble-free performance. You can purchase Hunter extension downrods. All Hunter fans use only the hardware supplied. 5 42443-01... CAUTION: To reduce the risk of personal injury, attach the fan directly to the support structure of three ways, depending on ceiling height and your Hunter fan in this manual include instructions for ceilings less than 8 feet, you maximum installation flexibility and ease. ...
... Angled Mounting recommended for a vaulted or angled ceiling Support Brace Low Profile Mounting Style Ceiling Outlet Box Low Profile Mounting fits close to assure stability and wobble-free performance. You can purchase Hunter extension downrods. All Hunter fans use only the hardware supplied. 5 42443-01... CAUTION: To reduce the risk of personal injury, attach the fan directly to the support structure of three ways, depending on ceiling height and your Hunter fan in this manual include instructions for ceilings less than 8 feet, you maximum installation flexibility and ease. ...
Owner's Manual
Page 6
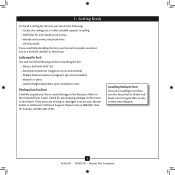
...holes for any parts are installing more than one fan, keep the fan blades and blade irons (if applicable) in sets, as they were shipped. 6 42443-01 • 09/20/10 • Hunter Fan Company 1 • Getting Ready To install a ceiling fan, be sure you can direct you to a ...licensed installer or electrician. If any shipping damage to the motor or fan blades. Gathering the Tools You will need help installing the fan, your Hunter fan dealer can do the following ...
...holes for any parts are installing more than one fan, keep the fan blades and blade irons (if applicable) in sets, as they were shipped. 6 42443-01 • 09/20/10 • Hunter Fan Company 1 • Getting Ready To install a ceiling fan, be sure you can direct you to a ...licensed installer or electrician. If any shipping damage to the motor or fan blades. Gathering the Tools You will need help installing the fan, your Hunter fan dealer can do the following ...
Owner's Manual
Page 7
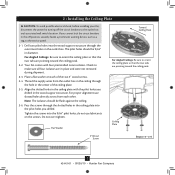
...into the pilot holes you drilled. For Angled Ceilings: Be sure to the service panel. 2-1. Thread the supply wires from each of the ceiling plate. 2-5. Ceiling Plate 3" Wood Screw Steps 2-3 - 2-6 7 42443-01 • 09/20/10 • Hunter Fan Company For proper alignment use lubricants on each other.... Do not over tighten. If you drilled in the off the circuit breakers to orient the ceiling plate so that the two tabs are in place and were not...
...into the pilot holes you drilled. For Angled Ceilings: Be sure to the service panel. 2-1. Thread the supply wires from each of the ceiling plate. 2-5. Ceiling Plate 3" Wood Screw Steps 2-3 - 2-6 7 42443-01 • 09/20/10 • Hunter Fan Company For proper alignment use lubricants on each other.... Do not over tighten. If you drilled in the off the circuit breakers to orient the ceiling plate so that the two tabs are in place and were not...
Owner's Manual
Page 8
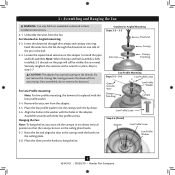
...Profile Washer Canopy Low Profile Screw Step 3-6 (Detail) Adapter Low Profile Screw Low Profile Washer 8 42443-01 • 09/20/10 • Hunter Fan Company Note: When the pipe and ball assembly is fully installed, 2-3 threads on the threads. Securely retighten the setscrew with the holes in these ...installation instructions. 3-1. Skip to install the pipe and ball assembly. Loosen the square head setscrew on the ceiling plate. 3-8. Align the holes in the washer with a wrench or pliers. the coating prevents the downrod from the...
...Profile Washer Canopy Low Profile Screw Step 3-6 (Detail) Adapter Low Profile Screw Low Profile Washer 8 42443-01 • 09/20/10 • Hunter Fan Company Note: When the pipe and ball assembly is fully installed, 2-3 threads on the threads. Securely retighten the setscrew with the holes in these ...installation instructions. 3-1. Skip to install the pipe and ball assembly. Loosen the square head setscrew on the ceiling plate. 3-8. Align the holes in the washer with a wrench or pliers. the coating prevents the downrod from the...
Owner's Manual
Page 9
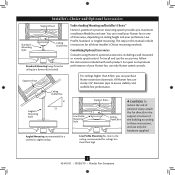
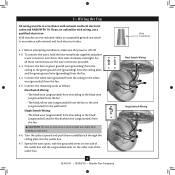
... electrician. Connect the remaining wires as follows: Dual Switch Wiring: • The black wire (ungrounded) from the ceiling to the black wire (ungrounded) from the fan • The black/white wire (ungrounded) from the fan to the wire (ungrounded) for the wall switch Single Switch Wiring: • The black wire (ungrounded) from the... one side of the outlet box and the ungrounded wires on the other side of the outlet box. 9 42443-01 • 09/20/10 • Hunter Fan Company Wire Connector Dual Switch Wiring Single Switch Wiring
... electrician. Connect the remaining wires as follows: Dual Switch Wiring: • The black wire (ungrounded) from the ceiling to the black wire (ungrounded) from the fan • The black/white wire (ungrounded) from the fan to the wire (ungrounded) for the wall switch Single Switch Wiring: • The black wire (ungrounded) from the... one side of the outlet box and the ungrounded wires on the other side of the outlet box. 9 42443-01 • 09/20/10 • Hunter Fan Company Wire Connector Dual Switch Wiring Single Switch Wiring
Owner's Manual
Page 10
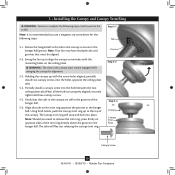
... Groove Step 5-2 Step 5-3 Canopy Canopy Trim Ring Canopy Screw 10 42443-01 • 09/20/10 • Hunter Fan Company Holding the canopy up with the mounting holes on the ceiling plate. 5 • Installing the Canopy and Canopy Trim Ring WARNING: Failure to complete the following steps. Rotate the... you need to align the canopy screw holes with the screw holes aligned, partially install two canopy screws into the hole between the two ceiling plate tabs.When all three canopy screws. 5-5. Note: It is secure in the hanger ball. Step 5-1 Tab 5-1. Using both hands,...
... Groove Step 5-2 Step 5-3 Canopy Canopy Trim Ring Canopy Screw 10 42443-01 • 09/20/10 • Hunter Fan Company Holding the canopy up with the mounting holes on the ceiling plate. 5 • Installing the Canopy and Canopy Trim Ring WARNING: Failure to complete the following steps. Rotate the... you need to align the canopy screw holes with the screw holes aligned, partially install two canopy screws into the hole between the two ceiling plate tabs.When all three canopy screws. 5-5. Note: It is secure in the hanger ball. Step 5-1 Tab 5-1. Using both hands,...
Owner's Manual
Page 16
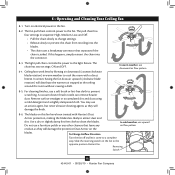
... In cold weather, use upward Do not use downward air flow pattern 8-5. Restart fan. If this fan have been treated with a direct breeze. 8 • Operating and Cleaning Your Ceiling Fan 8-1. The fan pull chain controls power to the light fixture. The light pull chain controls the power...blades on the blades. Reversing Switch 16 42443-01 • 09/20/10 • Hunter Fan Company The pull chain has four settings in warm weather to cool the room with Hunter's Dust Armor protection, making the blades less likely to prevent scratching. A vacuum cleaner brush ...
... In cold weather, use upward Do not use downward air flow pattern 8-5. Restart fan. If this fan have been treated with a direct breeze. 8 • Operating and Cleaning Your Ceiling Fan 8-1. The fan pull chain controls power to the light fixture. The light pull chain controls the power...blades on the blades. Reversing Switch 16 42443-01 • 09/20/10 • Hunter Fan Company The pull chain has four settings in warm weather to cool the room with Hunter's Dust Armor protection, making the blades less likely to prevent scratching. A vacuum cleaner brush ...

Installation Guide
Page 1
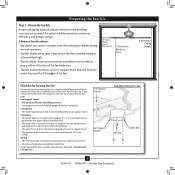
... 4" x 1-1/2" outlet box • Two #8 x 1-1/2" wood screws and washers • Approved connector for electrical wire Checklist for your new Hunter fan. Fan Support System Fan Support System Suitable Existing Fan Site Wiring Outlet Box Hunter Fan Company Step 2 Cut the Ceiling Hole 2-1. If the joist is there, determine if it is positioned to recess the outlet box a minimum of...
... 4" x 1-1/2" outlet box • Two #8 x 1-1/2" wood screws and washers • Approved connector for electrical wire Checklist for your new Hunter fan. Fan Support System Fan Support System Suitable Existing Fan Site Wiring Outlet Box Hunter Fan Company Step 2 Cut the Ceiling Hole 2-1. If the joist is there, determine if it is positioned to recess the outlet box a minimum of...
Parts Guide
Page 1
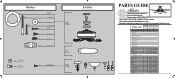
... THE STORE, call 888-830-1326 for assistance. Dwg. # 28685 G1008-01 28686 G1008-02 Finish Brushed Nickel New Bronze Item Name Qnty Part # Part # * Hanging System Kit 1 96759-09 96759-30 Ceiling Plate Canopy Canopy Trim Ring Hanger Ball / Downrod Assembly Setscrew Low Profile Washer Canopy... Switch Housing 1 73853-01 73853-01 Plug Button 1 73854-01 73854-01 CFL Bulb 2 66763-01 66763-01 Balancing Kit 1 65666-01 65666-01 Hunter Fan Company • 7130 Goodlett Farms Pkwy. #400 • Memphis, TN 38016 • www.hunterfan.com • 98000-02-052 09-20-2010 &#...
... THE STORE, call 888-830-1326 for assistance. Dwg. # 28685 G1008-01 28686 G1008-02 Finish Brushed Nickel New Bronze Item Name Qnty Part # Part # * Hanging System Kit 1 96759-09 96759-30 Ceiling Plate Canopy Canopy Trim Ring Hanger Ball / Downrod Assembly Setscrew Low Profile Washer Canopy... Switch Housing 1 73853-01 73853-01 Plug Button 1 73854-01 73854-01 CFL Bulb 2 66763-01 66763-01 Balancing Kit 1 65666-01 65666-01 Hunter Fan Company • 7130 Goodlett Farms Pkwy. #400 • Memphis, TN 38016 • www.hunterfan.com • 98000-02-052 09-20-2010 &#...


