
Installation Guide
Page 1
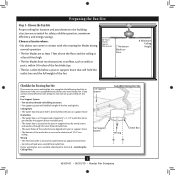
... and washers through the inner holes of the fan and light kit. Wiring o e electrical cable is a ceiling joist directly above the floor and the ceiling is at least 6" beyond the box. 5-3. Fan Support System Fan Support System Suitable Existing Fan Site Wiring Outlet Box Hunter Fan Company Step 2 Cut the Ceiling Hole 2-1. Steps 2 - 3 Step 3 Install a Support Brace, If...
... and washers through the inner holes of the fan and light kit. Wiring o e electrical cable is a ceiling joist directly above the floor and the ceiling is at least 6" beyond the box. 5-3. Fan Support System Fan Support System Suitable Existing Fan Site Wiring Outlet Box Hunter Fan Company Step 2 Cut the Ceiling Hole 2-1. Steps 2 - 3 Step 3 Install a Support Brace, If...
Owner's Manual
Page 2
... appreciate the opportunity to the outlet box and associated wall switch location. Welcome Your new Hunter® ceiling fan is complete. © 2010 Hunter Fan Company 2 42439-01 • 06/15/10 • Hunter Fan Company If you with this fan. Before installing your fan, disconnect the power by turning off position, securely fasten a prominent warning device, such as...
... appreciate the opportunity to the outlet box and associated wall switch location. Welcome Your new Hunter® ceiling fan is complete. © 2010 Hunter Fan Company 2 42439-01 • 06/15/10 • Hunter Fan Company If you with this fan. Before installing your fan, disconnect the power by turning off position, securely fasten a prominent warning device, such as...
Owner's Manual
Page 3
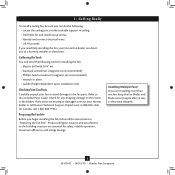
... is secured to determine if the site is at least 8 feet high. • e fan blades have no obstructions to Section 2 • Installing the Ceiling Plate. Preparing the Fan Site Step 1 - If your new Hunter fan. Choose the Fan Site Proper ceiling fan location and attachment to the building structure are at least 7 feet above the floor and...
... is secured to determine if the site is at least 8 feet high. • e fan blades have no obstructions to Section 2 • Installing the Ceiling Plate. Preparing the Fan Site Step 1 - If your new Hunter fan. Choose the Fan Site Proper ceiling fan location and attachment to the building structure are at least 7 feet above the floor and...

Owner's Manual
Page 4
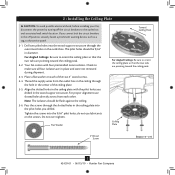
...washers. e bottom of the outlet box must be recessed a minimum of the ceiling. If the joist is there, determine if it will use a qualified electrician. 4 42439-01 • 06/15/10 • Hunter Fan Company Steps 2 - 3 3-2. Step 3 - Check the support brace to recess the... outlet box a minimum of the fan and light kit. If you to ensure it is a ceiling joist directly above the ceiling hole. Cut the Ceiling Hole 2-1.
...washers. e bottom of the outlet box must be recessed a minimum of the ceiling. If the joist is there, determine if it will use a qualified electrician. 4 42439-01 • 06/15/10 • Hunter Fan Company Steps 2 - 3 3-2. Step 3 - Check the support brace to recess the... outlet box a minimum of the fan and light kit. If you to ensure it is a ceiling joist directly above the ceiling hole. Cut the Ceiling Hole 2-1.
Owner's Manual
Page 5
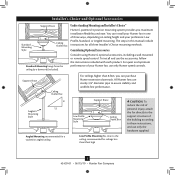
... 8 feet high CAUTION: To reduce the risk of personal injury, attach the fan directly to the support structure of three ways, depending on ceiling height and your Hunter fan, use only the hardware supplied. 5 42439-01 • 06/15/10 • Hunter Fan Company The steps in one of the building according to these instructions, and...
... 8 feet high CAUTION: To reduce the risk of personal injury, attach the fan directly to the support structure of three ways, depending on ceiling height and your Hunter fan, use only the hardware supplied. 5 42439-01 • 06/15/10 • Hunter Fan Company The steps in one of the building according to these instructions, and...
Owner's Manual
Page 6
... you are missing or damaged, contact your Hunter dealer or call Hunter Technical Support Department at 888-830-1326 (In Canada, call 1-866-268-1936). Proper ceiling fan location and attachment to the building structure are essential for and install wood screws. • Identify and connect electrical wires. • Lift 40 pounds. 1 • ...
... you are missing or damaged, contact your Hunter dealer or call Hunter Technical Support Department at 888-830-1326 (In Canada, call 1-866-268-1936). Proper ceiling fan location and attachment to the building structure are essential for and install wood screws. • Identify and connect electrical wires. • Lift 40 pounds. 1 • ...
Owner's Manual
Page 7
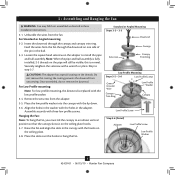
...the center of the two 3" wood screws. 2-4. Note: The isolators should be flush against the ceiling. 2-6. Ceiling Plate 3" Wood Screw Steps 2-3 - 2-6 7 42439-01 • 06/15/10 • Hunter Fan Company The pilot holes should be 9/64" in the off the circuit breakers to the outlet box... and associated wall switch location. Check to make sure all four isolators are pointing toward the ceiling peak. 2-2. For proper alignment use lubricants on...
...the center of the two 3" wood screws. 2-4. Note: The isolators should be flush against the ceiling. 2-6. Ceiling Plate 3" Wood Screw Steps 2-3 - 2-6 7 42439-01 • 06/15/10 • Hunter Fan Company The pilot holes should be 9/64" in the off the circuit breakers to the outlet box... and associated wall switch location. Check to make sure all four isolators are pointing toward the ceiling peak. 2-2. For proper alignment use lubricants on...
Owner's Manual
Page 8
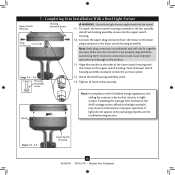
...slots over the hooks to an almost vertical position so that the canopy slots sit on the ceiling plate. 3-8. 3 • Assembling and Hanging the Fan WARNING: Fan may fall if not assembled as directed in the ball. 3-3. Insert the downrod through the...the low profile washer into the canopy with the holes in the canopy with the low profile washer. 3-4. Raise the fan and align the slots in the adapter. Skip to install the pipe and ball assembly. Feed the wires from the ... Adapter Low Profile Screw Low Profile Washer 8 42439-01 • 06/15/10 • Hunter Fan Company
...slots over the hooks to an almost vertical position so that the canopy slots sit on the ceiling plate. 3-8. 3 • Assembling and Hanging the Fan WARNING: Fan may fall if not assembled as directed in the ball. 3-3. Insert the downrod through the...the low profile washer into the canopy with the holes in the canopy with the low profile washer. 3-4. Raise the fan and align the slots in the adapter. Skip to install the pipe and ball assembly. Feed the wires from the ... Adapter Low Profile Screw Low Profile Washer 8 42439-01 • 06/15/10 • Hunter Fan Company

Owner's Manual
Page 9
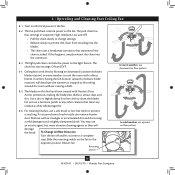
... (ungrounded) for the wall switch Single Switch Wiring: • The black wire (ungrounded) from the ceiling to the green ground wire (grounding) from the ceiling plate and the green ground wire from the fan. 4-5. If you are unfamiliar with national and local electrical codes. 4-1. Spread the wires apart, with ...of the outlet box and the ungrounded wires on the other side of the outlet box. 9 42439-01 • 06/15/10 • Hunter Fan Company Wire Connector Dual Switch Wiring Single Switch Wiring To connect the wires, hold the bare metal leads together and place a wire connector over ...
... (ungrounded) for the wall switch Single Switch Wiring: • The black wire (ungrounded) from the ceiling to the green ground wire (grounding) from the ceiling plate and the green ground wire from the fan. 4-5. If you are unfamiliar with national and local electrical codes. 4-1. Spread the wires apart, with ...of the outlet box and the ungrounded wires on the other side of the outlet box. 9 42439-01 • 06/15/10 • Hunter Fan Company Wire Connector Dual Switch Wiring Single Switch Wiring To connect the wires, hold the bare metal leads together and place a wire connector over ...
Owner's Manual
Page 10
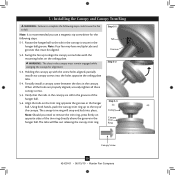
... the canopy is recommended you need to the top of the canopy. Holding the canopy up to remove the trim ring, press firmly on the ceiling plate. Using both hands, push the canopy trim ring up with the mounting holes on opposite sides of the hanger ball. 5-6. Note: Should... for alignment. 5-3. Step 5-1 Tab Groove Step 5-2 Step 5-3 Canopy Canopy Trim Ring Canopy Screw 10 42439-01 • 06/15/10 • Hunter Fan Company Note: Your fan may have multiple tabs and grooves that the tabs in the canopy are properly aligned, securely tighten all the holes are still in the...
... the canopy is recommended you need to the top of the canopy. Holding the canopy up to remove the trim ring, press firmly on the ceiling plate. Using both hands, push the canopy trim ring up with the mounting holes on opposite sides of the hanger ball. 5-6. Note: Should... for alignment. 5-3. Step 5-1 Tab Groove Step 5-2 Step 5-3 Canopy Canopy Trim Ring Canopy Screw 10 42439-01 • 06/15/10 • Hunter Fan Company Note: Your fan may have multiple tabs and grooves that the tabs in the canopy are properly aligned, securely tighten all the holes are still in the...
Owner's Manual
Page 12
... product. 7-3. Steps 7-3 - 7-5 Lower Switch Housing 12 42439-01 • 06/15/10 • Hunter Fan Company To attach the lower switch housing assembly to the lower plug connector in the sides of the lower switch housing with this ceiling fan contains a device that restricts its light output. Align the notches in the lower switch...
... product. 7-3. Steps 7-3 - 7-5 Lower Switch Housing 12 42439-01 • 06/15/10 • Hunter Fan Company To attach the lower switch housing assembly to the lower plug connector in the sides of the lower switch housing with this ceiling fan contains a device that restricts its light output. Align the notches in the lower switch...
Owner's Manual
Page 14
...weather, use downward air flow pattern In cold weather, use a soft brush or lint-free cloth to the fan. 8-2. If this fan have been treated with a direct breeze. Ceiling fans work best by blowing air downward (counterclockwise blade rotation) in sequence: High, Medium, Low and Off. ...Hunter's Dust Armor protection, making the blades less likely to prevent the chain from recoiling into the connector. 8-3. The light pull chain controls the power to a complete stop. In winter, having the fan draw air upward (clockwise blade rotation) will distribute the warmer air trapped at the ceiling...
...weather, use downward air flow pattern In cold weather, use a soft brush or lint-free cloth to the fan. 8-2. If this fan have been treated with a direct breeze. Ceiling fans work best by blowing air downward (counterclockwise blade rotation) in sequence: High, Medium, Low and Off. ...Hunter's Dust Armor protection, making the blades less likely to prevent the chain from recoiling into the connector. 8-3. The light pull chain controls the power to a complete stop. In winter, having the fan draw air upward (clockwise blade rotation) will distribute the warmer air trapped at the ceiling...
Parts Guide
Page 1
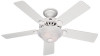
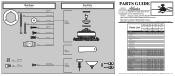
...ITEM TO THE STORE, call 888-830-1326 for assistance. Dwg. # G0829-01 28680 G0829-02 28681 G0829-03 Finish Qnty 1 Onyx Bengal Brushed Nickel White Part # 96759-90 Part # 96759-09...-18 84743-05 84886-13 2 77646-04 77646-04 77646-04 1 65666-01 65666-01 65666-01 Hunter Fan Company • 7130 Goodlett Farms Pkwy. #400 • Memphis, TN 38016 • www.hunterfan.com...98000-02-046 07-21-2011 • ©2011 Parts List Item Name * Hanging System Kit Ceiling Plate Canopy Canopy Trim Ring Hanger Ball / Downrod Assembly Setscrew Low Profile Washer Canopy Screw Wood Screw ...
...ITEM TO THE STORE, call 888-830-1326 for assistance. Dwg. # G0829-01 28680 G0829-02 28681 G0829-03 Finish Qnty 1 Onyx Bengal Brushed Nickel White Part # 96759-90 Part # 96759-09...-18 84743-05 84886-13 2 77646-04 77646-04 77646-04 1 65666-01 65666-01 65666-01 Hunter Fan Company • 7130 Goodlett Farms Pkwy. #400 • Memphis, TN 38016 • www.hunterfan.com...98000-02-046 07-21-2011 • ©2011 Parts List Item Name * Hanging System Kit Ceiling Plate Canopy Canopy Trim Ring Hanger Ball / Downrod Assembly Setscrew Low Profile Washer Canopy Screw Wood Screw ...


