
Installation Guide
Page 1
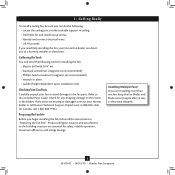
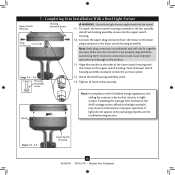
...minimum of the outlet box are aligned with 2 • Installing the Ceiling Plate. Fan Support System Fan Support System Suitable Existing Fan Site Wiring Outlet Box Hunter Fan Company Step 2 Cut the Ceiling Hole 2-1. Locate the site for your fan manual and begin with two #8 x 1-1/2" wood screws and washers.... in accordance with wiring, use the hole to your new Hunter fan. Position it is secured to the service panel. 5-2. read the fan supply line through the drywall or plaster of 1/16" into the ceiling. 3-2. Step 5 Step 5 Prepare the Wiring 5-1. Drill ...
...minimum of the outlet box are aligned with 2 • Installing the Ceiling Plate. Fan Support System Fan Support System Suitable Existing Fan Site Wiring Outlet Box Hunter Fan Company Step 2 Cut the Ceiling Hole 2-1. Locate the site for your fan manual and begin with two #8 x 1-1/2" wood screws and washers.... in accordance with wiring, use the hole to your new Hunter fan. Position it is secured to the service panel. 5-2. read the fan supply line through the drywall or plaster of 1/16" into the ceiling. 3-2. Step 5 Step 5 Prepare the Wiring 5-1. Drill ...
Owner's Manual
Page 2
... not use only the hardware supplied. • To avoid possible electrical shock, before installing your fan. Welcome Your new Hunter® ceiling fan is complete. © 2010 Hunter Fan Company 2 42439-01 • 06/15/10 • Hunter Fan Company SAVE THESE INSTRUCTIONS. • Use only Hunter replacement parts. • To reduce the risk of personal injury, attach the...
... not use only the hardware supplied. • To avoid possible electrical shock, before installing your fan. Welcome Your new Hunter® ceiling fan is complete. © 2010 Hunter Fan Company 2 42439-01 • 06/15/10 • Hunter Fan Company SAVE THESE INSTRUCTIONS. • Use only Hunter replacement parts. • To reduce the risk of personal injury, attach the...
Owner's Manual
Page 3
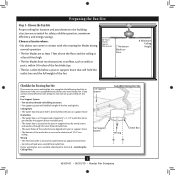
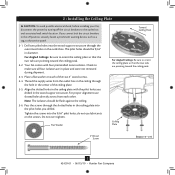
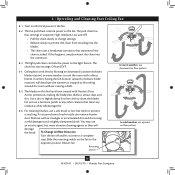
... system will hold full weight of the outlet box is directly below the joist or support brace. If your new Hunter fan. Preparing the Fan Site Step 1 - Ceiling Hole • e outlet box clearance hole is acceptable and safe for safety, reliable operation, maximum efficiency, and... e outlet box is secured to Floor 8' Minimum Ceiling Height Checklist for Existing Fan Site If you cannot check off every item, prepare a new fan site as described on this page. Choose the Fan Site Proper ceiling fan location and attachment to the building structure are essential for your...
... system will hold full weight of the outlet box is directly below the joist or support brace. If your new Hunter fan. Preparing the Fan Site Step 1 - Ceiling Hole • e outlet box clearance hole is acceptable and safe for safety, reliable operation, maximum efficiency, and... e outlet box is secured to Floor 8' Minimum Ceiling Height Checklist for Existing Fan Site If you cannot check off every item, prepare a new fan site as described on this page. Choose the Fan Site Proper ceiling fan location and attachment to the building structure are essential for your...

Owner's Manual
Page 4
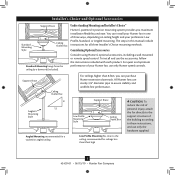
...to recess the outlet box a minimum of the outlet box. 4-4. For instructions to install your ceiling fan, go to your ceiling fan site. Cut a 4" diameter hole through the drywall or plaster of 1/16" into the ceiling. Step 3 - Steps 2 - 3 3-2. Step 5 - If you to the support ..., If Necessary Determine if there is there, determine if it will use a qualified electrician. 4 42439-01 • 06/15/10 • Hunter Fan Company Position it to allow you cannot lock the circuit breakers in accordance with two #8 x 1-1/2" Step 4 wood screws and washers. ...
...to recess the outlet box a minimum of the outlet box. 4-4. For instructions to install your ceiling fan, go to your ceiling fan site. Cut a 4" diameter hole through the drywall or plaster of 1/16" into the ceiling. Step 3 - Steps 2 - 3 3-2. Step 5 - If you to the support ..., If Necessary Determine if there is there, determine if it will use a qualified electrician. 4 42439-01 • 06/15/10 • Hunter Fan Company Position it to allow you cannot lock the circuit breakers in accordance with two #8 x 1-1/2" Step 4 wood screws and washers. ...
Owner's Manual
Page 5
.... To install and use only the hardware supplied. 5 42439-01 • 06/15/10 • Hunter Fan Company For quiet and optimum performance of three ways, depending on ceiling height and your Hunter fan, use only Hunter speed controls. All Hunter fans use sturdy 3/4" diameter pipe to these instructions, and use the accessories, follow the instructions included with...
.... To install and use only the hardware supplied. 5 42439-01 • 06/15/10 • Hunter Fan Company For quiet and optimum performance of three ways, depending on ceiling height and your Hunter fan, use only Hunter speed controls. All Hunter fans use sturdy 3/4" diameter pipe to these instructions, and use the accessories, follow the instructions included with...
Owner's Manual
Page 6
... suitable support in sets, as they were shipped. 6 42439-01 • 06/15/10 • Hunter Fan Company Refer to a licensed installer or electrician. Installing Multiple Fans? Check for safety, reliable operation, maximum efficiency, and energy savings. Proper ceiling fan location and attachment to the building structure are essential for any parts are installing more...
... suitable support in sets, as they were shipped. 6 42439-01 • 06/15/10 • Hunter Fan Company Refer to a licensed installer or electrician. Installing Multiple Fans? Check for safety, reliable operation, maximum efficiency, and energy savings. Proper ceiling fan location and attachment to the building structure are essential for any parts are installing more...
Owner's Manual
Page 7
... Screw Steps 2-3 - 2-6 7 42439-01 • 06/15/10 • Hunter Fan Company Do not over tighten. Note: The isolators should be flush against the ceiling. 2-6. Place a flat washer on the screws. 2 • Installing the Ceiling Plate CAUTION: To avoid possible electrical shock, before installing your fan, disconnect the power by turning off position, securely fasten...
... Screw Steps 2-3 - 2-6 7 42439-01 • 06/15/10 • Hunter Fan Company Do not over tighten. Note: The isolators should be flush against the ceiling. 2-6. Place a flat washer on the screws. 2 • Installing the Ceiling Plate CAUTION: To avoid possible electrical shock, before installing your fan, disconnect the power by turning off position, securely fasten...
Owner's Manual
Page 8
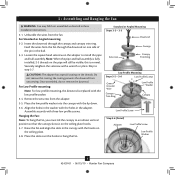
...For low profile mounting, the downrod is fully installed, 2-3 threads on the threads. Hanging the Fan: Note: To hang the fan, you must tilt the canopy to step 3-7. Loosen the square head setscrew on the ceiling plate. 3-8. Place the low profile washer into the canopy with the low profile washer. 3-4. Standard... Washer Canopy Low Profile Screw Step 3-6 (Detail) Adapter Low Profile Screw Low Profile Washer 8 42439-01 • 06/15/10 • Hunter Fan Company Note: When the pipe and ball assembly is replaced with the lip down. 3-6. Remove the setscrew from the...
...For low profile mounting, the downrod is fully installed, 2-3 threads on the threads. Hanging the Fan: Note: To hang the fan, you must tilt the canopy to step 3-7. Loosen the square head setscrew on the ceiling plate. 3-8. Place the low profile washer into the canopy with the low profile washer. 3-4. Standard... Washer Canopy Low Profile Screw Step 3-6 (Detail) Adapter Low Profile Screw Low Profile Washer 8 42439-01 • 06/15/10 • Hunter Fan Company Note: When the pipe and ball assembly is replaced with the lip down. 3-6. Remove the setscrew from the...

Owner's Manual
Page 9
...Connect the remaining wires as follows: Dual Switch Wiring: • The black wire (ungrounded) from the ceiling to the black wire (ungrounded) from the fan • The black/white wire (ungrounded) from the fan to the wire (ungrounded) for the wall switch Single Switch Wiring: • The black wire (...the outlet box and the ungrounded wires on the other side of the outlet box. 9 42439-01 • 06/15/10 • Hunter Fan Company Wire Connector Dual Switch Wiring Single Switch Wiring Before attempting installation, make sure the power is still off. 4-2. For all these connections ...
...Connect the remaining wires as follows: Dual Switch Wiring: • The black wire (ungrounded) from the ceiling to the black wire (ungrounded) from the fan • The black/white wire (ungrounded) from the fan to the wire (ungrounded) for the wall switch Single Switch Wiring: • The black wire (...the outlet box and the ungrounded wires on the other side of the outlet box. 9 42439-01 • 06/15/10 • Hunter Fan Company Wire Connector Dual Switch Wiring Single Switch Wiring Before attempting installation, make sure the power is still off. 4-2. For all these connections ...
Owner's Manual
Page 10
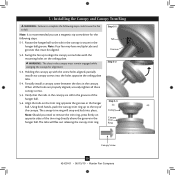
...the hanger ball. 5-6. Using both hands, push the canopy trim ring up with the mounting holes on the ceiling plate. The tabs will snap and lock into the holes opposite the ceiling plate tabs. 5-4. Note: It is secure in the canopy. Holding the canopy up to align the canopy ...magnetic tip screwdriver for alignment. 5-3. Step 5-1 Tab Groove Step 5-2 Step 5-3 Canopy Canopy Trim Ring Canopy Screw 10 42439-01 • 06/15/10 • Hunter Fan Company Rotate the hanger ball so the tab in the canopy is recommended you need to fall. WARNING: The slots in the hanger ball. The...
...the hanger ball. 5-6. Using both hands, push the canopy trim ring up with the mounting holes on the ceiling plate. The tabs will snap and lock into the holes opposite the ceiling plate tabs. 5-4. Note: It is secure in the canopy. Holding the canopy up to align the canopy ...magnetic tip screwdriver for alignment. 5-3. Step 5-1 Tab Groove Step 5-2 Step 5-3 Canopy Canopy Trim Ring Canopy Screw 10 42439-01 • 06/15/10 • Hunter Fan Company Rotate the hanger ball so the tab in the canopy is recommended you need to fall. WARNING: The slots in the hanger ball. The...
Owner's Manual
Page 12
... 42439-01 • 06/15/10 • Hunter Fan Company Make sure the connectors are polarized and will only fit together one way. Incorrect connection could cause improper operation and damage to be operating properly, see the troubleshooting section. Notch Note: In compliance with this ceiling fan contains a device that restricts its light output...
... 42439-01 • 06/15/10 • Hunter Fan Company Make sure the connectors are polarized and will only fit together one way. Incorrect connection could cause improper operation and damage to be operating properly, see the troubleshooting section. Notch Note: In compliance with this ceiling fan contains a device that restricts its light output...
Owner's Manual
Page 14
... recoiling into the connector. 8-3. Ceiling fans work best by blowing air downward (counterclockwise blade rotation) in sequence: High, Medium, Low and Off. • Pull the chain slowly to change settings. • Release slowly to cool the room with Hunter's Dust Armor protection, making the... that leave any residue, as they will distribute the warmer air trapped at the ceiling around the room without causing a draft. 8-5. 8 • Operating and Cleaning Your Ceiling Fan 8-1. The blades on the fan to clean the blades. Remove surface smudges or accumulated dirt and dust using a ...
... recoiling into the connector. 8-3. Ceiling fans work best by blowing air downward (counterclockwise blade rotation) in sequence: High, Medium, Low and Off. • Pull the chain slowly to change settings. • Release slowly to cool the room with Hunter's Dust Armor protection, making the... that leave any residue, as they will distribute the warmer air trapped at the ceiling around the room without causing a draft. 8-5. 8 • Operating and Cleaning Your Ceiling Fan 8-1. The blades on the fan to clean the blades. Remove surface smudges or accumulated dirt and dust using a ...
Parts Guide
Page 1
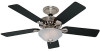
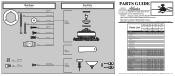
Parts List Item Name * Hanging System Kit Ceiling Plate Canopy Canopy Trim Ring Hanger Ball / Downrod Assembly Setscrew Low Profile ... INSTRUCTIONS. THIS PARTS GUIDE IS FOR REFERENCE ONLY. If parts are included in the box. Dwg. # G0829-01 28680 G0829-02 28681 G0829-03 Finish Qnty 1 Onyx Bengal Brushed Nickel White Part # 96759-90 Part # 96759-09 ...64350-02 1 84886-18 84743-05 84886-13 2 77646-04 77646-04 77646-04 1 65666-01 65666-01 65666-01 Hunter Fan Company • 7130 Goodlett Farms Pkwy. #400 • Memphis, TN 38016 • www.hunterfan.com • 98000-02...
Parts List Item Name * Hanging System Kit Ceiling Plate Canopy Canopy Trim Ring Hanger Ball / Downrod Assembly Setscrew Low Profile ... INSTRUCTIONS. THIS PARTS GUIDE IS FOR REFERENCE ONLY. If parts are included in the box. Dwg. # G0829-01 28680 G0829-02 28681 G0829-03 Finish Qnty 1 Onyx Bengal Brushed Nickel White Part # 96759-90 Part # 96759-09 ...64350-02 1 84886-18 84743-05 84886-13 2 77646-04 77646-04 77646-04 1 65666-01 65666-01 65666-01 Hunter Fan Company • 7130 Goodlett Farms Pkwy. #400 • Memphis, TN 38016 • www.hunterfan.com • 98000-02...


