
Installation Guide
Page 1
... must be in the box align with 2 • Installing the Ceiling Plate. If your fan manual and begin with national and local electrical codes and ANSI/NFPA 70. Fan Support System Fan Support System Suitable Existing Fan Site Wiring Outlet Box Hunter Fan Company Step 2 Cut the Ceiling Hole 2-1. Locate the site for safety, reliable operation, maximum efficiency...
... must be in the box align with 2 • Installing the Ceiling Plate. If your fan manual and begin with national and local electrical codes and ANSI/NFPA 70. Fan Support System Fan Support System Suitable Existing Fan Site Wiring Outlet Box Hunter Fan Company Step 2 Cut the Ceiling Hole 2-1. Locate the site for safety, reliable operation, maximum efficiency...
Owner's Manual
Page 2
... With a Bowl Light Fixture 12 8 • Operating and Cleaning Your Ceiling Fan 14 9 • Troubleshooting 15 Cautions and Warnings • READ THIS ENTIRE MANUAL CAREFULLY BEFORE BEGINNING INSTALLATION. Use only Hunter speed controls. • This product conforms to UL STD 507 and is...8226; To reduce the risk of our work. Welcome Your new Hunter® ceiling fan is complete. © 2010 Hunter Fan Company 2 42439-01 • 06/15/10 • Hunter Fan Company Never insert foreign objects between rotating fan blades. • To reduce the risk of the building according ...
... With a Bowl Light Fixture 12 8 • Operating and Cleaning Your Ceiling Fan 14 9 • Troubleshooting 15 Cautions and Warnings • READ THIS ENTIRE MANUAL CAREFULLY BEFORE BEGINNING INSTALLATION. Use only Hunter speed controls. • This product conforms to UL STD 507 and is...8226; To reduce the risk of our work. Welcome Your new Hunter® ceiling fan is complete. © 2010 Hunter Fan Company 2 42439-01 • 06/15/10 • Hunter Fan Company Never insert foreign objects between rotating fan blades. • To reduce the risk of the building according ...
Owner's Manual
Page 3
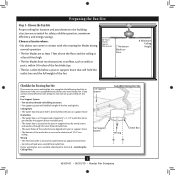
...new Hunter fan. Choose the Fan Site Proper ceiling fan location and attachment to the building structure are aligned with the rotating fan blades during normal operation. • e fan blades are at least 7 feet above the floor and the ceiling is at least 8 feet high. • e fan ...or support brace by an approved connector. • Six inches of the fan and light kit. Fan Support System Fan Support System Suitable Existing Fan Site Wiring Outlet Box 3 42439-01 • 06/15/10 • Hunter Fan Company Outlet Box • e outlet box is an UL-approved...
...new Hunter fan. Choose the Fan Site Proper ceiling fan location and attachment to the building structure are aligned with the rotating fan blades during normal operation. • e fan blades are at least 7 feet above the floor and the ceiling is at least 8 feet high. • e fan ...or support brace by an approved connector. • Six inches of the fan and light kit. Fan Support System Fan Support System Suitable Existing Fan Site Wiring Outlet Box 3 42439-01 • 06/15/10 • Hunter Fan Company Outlet Box • e outlet box is an UL-approved...

Owner's Manual
Page 4
...standards and ANSI/NFPA 70. For instructions to install your ceiling fan, go to the support brace or joist with Section 2 • Installing the Ceiling Plate. Cut the Ceiling Hole 2-1. Locate the site for the ceiling hole directly below the joist or support brace that will... will use a qualified electrician. 4 42439-01 • 06/15/10 • Hunter Fan Company Steps 2 - 3 3-2. Position it will hold the outlet box and fan. 2-2. Step 5 CAUTION: All wiring must be in the off . Preparing the Fan Site (continued) Step 2 - Step 4 - Prepare the Wiring 5-1. Make sure the...
...standards and ANSI/NFPA 70. For instructions to install your ceiling fan, go to the support brace or joist with Section 2 • Installing the Ceiling Plate. Cut the Ceiling Hole 2-1. Locate the site for the ceiling hole directly below the joist or support brace that will... will use a qualified electrician. 4 42439-01 • 06/15/10 • Hunter Fan Company Steps 2 - 3 3-2. Position it will hold the outlet box and fan. 2-2. Step 5 CAUTION: All wiring must be in the off . Preparing the Fan Site (continued) Step 2 - Step 4 - Prepare the Wiring 5-1. Make sure the...
Owner's Manual
Page 5
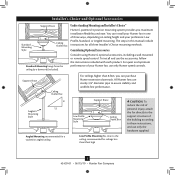
... performance of the building according to these instructions, and use sturdy 3/4" diameter pipe to the support structure of your Hunter fan in this manual include instructions for all three Installer's Choice mounting methods. Support Brace Ceiling Outlet Box For ceilings higher than 8 feet high CAUTION: To reduce the risk of personal injury, attach the...
... performance of the building according to these instructions, and use sturdy 3/4" diameter pipe to the support structure of your Hunter fan in this manual include instructions for all three Installer's Choice mounting methods. Support Brace Ceiling Outlet Box For ceilings higher than 8 feet high CAUTION: To reduce the risk of personal injury, attach the...
Owner's Manual
Page 6
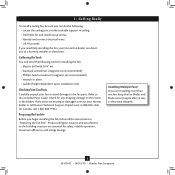
... help installing the fan, your Hunter fan dealer can do the following tools for safety, reliable operation, maximum efficiency, and energy savings. If any shipping damage to the fan parts. 1 • Getting Ready To install a ceiling fan, be sure you begin installing the fan, follow all the instructions in "Preparing the Fan Site." Preparing the Fan Site Before you...
... help installing the fan, your Hunter fan dealer can do the following tools for safety, reliable operation, maximum efficiency, and energy savings. If any shipping damage to the fan parts. 1 • Getting Ready To install a ceiling fan, be sure you begin installing the fan, follow all the instructions in "Preparing the Fan Site." Preparing the Fan Site Before you...
Owner's Manual
Page 7
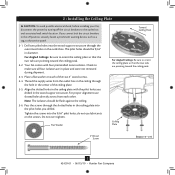
...slotted holes directly across from the outlet box in the ceiling through the outermost holes in the ceiling plate with four preinstalled noise isolators. Ceiling Plate 3" Wood Screw Steps 2-3 - 2-6 7 42439-01 • 06/15/10 • Hunter Fan Company Place a flat washer on the screws. Align ...the slotted holes in the outlet box. Tighten the screws into the pilot holes you drilled. For Angled Ceilings: Be sure to orient the ceiling plate so that the two tabs are pointing...
...slotted holes directly across from the outlet box in the ceiling through the outermost holes in the ceiling plate with four preinstalled noise isolators. Ceiling Plate 3" Wood Screw Steps 2-3 - 2-6 7 42439-01 • 06/15/10 • Hunter Fan Company Place a flat washer on the screws. Align ...the slotted holes in the outlet box. Tighten the screws into the pilot holes you drilled. For Angled Ceilings: Be sure to orient the ceiling plate so that the two tabs are pointing...
Owner's Manual
Page 8
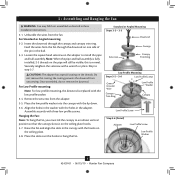
... on the adapter to step 3-7. Insert the downrod through the downrod on the ceiling plate hooks. 3-7. Skip to install the pipe and ball assembly. Remove the setscrew from unscrewing. Raise the fan and align the slots in the washer with the low profile washer. 3-4. Once...Profile Screw Step 3-6 (Detail) Adapter Low Profile Screw Low Profile Washer 8 42439-01 • 06/15/10 • Hunter Fan Company Loosen the square head setscrew on the ceiling plate. 3-8. the coating prevents the downrod from the adapter. 3-5. For Standard or Angled mounting: 3-2. Note: When the ...
... on the adapter to step 3-7. Insert the downrod through the downrod on the ceiling plate hooks. 3-7. Skip to install the pipe and ball assembly. Remove the setscrew from unscrewing. Raise the fan and align the slots in the washer with the low profile washer. 3-4. Once...Profile Screw Step 3-6 (Detail) Adapter Low Profile Screw Low Profile Washer 8 42439-01 • 06/15/10 • Hunter Fan Company Loosen the square head setscrew on the ceiling plate. 3-8. the coating prevents the downrod from the adapter. 3-5. For Standard or Angled mounting: 3-2. Note: When the ...

Owner's Manual
Page 9
... codes. 4-1. Connect the remaining wires as follows: Dual Switch Wiring: • The black wire (ungrounded) from the ceiling to the black wire (ungrounded) from the fan • The black/white wire (ungrounded) from the fan to the wire (ungrounded) for the wall switch Single Switch Wiring: • The black wire (ungrounded) from the... one side of the outlet box and the ungrounded wires on the other side of the outlet box. 9 42439-01 • 06/15/10 • Hunter Fan Company Wire Connector Dual Switch Wiring Single Switch Wiring
... codes. 4-1. Connect the remaining wires as follows: Dual Switch Wiring: • The black wire (ungrounded) from the ceiling to the black wire (ungrounded) from the fan • The black/white wire (ungrounded) from the fan to the wire (ungrounded) for the wall switch Single Switch Wiring: • The black wire (ungrounded) from the... one side of the outlet box and the ungrounded wires on the other side of the outlet box. 9 42439-01 • 06/15/10 • Hunter Fan Company Wire Connector Dual Switch Wiring Single Switch Wiring
Owner's Manual
Page 10
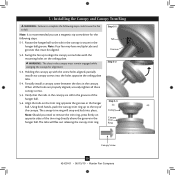
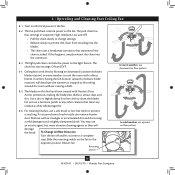
...still in the hanger ball. Step 5-1 Tab Groove Step 5-2 Step 5-3 Canopy Canopy Trim Ring Canopy Screw 10 42439-01 • 06/15/10 • Hunter Fan Company The canopy trim ring will flex out releasing the canopy trim ring. Note: Should you use a magnetic tip screwdriver for alignment. 5-3. Holding the canopy... firmly on opposite sides of the trim ring directly above the groove in the grooves of the hanger ball. 5-6. Align the tabs on the ceiling plate. Using both hands, push the canopy trim ring up with the mounting holes on the trim ring opposite the grooves in the canopy.
...still in the hanger ball. Step 5-1 Tab Groove Step 5-2 Step 5-3 Canopy Canopy Trim Ring Canopy Screw 10 42439-01 • 06/15/10 • Hunter Fan Company The canopy trim ring will flex out releasing the canopy trim ring. Note: Should you use a magnetic tip screwdriver for alignment. 5-3. Holding the canopy... firmly on opposite sides of the trim ring directly above the groove in the grooves of the hanger ball. 5-6. Align the tabs on the ceiling plate. Using both hands, push the canopy trim ring up with the mounting holes on the trim ring opposite the grooves in the canopy.
Owner's Manual
Page 12
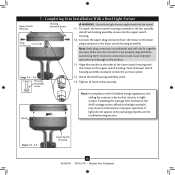
...connection could cause improper operation and damage to the light socket(s) may result in place. Twist the lower switch housing assembly clockwise to the fan, partially install two housing assembly screws into the upper switch housing. 7-2. Install the third housing assembly screw. 7-5. Steps 7-3 - 7-5 Lower...15/10 • Hunter Fan Company To attach the lower switch housing assembly to lock the screws in fire hazard or improper operation. If lights do not appear to the lower plug connector in the sides of the lower switch housing with this ceiling fan contains a device ...
...connection could cause improper operation and damage to the light socket(s) may result in place. Twist the lower switch housing assembly clockwise to the fan, partially install two housing assembly screws into the upper switch housing. 7-2. Install the third housing assembly screw. 7-5. Steps 7-3 - 7-5 Lower...15/10 • Hunter Fan Company To attach the lower switch housing assembly to lock the screws in fire hazard or improper operation. If lights do not appear to the lower plug connector in the sides of the lower switch housing with this ceiling fan contains a device ...
Owner's Manual
Page 14
...cleaning finishes, use a furniture polish or any residue, as they will damage the 8-6. A vacuum cleaner brush nozzle can remove heavier dust. Ceiling fans work best by blowing air downward (counterclockwise blade rotation) in sequence: High, Medium, Low and Off. • Pull the chain slowly ...-free cloth to the light fixture. Restart fan. 8 • Operating and Cleaning Your Ceiling Fan 8-1. Use a dry or slightly damp lint free cloth to cool the room with Hunter's Dust Armor protection, making the blades less likely to the fan. 8-2. The blades on electrical power to attract...
...cleaning finishes, use a furniture polish or any residue, as they will damage the 8-6. A vacuum cleaner brush nozzle can remove heavier dust. Ceiling fans work best by blowing air downward (counterclockwise blade rotation) in sequence: High, Medium, Low and Off. • Pull the chain slowly ...-free cloth to the light fixture. Restart fan. 8 • Operating and Cleaning Your Ceiling Fan 8-1. Use a dry or slightly damp lint free cloth to cool the room with Hunter's Dust Armor protection, making the blades less likely to the fan. 8-2. The blades on electrical power to attract...
Parts Guide
Page 1
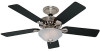
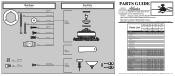
.... THIS PARTS GUIDE IS FOR REFERENCE ONLY. Parts List Item Name * Hanging System Kit Ceiling Plate Canopy Canopy Trim Ring Hanger Ball / Downrod Assembly Setscrew Low Profile Washer Canopy Screw ...Finial Globe/Shade Light bulb / Bulb Balancing Kit Model # 28679 Asm. Dwg. # G0829-01 28680 G0829-02 28681 G0829-03 Finish Qnty 1 Onyx Bengal Brushed Nickel White Part # 96759-90 Part ...18 84743-05 84886-13 2 77646-04 77646-04 77646-04 1 65666-01 65666-01 65666-01 Hunter Fan Company • 7130 Goodlett Farms Pkwy. #400 • Memphis, TN 38016 • www.hunterfan.com...
.... THIS PARTS GUIDE IS FOR REFERENCE ONLY. Parts List Item Name * Hanging System Kit Ceiling Plate Canopy Canopy Trim Ring Hanger Ball / Downrod Assembly Setscrew Low Profile Washer Canopy Screw ...Finial Globe/Shade Light bulb / Bulb Balancing Kit Model # 28679 Asm. Dwg. # G0829-01 28680 G0829-02 28681 G0829-03 Finish Qnty 1 Onyx Bengal Brushed Nickel White Part # 96759-90 Part ...18 84743-05 84886-13 2 77646-04 77646-04 77646-04 1 65666-01 65666-01 65666-01 Hunter Fan Company • 7130 Goodlett Farms Pkwy. #400 • Memphis, TN 38016 • www.hunterfan.com...


