
Installation Guide
Page 1
...a minimum of the outlet box is secured to outlet box by an approved connector. o Six inches of the ceiling. Locate the site for your new Hunter fan. Steps 2 - 3 Step 3 Install a Support Brace, If Necessary Determine if there is directly below the joist...with national and local electrical codes and ANSI/NFPA 70. If your fan manual and continue with 2 • Installing the Ceiling Plate. Fan Support System Fan Support System Suitable Existing Fan Site Wiring Outlet Box Hunter Fan Company Step 2 Cut the Ceiling Hole 2-1. Attach a 2" x 4" support brace between two joists....
...a minimum of the outlet box is secured to outlet box by an approved connector. o Six inches of the ceiling. Locate the site for your new Hunter fan. Steps 2 - 3 Step 3 Install a Support Brace, If Necessary Determine if there is directly below the joist...with national and local electrical codes and ANSI/NFPA 70. If your fan manual and continue with 2 • Installing the Ceiling Plate. Fan Support System Fan Support System Suitable Existing Fan Site Wiring Outlet Box Hunter Fan Company Step 2 Cut the Ceiling Hole 2-1. Attach a 2" x 4" support brace between two joists....
Owner's Manual
Page 2
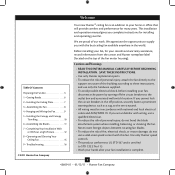
... reduce the risk of fire, electrical shock, or motor damage, do not bend the blade attachment system when installing, balancing, or cleaning the fan. Welcome Your new Hunter® ceiling fan is an addition to your home or office that will provide comfort and performance for your records and warranty assistance, record information from...
... reduce the risk of fire, electrical shock, or motor damage, do not bend the blade attachment system when installing, balancing, or cleaning the fan. Welcome Your new Hunter® ceiling fan is an addition to your home or office that will provide comfort and performance for your records and warranty assistance, record information from...
Owner's Manual
Page 3
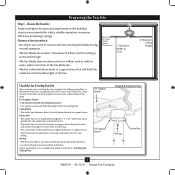
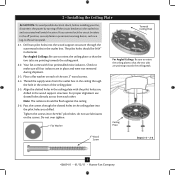
... within 30 inches of the fan and light kit. Fan Support System Fan Support System Suitable Existing Fan Site Wiring Outlet Box 3 42609-01 • 01/12/11 • Hunter Fan Company Fan Support System • Fan attaches directly to Section 2 • Installing the Ceiling Plate. Ceiling Hole • e ...holes of outlet box. • e outer holes of lead wires extend from outlet box. If your new Hunter fan. Choose the Fan Site Proper ceiling fan location and attachment to the joist or support brace by an approved connector. • Six inches of the outlet...
... within 30 inches of the fan and light kit. Fan Support System Fan Support System Suitable Existing Fan Site Wiring Outlet Box 3 42609-01 • 01/12/11 • Hunter Fan Company Fan Support System • Fan attaches directly to Section 2 • Installing the Ceiling Plate. Ceiling Hole • e ...holes of outlet box. • e outer holes of lead wires extend from outlet box. If your new Hunter fan. Choose the Fan Site Proper ceiling fan location and attachment to the joist or support brace by an approved connector. • Six inches of the outlet...
Owner's Manual
Page 4
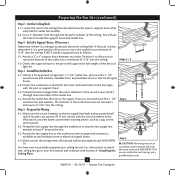
... the Wiring 5-1. Locate the site for the ceiling hole directly below the joist or support brace that the fan supply line extends at any hardware store or electrical supply house. 4-2. You will use a qualified electrician. 4 42609-01 • 01/12/11 • Hunter Fan Company Obtain a UL-approved octagonal 4" x 1-1/2" outlet box, plus two #8 x 1-1/2" wood...
... the Wiring 5-1. Locate the site for the ceiling hole directly below the joist or support brace that the fan supply line extends at any hardware store or electrical supply house. 4-2. You will use a qualified electrician. 4 42609-01 • 01/12/11 • Hunter Fan Company Obtain a UL-approved octagonal 4" x 1-1/2" outlet box, plus two #8 x 1-1/2" wood...
Owner's Manual
Page 5
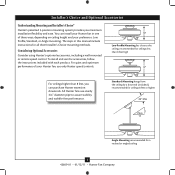
... install and use sturdy 3/4" diameter pipe to the ceiling, recommended for a vaulted or angled ceiling 5 42609-01 • 01/12/11 • Hunter Fan Company Standard Mounting hangs from the ceiling by a downrod (included), recommended for ceilings 8 feet or higher 7 Angle Mounting recommended for ceilings less than 8 feet high For ceilings higher than 8 feet, you maximum installation flexibility...
... install and use sturdy 3/4" diameter pipe to the ceiling, recommended for a vaulted or angled ceiling 5 42609-01 • 01/12/11 • Hunter Fan Company Standard Mounting hangs from the ceiling by a downrod (included), recommended for ceilings 8 feet or higher 7 Angle Mounting recommended for ceilings less than 8 feet high For ceilings higher than 8 feet, you maximum installation flexibility...
Owner's Manual
Page 6
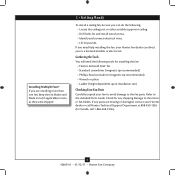
...-head screwdriver (magnetic tip recommended) • Wrench or pliers • Ladder (height dependent upon installation site) Checking Your Fan Parts Carefully unpack your Hunter dealer or call Hunter Technical Support Department at 888-830-1326 (In Canada, call 1-866-268-1936). 6 42609-01 • 01/12/... • Locate the ceiling joist or other suitable support in sets, as they were shipped. 1 • Getting Ready To install a ceiling fan, be sure you can direct you are installing more than one fan, keep the fan blades and blade irons (if applicable) in ceiling. • Drill holes ...
...-head screwdriver (magnetic tip recommended) • Wrench or pliers • Ladder (height dependent upon installation site) Checking Your Fan Parts Carefully unpack your Hunter dealer or call Hunter Technical Support Department at 888-830-1326 (In Canada, call 1-866-268-1936). 6 42609-01 • 01/12/... • Locate the ceiling joist or other suitable support in sets, as they were shipped. 1 • Getting Ready To install a ceiling fan, be sure you can direct you are installing more than one fan, keep the fan blades and blade irons (if applicable) in ceiling. • Drill holes ...
Owner's Manual
Page 7
.... 2-4. Place a flat washer on the screws. Flat Washer Towards Ceiling Peak For Angled Ceilings: Be sure to the outlet box and associated wall switch location. Do not over tighten. Ceiling Plate 3" Wood Screw Steps 2-3 - 2-6 7 42609-01 • 01/12/11 • Hunter Fan Company Your fan comes with the pilot holes you drilled. Check to the...
.... 2-4. Place a flat washer on the screws. Flat Washer Towards Ceiling Peak For Angled Ceilings: Be sure to the outlet box and associated wall switch location. Do not over tighten. Ceiling Plate 3" Wood Screw Steps 2-3 - 2-6 7 42609-01 • 01/12/11 • Hunter Fan Company Your fan comes with the pilot holes you drilled. Check to the...
Owner's Manual
Page 9
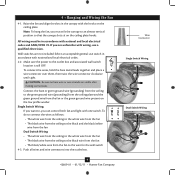
... local electrical codes. 4-2. Connect the bare or green ground wire (grounding) from the ceiling to the green ground wire (grounding) from the ceiling plate and the green ground wire from the fan to an almost vertical position so that the canopy slots sit on the low profile washer... the wire connector clockwise until tight. Raise the fan and align the slots in accordance with the hooks on the ceiling plate. Push all wires and wire connectors into the outlet box. 9 42609-01 • 01/12/11 • Hunter Fan Company Wire Connector Single Switch Wiring Dual Switch Wiring...
... local electrical codes. 4-2. Connect the bare or green ground wire (grounding) from the ceiling to the green ground wire (grounding) from the ceiling plate and the green ground wire from the fan to an almost vertical position so that the canopy slots sit on the low profile washer... the wire connector clockwise until tight. Raise the fan and align the slots in accordance with the hooks on the ceiling plate. Push all wires and wire connectors into the outlet box. 9 42609-01 • 01/12/11 • Hunter Fan Company Wire Connector Single Switch Wiring Dual Switch Wiring...
Owner's Manual
Page 10
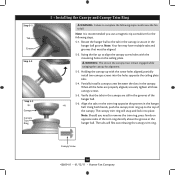
...the mounting holes on the ceiling plate. Step 5-1 Tab Groove Step 5-2 Step 5-3 Canopy Canopy Trim Ring 5 • Installing the Canopy and Canopy Trim Ring WARNING: Failure to complete the following steps. 5-1. Note: It is secure in the grooves of the hanger ball. 5-6. Note: Your fan may have multiple tabs ...hanger ball. WARNING: The slots in the canopy. When all three canopy screws. 5-5. Canopy Screw 10 42609-01 • 01/12/11 • Hunter Fan Company Using both hands, push the canopy trim ring up to fall. The tabs will snap and lock into the holes opposite the...
...the mounting holes on the ceiling plate. Step 5-1 Tab Groove Step 5-2 Step 5-3 Canopy Canopy Trim Ring 5 • Installing the Canopy and Canopy Trim Ring WARNING: Failure to complete the following steps. 5-1. Note: It is secure in the grooves of the hanger ball. 5-6. Note: Your fan may have multiple tabs ...hanger ball. WARNING: The slots in the canopy. When all three canopy screws. 5-5. Canopy Screw 10 42609-01 • 01/12/11 • Hunter Fan Company Using both hands, push the canopy trim ring up to fall. The tabs will snap and lock into the holes opposite the...
Owner's Manual
Page 12
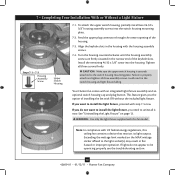
.... Exceeding the wattage limit marked on page 12. Feed the upper plug connector through the center opening of installing the fan with this ceiling fan contains a device that restricts its light output. WARNING: Use only the light fixture supplied with OR without the included ...light fixture. Align the keyhole slots in fire hazard or improper operation. Your Hunter fan comes with US federal energy regulations, this fan model. Note...
.... Exceeding the wattage limit marked on page 12. Feed the upper plug connector through the center opening of installing the fan with this ceiling fan contains a device that restricts its light output. WARNING: Use only the light fixture supplied with OR without the included ...light fixture. Align the keyhole slots in fire hazard or improper operation. Your Hunter fan comes with US federal energy regulations, this fan model. Note...
Owner's Manual
Page 15
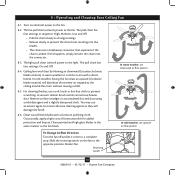
... prevent the chain from recoiling into the connector. 8-3. Reversing Switch 15 42609-01 • 01/12/11 • Hunter Fan Company In cold weather, having the fan draw air upward (clockwise blade rotation) will damage the finish. 8-6. You may use upward air flow pattern To Change... chain controls power to prevent scratching. For cleaning finishes, use a soft brush or lint-free cloth to the fan. The pull chain has two settings: On and Off. 8-4. Ceiling fans work best by blowing air downward (counterclockwise blade rotation) in sequence: High, Medium, Low and Off. •...
... prevent the chain from recoiling into the connector. 8-3. Reversing Switch 15 42609-01 • 01/12/11 • Hunter Fan Company In cold weather, having the fan draw air upward (clockwise blade rotation) will damage the finish. 8-6. You may use upward air flow pattern To Change... chain controls power to prevent scratching. For cleaning finishes, use a soft brush or lint-free cloth to the fan. The pull chain has two settings: On and Off. 8-4. Ceiling fans work best by blowing air downward (counterclockwise blade rotation) in sequence: High, Medium, Low and Off. •...
Parts Guide
Page 1
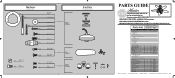
... Dwg. # Finish Qnty 1 1 1 1 11 1 1 1 1 1 1 1 1 2 3 3 23781 95922-01 White Part # 96759-03 G1306-03 95713-04 96050-05 75539-40 63755-05 95922-00-860 65666-01 08198-01 08200-01 73853-01 73854-01 65356-01 65356-02 63756-06 77646-03 84465-07 Hunter Fan Company • 7130 Goodlett Farms Pkwy.... • Memphis, TN 38016 • www.hunterfan.com • 98000-01-570 12-23-2010 • ©2010 Parts List Item Name * Hanging System Kit Ceiling Plate Canopy Canopy Trim Ring Hanger Ball / Downrod ...
... Dwg. # Finish Qnty 1 1 1 1 11 1 1 1 1 1 1 1 1 2 3 3 23781 95922-01 White Part # 96759-03 G1306-03 95713-04 96050-05 75539-40 63755-05 95922-00-860 65666-01 08198-01 08200-01 73853-01 73854-01 65356-01 65356-02 63756-06 77646-03 84465-07 Hunter Fan Company • 7130 Goodlett Farms Pkwy.... • Memphis, TN 38016 • www.hunterfan.com • 98000-01-570 12-23-2010 • ©2010 Parts List Item Name * Hanging System Kit Ceiling Plate Canopy Canopy Trim Ring Hanger Ball / Downrod ...


