
Installation Guide
Page 1
...to the joist or support brace by the support brace manufacturer). o Six inches of the outlet box are turned off. Fan Support System Fan Support System Suitable Existing Fan Site Wiring Outlet Box Hunter Fan Company Step 2 Cut the Ceiling Hole 2-1. Steps 2 - 3 Step 3 Install a Support Brace, If Necessary Determine ... support brace and outlet box. If your existing fan site is positioned to your new Hunter fan. You will support the full weight of the fan. If the joist is there, determine if it will use an existing fan site, complete the following checklist to determine if ...
...to the joist or support brace by the support brace manufacturer). o Six inches of the outlet box are turned off. Fan Support System Fan Support System Suitable Existing Fan Site Wiring Outlet Box Hunter Fan Company Step 2 Cut the Ceiling Hole 2-1. Steps 2 - 3 Step 3 Install a Support Brace, If Necessary Determine ... support brace and outlet box. If your existing fan site is positioned to your new Hunter fan. You will support the full weight of the fan. If the joist is there, determine if it will use an existing fan site, complete the following checklist to determine if ...

Owner's Manual
Page 2
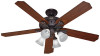
... to supply you with national and local electrical codes and ANSI/NFPA 70. Hunter Fan Company 41922-01 • 02/26/07 We are unfamiliar with this entire manual carefully before installing your fan, disconnect the power by turning off position, securely fasten a prominent warning device...Operating the Remote Control and Mounting the Holder 13 10 • Operating and Cleaning Your Ceiling Fan 14 11 • Troubleshooting 15 © 2007 Hunter Fan Company Your new Hunter® ceiling fan is an addition to your home or office that will provide comfort and performance for many years...
... to supply you with national and local electrical codes and ANSI/NFPA 70. Hunter Fan Company 41922-01 • 02/26/07 We are unfamiliar with this entire manual carefully before installing your fan, disconnect the power by turning off position, securely fasten a prominent warning device...Operating the Remote Control and Mounting the Holder 13 10 • Operating and Cleaning Your Ceiling Fan 14 11 • Troubleshooting 15 © 2007 Hunter Fan Company Your new Hunter® ceiling fan is an addition to your home or office that will provide comfort and performance for many years...
Owner's Manual
Page 3
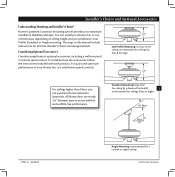
...ways, depending on ceiling height and your Hunter fan, use only Hunter speed controls. You can purchase Hunter extension downrods. Considering Optional Accessories Consider using Hunter's optional accessories, including a wall-mounted or remote speed control. All Hunter fans use the accessories, follow the instructions ...and ease. Installer's Choice and Optional Accessories Understanding Mounting and Installer's Choice® Hunter's patented 3-position mounting system provides you can install your Hunter fan in this manual include instructions for a vaulted or angled ceiling...
...ways, depending on ceiling height and your Hunter fan, use only Hunter speed controls. You can purchase Hunter extension downrods. Considering Optional Accessories Consider using Hunter's optional accessories, including a wall-mounted or remote speed control. All Hunter fans use the accessories, follow the instructions ...and ease. Installer's Choice and Optional Accessories Understanding Mounting and Installer's Choice® Hunter's patented 3-position mounting system provides you can install your Hunter fan in this manual include instructions for a vaulted or angled ceiling...
Owner's Manual
Page 4
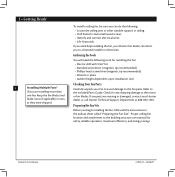
...dependent upon installation site) Checking Your Fan Parts Carefully unpack your Hunter dealer or call Hunter Technical Support Department at 888-830-1326. Proper ceiling fan location and attachment to the building structure are installing more than one fan, keep the fan blades and blade irons (if applicable...) in sets, as they were shipped. Hunter Fan Company 41922-01 • 02/26/07 1 • Getting Ready 4 Installing Multiple Fans? If you need the following : •...
...dependent upon installation site) Checking Your Fan Parts Carefully unpack your Hunter dealer or call Hunter Technical Support Department at 888-830-1326. Proper ceiling fan location and attachment to the building structure are installing more than one fan, keep the fan blades and blade irons (if applicable...) in sets, as they were shipped. Hunter Fan Company 41922-01 • 02/26/07 1 • Getting Ready 4 Installing Multiple Fans? If you need the following : •...
Owner's Manual
Page 5
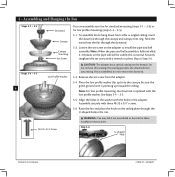
... 2-3 - 2-5 3" Screw 41922-01 • 02/26/07 For Angled Ceilings: Be sure to orient the ceiling plate so that the arrows printed on the screws. Hunter Fan Company Position the isolators between the ceiling plate and ceiling by inserting the raised areas on each other. For proper alignment use lubricants on the...
... 2-3 - 2-5 3" Screw 41922-01 • 02/26/07 For Angled Ceilings: Be sure to orient the ceiling plate so that the arrows printed on the screws. Hunter Fan Company Position the isolators between the ceiling plate and ceiling by inserting the raised areas on each other. For proper alignment use lubricants on the...
Owner's Manual
Page 6
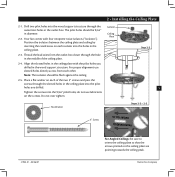
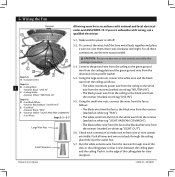
...canopy trim ring. Note: When the pipe and ball assembly is normal. Skip to install the pipe and ball assembly. Step 3-6 U-shaped Hole Hunter Fan Company 41922-01 • 02/26/07 Feed the wires from the adapter. 3-4. Once assembled, do not remove the downrod. 3-3. Be sure... the green ground wire is replaced with the holes in these installation instructions. See Steps 3-4 - 3-5. 3-5. To assemble fan to hang down from unscrewing. Do not remove this is fully installed, 2-3 threads on the threads. the coating prevents the downrod from a flat or...
...canopy trim ring. Note: When the pipe and ball assembly is normal. Skip to install the pipe and ball assembly. Step 3-6 U-shaped Hole Hunter Fan Company 41922-01 • 02/26/07 Feed the wires from the adapter. 3-4. Once assembled, do not remove the downrod. 3-3. Be sure... the green ground wire is replaced with the holes in these installation instructions. See Steps 3-4 - 3-5. 3-5. To assemble fan to hang down from unscrewing. Do not remove this is fully installed, 2-3 threads on the threads. the coating prevents the downrod from a flat or...

Owner's Manual
Page 7
...Operation is not connected to operate this product. 41922-01 • 02/26/07 Hunter Fan Company Do not use any interference received, including interference that the operation of one fan does not affect the operation of the jumper in the transmitter and the receiver. Be...-off 1 = on 42 == ooffff 31 == oonn 2 = off wall switch). Install the included 12-volt battery into the transmitter. Changes or modifications not expressly approved by Hunter Fan Company could void your authority to the transmitter. 4 = off 3 = on 42 == oofnf 31 == oonn 2 = on 1 = on 4 = off 3 = on 7 ...
...Operation is not connected to operate this product. 41922-01 • 02/26/07 Hunter Fan Company Do not use any interference received, including interference that the operation of one fan does not affect the operation of the jumper in the transmitter and the receiver. Be...-off 1 = on 42 == ooffff 31 == oonn 2 = off wall switch). Install the included 12-volt battery into the transmitter. Changes or modifications not expressly approved by Hunter Fan Company could void your authority to the transmitter. 4 = off 3 = on 42 == oofnf 31 == oonn 2 = on 1 = on 4 = off 3 = on 7 ...
Owner's Manual
Page 8
...place a wire nut over them, then twist clockwise until tight. Small Wire Nut 5-7. Push it rests between the ceiling plate and the ceiling. Hunter Fan Company 41922-01 • 02/26/07 If you are visible. CAUTION: Be sure no bare wire or wire strands are unfamiliar with national and... local electrical codes and ANSI/NFPA 70. Using the small wire nuts, connect the wires from the fan as follows: Step 5-4 8 B • Ceiling Black • Receiver Black: "LIVE IN" • e white (common) power wire from the ceiling to the...
...place a wire nut over them, then twist clockwise until tight. Small Wire Nut 5-7. Push it rests between the ceiling plate and the ceiling. Hunter Fan Company 41922-01 • 02/26/07 If you are visible. CAUTION: Be sure no bare wire or wire strands are unfamiliar with national and... local electrical codes and ANSI/NFPA 70. Using the small wire nuts, connect the wires from the fan as follows: Step 5-4 8 B • Ceiling Black • Receiver Black: "LIVE IN" • e white (common) power wire from the ceiling to the...

Owner's Manual
Page 9
... the canopy with the slots in , tighten them. 6-5. Raise the canopy over the ceiling plate. Holding the canopy, raise the fan off the hook. 6-2. Steps 6-4 - 6-5 9 Step 6-3 41922-01 • 02/26/07 Canopy Screw Hunter Fan Company Loosely assemble the three canopy screws into place. 6• Installing the Canopy and Canopy Trim Ring 6-1.
... the canopy with the slots in , tighten them. 6-5. Raise the canopy over the ceiling plate. Holding the canopy, raise the fan off the hook. 6-2. Steps 6-4 - 6-5 9 Step 6-3 41922-01 • 02/26/07 Canopy Screw Hunter Fan Company Loosely assemble the three canopy screws into place. 6• Installing the Canopy and Canopy Trim Ring 6-1.
Owner's Manual
Page 10
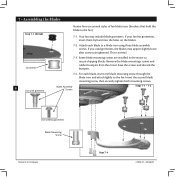
... the blade mountings screws and rubber bumpers from the motor. Blade Assembly Screws Steps 7-1 - 7-2 Use without grommet Blade Mounting Screw Hunter Fan Company Step 7-4 41922-01 • 02/26/07 Save the screws and discard the bumpers. 7-4. Attach each blade, insert one... used grommets, the blades may include blade grommets. 7 • Assembling the Blades Step 7-1 (Detail) Grommet 10 Use with grommet Hunter fans use several styles of fan blade irons (brackets that hold the blade to secure shipping blocks. Some blade mounting screws are tightened. is is normal. 7-3....
... the blade mountings screws and rubber bumpers from the motor. Blade Assembly Screws Steps 7-1 - 7-2 Use without grommet Blade Mounting Screw Hunter Fan Company Step 7-4 41922-01 • 02/26/07 Save the screws and discard the bumpers. 7-4. Attach each blade, insert one... used grommets, the blades may include blade grommets. 7 • Assembling the Blades Step 7-1 (Detail) Grommet 10 Use with grommet Hunter fans use several styles of fan blade irons (brackets that hold the blade to secure shipping blocks. Some blade mounting screws are tightened. is is normal. 7-3....
Owner's Manual
Page 11
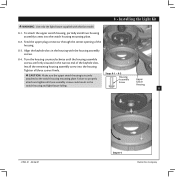
... to properly Assembly Upper attach and tighten all three screws firmly. Align the keyhole slots in the housing with this fan model. 8-1. Housing 11 41922-01 • 02/26/07 Step 8-4 Hunter Fan Company Turn the housing counterclockwise until the housing assembly screws are firmly situated in the Screw Switch switch housing and...
... to properly Assembly Upper attach and tighten all three screws firmly. Align the keyhole slots in the housing with this fan model. 8-1. Housing 11 41922-01 • 02/26/07 Step 8-4 Hunter Fan Company Turn the housing counterclockwise until the housing assembly screws are firmly situated in the Screw Switch switch housing and...

Owner's Manual
Page 12
Align the side screw holes in the lower switch housing assembly. Housing Assembly Screw Steps 8-7 - 8-9 umbscrews Shade Bulb Hunter Fan Company 41922-01 • 02/26/07 Incorrect connection could cause improper Plug Connector operation and damage to the upper switch housing with three housing ...
Align the side screw holes in the lower switch housing assembly. Housing Assembly Screw Steps 8-7 - 8-9 umbscrews Shade Bulb Hunter Fan Company 41922-01 • 02/26/07 Incorrect connection could cause improper Plug Connector operation and damage to the upper switch housing with three housing ...
Owner's Manual
Page 13
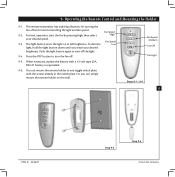
...01 • 02/26/07 Step 9-6 Step 9-5 Hunter Fan Company Or, you reach your desired speed. You can simply mount the remote holder on to turn off the light. 9-4. For best operation, start the fan by pressing high, then select Fan Speed High your desired brightness. To dim the Low light... in the switch plate. 9• Operating the Remote Control and Mounting the Holder 9-1. e remote transmitter has individual buttons for turning the fan off . 9-5. Push the light button again to any toggle switch plate with a 12-volt type 23A, MN-21 battery or equivalent. 9-6....
...01 • 02/26/07 Step 9-6 Step 9-5 Hunter Fan Company Or, you reach your desired speed. You can simply mount the remote holder on to turn off the light. 9-4. For best operation, start the fan by pressing high, then select Fan Speed High your desired brightness. To dim the Low light... in the switch plate. 9• Operating the Remote Control and Mounting the Holder 9-1. e remote transmitter has individual buttons for turning the fan off . 9-5. Push the light button again to any toggle switch plate with a 12-volt type 23A, MN-21 battery or equivalent. 9-6....
Owner's Manual
Page 14
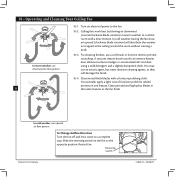
... use an artistic agent, but never abrasive cleaning agents, as the fan finish. A vacuum cleaner brush nozzle can remove heavier dust. Reversing Switch Hunter Fan Company 41922-01 • 02/26/07 Turn on the fan to the opposite position. Occasionally, apply a light coat of furniture polish... for added protection and beauty. Ceiling fans work best by blowing air downward (counterclockwise blade ...
... use an artistic agent, but never abrasive cleaning agents, as the fan finish. A vacuum cleaner brush nozzle can remove heavier dust. Reversing Switch Hunter Fan Company 41922-01 • 02/26/07 Turn on the fan to the opposite position. Occasionally, apply a light coat of furniture polish... for added protection and beauty. Ceiling fans work best by blowing air downward (counterclockwise blade ...
Owner's Manual
Page 15
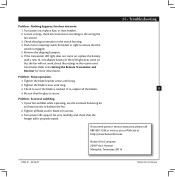
...is secure. Problem: Excessive wobbling. 1. Tighten all connections according to the wiring the fan section. 3. Hunter Fan Company 2500 Frisco Avenue Memphis, Tennessee 38114 41922-01 • 02/26/07 Hunter Fan Company Tighten the blade screws until snug. 2. If the LED light does come on,... replace the battery with a new 12-volt alkaline battery. Check to balance the fan. 2. Turn power off, support fan very carefully, and check that the...
...is secure. Problem: Excessive wobbling. 1. Tighten all connections according to the wiring the fan section. 3. Hunter Fan Company 2500 Frisco Avenue Memphis, Tennessee 38114 41922-01 • 02/26/07 Hunter Fan Company Tighten the blade screws until snug. 2. If the LED light does come on,... replace the battery with a new 12-volt alkaline battery. Check to balance the fan. 2. Turn power off, support fan very carefully, and check that the...
Parts Guide
Page 1
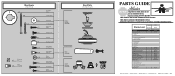
...Control Transmitter Remote Control Cradle Hardware Kit Blade Grommet Blade Assembly Screw Screw, Machine, 6-32 Screw, Switch Housing Assembly Wire Connector Balancing Kit Model # 23683 Asm. If parts are included in the box. Dwg. # 96685-01 Finish Qnty 1 Weathered Bronze Part # 94945-27 1 97276-05 1...75147-03 11 63755-05 1 98983-27 4 94970-01 4 77646-03 1 85482-01 1 85095-02 1 85093-01 1 96685-00-860 1 07570-01 Hunter Fan Company • 2500 Frisco Avenue • Memphis, TN 38114 • www.hunterfan.com • 98000-01-567 12-18-2008 • ©2008 Hardware ...
...Control Transmitter Remote Control Cradle Hardware Kit Blade Grommet Blade Assembly Screw Screw, Machine, 6-32 Screw, Switch Housing Assembly Wire Connector Balancing Kit Model # 23683 Asm. If parts are included in the box. Dwg. # 96685-01 Finish Qnty 1 Weathered Bronze Part # 94945-27 1 97276-05 1...75147-03 11 63755-05 1 98983-27 4 94970-01 4 77646-03 1 85482-01 1 85095-02 1 85093-01 1 96685-00-860 1 07570-01 Hunter Fan Company • 2500 Frisco Avenue • Memphis, TN 38114 • www.hunterfan.com • 98000-01-567 12-18-2008 • ©2008 Hardware ...


