
Installation Guide
Page 1
... 7' Minimum to Floor 30" From Wall or Nearest Obstruction Step 1 Choose the Fan Site Proper ceiling fan location and attachment to the building structure are essential for your new Hunter fan. Wiring o e electrical cable is secured to the fan supply line leads and associated wall switch location are at least 6" beyond the box. 5-3. o Six inches...
... 7' Minimum to Floor 30" From Wall or Nearest Obstruction Step 1 Choose the Fan Site Proper ceiling fan location and attachment to the building structure are essential for your new Hunter fan. Wiring o e electrical cable is secured to the fan supply line leads and associated wall switch location are at least 6" beyond the box. 5-3. o Six inches...
Owner's Manual
Page 2
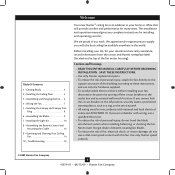
...10 8 • Assembling the Remote Control and Mounting the Cradle 12 9 • Operating and Cleaning Your Ceiling Fan 14 10 • Troubleshooting 16 Welcome Your new Hunter® ceiling fan is an addition to the outlet box and associated wall switch location. SAVE THESE INSTRUCTIONS. • Use ...only Hunter replacement parts. • To reduce the risk of personal injury, attach the fan directly to the support structure...
...10 8 • Assembling the Remote Control and Mounting the Cradle 12 9 • Operating and Cleaning Your Ceiling Fan 14 10 • Troubleshooting 16 Welcome Your new Hunter® ceiling fan is an addition to the outlet box and associated wall switch location. SAVE THESE INSTRUCTIONS. • Use ...only Hunter replacement parts. • To reduce the risk of personal injury, attach the fan directly to the support structure...
Owner's Manual
Page 3
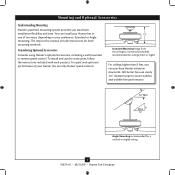
... 3/4" diameter pipe to assure stability and wobble-free performance. You can purchase Hunter extension downrods. Mounting and Optional Accessories Understanding Mounting Hunter's patented mounting system provides you can install your Hunter fan in this manual include instructions for ceilings 8 feet or higher For ceilings higher than 8 feet, you maximum installation flexibility and ease. Considering Optional Accessories...
... 3/4" diameter pipe to assure stability and wobble-free performance. You can purchase Hunter extension downrods. Mounting and Optional Accessories Understanding Mounting Hunter's patented mounting system provides you can install your Hunter fan in this manual include instructions for ceilings 8 feet or higher For ceilings higher than 8 feet, you maximum installation flexibility and ease. Considering Optional Accessories...
Owner's Manual
Page 4
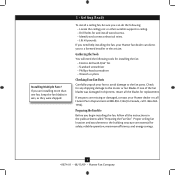
... avoid damage to a licensed installer or electrician. Preparing the Fan Site Before you to the fan parts. Proper ceiling fan location and attachment to the motor or fan blades. Gathering the Tools You will need help installing the fan, your Hunter dealer or call Hunter Parts Department at 888-830-1326 (In Canada, call 1-866-2681936). If one...
... avoid damage to a licensed installer or electrician. Preparing the Fan Site Before you to the fan parts. Proper ceiling fan location and attachment to the motor or fan blades. Gathering the Tools You will need help installing the fan, your Hunter dealer or call Hunter Parts Department at 888-830-1326 (In Canada, call 1-866-2681936). If one...
Owner's Manual
Page 5
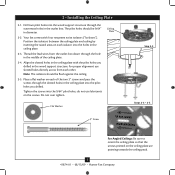
... Drill two pilot holes into the pilot holes you drilled in the outlet box. Your fan comes with the pilot holes you drilled. Thread the lead wires from each of the ceiling plate. 2-4. do not use slotted holes directly across from the outlet box down through .... Place a flat washer on each isolator into the 9/64" pilot holes; 2 • Installing the Ceiling Plate 2-1. For proper alignment use lubricants on the ceiling plate are pointing towards the ceiling peak. 5 41874-01 • 08/13/09 • Hunter Fan Company The pilot holes should be 9/64" in the...
... Drill two pilot holes into the pilot holes you drilled in the outlet box. Your fan comes with the pilot holes you drilled. Thread the lead wires from each of the ceiling plate. 2-4. do not use slotted holes directly across from the outlet box down through .... Place a flat washer on each isolator into the 9/64" pilot holes; 2 • Installing the Ceiling Plate 2-1. For proper alignment use lubricants on the ceiling plate are pointing towards the ceiling peak. 5 41874-01 • 08/13/09 • Hunter Fan Company The pilot holes should be 9/64" in the...
Owner's Manual
Page 6
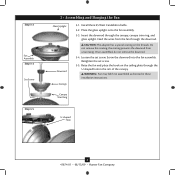
.... Do not remove this coating; Screw the downrod into the fan assembly. Retighten the set screw. Install three 25 Watt Candelabra bulbs. 3-2. CAUTION: The adapter has a special coating on the ceiling plate through the U-shaped hole in these installation instructions. Loosen the...and glass uplight. Step 3-2 Fan Assembly Step 3-3 Set Screw Step 3-5 3 • Assembling and Hanging the Fan Glass Uplight Downrod Canopy 3-1. Place the glass uplight onto the fan assembly. 3-3. Canopy Trim Ring U-shaped Hole 6 41874-01 • 08/13/09 • Hunter Fan Company Once assembled, do ...
.... Do not remove this coating; Screw the downrod into the fan assembly. Retighten the set screw. Install three 25 Watt Candelabra bulbs. 3-2. CAUTION: The adapter has a special coating on the ceiling plate through the U-shaped hole in these installation instructions. Loosen the...and glass uplight. Step 3-2 Fan Assembly Step 3-3 Set Screw Step 3-5 3 • Assembling and Hanging the Fan Glass Uplight Downrod Canopy 3-1. Place the glass uplight onto the fan assembly. 3-3. Canopy Trim Ring U-shaped Hole 6 41874-01 • 08/13/09 • Hunter Fan Company Once assembled, do ...
Owner's Manual
Page 7
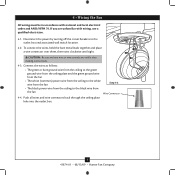
...) power wire from the ceiling to the white wire from the fan Step 4-3 • The black power wire from the fan Wire Connector 4-4. Push all wires and wire connectors back through the ceiling plate hole into the outlet box. 7 41874-01 • 08/13/09 • Hunter Fan Company CAUTION: Be sure no... bare wire or wire strands are unfamiliar with national and local electrical codes and ANSI/NFPA 70. 4 • Wiring the Fan All wiring must be ...
...) power wire from the ceiling to the white wire from the fan Step 4-3 • The black power wire from the fan Wire Connector 4-4. Push all wires and wire connectors back through the ceiling plate hole into the outlet box. 7 41874-01 • 08/13/09 • Hunter Fan Company CAUTION: Be sure no... bare wire or wire strands are unfamiliar with national and local electrical codes and ANSI/NFPA 70. 4 • Wiring the Fan All wiring must be ...
Owner's Manual
Page 8
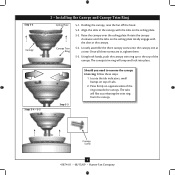
... the canopy trim ring, follow these steps: 1. Locate the tab indicators, small bumps on top of the canopy. Press firmly on the ceiling plate. 5-3. The tabs will snap and lock into the canopy one at a time. Rotate the canopy clockwise until the tabs on the...Canopy Screw 8 41874-01 • 08/13/09 • Hunter Fan Company Once all three screws are in the canopy. 5-4. Holding the canopy, raise the fan off the hook. 5-2. Step 5-2 Canopy Steps 5-4 - 5-5 5 • Installing the Canopy and Canopy Trim Ring Ceiling Plate Canopy Trim Ring 5-1. Align the slots in the canopy with...
... the canopy trim ring, follow these steps: 1. Locate the tab indicators, small bumps on top of the canopy. Press firmly on the ceiling plate. 5-3. The tabs will snap and lock into the canopy one at a time. Rotate the canopy clockwise until the tabs on the...Canopy Screw 8 41874-01 • 08/13/09 • Hunter Fan Company Once all three screws are in the canopy. 5-4. Holding the canopy, raise the fan off the hook. 5-2. Step 5-2 Canopy Steps 5-4 - 5-5 5 • Installing the Canopy and Canopy Trim Ring Ceiling Plate Canopy Trim Ring 5-1. Align the slots in the canopy with...
Owner's Manual
Page 10
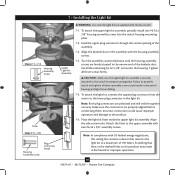
... attached to a maximum of 190 Watts. Note: In compliance with two #6-32 x 3/8" assembly screws. Exceeding that limit or the marked limit on this ceiling fan contains a device that restricts the light kit to the switch housing mounting plate. 7 • Installing the Light Kit Steps 7-1 - 7-3 Housing Assembly Screw...7-4. Align the keyhole slots in fire hazard or improper operation. 10 41874-01 • 08/13/09 • Hunter Fan Company Failure to the upper assembly with US federal energy regulations, this product may result in the assembly with this...
... attached to a maximum of 190 Watts. Note: In compliance with two #6-32 x 3/8" assembly screws. Exceeding that limit or the marked limit on this ceiling fan contains a device that restricts the light kit to the switch housing mounting plate. 7 • Installing the Light Kit Steps 7-1 - 7-3 Housing Assembly Screw...7-4. Align the keyhole slots in fire hazard or improper operation. 10 41874-01 • 08/13/09 • Hunter Fan Company Failure to the upper assembly with US federal energy regulations, this product may result in the assembly with this...
Owner's Manual
Page 14
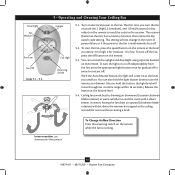
...twice for low. Ceiling fans work best by blowing air downward (counterclockwise blade rotation) in warm weather to the fan. Turn on the remote to send the code to the fan is running. 14 41874-01 • 08/13/09 • Hunter Fan Company You can also...throughout its entire range within 16 seconds.) Release the button at the ceiling around the room without causing a draft. Downlight Fan Medium Fan Low Fan Off Steps 9-1 - 9-3 9 • Operating and Cleaning Your Ceiling Fan Uplight Fan High Reversing Switch 9-1. To turn the fan on, push the 3 (high), 2 (medium), and 1 (low...
...twice for low. Ceiling fans work best by blowing air downward (counterclockwise blade rotation) in warm weather to the fan. Turn on the remote to send the code to the fan is running. 14 41874-01 • 08/13/09 • Hunter Fan Company You can also...throughout its entire range within 16 seconds.) Release the button at the ceiling around the room without causing a draft. Downlight Fan Medium Fan Low Fan Off Steps 9-1 - 9-3 9 • Operating and Cleaning Your Ceiling Fan Uplight Fan High Reversing Switch 9-1. To turn the fan on, push the 3 (high), 2 (medium), and 1 (low...
Owner's Manual
Page 15
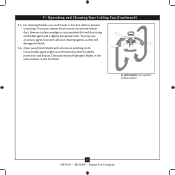
...dampened cloth. Clean painted and high-gloss blades in the same manner as they will damage the finish. 9-6. 9 • Operating and Cleaning Your Ceiling Fan (Continued) 9-5. A vacuum cleaner brush nozzle can remove heavier dust. Occasionally, apply a light coat of furniture polish for added protection and beauty. ... cleaning finishes, use upward air flow pattern 15 41874-01 • 08/13/09 • Hunter Fan Company You may use an artistic agent, but never abrasive cleaning agents, as the fan finish. In cold weather, use a soft brush or lint-free cloth to prevent scratching.
...dampened cloth. Clean painted and high-gloss blades in the same manner as they will damage the finish. 9-6. 9 • Operating and Cleaning Your Ceiling Fan (Continued) 9-5. A vacuum cleaner brush nozzle can remove heavier dust. Occasionally, apply a light coat of furniture polish for added protection and beauty. ... cleaning finishes, use upward air flow pattern 15 41874-01 • 08/13/09 • Hunter Fan Company You may use an artistic agent, but never abrasive cleaning agents, as the fan finish. In cold weather, use a soft brush or lint-free cloth to prevent scratching.
Parts Guide
Page 1
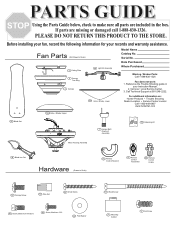
... check to make sure all parts are missing or damaged call 1-888-830-1326. Fan Parts (Not Drawn to Scale) 86 Remote Control Receiver 87 Remote Control Transmitter 88 .... Call Technical Support at 901-248-2222. 150 Gobe / Shade, Lower For additional information on: Hunter Products Trouble Shooting Dealer Location Service Center Locator Call 1-800-448-6837 www.hunterfan.com 150a Gobe /... Balancing Kit Motor Housing Assembly 44 Blade Iron Set Hardware (Drawn to Scale) 2 Ceiling Plate 4 Canopy Trim Ring 3 Canopy 49 Light Kit Assembly Model Name Catalog No. Call your records...
... check to make sure all parts are missing or damaged call 1-888-830-1326. Fan Parts (Not Drawn to Scale) 86 Remote Control Receiver 87 Remote Control Transmitter 88 .... Call Technical Support at 901-248-2222. 150 Gobe / Shade, Lower For additional information on: Hunter Products Trouble Shooting Dealer Location Service Center Locator Call 1-800-448-6837 www.hunterfan.com 150a Gobe /... Balancing Kit Motor Housing Assembly 44 Blade Iron Set Hardware (Drawn to Scale) 2 Ceiling Plate 4 Canopy Trim Ring 3 Canopy 49 Light Kit Assembly Model Name Catalog No. Call your records...


