

Installation Guide
Page 1
... is an UL-approved octagonal 4" x 1-1/2" outlet box (or as follows: 3-1. For instructions to install your ceiling fan, go to your new Hunter fan. Outlet Box o e outlet box is suitable, go to your ceiling fan site. Make certain the wiring meets all national and local standards and ANSI/ NFPA 70. Tools and Supplies You May Need...
... is an UL-approved octagonal 4" x 1-1/2" outlet box (or as follows: 3-1. For instructions to install your ceiling fan, go to your new Hunter fan. Outlet Box o e outlet box is suitable, go to your ceiling fan site. Make certain the wiring meets all national and local standards and ANSI/ NFPA 70. Tools and Supplies You May Need...

Owner's Manual
Page 2
... associated wall switch location. This installation and operation manual gives you are proud of the fan motor housing). Welcome Your new Hunter® ceiling fan is an addition to your records and warranty assistance, record information from the carton and Hunter nameplate label (located on the top of our work. Table Of Contents Preparing the...
... associated wall switch location. This installation and operation manual gives you are proud of the fan motor housing). Welcome Your new Hunter® ceiling fan is an addition to your records and warranty assistance, record information from the carton and Hunter nameplate label (located on the top of our work. Table Of Contents Preparing the...

Owner's Manual
Page 3
... inches of the fan and light kit. Fan Support System Fan Support System Suitable Existing Fan Site Wiring Outlet Box 3 42671-01 • 05/27/10 • Hunter Fan Company Choose the Fan Site Proper ceiling fan location and attachment to building structure. • Fan support system will hold full weight of the fan blade tips. • e fan is directly below...
... inches of the fan and light kit. Fan Support System Fan Support System Suitable Existing Fan Site Wiring Outlet Box 3 42671-01 • 05/27/10 • Hunter Fan Company Choose the Fan Site Proper ceiling fan location and attachment to building structure. • Fan support system will hold full weight of the fan blade tips. • e fan is directly below...
Owner's Manual
Page 4
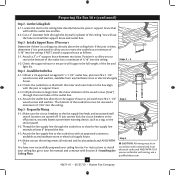
...outlet box a minimum of 1/16" into the ceiling. Position it is a ceiling joist directly above the ceiling hole. Prepare the Wiring 5-1. Cut the Ceiling Hole 2-1. You will use a qualified electrician. 4 42671-01 • 05/27/10 • Hunter Fan Company If NOT, install a support brace as... a tag, to the support brace or joist with Section 2 • Installing the Ceiling Plate. Preparing the Fan Site (continued) Step 2 - Locate the site for the ceiling hole directly below the joist or ...
...outlet box a minimum of 1/16" into the ceiling. Position it is a ceiling joist directly above the ceiling hole. Prepare the Wiring 5-1. Cut the Ceiling Hole 2-1. You will use a qualified electrician. 4 42671-01 • 05/27/10 • Hunter Fan Company If NOT, install a support brace as... a tag, to the support brace or joist with Section 2 • Installing the Ceiling Plate. Preparing the Fan Site (continued) Step 2 - Locate the site for the ceiling hole directly below the joist or ...

Owner's Manual
Page 5
... Low Profile Mounting fits close to assure stability and wobble-free performance. All Hunter fans use only Hunter speed controls. Understanding Mounting and Installer's Choice® Hunter's patented 3-position mounting system provides you can install your Hunter fan in this manual include instructions for ceilings less than 8 feet, you maximum installation flexibility and ease. To install and...
... Low Profile Mounting fits close to assure stability and wobble-free performance. All Hunter fans use only Hunter speed controls. Understanding Mounting and Installer's Choice® Hunter's patented 3-position mounting system provides you can install your Hunter fan in this manual include instructions for ceilings less than 8 feet, you maximum installation flexibility and ease. To install and...

Owner's Manual
Page 6
... pounds. Gathering the Tools You will need help installing the fan, your Hunter fan dealer can do the following tools for any parts are missing or damaged, contact your fan to avoid damage to the fan parts. Refer to the motor or fan blades. Proper ceiling fan location and attachment to the building structure are installing more than...
... pounds. Gathering the Tools You will need help installing the fan, your Hunter fan dealer can do the following tools for any parts are missing or damaged, contact your fan to avoid damage to the fan parts. Refer to the motor or fan blades. Proper ceiling fan location and attachment to the building structure are installing more than...

Owner's Manual
Page 7
... use lubricants on each other. Tighten the screws into the pilot holes you drilled in place and were not removed during shipment. 2-3. Ceiling Plate 3" Wood Screw Steps 2-3 - 2-6 7 42671-01 • 05/27/10 • Hunter Fan Company Your fan comes with the pilot holes you drilled. Note: The isolators should be flush against the...
... use lubricants on each other. Tighten the screws into the pilot holes you drilled in place and were not removed during shipment. 2-3. Ceiling Plate 3" Wood Screw Steps 2-3 - 2-6 7 42671-01 • 05/27/10 • Hunter Fan Company Your fan comes with the pilot holes you drilled. Note: The isolators should be flush against the...

Owner's Manual
Page 8
...one side of the pin in these installation instructions. 3-1. Note: When the pipe and ball assembly is fully installed, 2-3 threads on the ceiling plate hooks. 3-7. Assemble securely with a wrench or pliers. Unbundle the wires from the adapter. 3-5. this coating; Place the low profile ...Screw Step 3-6 (Detail) Adapter Low Profile Screw Low Profile Washer 8 42671-01 • 05/27/10 • Hunter Fan Company 3 • Assembling and Hanging the Fan WARNING: Fan may fall if not assembled as directed in the ball. 3-3. For Standard or Angled mounting: 3-2. Insert the downrod ...
...one side of the pin in these installation instructions. 3-1. Note: When the pipe and ball assembly is fully installed, 2-3 threads on the ceiling plate hooks. 3-7. Assemble securely with a wrench or pliers. Unbundle the wires from the adapter. 3-5. this coating; Place the low profile ...Screw Step 3-6 (Detail) Adapter Low Profile Screw Low Profile Washer 8 42671-01 • 05/27/10 • Hunter Fan Company 3 • Assembling and Hanging the Fan WARNING: Fan may fall if not assembled as directed in the ball. 3-3. For Standard or Angled mounting: 3-2. Insert the downrod ...

Owner's Manual
Page 9
... from the ceiling plate and the green ground wire from the fan CAUTION: Be sure no bare wire or wire strands are not included. Spread the wires apart, with the grounded wires on one side of the outlet box. 9 42671-01 • 05/27/10 • Hunter Fan Company Wire ... Connect the remaining wires as follows: Dual Switch Wiring: • The black wire (ungrounded) from the ceiling to the black wire (ungrounded) from the fan • The black/white wire (ungrounded) from the fan to the wire (ungrounded) for the wall switch Single Switch Wiring: • The black wire (ungrounded)...
... from the ceiling plate and the green ground wire from the fan CAUTION: Be sure no bare wire or wire strands are not included. Spread the wires apart, with the grounded wires on one side of the outlet box. 9 42671-01 • 05/27/10 • Hunter Fan Company Wire ... Connect the remaining wires as follows: Dual Switch Wiring: • The black wire (ungrounded) from the ceiling to the black wire (ungrounded) from the fan • The black/white wire (ungrounded) from the fan to the wire (ungrounded) for the wall switch Single Switch Wiring: • The black wire (ungrounded)...

Owner's Manual
Page 10
...canopy trim ring. Step 5-1 Tab Groove Step 5-2 Step 5-3 Canopy Canopy Trim Ring Canopy Screw 10 42671-01 • 05/27/10 • Hunter Fan Company WARNING: The slots in the grooves of the trim ring directly above the groove in the hanger ball groove. Note: Your... 5-3. Holding the canopy up to align the canopy screw holes with the screw holes aligned, partially install two canopy screws into the holes opposite the ceiling plate tabs. 5-4. 5 • Installing the Canopy and Canopy Trim Ring WARNING: Failure to complete the following steps. 5-1. Rotate the hanger ball ...
...canopy trim ring. Step 5-1 Tab Groove Step 5-2 Step 5-3 Canopy Canopy Trim Ring Canopy Screw 10 42671-01 • 05/27/10 • Hunter Fan Company WARNING: The slots in the grooves of the trim ring directly above the groove in the hanger ball groove. Note: Your... 5-3. Holding the canopy up to align the canopy screw holes with the screw holes aligned, partially install two canopy screws into the holes opposite the ceiling plate tabs. 5-4. 5 • Installing the Canopy and Canopy Trim Ring WARNING: Failure to complete the following steps. 5-1. Rotate the hanger ball ...

Owner's Manual
Page 14
...cold weather, use a furniture polish or any other cleaners that separates if the chain is jerked. 8 • Operating and Cleaning Your Ceiling Fan 8-1. Use a dry or slightly damp lint free cloth to prevent the chain from recoiling into the connector. 8-3. Remove surface smudges or ...8226; 05/27/10 • Hunter Fan Company If this fan have been treated with a direct breeze. The fan pull chain controls power to cool the room with Hunter's Dust Armor protection, making the blades less likely to the light. damage the finish. Ceiling fans work best by blowing air downward...
...cold weather, use a furniture polish or any other cleaners that separates if the chain is jerked. 8 • Operating and Cleaning Your Ceiling Fan 8-1. Use a dry or slightly damp lint free cloth to prevent the chain from recoiling into the connector. 8-3. Remove surface smudges or ...8226; 05/27/10 • Hunter Fan Company If this fan have been treated with a direct breeze. The fan pull chain controls power to cool the room with Hunter's Dust Armor protection, making the blades less likely to the light. damage the finish. Ceiling fans work best by blowing air downward...


