
Installation Guide
Page 1
...wood screws and washers • Approved connector for electrical wire Checklist for your new Hunter fan. o Fan support system will use a qualified electrician. 41681-01 • 02/20/04 If your existing fan site is secured to the joist or support brace by the support brace manufacturer). ... and the full weight of the outlet box must be recessed a minimum of 1/16" into ceiling. Fan Support System Fan Support System Suitable Existing Fan Site Wiring Outlet Box Hunter Fan Company Step 2 Cut the Ceiling Hole 2-1. Cut a 4" diameter hole through the inner holes of 1/...
...wood screws and washers • Approved connector for electrical wire Checklist for your new Hunter fan. o Fan support system will use a qualified electrician. 41681-01 • 02/20/04 If your existing fan site is secured to the joist or support brace by the support brace manufacturer). ... and the full weight of the outlet box must be recessed a minimum of 1/16" into ceiling. Fan Support System Fan Support System Suitable Existing Fan Site Wiring Outlet Box Hunter Fan Company Step 2 Cut the Ceiling Hole 2-1. Cut a 4" diameter hole through the inner holes of 1/...
Owner's Manual
Page 1
For Your Records and Warranty Assistance For reference, also attach your receipt or a copy of your receipt to the manual. Date Purchased Where Purchased Type 3 Models Owner's Guide and Installation Manual English Español Form# 42683-01 20090911 ©2009 Hunter Fan Co. Model Name Model No.
For Your Records and Warranty Assistance For reference, also attach your receipt or a copy of your receipt to the manual. Date Purchased Where Purchased Type 3 Models Owner's Guide and Installation Manual English Español Form# 42683-01 20090911 ©2009 Hunter Fan Co. Model Name Model No.
Owner's Manual
Page 2
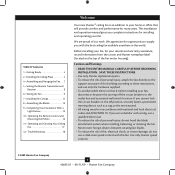
... READ THIS ENTIRE MANUAL CAREFULLY BEFORE BEGINNING INSTALLATION. SAVE THESE INSTRUCTIONS. • Use only Hunter replacement parts. • To reduce the risk of personal injury, attach the fan directly to the support structure of personal injury, do not bend the blade attachment system when..., or cleaning the fan. This installation and operation manual gives you cannot lock the circuit breakers in the world. Use only Hunter speed controls. © 2009 Hunter Fan Company 2 42683-01 • 09/11/09 • Hunter Fan Company We are unfamiliar with this fan. If you complete ...
... READ THIS ENTIRE MANUAL CAREFULLY BEFORE BEGINNING INSTALLATION. SAVE THESE INSTRUCTIONS. • Use only Hunter replacement parts. • To reduce the risk of personal injury, attach the fan directly to the support structure of personal injury, do not bend the blade attachment system when..., or cleaning the fan. This installation and operation manual gives you cannot lock the circuit breakers in the world. Use only Hunter speed controls. © 2009 Hunter Fan Company 2 42683-01 • 09/11/09 • Hunter Fan Company We are unfamiliar with this fan. If you complete ...
Owner's Manual
Page 3
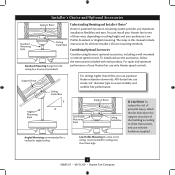
...high CAUTION: To reduce the risk of personal injury, attach the fan directly to the support structure of the building according to these instructions, and use only Hunter speed controls. All Hunter fans use the accessories, follow the instructions included with each product. ... close to assure stability and wobble-free performance. Understanding Mounting and Installer's Choice® Hunter's patented 3-position mounting system provides you can install your Hunter fan in this manual include instructions for ceilings less than 8 feet, you maximum installation flexibility and...
...high CAUTION: To reduce the risk of personal injury, attach the fan directly to the support structure of the building according to these instructions, and use only Hunter speed controls. All Hunter fans use the accessories, follow the instructions included with each product. ... close to assure stability and wobble-free performance. Understanding Mounting and Installer's Choice® Hunter's patented 3-position mounting system provides you can install your Hunter fan in this manual include instructions for ceilings less than 8 feet, you maximum installation flexibility and...
Owner's Manual
Page 4
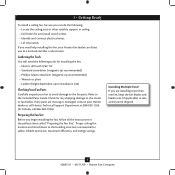
...42683-01 • 09/11/09 • Hunter Fan Company Gathering the Tools You will need help installing the fan, your Hunter dealer or call Hunter Technical Support Department at 888-830-1326. (In Canada, call 866-268-1936). Proper ceiling fan location and attachment to the included Parts Guide....holes for any parts are installing more than one fan, keep the fan blades and blade irons (if applicable) in the pullout sheet called "Preparing the Fan Site." Preparing the Fan Site Before you are missing or damaged, contact your Hunter fan dealer can direct you can do the following ...
...42683-01 • 09/11/09 • Hunter Fan Company Gathering the Tools You will need help installing the fan, your Hunter dealer or call Hunter Technical Support Department at 888-830-1326. (In Canada, call 866-268-1936). Proper ceiling fan location and attachment to the included Parts Guide....holes for any parts are installing more than one fan, keep the fan blades and blade irons (if applicable) in the pullout sheet called "Preparing the Fan Site." Preparing the Fan Site Before you are missing or damaged, contact your Hunter fan dealer can direct you can do the following ...
Owner's Manual
Page 5
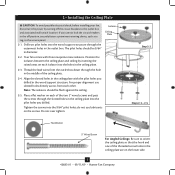
..., such as a tag, to the outlet box and associated wall switch location. Tighten the screws into the pilot holes you drilled. Your fan comes with the pilot holes you cannot lock the circuit breakers in the off the circuit breakers to the service panel. do not use slotted... structure. Do not over tighten. For proper alignment use lubricants on the lower side. 5 42683-01 • 09/11/09 • Hunter Fan Company Thread the lead wires from each other. 2 • Installing the Ceiling Plate CAUTION: To avoid possible electrical shock, before installing your...
..., such as a tag, to the outlet box and associated wall switch location. Tighten the screws into the pilot holes you drilled. Your fan comes with the pilot holes you cannot lock the circuit breakers in the off the circuit breakers to the service panel. do not use slotted... structure. Do not over tighten. For proper alignment use lubricants on the lower side. 5 42683-01 • 09/11/09 • Hunter Fan Company Thread the lead wires from each other. 2 • Installing the Ceiling Plate CAUTION: To avoid possible electrical shock, before installing your...
Owner's Manual
Page 6
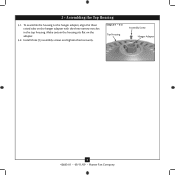
Install three (3) assembly screws and tighten them securely. Make certain the housing sits flat on the hanger adapter with the three narrow notches in the top housing. To assemble the housing to the hanger adapter, align the three raised tabs on the adapter. 3-2. Steps 3-1 - 3-2 Top Housing Assembly Screw Hanger Adapter 6 42683-01 • 09/11/09 • Hunter Fan Company 3 • Assembling the Top Housing 3-1.
Install three (3) assembly screws and tighten them securely. Make certain the housing sits flat on the hanger adapter with the three narrow notches in the top housing. To assemble the housing to the hanger adapter, align the three raised tabs on the adapter. 3-2. Steps 3-1 - 3-2 Top Housing Assembly Screw Hanger Adapter 6 42683-01 • 09/11/09 • Hunter Fan Company 3 • Assembling the Top Housing 3-1.

Owner's Manual
Page 7
...: Make sure all the wires are on the ceiling plate through the low profile washer and the canopy. Securely retighten the set screw from the fan through the canopy. Steps 4-1 - 4-2 Downrod Steps 4-5 - 4-6 Canopy Set Screw Low Profile Washer Low Profile Screw Step 4-7 Round Hole 7 42683-...01 • 09/11/09 • Hunter Fan Company Feed the wires from the adapter. 4-5. Be sure the green ground wire is replaced with a wrench or pliers. Do not remove this is fully...
...: Make sure all the wires are on the ceiling plate through the low profile washer and the canopy. Securely retighten the set screw from the fan through the canopy. Steps 4-1 - 4-2 Downrod Steps 4-5 - 4-6 Canopy Set Screw Low Profile Washer Low Profile Screw Step 4-7 Round Hole 7 42683-...01 • 09/11/09 • Hunter Fan Company Feed the wires from the adapter. 4-5. Be sure the green ground wire is replaced with a wrench or pliers. Do not remove this is fully...

Owner's Manual
Page 8
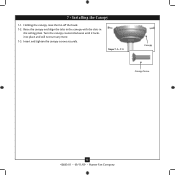
... jumpers, read the box below. 5-2. maximum lamp is 1 Amp; You can access the jumpers from the battery compartment. Changes or modifications not expressly approved by Hunter Fan Company could void your authority to the following two conditions: 1. Do not use any interference received, including interference that the operation of one... a small pair of the other , you change a jumper, make sure the battery is subject to operate this product. 8 42683-01 • 09/11/09 • Hunter Fan Company Before you may desire to have the receiver/transmitter for each other...
... jumpers, read the box below. 5-2. maximum lamp is 1 Amp; You can access the jumpers from the battery compartment. Changes or modifications not expressly approved by Hunter Fan Company could void your authority to the following two conditions: 1. Do not use any interference received, including interference that the operation of one... a small pair of the other , you change a jumper, make sure the battery is subject to operate this product. 8 42683-01 • 09/11/09 • Hunter Fan Company Before you may desire to have the receiver/transmitter for each other...
Owner's Manual
Page 9
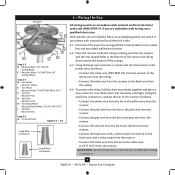
... with national and local electrical codes. 6-1. CAUTION: Be sure no bare wire or wire strands are not included. Using the small wire connectors, connect the fan to the receiver as follows: • Connect the white wire (NEUTRAL IN) from the receiver to the white wire from the ceiling. • Connect the... you are facing down toward the bottom of the canopy. 6-3. Place the receiver inside the canopy, making connections. 9 42683-01 • 09/11/09 • Hunter Fan Company Disconnect the power by turning off the circuit breakers to the black wire from the receiver.
... with national and local electrical codes. 6-1. CAUTION: Be sure no bare wire or wire strands are not included. Using the small wire connectors, connect the fan to the receiver as follows: • Connect the white wire (NEUTRAL IN) from the receiver to the white wire from the ceiling. • Connect the... you are facing down toward the bottom of the canopy. 6-3. Place the receiver inside the canopy, making connections. 9 42683-01 • 09/11/09 • Hunter Fan Company Disconnect the power by turning off the circuit breakers to the black wire from the receiver.
Owner's Manual
Page 10
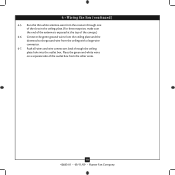
... ground wires from the ceiling plate and the downrod to the ground wire from the other wires. 10 42683-01 • 09/11/09 • Hunter Fan Company 6 • Wiring the Fan (continued) 6-5. Run the thin white antenna wire from the receiver through the ceiling plate hole into the outlet box.
... ground wires from the ceiling plate and the downrod to the ground wire from the other wires. 10 42683-01 • 09/11/09 • Hunter Fan Company 6 • Wiring the Fan (continued) 6-5. Run the thin white antenna wire from the receiver through the ceiling plate hole into the outlet box.
Owner's Manual
Page 11
Turn the canopy counterclockwise until it locks into place and will not turn any more. 7-3. Insert and tighten the canopy screws securely. Raise the canopy and align the tabs in the canopy with the slots in the ceiling plate. Steps 7-1- 7-3 Canopy Canopy Screw 11 42683-01 • 09/11/09 • Hunter Fan Company Holding the canopy, raise the fan off the hook. 7-2. 7 • Installing the Canopy 7-1.
Turn the canopy counterclockwise until it locks into place and will not turn any more. 7-3. Insert and tighten the canopy screws securely. Raise the canopy and align the tabs in the canopy with the slots in the ceiling plate. Steps 7-1- 7-3 Canopy Canopy Screw 11 42683-01 • 09/11/09 • Hunter Fan Company Holding the canopy, raise the fan off the hook. 7-2. 7 • Installing the Canopy 7-1.
Owner's Manual
Page 12
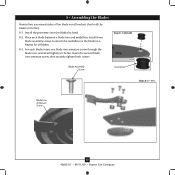
.... 8-2. Install three blade assembly screws to attach the medallion to the fan. Step 8-1 (Detail) Blade Assembly Screw Grommet Steps 8-2 - 8-4 Blade Iron Armature Screw 12 42683-01 • 09/11/09 • Hunter Fan Company Insert the second blade iron armature screw, then securely tighten both screws.... 8 • Assembling the Blades Hunter fans use several styles of fan blade irons (brackets that hold the blade to the fan). 8-1. Place each blade, insert one blade iron armature screw through the blade iron, and ...
.... 8-2. Install three blade assembly screws to attach the medallion to the fan. Step 8-1 (Detail) Blade Assembly Screw Grommet Steps 8-2 - 8-4 Blade Iron Armature Screw 12 42683-01 • 09/11/09 • Hunter Fan Company Insert the second blade iron armature screw, then securely tighten both screws.... 8 • Assembling the Blades Hunter fans use several styles of fan blade irons (brackets that hold the blade to the fan). 8-1. Place each blade, insert one blade iron armature screw through the blade iron, and ...
Owner's Manual
Page 13
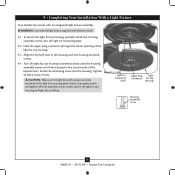
... the keyhole slots. Upper Plug Light Connector Kit Top Housing Housing Assembly Screw 13 42683-01 • 09/11/09 • Hunter Fan Company WARNING: Use only the light fixture supplied with the housing assembly screws. 9-4. Tighten Steps 9-1 - 9-3 all three assembly screws...Plate attached to properly attach and tighten all three screws firmly. 9 • Completing Your Installation With a Light Fixture Your Hunter fan comes with an integrated light fixture assembly. Turn the light kit top housing counterclockwise until the housing assembly screws are firmly situated...
... the keyhole slots. Upper Plug Light Connector Kit Top Housing Housing Assembly Screw 13 42683-01 • 09/11/09 • Hunter Fan Company WARNING: Use only the light fixture supplied with the housing assembly screws. 9-4. Tighten Steps 9-1 - 9-3 all three assembly screws...Plate attached to properly attach and tighten all three screws firmly. 9 • Completing Your Installation With a Light Fixture Your Hunter fan comes with an integrated light fixture assembly. Turn the light kit top housing counterclockwise until the housing assembly screws are firmly situated...
Owner's Manual
Page 14
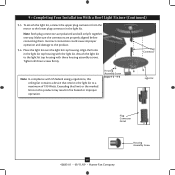
... Your Installation With a Bowl Light Fixture (Continued) 9-5. Align the holes in the light kit top housing with US federal energy regulations, this ceiling fan contains a device that limit or the marked limit on this product may result in the light kit. Housing Assembly Screw Steps 9-5 - 9-6 Light Kit... Plug Connector Detail 14 42683-01 • 09/11/09 • Hunter Fan Company Housing Assembly Screw Make sure the connectors are polarized and will only fit together one way. Attach the light kit to the product. 9-6....
... Your Installation With a Bowl Light Fixture (Continued) 9-5. Align the holes in the light kit top housing with US federal energy regulations, this ceiling fan contains a device that limit or the marked limit on this product may result in the light kit. Housing Assembly Screw Steps 9-5 - 9-6 Light Kit... Plug Connector Detail 14 42683-01 • 09/11/09 • Hunter Fan Company Housing Assembly Screw Make sure the connectors are polarized and will only fit together one way. Attach the light kit to the product. 9-6....
Owner's Manual
Page 15
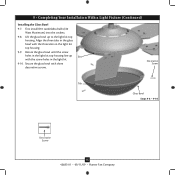
... line up to the light kit top housing. Decorative Screw Tab Glass Bowl Steps 9-8 - 9-10 Decorative Screw 15 42683-01 • 09/11/09 • Hunter Fan Company Align the three tabs in the glass bowl with the screw holes in the light kit top housing. 9-9. First install B10 candelabra bulbs (60...
... line up to the light kit top housing. Decorative Screw Tab Glass Bowl Steps 9-8 - 9-10 Decorative Screw 15 42683-01 • 09/11/09 • Hunter Fan Company Align the three tabs in the glass bowl with the screw holes in the light kit top housing. 9-9. First install B10 candelabra bulbs (60...
Owner's Manual
Page 16
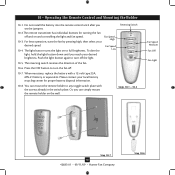
...off and on the wall. Steps 10-1 - 10-5 Fan Speed Medium Fan Off Fan Light Step 10-7 16 42683-01 • 09/11/09 • Hunter Fan Company Step 10-6 Press the OFF button to turn the fan off. 10-7. Fan Speed High 10-3. The reversing switch reverses the direction of... the fan. 10-6. You can simply mount the remote holder on and controlling the light and fan speed. 10 • Operating...
...off and on the wall. Steps 10-1 - 10-5 Fan Speed Medium Fan Off Fan Light Step 10-7 16 42683-01 • 09/11/09 • Hunter Fan Company Step 10-6 Press the OFF button to turn the fan off. 10-7. Fan Speed High 10-3. The reversing switch reverses the direction of... the fan. 10-6. You can simply mount the remote holder on and controlling the light and fan speed. 10 • Operating...

Owner's Manual
Page 17
...and high-gloss blades in warm weather to prevent scratching. The fan should turn ON. Clean wood finish blades with a direct breeze. Ceiling fans work best by blowing air downward (counterclockwise blade rotation) in... for 5 days or more, turn the wall switch OFF. 11-3. In cold weather, having the fan draw air upward (clockwise blade rotation) will turn on at the ceiling around the room without the remote...air trapped at maximum brightness. 11-2. 11 • Operating and Cleaning Your Ceiling Fan In warm weather, use downward air flow pattern In cold weather, use an artistic agent, but...
...and high-gloss blades in warm weather to prevent scratching. The fan should turn ON. Clean wood finish blades with a direct breeze. Ceiling fans work best by blowing air downward (counterclockwise blade rotation) in... for 5 days or more, turn the wall switch OFF. 11-3. In cold weather, having the fan draw air upward (clockwise blade rotation) will turn on at the ceiling around the room without the remote...air trapped at maximum brightness. 11-2. 11 • Operating and Cleaning Your Ceiling Fan In warm weather, use downward air flow pattern In cold weather, use an artistic agent, but...
Owner's Manual
Page 18
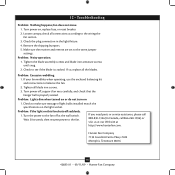
... the hanger ball is cracked. Loosen canopy, check all connections according to the fan. Problem: Noisy operation. 1. Problem: Lights dim when turned on or do not turn on the light socket. Hunter Fan Company 7130 Goodlett Farms Pkwy. #400 Memphis, Tennessee 38016 18 42683-01 &#...8226; 09/11/09 • Hunter Fan Company Check to the fan off suddenly. 1. Problem: Excessive wobbling. 1. Turn the power to see...
... the hanger ball is cracked. Loosen canopy, check all connections according to the fan. Problem: Noisy operation. 1. Problem: Lights dim when turned on or do not turn on the light socket. Hunter Fan Company 7130 Goodlett Farms Pkwy. #400 Memphis, Tennessee 38016 18 42683-01 &#...8226; 09/11/09 • Hunter Fan Company Check to the fan off suddenly. 1. Problem: Excessive wobbling. 1. Turn the power to see...
Parts Guide
Page 1
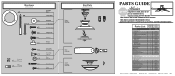
... Parts Guide, make sure all parts are missing, DO NOT RETURN THIS ITEM TO THE STORE, call 888-830-1326 for assistance. Dwg. # Finish Qnty 20171 99146-01 Brushed Nickel Part # 1 92356-01 1 84206-01 1 63722-25 1 03009-01 1 73788-01 3 74510-03 2 03144-03 2 06512-02 4 06301-01...-05 11 74510-04 1 99146-00-860 1 07634-01 3 73985-01 1 85483-01 1 85094-02 1 85093-01 1 92650-02 2 77646-04 1 92651-01 Hunter Fan Company • 2500 Frisco Avenue • Memphis, TN 38114 • www.hunterfan.com • 98000-01-961 11-20-2008 • ©2008 If parts...
... Parts Guide, make sure all parts are missing, DO NOT RETURN THIS ITEM TO THE STORE, call 888-830-1326 for assistance. Dwg. # Finish Qnty 20171 99146-01 Brushed Nickel Part # 1 92356-01 1 84206-01 1 63722-25 1 03009-01 1 73788-01 3 74510-03 2 03144-03 2 06512-02 4 06301-01...-05 11 74510-04 1 99146-00-860 1 07634-01 3 73985-01 1 85483-01 1 85094-02 1 85093-01 1 92650-02 2 77646-04 1 92651-01 Hunter Fan Company • 2500 Frisco Avenue • Memphis, TN 38114 • www.hunterfan.com • 98000-01-961 11-20-2008 • ©2008 If parts...


