
User Manual
Page 2
... to be copied, used or translated in part or whole without HUMAX's prior consent in writing except approval of ownership of the information contained in this user's manual is subject to change without notice. GB1 User's Manual The information in this user's manual next to misuse of copyright and copyright law. This product incorporates...
... to be copied, used or translated in part or whole without HUMAX's prior consent in writing except approval of ownership of the information contained in this user's manual is subject to change without notice. GB1 User's Manual The information in this user's manual next to misuse of copyright and copyright law. This product incorporates...
User Manual
Page 3
...apparatus. • Note Indicates additional information to make the user aware of possible problems and information of its working life. GB2 User's Manual No user serviceable parts inside the product that indicate hazardous situations. • Warning Indicates a hazardous situation which could result in serious injury.... office for details of where and how they can take this item for disposal. Notice Warnings, Cautions and Notes Throughout the whole manual, pay special attention to the following marks that presents a risk of electric shock, do not remove cover (or back). Refer ...
...apparatus. • Note Indicates additional information to make the user aware of possible problems and information of its working life. GB2 User's Manual No user serviceable parts inside the product that indicate hazardous situations. • Warning Indicates a hazardous situation which could result in serious injury.... office for details of where and how they can take this item for disposal. Notice Warnings, Cautions and Notes Throughout the whole manual, pay special attention to the following marks that presents a risk of electric shock, do not remove cover (or back). Refer ...
User Manual
Page 4
... shock. 3. LOCATION • Place the product indoors to avoid exposing it to lightning, rain or sun. • Do not place it can fall. GB3 User's Manual LIQUID • The product should be left uncovered to allow proper airflow into the wall outlet. Failure to do not place the product on a bed...
... shock. 3. LOCATION • Place the product indoors to avoid exposing it to lightning, rain or sun. • Do not place it can fall. GB3 User's Manual LIQUID • The product should be left uncovered to allow proper airflow into the wall outlet. Failure to do not place the product on a bed...
User Manual
Page 5
... the manufacturer or those that have the same characteristics as a disconnection device, shall remain readily accessible by the carelessness or misuse of users. GB4 User's Manual To avoid damage of order. • Do not insert metal or alien substance into the slots for any corruption of data on the hard disk...
... the manufacturer or those that have the same characteristics as a disconnection device, shall remain readily accessible by the carelessness or misuse of users. GB4 User's Manual To avoid damage of order. • Do not insert metal or alien substance into the slots for any corruption of data on the hard disk...
User Manual
Page 6
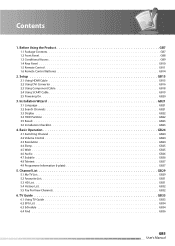
... GB26 4.7 Subtitle GB26 4.8 Teletext GB27 4.9 Programme Information (i-plate GB27 5. TV Guide GB33 6.1 Using TV Guide GB33 6.2 EPG List GB34 6.3 Schedule GB34 6.4 Find GB36 GB5 User's Manual Setup GB15 2.1 Using HDMI Cable GB15 2.2 Using DVI Converter GB16 2.3 Using Component Cable GB18 2.4 Using SCART Cable GB19 2.5 Powering On GB20 3. Before Using the Product...
... GB26 4.7 Subtitle GB26 4.8 Teletext GB27 4.9 Programme Information (i-plate GB27 5. TV Guide GB33 6.1 Using TV Guide GB33 6.2 EPG List GB34 6.3 Schedule GB34 6.4 Find GB36 GB5 User's Manual Setup GB15 2.1 Using HDMI Cable GB15 2.2 Using DVI Converter GB16 2.3 Using Component Cable GB18 2.4 Using SCART Cable GB19 2.5 Powering On GB20 3. Before Using the Product...
User Manual
Page 7
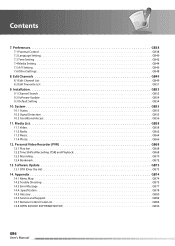
... 14. Specification GB78 14.5 Glossary GB80 14.6 Service and Support GB82 14.7 Remote Control Code List GB84 14.8 OPEN SOURCE SOFTWARE NOTICE GB96 GB6 User's Manual Installation GB53 9.1 Channel Search GB53 9.2 Software Update GB54 9.3 Default Setting GB54 10. Media List GB58 11.1 Video GB58 11.2 Radio GB62 11.3 Music GB64 11...
... 14. Specification GB78 14.5 Glossary GB80 14.6 Service and Support GB82 14.7 Remote Control Code List GB84 14.8 OPEN SOURCE SOFTWARE NOTICE GB96 GB6 User's Manual Installation GB53 9.1 Channel Search GB53 9.2 Software Update GB54 9.3 Default Setting GB54 10. Media List GB58 11.1 Video GB58 11.2 Radio GB62 11.3 Music GB64 11...
User Manual
Page 8
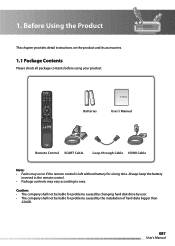
... not be liable for problems caused by changing hard disk drive by user. • The company shall not be liable for a long time. Batteries User's Manual User's Manual Remote Control SCART Cable Loop-through Cable HDMI Cable Note: • Faults may vary according to area. GB7 User...
... not be liable for problems caused by changing hard disk drive by user. • The company shall not be liable for a long time. Batteries User's Manual User's Manual Remote Control SCART Cable Loop-through Cable HDMI Cable Note: • Faults may vary according to area. GB7 User...
User Manual
Page 9
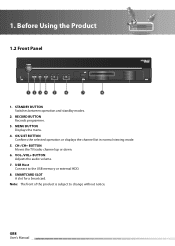
... for a Smartcard. RECORD BUTTON Records programme. 3. MENU BUTTON Displays the menu. 4. VOL-/VOL+ BUTTON Adjusts the audio volume. 7. Before Using the Product 1.2 Front Panel HDPVR-1000C CH 1. OK/LIST BUTTON Confirms the selected operation or displays the channel list in normal viewing mode. 5. CH-/CH+ BUTTON Moves the TV/radio channel... up or down. 6. STANDBY BUTTON Switches between operation and standby modes. 2. USB Host Connect to change without notice. GB8 User's Manual Note: The front of the product is subject to the USB memory or external HDD. 8. 1.
... for a Smartcard. RECORD BUTTON Records programme. 3. MENU BUTTON Displays the menu. 4. VOL-/VOL+ BUTTON Adjusts the audio volume. 7. Before Using the Product 1.2 Front Panel HDPVR-1000C CH 1. OK/LIST BUTTON Confirms the selected operation or displays the channel list in normal viewing mode. 5. CH-/CH+ BUTTON Moves the TV/radio channel... up or down. 6. STANDBY BUTTON Switches between operation and standby modes. 2. USB Host Connect to change without notice. GB8 User's Manual Note: The front of the product is subject to the USB memory or external HDD. 8. 1.
User Manual
Page 10
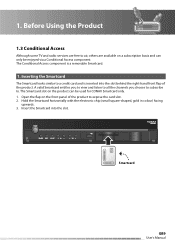
... to a credit card and is a removable Smartcard. 1. Insert the Smartcard into the slot behind the right-hand front flap of the product to . HDPVR-1000C CH Smartcard GB9 User's Manual The Smartcard slot on a subscription basis and can be enjoyed via a Conditional Access component. Hold the Smartcard horizontally with the electronic chip (small...
... to a credit card and is a removable Smartcard. 1. Insert the Smartcard into the slot behind the right-hand front flap of the product to . HDPVR-1000C CH Smartcard GB9 User's Manual The Smartcard slot on a subscription basis and can be enjoyed via a Conditional Access component. Hold the Smartcard horizontally with the electronic chip (small...

User Manual
Page 11
... Connects to the TV or VCR using a VCR SCART cable. 6. ON/OFF Powers on/off. ETHERNET Ethernet port (for changing video. (default: YPbPr) 7. GB10 User's Manual VIDEO Connects to the TV using a component cable. 10. Note: The rear panel of the TV or VCR using an S/PDIF cable. (digital audio) 13...
... Connects to the TV or VCR using a VCR SCART cable. 6. ON/OFF Powers on/off. ETHERNET Ethernet port (for changing video. (default: YPbPr) 7. GB10 User's Manual VIDEO Connects to the TV using a component cable. 10. Note: The rear panel of the TV or VCR using an S/PDIF cable. (digital audio) 13...

User Manual
Page 12
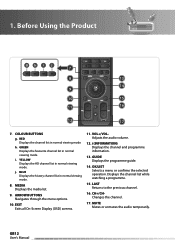
.... STOP Stops a recording or goes to 14.7 Remote Control Code List. 1 5 2 a bc 3 6 4 def 1. MODE Changes the mode from PVR, TV, audio and DVD. 4. GB11 User's Manual b.
.... STOP Stops a recording or goes to 14.7 Remote Control Code List. 1 5 2 a bc 3 6 4 def 1. MODE Changes the mode from PVR, TV, audio and DVD. 4. GB11 User's Manual b.
User Manual
Page 13
.... MUTE Mutes or unmutes the audio temporarily. h. BLUE Displays the history channel list in normal viewing mode. VOL+/VOLAdjusts the audio volume. 12. GB12 User's Manual i. GREEN Displays the favourite channel list in normal viewing mode. 8. RED Displays the channel list in normal viewing mode. CH+/CHChanges the channel. 17. YELLOW...
.... MUTE Mutes or unmutes the audio temporarily. h. BLUE Displays the history channel list in normal viewing mode. VOL+/VOLAdjusts the audio volume. 12. GB12 User's Manual i. GREEN Displays the favourite channel list in normal viewing mode. 8. RED Displays the channel list in normal viewing mode. CH+/CHChanges the channel. 17. YELLOW...
User Manual
Page 14
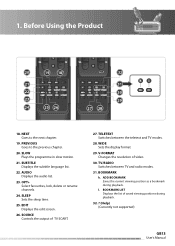
..., lock, delete or rename channels. 24. BOOKMARK k. ADD BOOKMARK Saves the current viewing position as a bookmark during playback. 32. ? (Help) (Currently not supported) GB13 User's Manual Before Using the Product 20 19 18 21 22 23 24 25 26 32 31 30 29 27 28 kl 18. SLOW Plays the programme...
..., lock, delete or rename channels. 24. BOOKMARK k. ADD BOOKMARK Saves the current viewing position as a bookmark during playback. 32. ? (Help) (Currently not supported) GB13 User's Manual Before Using the Product 20 19 18 21 22 23 24 25 26 32 31 30 29 27 28 kl 18. SLOW Plays the programme...
User Manual
Page 15
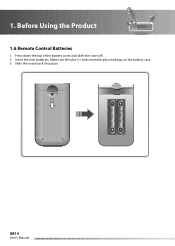
Press down the top of the battery cover and slide the cover off. 2. Insert the new batteries. Make sure the plus (+) ends meet the plus markings on the battery case. 3. GB14 User's Manual iˆ››Œ™ 1. Slide the cover back into place. Before Using the Product 1.6 Remote Control Batteries 1.
Press down the top of the battery cover and slide the cover off. 2. Insert the new batteries. Make sure the plus (+) ends meet the plus markings on the battery case. 3. GB14 User's Manual iˆ››Œ™ 1. Slide the cover back into place. Before Using the Product 1.6 Remote Control Batteries 1.
User Manual
Page 16
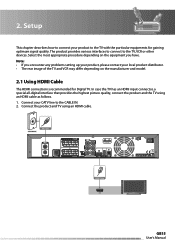
... that provides the highest picture quality, connect the product and the TV using an HDMI cable. Cable Outlet RF Cable HDMI Cable HDMI GB15 User's Manual Select the most appropriate procedure depending on the manufacturer and model. 2.1 Using HDMI Cable The HDMI connection is recommended for gaining optimum signal quality. 2. Connect...
... that provides the highest picture quality, connect the product and the TV using an HDMI cable. Cable Outlet RF Cable HDMI Cable HDMI GB15 User's Manual Select the most appropriate procedure depending on the manufacturer and model. 2.1 Using HDMI Cable The HDMI connection is recommended for gaining optimum signal quality. 2. Connect...
User Manual
Page 17
... an HDMI to the TV. 4. Connect the product and the Dolby Digital decoder using an S/PDIF cable. Cable Outlet RF Cable HDMI Cable GB16 User's Manual 2.
... an HDMI to the TV. 4. Connect the product and the Dolby Digital decoder using an S/PDIF cable. Cable Outlet RF Cable HDMI Cable GB16 User's Manual 2.

User Manual
Page 18
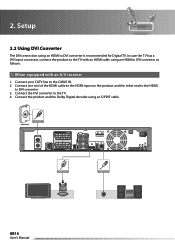
... the DVI converter to DVI converter. 4. Note: You can also connect the product to the CABLE IN. 2. Cable Outlet RF Cable HDMI Cable GB17 User's Manual Connect your CATV line to the TV using an RCA cable. 3. When there is no A/V receiver available In case you are not equipped with an...
... the DVI converter to DVI converter. 4. Note: You can also connect the product to the CABLE IN. 2. Cable Outlet RF Cable HDMI Cable GB17 User's Manual Connect your CATV line to the TV using an RCA cable. 3. When there is no A/V receiver available In case you are not equipped with an...
User Manual
Page 19
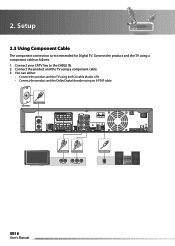
Cable Outlet RF Cable RCA Cable Component Cable L AUDIO R COMPONENT IN S/PDIF Cable S/PDIF GB18 User's Manual Setup 2.3 Using Component Cable The component connection is recommended for Digital TV. Connect the product and the TV using a component cable as follows. 1. Connect the product and the TV using a component cable. 3. Connect your CATV line to the CABLE IN. 2. 2. You can either: • Connect the product and the TV using an RCA cable (Audio L/R). • Connect the product and the Dolby Digital decoder using an S/PDIF cable.
Cable Outlet RF Cable RCA Cable Component Cable L AUDIO R COMPONENT IN S/PDIF Cable S/PDIF GB18 User's Manual Setup 2.3 Using Component Cable The component connection is recommended for Digital TV. Connect the product and the TV using a component cable as follows. 1. Connect the product and the TV using a component cable. 3. Connect your CATV line to the CABLE IN. 2. 2. You can either: • Connect the product and the TV using an RCA cable (Audio L/R). • Connect the product and the Dolby Digital decoder using an S/PDIF cable.
User Manual
Page 20
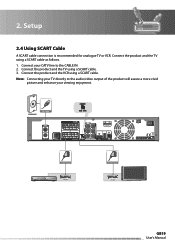
Connect the product and the VCR using a SCART cable. 3. Cable Outlet RF Cable SCART Cable VCR SCART SCART Cable TV SCART GB19 User's Manual 2. Setup 2.4 Using SCART Cable A SCART cable connection is recommended for analogue TV or VCR. Connect your viewing enjoyment. Connect the product and the TV using a SCART cable. Connect the product and the TV using a SCART cable as follows. 1. Note: Connecting your TV directly to the audio/video output of the product will assure a more vivid picture and enhance your CATV line to the CABLE IN. 2.
Connect the product and the VCR using a SCART cable. 3. Cable Outlet RF Cable SCART Cable VCR SCART SCART Cable TV SCART GB19 User's Manual 2. Setup 2.4 Using SCART Cable A SCART cable connection is recommended for analogue TV or VCR. Connect your viewing enjoyment. Connect the product and the TV using a SCART cable. Connect the product and the TV using a SCART cable as follows. 1. Note: Connecting your TV directly to the audio/video output of the product will assure a more vivid picture and enhance your CATV line to the CABLE IN. 2.

User Manual
Page 21
Setup 2.5 Powering On 1. GB20 User's Manual Connect the power cord of the product. 3. Turn on by pressing the STANDBY button of the remote control or the STANDBY button at the back left side of the product to a wall outlet. 2. 2. Power on the power switch located at the front of the product.
Setup 2.5 Powering On 1. GB20 User's Manual Connect the power cord of the product. 3. Turn on by pressing the STANDBY button of the remote control or the STANDBY button at the back left side of the product to a wall outlet. 2. 2. Power on the power switch located at the front of the product.


