
User Guide
Page 1
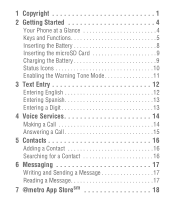
1 Copyright 1 2 Getting Started 4 Your Phone at a Glance 4 Keys and Functions 5 Inserting the Battery 8 Inserting the microSD Card 9 Charging the Battery 9 Status Icons 10 Enabling the Warning Tone Mode 11 3 Text Entry 12 Entering English 12 Entering Spanish 13 Entering a Digit 13 4 Voice Services 14 Making a Call 14 Answering a Call 15 5 Contacts 16 Adding a Contact 16 Searching for a Contact 16 6 Messaging 17 Writing and Sending a Message 17 Reading a Message 17 7 @metro App Storesm 18
1 Copyright 1 2 Getting Started 4 Your Phone at a Glance 4 Keys and Functions 5 Inserting the Battery 8 Inserting the microSD Card 9 Charging the Battery 9 Status Icons 10 Enabling the Warning Tone Mode 11 3 Text Entry 12 Entering English 12 Entering Spanish 13 Entering a Digit 13 4 Voice Services 14 Making a Call 14 Answering a Call 15 5 Contacts 16 Adding a Contact 16 Searching for a Contact 16 6 Messaging 17 Writing and Sending a Message 17 Reading a Message 17 7 @metro App Storesm 18
User Guide
Page 2
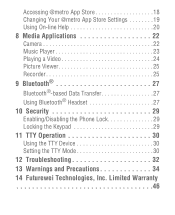
Accessing @metro App Store 18 Changing Your @metro App Store Settings 19 Using On-line Help 20 8 Media Applications 22 Camera 22 Music Player 23 Playing a Video 24 Picture Viewer 25 Recorder 25 9 Bluetooth 27 Bluetooth®-based Data Transfer 27 Using Bluetooth® Headset 27 10 Security 29 Enabling/Disabling the Phone Lock 29 Locking the Keypad 29 11 TTY Operation 30 Using the TTY Device 30 Setting the TTY Mode 30 12 Troubleshooting 32 13 Warnings and Precautions 34 14 Futurewei Technologies, Inc. Limited Warranty 46
Accessing @metro App Store 18 Changing Your @metro App Store Settings 19 Using On-line Help 20 8 Media Applications 22 Camera 22 Music Player 23 Playing a Video 24 Picture Viewer 25 Recorder 25 9 Bluetooth 27 Bluetooth®-based Data Transfer 27 Using Bluetooth® Headset 27 10 Security 29 Enabling/Disabling the Phone Lock 29 Locking the Keypad 29 11 TTY Operation 30 Using the TTY Device 30 Setting the TTY Mode 30 12 Troubleshooting 32 13 Warnings and Precautions 34 14 Futurewei Technologies, Inc. Limited Warranty 46
User Guide
Page 7
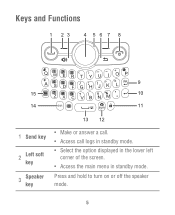
Press and hold to turn on or off the speaker mode. 5 Keys and Functions 1 23 4 56 7 8 9 15 10 14 11 1 Send key 2 Left soft key 3 Speaker key 13 12 • Make or answer a call. • Access call logs in standby mode. • Select the option displayed in the lower left corner of the screen. • Access the main menu in standby mode.
Press and hold to turn on or off the speaker mode. 5 Keys and Functions 1 23 4 56 7 8 9 15 10 14 11 1 Send key 2 Left soft key 3 Speaker key 13 12 • Make or answer a call. • Access call logs in standby mode. • Select the option displayed in the lower left corner of the screen. • Access the main menu in standby mode.
User Guide
Page 8
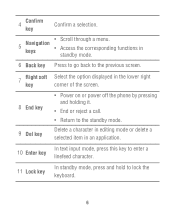
... displayed in an application. 10 Enter key In text input mode, press this key to enter a linefeed character. 11 Lock key In standby mode, press and hold to the standby mode. Delete a character in editing mode or delete a selected item in the lower right corner of the screen. 8 End key 9 Del key • Power on or power off the phone by pressing and holding it. • End or reject a call. • Return to lock...
... displayed in an application. 10 Enter key In text input mode, press this key to enter a linefeed character. 11 Lock key In standby mode, press and hold to the standby mode. Delete a character in editing mode or delete a selected item in the lower right corner of the screen. 8 End key 9 Del key • Power on or power off the phone by pressing and holding it. • End or reject a call. • Return to lock...
User Guide
Page 11
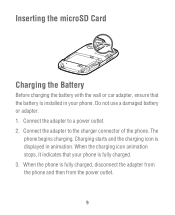
... charging icon animation stops, it indicates that the battery is displayed in your phone is fully charged, disconnect the adapter from the phone and then from the power outlet. 9 When the phone is fully charged. 3. The phone begins charging. Connect the adapter to a power outlet. 2. Do not use a damaged battery or adapter. 1. Connect the adapter to the charger connector of the phone. Charging starts and the charging icon is installed in animation. Inserting the microSD Card Charging...
... charging icon animation stops, it indicates that the battery is displayed in your phone is fully charged, disconnect the adapter from the phone and then from the power outlet. 9 When the phone is fully charged. 3. The phone begins charging. Connect the adapter to a power outlet. 2. Do not use a damaged battery or adapter. 1. Connect the adapter to the charger connector of the phone. Charging starts and the charging icon is installed in animation. Inserting the microSD Card Charging...
User Guide
Page 12
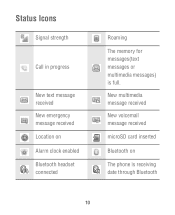
New multimedia message received New voicemail message received microSD card inserted Bluetooth on Alarm clock enabled Bluetooth headset connected Roaming The memory for messages(text messages or multimedia messages) is receiving date through Bluetooth 10 Status Icons Signal strength Call in progress New text message received New emergency message received Location on The phone is full.
New multimedia message received New voicemail message received microSD card inserted Bluetooth on Alarm clock enabled Bluetooth headset connected Roaming The memory for messages(text messages or multimedia messages) is receiving date through Bluetooth 10 Status Icons Signal strength Call in progress New text message received New emergency message received Location on The phone is full.
User Guide
Page 13
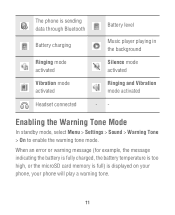
...an error or warning message (for example, the message indicating the battery is fully charged, the battery temperature is too high, or the microSD card memory is full) is sending data through Bluetooth Battery level Battery charging Music player playing in the background Ringing mode activated Silence mode activated Vibration mode activated Ringing and Vibration mode activated Headset connected -- Enabling the Warning Tone Mode In standby mode, select Menu > Settings > Sound > Warning Tone > On to enable the warning tone mode. The phone is displayed on your phone, your phone will...
...an error or warning message (for example, the message indicating the battery is fully charged, the battery temperature is too high, or the microSD card memory is full) is sending data through Bluetooth Battery level Battery charging Music player playing in the background Ringing mode activated Silence mode activated Vibration mode activated Ringing and Vibration mode activated Headset connected -- Enabling the Warning Tone Mode In standby mode, select Menu > Settings > Sound > Warning Tone > On to enable the warning tone mode. The phone is displayed on your phone, your phone will...
User Guide
Page 14
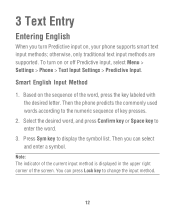
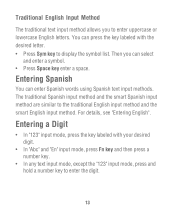
... sequence of key presses. 2. To turn Predictive input on, your phone supports smart text input methods; Select the desired word, and press Confirm key or Space key to display the symbol list. 3 Text Entry Entering English When you can press Lock key to the numeric sequence of the word, press the key labeled with the desired letter. Then the phone predicts the commonly used words according to change the...
... sequence of key presses. 2. To turn Predictive input on, your phone supports smart text input methods; Select the desired word, and press Confirm key or Space key to display the symbol list. 3 Text Entry Entering English When you can press Lock key to the numeric sequence of the word, press the key labeled with the desired letter. Then the phone predicts the commonly used words according to change the...
User Guide
Page 15
... mode, press Fn key and then press a number key. • In any text input mode, except the "123" input mode, press and hold a number key to enter uppercase or lowercase English letters. The traditional Spanish input method and the smart Spanish input method are similar to display the symbol list. For details, see "Entering English". Then you to enter the digit. 13 Entering a Digit • In "123" input mode...
... mode, press Fn key and then press a number key. • In any text input mode, except the "123" input mode, press and hold a number key to enter uppercase or lowercase English letters. The traditional Spanish input method and the smart Spanish input method are similar to display the symbol list. For details, see "Entering English". Then you to enter the digit. 13 Entering a Digit • In "123" input mode...

User Guide
Page 16
... call , press O/+ key to enter the international long-distance code (+), and then enter the country code or region code, area code, and phone number in sequence. • To dial an extension number, enter the phone number, press P/@ key to insert P or press T/( key to insert T, and then enter the extension number. 2. 4 Voice Services Making a Call Dialing via Contacts Select Menu > Contacts, Select a contact, and press Send key to make an international call . In standby mode, enter the phone number. • To make a call. 14 Dialing via Keypad 1. Press Send key to dial the number...
... call , press O/+ key to enter the international long-distance code (+), and then enter the country code or region code, area code, and phone number in sequence. • To dial an extension number, enter the phone number, press P/@ key to insert P or press T/( key to insert T, and then enter the extension number. 2. 4 Voice Services Making a Call Dialing via Contacts Select Menu > Contacts, Select a contact, and press Send key to make an international call . In standby mode, enter the phone number. • To make a call. 14 Dialing via Keypad 1. Press Send key to dial the number...

User Guide
Page 19
... add picture, audio or slide to the message, and the message will be converted to send the message. Select Menu > Messages > Inbox. 2. Select Options > Send to MMS (Multimedia Message Service) mode automatically. 4. Press Navigation keys to scroll to access the contact list and then select one or multiple recipients. 3. Enter one or more recipient's numbers directly, or press Confirm key to a message. Reading a Message To read the message. 17 Select Menu > Messages > Create Message. 2. Note: Your phone supports...
... add picture, audio or slide to the message, and the message will be converted to send the message. Select Menu > Messages > Inbox. 2. Select Options > Send to MMS (Multimedia Message Service) mode automatically. 4. Press Navigation keys to scroll to access the contact list and then select one or multiple recipients. 3. Enter one or more recipient's numbers directly, or press Confirm key to a message. Reading a Message To read the message. 17 Select Menu > Messages > Create Message. 2. Note: Your phone supports...
User Guide
Page 20
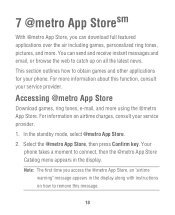
... to connect, then the @metro App Store Catalog menu appears in the display along with instructions on how to remove this function, consult your service provider. You can download full featured applications over the air including games, personalized ring tones, pictures, and more. Select the @metro App Store, then press Confirm key. Accessing @metro App Store Download games, ring tones, e-mail, and more information about this message. 18 For more using...
... to connect, then the @metro App Store Catalog menu appears in the display along with instructions on how to remove this function, consult your service provider. You can download full featured applications over the air including games, personalized ring tones, pictures, and more. Select the @metro App Store, then press Confirm key. Accessing @metro App Store Download games, ring tones, e-mail, and more information about this message. 18 For more using...
User Guide
Page 21
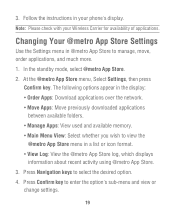
... wish to view the @metro App Store menu in @metro App Store to manage, move, order applications, and much more. 1. In the standby mode, select @metro App Store. 2. 3. Changing Your @metro App Store Settings Use the Settings menu in a list or icon format. • View Log: View the @metro App Store log, which displays information about recent activity using @metro App Store. 3. Note: Please check with your phone's display. Follow the instructions in your Wireless Carrier for...
... wish to view the @metro App Store menu in @metro App Store to manage, move, order applications, and much more. 1. In the standby mode, select @metro App Store. 2. 3. Changing Your @metro App Store Settings Use the Settings menu in a list or icon format. • View Log: View the @metro App Store log, which displays information about recent activity using @metro App Store. 3. Note: Please check with your phone's display. Follow the instructions in your Wireless Carrier for...
User Guide
Page 22
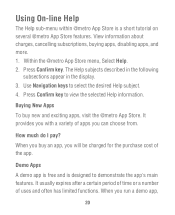
... period of time or a number of the app. The Help subjects described in the following subsections appear in the display. 3. When you can choose from. It provides you with a variety of apps you run a demo app, 20 Use Navigation keys to view the selected Help information. Demo Apps A demo app is free and is a short tutorial on several @metro App Store features. Buying New Apps To buy...
... period of time or a number of the app. The Help subjects described in the following subsections appear in the display. 3. When you can choose from. It provides you with a variety of apps you run a demo app, 20 Use Navigation keys to view the selected Help information. Demo Apps A demo app is free and is a short tutorial on several @metro App Store features. Buying New Apps To buy...
User Guide
Page 24
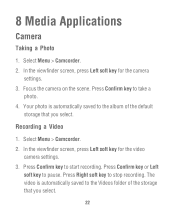
... Confirm key to stop recording. Press Right soft key to start recording. Press Confirm key to pause. Select Menu > Camcorder. 2. Your photo is automatically saved to the album of the storage that you select. 22 Select Menu > Camcorder. 2. In the viewfinder screen, press Left soft key for the video camera settings. 3. Recording a Video 1. In the viewfinder screen, press Left soft key for the camera settings. 3. The video is automatically saved to the Videos folder of the default storage...
... Confirm key to stop recording. Press Right soft key to start recording. Press Confirm key to pause. Select Menu > Camcorder. 2. Your photo is automatically saved to the album of the storage that you select. 22 Select Menu > Camcorder. 2. In the viewfinder screen, press Left soft key for the video camera settings. 3. Recording a Video 1. In the viewfinder screen, press Left soft key for the camera settings. 3. The video is automatically saved to the Videos folder of the default storage...
User Guide
Page 27
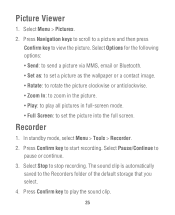
Select Stop to the Recorders folder of the default storage that you select. 4. The sound clip is automatically saved to stop recording. Press Navigation keys to scroll to a picture and then press Confirm key to pause or continue. 3. In standby mode, select Menu > Tools > Recorder. 2. Recorder 1. Picture Viewer 1. Select Pause/Continue to view the picture. Select Options for the following options: • Send: to send a picture via MMS, email or Bluetooth. • Set as: to set a picture as...
Select Stop to the Recorders folder of the default storage that you select. 4. The sound clip is automatically saved to stop recording. Press Navigation keys to scroll to a picture and then press Confirm key to pause or continue. 3. In standby mode, select Menu > Tools > Recorder. 2. Recorder 1. Picture Viewer 1. Select Pause/Continue to view the picture. Select Options for the following options: • Send: to send a picture via MMS, email or Bluetooth. • Set as: to set a picture as...
User Guide
Page 31
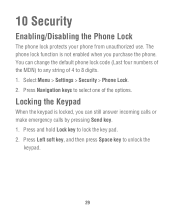
... then press Space key to select one of 4 to lock the key pad. 2. 10 Security Enabling/Disabling the Phone Lock The phone lock protects your phone from unauthorized use. The phone lock function is locked, you purchase the phone. You can still answer incoming calls or make emergency calls by pressing Send key. 1. Select Menu > Settings > Security > Phone Lock. 2. Press and hold Lock key to 8 digits. 1. Locking the Keypad When the keypad is not enabled when you can change the default phone lock code (Last four numbers of the MDN) to...
... then press Space key to select one of 4 to lock the key pad. 2. 10 Security Enabling/Disabling the Phone Lock The phone lock protects your phone from unauthorized use. The phone lock function is locked, you purchase the phone. You can still answer incoming calls or make emergency calls by pressing Send key. 1. Select Menu > Settings > Security > Phone Lock. 2. Press and hold Lock key to 8 digits. 1. Locking the Keypad When the keypad is not enabled when you can change the default phone lock code (Last four numbers of the MDN) to...
User Guide
Page 32
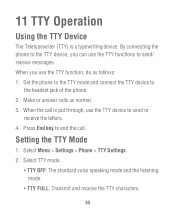
... as normal. 3. Select Menu > Settings > Phone > TTY Settings. 2. Setting the TTY Mode 1. Make or answer calls as follows: 1. When you can use the TTY functions to send or receive the letters. 4. When the call . Press End key to end the call is a typewriting device. By connecting the phone to the headset jack of the phone. 2. Set the phone to the TTY mode and connect the TTY device to the TTY device, you use the TTY device to send/ receive messages.
... as normal. 3. Select Menu > Settings > Phone > TTY Settings. 2. Setting the TTY Mode 1. Make or answer calls as follows: 1. When you can use the TTY functions to send or receive the letters. 4. When the call . Press End key to end the call is a typewriting device. By connecting the phone to the headset jack of the phone. 2. Set the phone to the TTY mode and connect the TTY device to the TTY device, you use the TTY device to send/ receive messages.
User Guide
Page 34
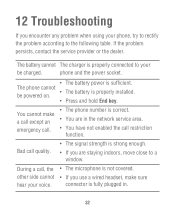
other side cannot • If you use a wired headset, make a call except an emergency call restriction function. If the problem persists, contact the service provider or the dealer. phone and the power socket. connector is fully plugged in the network service area. • You have not enabled the call . • The phone number is properly connected to your voice. The battery cannot The charger is correct. • You are staying...
other side cannot • If you use a wired headset, make a call except an emergency call restriction function. If the problem persists, contact the service provider or the dealer. phone and the power socket. connector is fully plugged in the network service area. • You have not enabled the call . • The phone number is properly connected to your voice. The battery cannot The charger is correct. • You are staying...
User Guide
Page 48
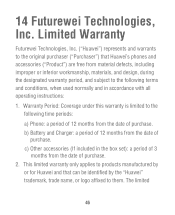
... terms and conditions, when used normally and in the box set): a period of 3 months from material defects, including improper or inferior workmanship, materials, and design, during the designated warranty period, and subject to the following time periods: a) Phone: a period of 12 months from the date of purchase. 2. The limited 46 b) Battery and Charger: a period of...
... terms and conditions, when used normally and in the box set): a period of 3 months from material defects, including improper or inferior workmanship, materials, and design, during the designated warranty period, and subject to the following time periods: a) Phone: a period of 12 months from the date of purchase. 2. The limited 46 b) Battery and Charger: a period of...


