User Manual
Page 9
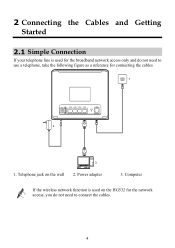
Power adapter 3. Telephone jack on the HG532 for the network access, you do not need to use a telephone, take the following figure as a reference for the broadband network access only and do not need to connect the cables. 4 Computer If the wireless network function is used on the wall 2. 2 Connecting the Cables and Getting Started 2.1 Simple Connection If your telephone line is used for connecting the cables. 1 POWER USB LAN4 LAN3 LAN2 LAN1 ADSL RESET 2 3 1.
Power adapter 3. Telephone jack on the HG532 for the network access, you do not need to use a telephone, take the following figure as a reference for the broadband network access only and do not need to connect the cables. 4 Computer If the wireless network function is used on the wall 2. 2 Connecting the Cables and Getting Started 2.1 Simple Connection If your telephone line is used for connecting the cables. 1 POWER USB LAN4 LAN3 LAN2 LAN1 ADSL RESET 2 3 1.
User Manual
Page 10
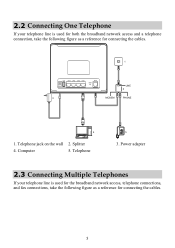
... your telephone line is used for both the broadband network access and a telephone connection, take the following figure as a reference for connecting the cables. 1 POWER USB LAN4 LAN3 LAN2 LAN1 ADSL RESET 3 #### LINE 2 #### #### MODEM PHONE 4 1. Telephone jack on the wall 2.
... your telephone line is used for both the broadband network access and a telephone connection, take the following figure as a reference for connecting the cables. 1 POWER USB LAN4 LAN3 LAN2 LAN1 ADSL RESET 3 #### LINE 2 #### #### MODEM PHONE 4 1. Telephone jack on the wall 2.
User Manual
Page 11
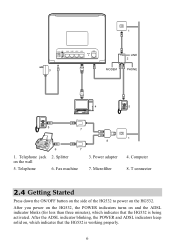
... indicator blinks (for less than three minutes), which indicates that the HG532 is working properly. 6 T connector 2.4 Getting Started Press down the ON/OFF button on the side of the HG532 to power on the wall 5. Telephone 6. Power adapter 7. Splitter on the HG532. 1 POWER USB LAN4 LAN3 LAN2 LAN1 ADSL RESET 3 #### LINE 2 ## ## #### MODEM PHONE 4 5 5 7 6 7 1. Telephone...
... indicator blinks (for less than three minutes), which indicates that the HG532 is working properly. 6 T connector 2.4 Getting Started Press down the ON/OFF button on the side of the HG532 to power on the wall 5. Telephone 6. Power adapter 7. Splitter on the HG532. 1 POWER USB LAN4 LAN3 LAN2 LAN1 ADSL RESET 3 #### LINE 2 ## ## #### MODEM PHONE 4 5 5 7 6 7 1. Telephone...
User Manual
Page 26
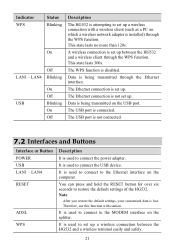
... hold the RESET button for over six seconds to the Ethernet interface on the USB port. It is used to the MODEM interface on which a wireless network adapter is set up between the HG532 and a wireless terminal easily and safely. 21 Indicator WPS Status Blinking On Off... is attempting to set up a wireless connection with caution. The USB port is not set up . LAN4 Blinking On Off USB Blinking On Off Description The HG532 is used to connect to restore the default settings of the HG532. A wireless connection is installed) through the Ethernet interface. This ...
... hold the RESET button for over six seconds to the Ethernet interface on the USB port. It is used to the MODEM interface on which a wireless network adapter is set up between the HG532 and a wireless terminal easily and safely. 21 Indicator WPS Status Blinking On Off... is attempting to set up a wireless connection with caution. The USB port is not set up . LAN4 Blinking On Off USB Blinking On Off Description The HG532 is used to connect to restore the default settings of the HG532. A wireless connection is installed) through the Ethernet interface. This ...


