User Manual
Page 12
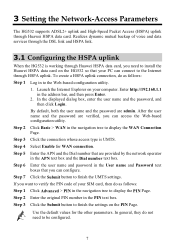
... the connection whose access type is working through HSPA uplink. In general, they do not need to install the Huawei HSPA data card on the HG532 so that your PC can connect to the Internet through Huawei HSPA data card, you want to be configured. 7 3 Setting the Network-Access Parameters The.... 2. Launch the Internet Explorer on the PIN Page. In the displayed dialog box, enter the user name and the password, and then click Login. After the user name and the password are verified, you can access the Web-based configuration utility. Step 4 Select Enable for the other parameters...
... the connection whose access type is working through HSPA uplink. In general, they do not need to install the Huawei HSPA data card on the HG532 so that your PC can connect to the Internet through Huawei HSPA data card, you want to be configured. 7 3 Setting the Network-Access Parameters The.... 2. Launch the Internet Explorer on the PIN Page. In the displayed dialog box, enter the user name and the password, and then click Login. After the user name and the password are verified, you can access the Web-based configuration utility. Step 4 Select Enable for the other parameters...
User Manual
Page 17
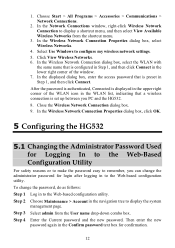
.... Click View Wireless Networks. 6. Choose Start > All Programs > Accessories > Communications > Network Connections. 2. Step 2 Choose Maintenance > Account in to remember, you PC and the HG532. 8. In the Wireless Network Connection Properties dialog box, select Wireless Networks. 4. In the displayed dialog box, enter the access password that is set up between...WLAN icon in the WLAN list, indicating that is configured in Step 1, and then click Connect in the Confirm password text box for login after logging in the navigation tree to configure my wireless network settings. 5.
.... Click View Wireless Networks. 6. Choose Start > All Programs > Accessories > Communications > Network Connections. 2. Step 2 Choose Maintenance > Account in to remember, you PC and the HG532. 8. In the Wireless Network Connection Properties dialog box, select Wireless Networks. 4. In the displayed dialog box, enter the access password that is set up between...WLAN icon in the WLAN list, indicating that is configured in Step 1, and then click Connect in the Confirm password text box for login after logging in the navigation tree to configure my wireless network settings. 5.
User Manual
Page 20
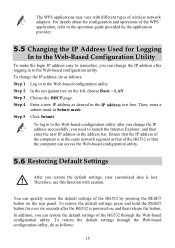
... utility. To restore the default settings, press and hold the RESET button for Logging In to the Web-Based Configuration Utility To make the login IP address easy to remember, you can change the IP address after you change the IP address, do as desired in Subnet mask. The... WPS applications may vary with caution. In addition, you can restore the default settings of the HG532 through the Web-based configuration utility, do as that of the HG532 so that the IP address of wireless network adapters. Therefore, use this function with different types of the computer...
... utility. To restore the default settings, press and hold the RESET button for Logging In to the Web-Based Configuration Utility To make the login IP address easy to remember, you can change the IP address after you change the IP address, do as desired in Subnet mask. The... WPS applications may vary with caution. In addition, you can restore the default settings of the HG532 through the Web-based configuration utility, do as that of the HG532 so that the IP address of wireless network adapters. Therefore, use this function with different types of the computer...

User Manual
Page 21
You can log in to the Web-based configuration utility. Step 3 Choose the Reset page. Step 4 Click the Restore Default Settings button. Step 2 In the navigation tree on the left, choose Maintenance > Device. After the preceding operations, the current page jumps to the login page. Step 1 Log in to the Web-based configuration utility by entering the default user name and password that are admin. 16
You can log in to the Web-based configuration utility. Step 3 Choose the Reset page. Step 4 Click the Restore Default Settings button. Step 2 In the navigation tree on the left, choose Maintenance > Device. After the preceding operations, the current page jumps to the login page. Step 1 Log in to the Web-based configuration utility by entering the default user name and password that are admin. 16


