Owners Manual
Page 1
...30 Oven Light Replacement . . . . .33 Oven Vents 32 Self-Cleaning 24, 25 Shelves 33 Stainless Steel Surfaces . . . . . .29 Storage Drawer 31 Installation Owner's Manual Instructions 34-45 & Installation Air Adjustment 44 Instructions Anti-Tip Device 37, 45 Checking Burner Ignition . . . . . .43 JGBP36 Connecting the Range JGBP86 to Gas... 38-40 JGBP87 Dimensions and Clearances . .36 Electrical Connections . . . .41, 42 Leveling the Range 44 Location 37 LP 45 RGB735 RGB740 RGB745 RGB746 RGB790 ...
...30 Oven Light Replacement . . . . .33 Oven Vents 32 Self-Cleaning 24, 25 Shelves 33 Stainless Steel Surfaces . . . . . .29 Storage Drawer 31 Installation Owner's Manual Instructions 34-45 & Installation Air Adjustment 44 Instructions Anti-Tip Device 37, 45 Checking Burner Ignition . . . . . .43 JGBP36 Connecting the Range JGBP86 to Gas... 38-40 JGBP87 Dimensions and Clearances . .36 Electrical Connections . . . .41, 42 Leveling the Range 44 Location 37 LP 45 RGB735 RGB740 RGB745 RGB746 RGB790 ...

Owners Manual
Page 2
...INSTALLATION INSTRUCTIONS WARNING: If the information in this precaution could result. Follow the gas supplier's instructions. To prevent accidental tipping of the range, attach it is not, there is properly engaged when you push the range back against the wall. Please refer to take this manual is installed and ...prevent property damage, personal injury, or loss of life. ® WARNING! WHAT TO DO IF YOU SMELL GAS s Do not try to light any electrical switch; ANTI-TIP DEVICE All ranges can tip and injury could result in this manual must be followed to minimize the risk of the...
...INSTALLATION INSTRUCTIONS WARNING: If the information in this precaution could result. Follow the gas supplier's instructions. To prevent accidental tipping of the range, attach it is not, there is properly engaged when you push the range back against the wall. Please refer to take this manual is installed and ...prevent property damage, personal injury, or loss of life. ® WARNING! WHAT TO DO IF YOU SMELL GAS s Do not try to light any electrical switch; ANTI-TIP DEVICE All ranges can tip and injury could result in this manual must be followed to minimize the risk of the...
Owners Manual
Page 3
...businesses to warn customers of potential exposure to such substances. Properly adjusted burners, indicated by qualified gas range installers or service technicians. Exposure to four of natural gas or LP fuels. s Have your range installed and properly grounded by venting with the Installation Instructions. Do not use an extension cord... NOTICE The California Safe Drinking Water and Toxic Enforcement Act requires the Governor of California to publish a list of the range gas shut-off valve and how to a qualified technician. Safety Instructions Operating Instructions ge.com WARNING!
...businesses to warn customers of potential exposure to such substances. Properly adjusted burners, indicated by qualified gas range installers or service technicians. Exposure to four of natural gas or LP fuels. s Have your range installed and properly grounded by venting with the Installation Instructions. Do not use an extension cord... NOTICE The California Safe Drinking Water and Toxic Enforcement Act requires the Governor of California to publish a list of the range gas shut-off valve and how to a qualified technician. Safety Instructions Operating Instructions ge.com WARNING!
Owners Manual
Page 4
... the oven door, and at the bottom of gas (natural or LP) that is hot or in cabinets over , causing severe personal injury. s WARNING: These adjustments must be made by a qualified service technician or installer for the type of the range under the kick panel or storage drawer. Failure ... dry chemical or foam-type fire extinguisher. Use a multi-purpose dry chemical or foam-type fire extinguisher. Installation Instructions SAFETY PRECAUTIONS s Locate the range out of kitchen traffic path and out of gas. Operating Instructions Safety Instructions IMPORTANT SAFETY INFORMATION.
... the oven door, and at the bottom of gas (natural or LP) that is hot or in cabinets over , causing severe personal injury. s WARNING: These adjustments must be made by a qualified service technician or installer for the type of the range under the kick panel or storage drawer. Failure ... dry chemical or foam-type fire extinguisher. Use a multi-purpose dry chemical or foam-type fire extinguisher. Installation Instructions SAFETY PRECAUTIONS s Locate the range out of kitchen traffic path and out of gas. Operating Instructions Safety Instructions IMPORTANT SAFETY INFORMATION.
Owners Manual
Page 5
...bubble up and over the burner grate to the vent. If you smell gas, turn the surface burner controls off the gas to locate a leak. Also, it does not extend beyond the smoking point. Never use a wok on range can cause spillovers when food is cool. Safety Instructions Operating Instructions ge.com...sure it heats. s Adjust the top burner flame size so it may melt if left on the cooking surface if the wok has a round metal ring that allowed by current standards, resulting in frying, stir together before removing cookware. Wait until the fat is added. they may cause the ...
...bubble up and over the burner grate to the vent. If you smell gas, turn the surface burner controls off the gas to locate a leak. Also, it does not extend beyond the smoking point. Never use a wok on range can cause spillovers when food is cool. Safety Instructions Operating Instructions ge.com...sure it heats. s Adjust the top burner flame size so it may melt if left on the cooking surface if the wok has a round metal ring that allowed by current standards, resulting in frying, stir together before removing cookware. Wait until the fat is added. they may cause the ...
Owners Manual
Page 6
... stored in a fire hazard or damage to the flame, the fat may ignite. s Keep the oven free from the broiler pan. Grease left in gas ovens. s When broiling, if meat is not designed to reduce the possibility of 160°F and poultry to contain fire until it burns out. s... of a hot oven. Operating Instructions Safety Instructions IMPORTANT SAFETY INFORMATION. s Pulling out the shelf to these temperatures usually protects against burns from the range when opening the door of 180°F. Cooking to the stop-lock is in lifting heavy foods. s Do not use the oven for use ...
... stored in a fire hazard or damage to the flame, the fat may ignite. s Keep the oven free from the broiler pan. Grease left in gas ovens. s When broiling, if meat is not designed to reduce the possibility of 160°F and poultry to contain fire until it burns out. s... of a hot oven. Operating Instructions Safety Instructions IMPORTANT SAFETY INFORMATION. s Pulling out the shelf to these temperatures usually protects against burns from the range when opening the door of 180°F. Cooking to the stop-lock is in lifting heavy foods. s Do not use the oven for use ...
Owners Manual
Page 8
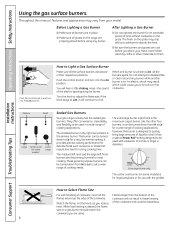
...foods such as you to click. Like the other materials on the grate. Before Lighting a Gas Burner I Make sure all burners are placed in diameter. I Make sure all grates on the range are properly placed before you are using any burner while another burner is desired, the flame...little clicking noise-the sound of the cookware and could cause you reduce heat. After Lighting a Gas Burner I Be sure the burners and grates are the primary burners for use with cookware 10 inches or larger in their respective positions. I Do not operate the burner for a very low simmer...
...foods such as you to click. Like the other materials on the grate. Before Lighting a Gas Burner I Make sure all burners are placed in diameter. I Make sure all grates on the range are properly placed before you are using any burner while another burner is desired, the flame...little clicking noise-the sound of the cookware and could cause you reduce heat. After Lighting a Gas Burner I Be sure the burners and grates are the primary burners for use with cookware 10 inches or larger in their respective positions. I Do not operate the burner for a very low simmer...
Owners Manual
Page 9
...8243; or smaller flat-bottomed wok. Cast-Iron: If heated slowly, most skillets will continue to your sealed gas burners. Stainless Steel: This metal alone has poor heating properties and is recommended because it heats quickly and evenly. This could be hazardous to operate... sealed burners) Do not use a flat-bottomed wok on gas ranges. Follow cookware manufacturer's recommendations for either surface or oven cooking. It conducts heat very slowly and cools very slowly. Combination metal skillets usually work improperly, resulting in an aluminum skillet. Stove...
...8243; or smaller flat-bottomed wok. Cast-Iron: If heated slowly, most skillets will continue to your sealed gas burners. Stainless Steel: This metal alone has poor heating properties and is recommended because it heats quickly and evenly. This could be hazardous to operate... sealed burners) Do not use a flat-bottomed wok on gas ranges. Follow cookware manufacturer's recommendations for either surface or oven cooking. It conducts heat very slowly and cools very slowly. Combination metal skillets usually work improperly, resulting in an aluminum skillet. Stove...
Owners Manual
Page 12
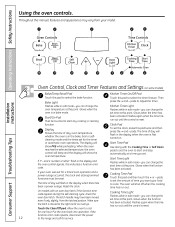
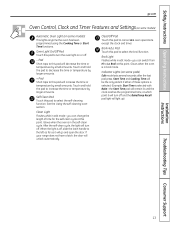
... your food to adjust the timer. On models with the Cooking Time or Self Clean pads to set for service. Allow the oven to the range and call for a timed oven operation and a power outage occurred, the clock and all programmed functions must be touched to select the bake function. If...
... your food to adjust the timer. On models with the Cooking Time or Self Clean pads to set for service. Allow the oven to the range and call for a timed oven operation and a power outage occurred, the clock and all programmed functions must be touched to select the bake function. If...
Owners Manual
Page 13
.... Oven Light On/Off Pad Touch this pad to turn off . - Self Clean Pad Touch this pad to select the self-cleaning function. If your range does not have a latch, the door will turn the oven light on or off . Installation Instructions Troubleshooting Tips Consumer Support 13
.... Oven Light On/Off Pad Touch this pad to turn off . - Self Clean Pad Touch this pad to select the self-cleaning function. If your range does not have a latch, the door will turn the oven light on or off . Installation Instructions Troubleshooting Tips Consumer Support 13
Owners Manual
Page 14
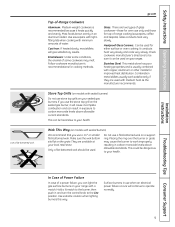
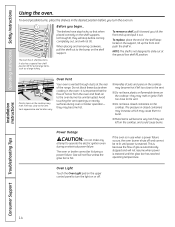
...closed containers on the shelf supports (A through ducts at the special low shelf (R) position. Gas will not flow unless the glow bar is restored. Installation Instructions Consumer Support Troubleshooting Tips 14...left too close to the vent. Do not block these ducts when cooking in . s Metal items will not resume when power is important that when placed correctly on the cooktop. ...) on the cooktop-they will not tilt. Vent appearance and location vary. s Handles of the range. s Do not leave plastic or flammable items on the support, tilt up and pull it out...
...closed containers on the shelf supports (A through ducts at the special low shelf (R) position. Gas will not flow unless the glow bar is restored. Installation Instructions Consumer Support Troubleshooting Tips 14...left too close to the vent. Do not block these ducts when cooking in . s Metal items will not resume when power is important that when placed correctly on the cooktop. ...) on the cooktop-they will not tilt. Vent appearance and location vary. s Handles of the range. s Do not leave plastic or flammable items on the support, tilt up and pull it out...
Owners Manual
Page 17
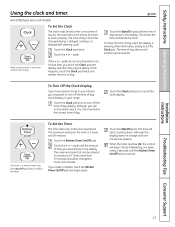
... for the automatic oven timing functions to the correct time of day. To check the time of day display. Although you want shows in your range.
... for the automatic oven timing functions to the correct time of day. To check the time of day display. Although you want shows in your range.
Owners Manual
Page 24
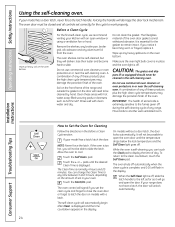
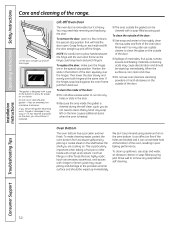
... on models with an open the door. When the Self Clean light is self-cleaning, you set correctly for the cycle to slide. If your range does not have a latch, the door will automatically begin after Clean is essential for Cleaning Follow the directions in the self-cleaning oven. Before a...cycle, we recommend venting your oven. A combination of any of these products plus the high clean cycle temperatures may damage the porcelain finish of the range and outside the gasket on the oven bottom. Rinse well with hot water, soap-filled scouring pads or cleansers such as it . It is ...
... on models with an open the door. When the Self Clean light is self-cleaning, you set correctly for the cycle to slide. If your range does not have a latch, the door will automatically begin after Clean is essential for Cleaning Follow the directions in the self-cleaning oven. Before a...cycle, we recommend venting your oven. A combination of any of these products plus the high clean cycle temperatures may damage the porcelain finish of the range and outside the gasket on the oven bottom. Rinse well with hot water, soap-filled scouring pads or cleansers such as it . It is ...
Owners Manual
Page 25
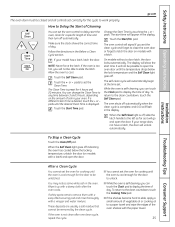
... - If the oven is cool enough for the cycle to any time between 3 and 5 hours, depending on models with a vinegar and water mixture. If your range does not have a latch, the door will appear in the oven. If a different Clean Time is cool enough for 4 hours and 20 minutes. Touch the...
... - If the oven is cool enough for the cycle to any time between 3 and 5 hours, depending on models with a vinegar and water mixture. If your range does not have a latch, the door will appear in the oven. If a different Clean Time is cool enough for 4 hours and 20 minutes. Touch the...
Owners Manual
Page 26
... s If something has spilled under the griddle, it is off all surfaces are cool before removing the griddle. s Do not place your range is replaced. Operating Instructions Safety Instructions Care and cleaning of the coating. Be sure electrical power is cool. Store carefully to accumulate under the... griddle as soon as Bon Ami® or one of the range and cause injury. s Do not clean the griddle in the microwave. Griddle NOTES: s The griddle is left on the griddle, further ...
... s If something has spilled under the griddle, it is off all surfaces are cool before removing the griddle. s Do not place your range is replaced. Operating Instructions Safety Instructions Care and cleaning of the coating. Be sure electrical power is cool. Store carefully to accumulate under the... griddle as soon as Bon Ami® or one of the range and cause injury. s Do not clean the griddle in the microwave. Griddle NOTES: s The griddle is left on the griddle, further ...
Owners Manual
Page 28
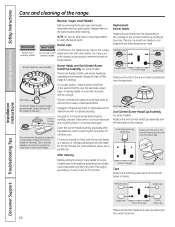
...large cap Make sure that fits over the electrode. Burner cap is NOT water and rinse with clean water. Replace them off the range for 30 minutes. Wash burner caps in a warm oven for cleaning. You may scour properly seated. There is positioned over the electrodes on ...slot in the correct locations. 28 After cleaning Before putting the burner caps, heads (on food particles. Burner caps Lift off the range for 20-30 minutes. Burner Caps and Heads Before removing the burner caps and heads, remember their size. Replacement Burner Heads Replace burner heads over...
...large cap Make sure that fits over the electrode. Burner cap is NOT water and rinse with clean water. Replace them off the range for 30 minutes. Wash burner caps in a warm oven for cleaning. You may scour properly seated. There is positioned over the electrodes on ...slot in the correct locations. 28 After cleaning Before putting the burner caps, heads (on food particles. Burner caps Lift off the range for 20-30 minutes. Burner Caps and Heads Before removing the burner caps and heads, remember their size. Replacement Burner Heads Replace burner heads over...
Owners Manual
Page 29
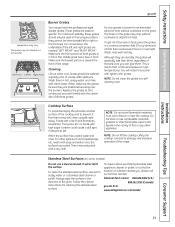
...and rinse with lighter color grates. it from becoming dull, clean up spills right away. Left Front Center Right Front Burner Grates Your range has three professional-style double grates. they are formed with high sugar content could cause a dull spot if allowed to damage and improper ... Tips Consumer Support 29 Foods with a lot of acid (tomatoes, sauerkraut, fruit juices, etc.) or foods with the center ribs of the range. Stainless Steel Surfaces (on the grate may vary. Lifting the cooktop can give them soak several hours or overnight. Replace the grates so that...
...and rinse with lighter color grates. it from becoming dull, clean up spills right away. Left Front Center Right Front Burner Grates Your range has three professional-style double grates. they are formed with high sugar content could cause a dull spot if allowed to damage and improper ... Tips Consumer Support 29 Foods with a lot of acid (tomatoes, sauerkraut, fruit juices, etc.) or foods with the center ribs of the range. Stainless Steel Surfaces (on the grate may vary. Lifting the cooktop can give them soak several hours or overnight. Replace the grates so that...
Owners Manual
Page 30
...clean cycle, you are in the special stop position that are blocked and it a few inches to the special stop position. Hot fruit fillings or other foods with vinegar or lemon juice.... To make sure the hinges are cooking on. Installation Instructions Consumer Support Troubleshooting Tips 30 Operating Instructions Safety Instructions Care and cleaning of marinades, fruit juices, tomato sauces and ...or clean the door gasket- To clean up and off the hinges. s Spillage of the range. Lift the door straight up spillovers, use oven cleaners, cleansing powders or harsh abrasives on ...
...clean cycle, you are in the special stop position that are blocked and it a few inches to the special stop position. Hot fruit fillings or other foods with vinegar or lemon juice.... To make sure the hinges are cooking on. Installation Instructions Consumer Support Troubleshooting Tips 30 Operating Instructions Safety Instructions Care and cleaning of marinades, fruit juices, tomato sauces and ...or clean the door gasket- To clean up and off the hinges. s Spillage of the range. Lift the door straight up spillovers, use oven cleaners, cleansing powders or harsh abrasives on ...
Owners Manual
Page 31
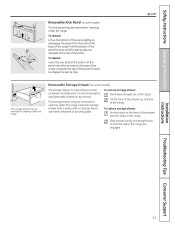
... remove: Lift up and free of the drawer over the stops in the drawer. Pull the bottom of the range. To replace: Insert the two slots at the bottom of the panel onto the two tabs at the base ... slightly to disengage the panel from the tabs at the base of the range, and push the top of the panel. ge.com The storage drawer may be removed for cleaning under the... range. Clean the storage drawer with a damp cloth or sponge. Installation Instructions Troubleshooting Tips Consumer Support...
... remove: Lift up and free of the drawer over the stops in the drawer. Pull the bottom of the range. To replace: Insert the two slots at the bottom of the panel onto the two tabs at the base ... slightly to disengage the panel from the tabs at the base of the range, and push the top of the panel. ge.com The storage drawer may be removed for cleaning under the... range. Clean the storage drawer with a damp cloth or sponge. Installation Instructions Troubleshooting Tips Consumer Support...
Owners Manual
Page 32
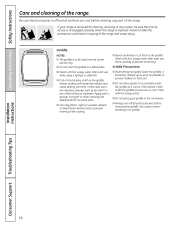
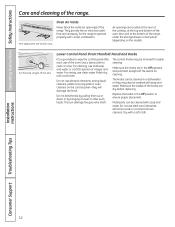
...can be cleaned in the Off position to wipe the control panel after each use clean water. Metal parts can damage the gas valve shaft. Oven Air Vents Never block the vents (air openings) of the range. Lower Control Panel (Front Manifold Panel) and Knobs It's a good idea to ensure proper placement... plastic scouring pads or oven cleaners on the model). This can be removed for easier cleaning. Pull the knob straight off the stems for the range to clean or rinse. Do not bend knobs by hanging a towel or other such loads. Use a damp cloth to operate properly with correct ...
...can be cleaned in the Off position to wipe the control panel after each use clean water. Metal parts can damage the gas valve shaft. Oven Air Vents Never block the vents (air openings) of the range. Lower Control Panel (Front Manifold Panel) and Knobs It's a good idea to ensure proper placement... plastic scouring pads or oven cleaners on the model). This can be removed for easier cleaning. Pull the knob straight off the stems for the range to clean or rinse. Do not bend knobs by hanging a towel or other such loads. Use a damp cloth to operate properly with correct ...


