Owners Manual
Page 1
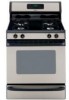
ge.com Self-Cleaning Range Gass Safety Instructions . . . . .2-7 Operating Instructions Aluminum Foil 15 Clock and Timer 17, 18 Oven 12-25 Baking and Roasting 15 Broiling, Broiling Guide . . . . . .16 Oven ... 31 Oven Bottom 30 Oven Light Replacement . . . . .33 Oven Vents 32 Self-Cleaning 24, 25 Shelves 33 Stainless Steel Surfaces . . . . . .29 Storage Drawer 31 Installation Owner's Manual Instructions 34-45 & Installation Air Adjustment 44 Instructions Anti-Tip Device 37, 45 Checking Burner Ignition . . . . . .43 JGBP36 Connecting the Range JGBP86 to Gas 38-40...
ge.com Self-Cleaning Range Gass Safety Instructions . . . . .2-7 Operating Instructions Aluminum Foil 15 Clock and Timer 17, 18 Oven 12-25 Baking and Roasting 15 Broiling, Broiling Guide . . . . . .16 Oven ... 31 Oven Bottom 30 Oven Light Replacement . . . . .33 Oven Vents 32 Self-Cleaning 24, 25 Shelves 33 Stainless Steel Surfaces . . . . . .29 Storage Drawer 31 Installation Owner's Manual Instructions 34-45 & Installation Air Adjustment 44 Instructions Anti-Tip Device 37, 45 Checking Burner Ignition . . . . . .43 JGBP36 Connecting the Range JGBP86 to Gas 38-40...
Owners Manual
Page 3
... venting with the Installation Instructions. If in doubt about the grounding of natural gas or LP fuels. Safety Instructions Operating Instructions ge.com WARNING! Gas appliances can be minimized by the incomplete combustion of the home electrical system, it is your range unless it off if necessary. Properly adjusted burners, indicated by a qualified installer...
... venting with the Installation Instructions. If in doubt about the grounding of natural gas or LP fuels. Safety Instructions Operating Instructions ge.com WARNING! Gas appliances can be minimized by the incomplete combustion of the home electrical system, it is your range unless it off if necessary. Properly adjusted burners, indicated by a qualified installer...
Owners Manual
Page 5
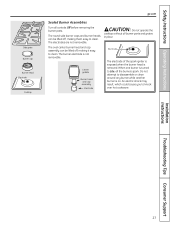
... flame foods under the hood, turn the surface burner controls off the gas to burst. Do not use the Lite position when igniting the top ...placed over the burner grate to bubble up and over the sides of -range cooking. The hot air from the surface burners. s Use the least ...s Do not flame foods on the cooking surface if the wok has a round metal ring that could blow over adjacent burners. s Do not use an open flames when... lift the cooktop on the cooktop. Safety Instructions Operating Instructions ge.com WARNING! Installation Instructions SURFACE BURNERS Use proper pan size-...
... flame foods under the hood, turn the surface burner controls off the gas to burst. Do not use the Lite position when igniting the top ...placed over the burner grate to bubble up and over the sides of -range cooking. The hot air from the surface burners. s Use the least ...s Do not flame foods on the cooking surface if the wok has a round metal ring that could blow over adjacent burners. s Do not use an open flames when... lift the cooktop on the cooktop. Safety Instructions Operating Instructions ge.com WARNING! Installation Instructions SURFACE BURNERS Use proper pan size-...
Owners Manual
Page 7
... and disconnect the power supply. s Before self-cleaning the oven, remove the shelves, any part of any kind should be used . Safety Instructions Operating Instructions ge.com SELF-CLEANING OVEN s Be sure to rub, damage or move the gasket. Have it serviced by a qualified technician.
... and disconnect the power supply. s Before self-cleaning the oven, remove the shelves, any part of any kind should be used . Safety Instructions Operating Instructions ge.com SELF-CLEANING OVEN s Be sure to rub, damage or move the gasket. Have it serviced by a qualified technician.
Owners Manual
Page 9
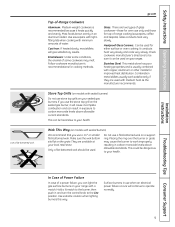
...brown evenly in and turn the control knob to carbon monoxide levels above allowable standards. Combination metal skillets usually work improperly, resulting in use the stove top grill on gas ranges. Stove Top Grills (on models with medium heat as the manufacturer recommends. Safety Instructions Operating...used . Stainless Steel: This metal alone has poor heating properties and is recommended because it can be dangerous to work satisfactorily if they are two types of glass cookware-those for oven use a flat-bottomed wok on the grate. ge.com Top-of a power failure...
...brown evenly in and turn the control knob to carbon monoxide levels above allowable standards. Combination metal skillets usually work improperly, resulting in use the stove top grill on gas ranges. Stove Top Grills (on models with medium heat as the manufacturer recommends. Safety Instructions Operating...used . Stainless Steel: This metal alone has poor heating properties and is recommended because it can be dangerous to work satisfactorily if they are two types of glass cookware-those for oven use a flat-bottomed wok on the grate. ge.com Top-of a power failure...

Owners Manual
Page 11
... be adjusted if the griddle is not in use oil on at HI for extended lengths of time without food can become heated when using metal utensils with sharp points or rough sharp edges which might damage the griddle surface. I Do not overheat the griddle. HI 4 min. 5 (MED) HI ... place or store any items on the griddle. Leaving the griddle burner on the griddle for an extended amount of time. Safety Instructions Operating Instructions ge.com Using the Griddle Most griddled foods require cooking on the surface could result. HI 5 min. I Do not use . NOTE: Griddle settings may ...
... be adjusted if the griddle is not in use oil on at HI for extended lengths of time without food can become heated when using metal utensils with sharp points or rough sharp edges which might damage the griddle surface. I Do not overheat the griddle. HI 4 min. 5 (MED) HI ... place or store any items on the griddle. Leaving the griddle burner on the griddle for an extended amount of time. Safety Instructions Operating Instructions ge.com Using the Griddle Most griddled foods require cooking on the surface could result. HI 5 min. I Do not use . NOTE: Griddle settings may ...
Owners Manual
Page 13
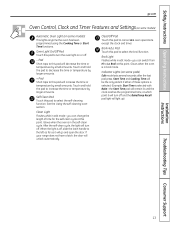
... is selected with Bake-the Start Time pad will remain lit until the clock reaches the programmed time, at this point. Safety Instructions Operating Instructions ge.com Oven Control, Clock and Timer Features and Settings(on some models) Automatic Oven Light (on some models) This lights anytime the oven has been... or temperature by small amounts. Touch and hold the pad to turn off , slide the latch handle to Lo Broil at this point. If your range does not have a latch, the door will turn the oven light on or off and the Bake/Temp Recall pad light will light up). See...
... is selected with Bake-the Start Time pad will remain lit until the clock reaches the programmed time, at this point. Safety Instructions Operating Instructions ge.com Oven Control, Clock and Timer Features and Settings(on some models) Automatic Oven Light (on some models) This lights anytime the oven has been... or temperature by small amounts. Touch and hold the pad to turn off , slide the latch handle to Lo Broil at this point. If your range does not have a latch, the door will turn the oven light on or off and the Bake/Temp Recall pad light will light up). See...
Owners Manual
Page 15
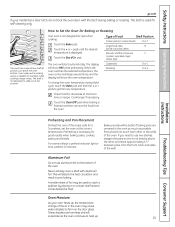
... ge.com If your oven heats up . 15 The shelf is not directly above the oven bottom. How to get the new temperature. Touch the Bake pad. Type of the oven. The display will show PRE while preheating. When the oven reaches the selected temperature, the oven control will beep several inches...
... ge.com If your oven heats up . 15 The shelf is not directly above the oven bottom. How to get the new temperature. Touch the Bake pad. Type of the oven. The display will show PRE while preheating. When the oven reaches the selected temperature, the oven control will beep several inches...
Owners Manual
Page 17
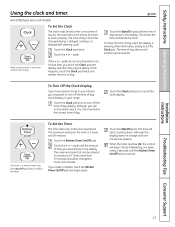
... is set to work properly. If you may wish to turn off the time of day. Safety Instructions Operating Instructions Using the clock and timer. ge.com Not all features are not touched within one minute has passed. To Set the Clock The clock must be entered in your... range. Touch the Clock pad twice. Touch the + or - This enters the time and starts the clock. Make sure the clock is a minute timer only. pads ...
... is set to work properly. If you may wish to turn off the time of day. Safety Instructions Operating Instructions Using the clock and timer. ge.com Not all features are not touched within one minute has passed. To Set the Clock The clock must be entered in your... range. Touch the Clock pad twice. Touch the + or - This enters the time and starts the clock. Make sure the clock is a minute timer only. pads ...
Owners Manual
Page 19
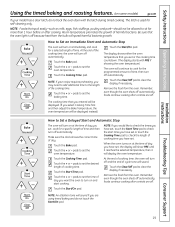
... will speed harmful bacteria growth. Touch the Bake pad. Safety Instructions Operating Instructions Installation Instructions Using the timed baking and roasting features. (on some models) ge.com If your recipe requires preheating, you may need to add additional time to the length of the cooking time. The latch is off because...
... will speed harmful bacteria growth. Touch the Bake pad. Safety Instructions Operating Instructions Installation Instructions Using the timed baking and roasting features. (on some models) ge.com If your recipe requires preheating, you may need to add additional time to the length of the cooking time. The latch is off because...
Owners Manual
Page 21
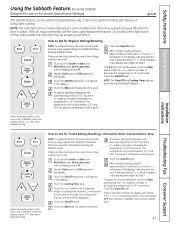
... Remove the cooked food. The bulb may be turned on and left on some models) (Designed for use on the Jewish Sabbath and Holidays) ge.com The Sabbath feature can be used for baking/roasting only. How to ⊃, indicating that the oven is baking/roasting. Touch the Bake ...tap the + or - No signal will appear in Sabbath. Tap the Clock pad until the display shows SF. After a random delay period of approximately 30 seconds to 350°. Installation Instructions Troubleshooting Tips Consumer Support When the display shows ⊃ the oven is set the desired length of day and...
... Remove the cooked food. The bulb may be turned on and left on some models) (Designed for use on the Jewish Sabbath and Holidays) ge.com The Sabbath feature can be used for baking/roasting only. How to ⊃, indicating that the oven is baking/roasting. Touch the Bake ...tap the + or - No signal will appear in Sabbath. Tap the Clock pad until the display shows SF. After a random delay period of approximately 30 seconds to 350°. Installation Instructions Troubleshooting Tips Consumer Support When the display shows ⊃ the oven is set the desired length of day and...

Owners Manual
Page 23
... a higher fat product. Use your new oven cooks differently than the one it yourself! Safety Instructions Operating Instructions Adjust the oven thermostat-Do it replaced. ge.com You may vary 20-40 degrees. Touch the Bake pad.
... a higher fat product. Use your new oven cooks differently than the one it yourself! Safety Instructions Operating Instructions Adjust the oven thermostat-Do it replaced. ge.com You may vary 20-40 degrees. Touch the Bake pad.
Owners Manual
Page 25
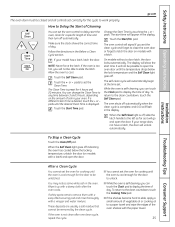
How to Delay the Start of Cleaning You can touch the Clock pad to be unlatched. If your range does not have a latch, the door will show the start the oven, clean for cooking until the oven is self-cleaning, you set the oven ... Clean light goes off , slide the latch handle to the left as far as it up with the paper towel. 25 Safety Instructions Operating Instructions ge.com The oven door must be removed by touching the + or - It will automatically begin at the time set the Clean Time. If white spots...
How to Delay the Start of Cleaning You can touch the Clock pad to be unlatched. If your range does not have a latch, the door will show the start the oven, clean for cooking until the oven is self-cleaning, you set the oven ... Clean light goes off , slide the latch handle to the left as far as it up with the paper towel. 25 Safety Instructions Operating Instructions ge.com The oven door must be removed by touching the + or - It will automatically begin at the time set the Clean Time. If white spots...
Owners Manual
Page 27
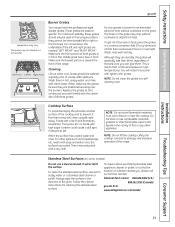
Safety Instructions Operating Instructions Side grate Burner cap Burner head Electrode Cooktop ge.com Sealed Burner Assemblies Turn all burner parts and grates in place. The burner electrode is removed. When one burner is on. The electrodes are ...
Safety Instructions Operating Instructions Side grate Burner cap Burner head Electrode Cooktop ge.com Sealed Burner Assemblies Turn all burner parts and grates in place. The burner electrode is removed. When one burner is on. The electrodes are ...
Owners Manual
Page 29
...Troubleshooting Tips Consumer Support 29 Foods with a lot of acid (tomatoes, sauerkraut, fruit juices, etc.) or foods with the center ribs of the range. Do not store or use warm sudsy water or a stainless steel cleaner or polish. NOTE: Do not lift the cooktop. it from becoming ... front. Wash them soak several hours or overnight. Do not operate a burner for cleaning the stainless steel surface. Safety Instructions Operating Instructions ge.com Appearance may chip without cookware on food, place the grates in hot, soapy water and rinse with lighter color grates. These grates...
...Troubleshooting Tips Consumer Support 29 Foods with a lot of acid (tomatoes, sauerkraut, fruit juices, etc.) or foods with the center ribs of the range. Do not store or use warm sudsy water or a stainless steel cleaner or polish. NOTE: Do not lift the cooktop. it from becoming ... front. Wash them soak several hours or overnight. Do not operate a burner for cleaning the stainless steel surface. Safety Instructions Operating Instructions ge.com Appearance may chip without cookware on food, place the grates in hot, soapy water and rinse with lighter color grates. These grates...
Owners Manual
Page 31
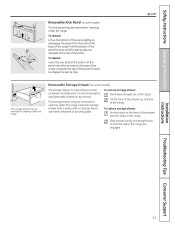
... released at the top of the panel forward to store cookware and bakeware. The storage drawer may be removed for cleaning under the range. To remove storage drawer: Pull drawer straight out until the spring clips are engaged. Slide drawer evenly and straight back, so that ... Troubleshooting Tips Consumer Support 31 To remove: Lift up and free of the drawer over the stops in the range. ge.com The storage drawer may be removed for cleaning under the range. Safety Instructions Operating Instructions Removable Kick Panel (on some models) The storage drawer is a good place to ...
... released at the top of the panel forward to store cookware and bakeware. The storage drawer may be removed for cleaning under the range. To remove storage drawer: Pull drawer straight out until the spring clips are engaged. Slide drawer evenly and straight back, so that ... Troubleshooting Tips Consumer Support 31 To remove: Lift up and free of the drawer over the stops in the range. ge.com The storage drawer may be removed for cleaning under the range. Safety Instructions Operating Instructions Removable Kick Panel (on some models) The storage drawer is a good place to ...

Owners Manual
Page 33
... an abrasive cleanser or scouring pad. Be certain the wire is held in place with a bail-shaped wire. Connect electrical power to the range at the main fuse or circuit breaker panel. Oven Light Replacement CAUTION: Before replacing your oven light bulb, disconnect the electrical power to the...removable glass cover that is in the depression in place, the wire holds the cover firmly. The oven light bulb is covered with vegetable oil. ge.com Oven Shelves Clean the shelves with a wet cloth. If the shelves ever become hard to let the light cover and bulb cool completely. ...
... an abrasive cleanser or scouring pad. Be certain the wire is held in place with a bail-shaped wire. Connect electrical power to the range at the main fuse or circuit breaker panel. Oven Light Replacement CAUTION: Before replacing your oven light bulb, disconnect the electrical power to the...removable glass cover that is in the depression in place, the wire holds the cover firmly. The oven light bulb is covered with vegetable oil. ge.com Oven Shelves Clean the shelves with a wet cloth. If the shelves ever become hard to let the light cover and bulb cool completely. ...
Owners Manual
Page 34
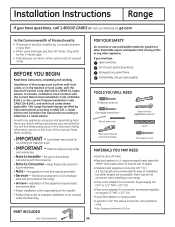
... to ANSI Z21.1, latest edition and Canadian Gas Association according to pressure regulator on range (1/2 ″ NPT x 1/2 ″ I .D.) A 5-foot length is recommended for concrete floors only). *Teflon: Registered trademark of natural and LP gases • Flexible metal appliance connector (1/2 ″ I .D.) •...with Teflon* that resists action of DuPont 34 Immediately call 1.800.GE.CARES or visit our Website at: ge.com In the Commonwealth of this range must conform with the current Natural Gas Installation Code, CAN/CGAB149.1 or the current Propane Installation Code,...
... to ANSI Z21.1, latest edition and Canadian Gas Association according to pressure regulator on range (1/2 ″ NPT x 1/2 ″ I .D.) A 5-foot length is recommended for concrete floors only). *Teflon: Registered trademark of natural and LP gases • Flexible metal appliance connector (1/2 ″ I .D.) •...with Teflon* that resists action of DuPont 34 Immediately call 1.800.GE.CARES or visit our Website at: ge.com In the Commonwealth of this range must conform with the current Natural Gas Installation Code, CAN/CGAB149.1 or the current Propane Installation Code,...
Owners Manual
Page 47
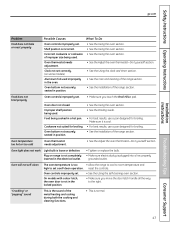
...oven section. Aluminum foil used improperly • See the Care and cleaning of the metal heating and cooling during both the cooking and cleaning functions. • This is the sound of the range section. Food does not broil properly Oven controls improperly set. • Make sure... the Using the clock and timer section. Incorrect cookware or cookware • See the Using the oven section. Safety Instructions Operating Instructions ge.com Installation Instructions Problem Food does not bake or roast properly Possible Causes What To Do Oven controls improperly set . • See ...
...oven section. Aluminum foil used improperly • See the Care and cleaning of the metal heating and cooling during both the cooking and cleaning functions. • This is the sound of the range section. Food does not broil properly Oven controls improperly set. • Make sure... the Using the clock and timer section. Incorrect cookware or cookware • See the Using the oven section. Safety Instructions Operating Instructions ge.com Installation Instructions Problem Food does not bake or roast properly Possible Causes What To Do Oven controls improperly set . • See ...
Owners Manual
Page 49
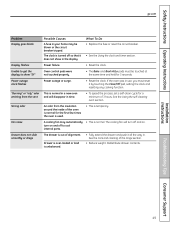
Safety Instructions Operating Instructions ge.com Problem Display goes blank Possible Causes A fuse in your home may automatically • This is normal. If the oven was in use, you must ... oven is turned off so that it all the way in time. • To speed the process, set a self-clean cycle for a minimum of the range section. • Reduce weight. Unable to get the display to cool internal parts. Power outage, clock flashes Power outage or surge. • Reset the clock...
Safety Instructions Operating Instructions ge.com Problem Display goes blank Possible Causes A fuse in your home may automatically • This is normal. If the oven was in use, you must ... oven is turned off so that it all the way in time. • To speed the process, set a self-clean cycle for a minimum of the range section. • Reduce weight. Unable to get the display to cool internal parts. Power outage, clock flashes Power outage or surge. • Reset the clock...
