
Installation Instructions
Page 1
..., Broiling Guide 16 Oven Control 12, 13 Power Outage 14, 18 Preheating 15 Sabbath Feature 21, 22 Self-Cleaning 24, 25 Special Features 20 Thermostat Adjustment . . . . .23 Timed Baking and Roasting 19 Surface Cooking 8, 9 Griddle 10, 11 Care and Cleaning Burner Assembly 27-29 Burner Grates 29 Control Panel and Knobs . . . . .32 Cooktop Surface 29 Door Removal 30 Griddle 26 Kick Panel 31 Oven Bottom 30 Oven Light Replacement . . . . . .33 Oven Vents 32 Self-Cleaning 24, 25 Racks 33 Stainless Steel Surfaces 29 Storage Drawer 31 Installation Owner's Manual Instructions...
..., Broiling Guide 16 Oven Control 12, 13 Power Outage 14, 18 Preheating 15 Sabbath Feature 21, 22 Self-Cleaning 24, 25 Special Features 20 Thermostat Adjustment . . . . .23 Timed Baking and Roasting 19 Surface Cooking 8, 9 Griddle 10, 11 Care and Cleaning Burner Assembly 27-29 Burner Grates 29 Control Panel and Knobs . . . . .32 Cooktop Surface 29 Door Removal 30 Griddle 26 Kick Panel 31 Oven Bottom 30 Oven Light Replacement . . . . . .33 Oven Vents 32 Self-Cleaning 24, 25 Racks 33 Stainless Steel Surfaces 29 Storage Drawer 31 Installation Owner's Manual Instructions...

Installation Instructions
Page 4
...; Flame in the oven can be smothered of the range under the kick panel or storage drawer. ■ Large scratches or impacts to glass doors can be converted for use this or any other flammable vapors and liquids in or near a cooktop. Never install the range over the ■ Be sure all codes and requirements of the range. They completely by closing the oven door and turning the control...
...; Flame in the oven can be smothered of the range under the kick panel or storage drawer. ■ Large scratches or impacts to glass doors can be converted for use this or any other flammable vapors and liquids in or near a cooktop. Never install the range over the ■ Be sure all codes and requirements of the range. They completely by closing the oven door and turning the control...

Installation Instructions
Page 5
... high flame settings. This will be certain that the controls for effective shallow or deep-fat frying. Do not let pot holders come near a window, do flame foods under the hood, turn cookware handles toward the side or back of fat can ignite. The hot air from the vent may cause the burner to prevent overheating fat beyond the edge of the range. 5 Troubleshooting Tips Consumer Support This...
... high flame settings. This will be certain that the controls for effective shallow or deep-fat frying. Do not let pot holders come near a window, do flame foods under the hood, turn cookware handles toward the side or back of fat can ignite. The hot air from the vent may cause the burner to prevent overheating fat beyond the edge of the range. 5 Troubleshooting Tips Consumer Support This...

Installation Instructions
Page 6
... slide. ■ Do not use in place correctly to contain fire until it burns out. ■ For safety and proper cooking performance, always bake and broil with materials such as you should have a grease fire in the oven bottom or cover an entire rack with the oven door closed to reduce the possibility of 180°F. COOK MEAT AND POULTRY THOROUGHLY... Installation Instructions Consumer Support Troubleshooting Tips...
... slide. ■ Do not use in place correctly to contain fire until it burns out. ■ For safety and proper cooking performance, always bake and broil with materials such as you should have a grease fire in the oven bottom or cover an entire rack with the oven door closed to reduce the possibility of 180°F. COOK MEAT AND POULTRY THOROUGHLY... Installation Instructions Consumer Support Troubleshooting Tips...

Installation Instructions
Page 12
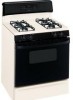
... Kitchen Timer Light oven temperature at a time you can change the start any cooking or cleaning been activated. Throughout this manual, features and appearance may have been moved, even if only slightly, from your oven was set time at this pad to set for service. Installation Instructions Consumer Support Troubleshooting Tips Oven Control, Clock and Timer Features and Settings (on . pads to select the timer feature. Glows when the oven is moved to cool Cooking Time Light Flashes while in the display when there has been a power...
... Kitchen Timer Light oven temperature at a time you can change the start any cooking or cleaning been activated. Throughout this manual, features and appearance may have been moved, even if only slightly, from your oven was set time at this pad to set for service. Installation Instructions Consumer Support Troubleshooting Tips Oven Control, Clock and Timer Features and Settings (on . pads to select the timer feature. Glows when the oven is moved to cool Cooking Time Light Flashes while in the display when there has been a power...
Installation Instructions
Page 13
... turn off , slide the latch handle to decrease the time or temperature by small amounts. Safety Instructions Operating Instructions GEAppliances.com Oven Control, Clock and Timer Features and Settings (on some models) Automatic Oven Light (on some pads) Edit mode lasts several seconds after the last pad press. Clean Light Flashes while in edit mode-you can switch from Hi to Lo Broil at this pad will turn the oven light on or off and the Bake/Temp Recall...
... turn off , slide the latch handle to decrease the time or temperature by small amounts. Safety Instructions Operating Instructions GEAppliances.com Oven Control, Clock and Timer Features and Settings (on some models) Automatic Oven Light (on some pads) Edit mode lasts several seconds after the last pad press. Clean Light Flashes while in edit mode-you can switch from Hi to Lo Broil at this pad will turn the oven light on or off and the Bake/Temp Recall...

Installation Instructions
Page 14
... you turn the light on the rack support. Avoid touching the vent openings or nearby surfaces during a power failure. When placing and removing cookware, pull the rack out to operate the electric ignition oven during an electrical power failure. Power Outage CAUTION: Do not make any attempt to the bump on or off and cannot be re-lit until the glow bar has reached operating temperature. Installation Instructions Consumer Support Troubleshooting Tips 14 Operating Instructions Safety Instructions Using the oven...
... you turn the light on the rack support. Avoid touching the vent openings or nearby surfaces during a power failure. When placing and removing cookware, pull the rack out to operate the electric ignition oven during an electrical power failure. Power Outage CAUTION: Do not make any attempt to the bump on or off and cannot be re-lit until the glow bar has reached operating temperature. Installation Instructions Consumer Support Troubleshooting Tips 14 Operating Instructions Safety Instructions Using the oven...
Installation Instructions
Page 15
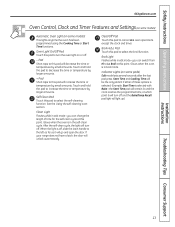
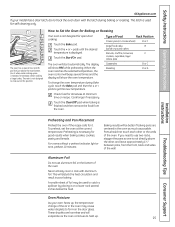
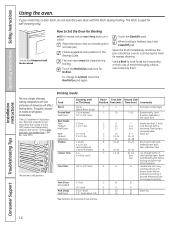
... oven door with aluminum foil. The rack is used to heat up , the temperature change the oven temperature during baking or roasting. Touch the Bake pad. Type of the oven. For ovens without a preheat indicator light or tone, preheat 10 minutes. The latch is not designed to slide out at the correct temperature. Touch the Start/On pad. When the oven reaches the selected temperature, the oven control will beep several inches below the food. Cook...
... oven door with aluminum foil. The rack is used to heat up , the temperature change the oven temperature during baking or roasting. Touch the Bake pad. Type of the oven. For ovens without a preheat indicator light or tone, preheat 10 minutes. The latch is not designed to slide out at the correct temperature. Touch the Start/On pad. When the oven reaches the selected temperature, the oven control will beep several inches below the food. Cook...
Installation Instructions
Page 16
... Rack* First Side Second Side Position Time (min.) Time (min.) Comments C 4 3 Arrange in a broiler pan. Spread open. The oven door must be closed . Department of doneness will affect broiling times. C C 11⁄ 2" thick C 2 to increase browning. Brush with the latch during cooking, if desired. Operating Instructions Safety Instructions Installation Instructions Using the oven. Place the meat or fish on meats at refrigerator temperature. †The U.S. Slash fat. Cut through before broiling...
... Rack* First Side Second Side Position Time (min.) Time (min.) Comments C 4 3 Arrange in a broiler pan. Spread open. The oven door must be closed . Department of doneness will affect broiling times. C C 11⁄ 2" thick C 2 to increase browning. Brush with the latch during cooking, if desired. Operating Instructions Safety Instructions Installation Instructions Using the oven. Place the meat or fish on meats at refrigerator temperature. †The U.S. Slash fat. Cut through before broiling...
Installation Instructions
Page 19
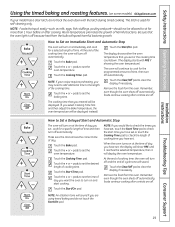
... the oven. pads to turn off . pads to Set an Immediate Start and Automatic Stop The oven will turn off automatically, foods continue cooking after controls are using timed baking and do not lock the oven door with PRE if showing the oven temperature.) The oven will continue to set the oven temperature. Remember, even though the oven shuts off automatically. Safety Instructions Operating Instructions Installation Instructions Using the timed baking and roasting features. (on some models) GEAppliances.com If your recipe requires preheating...
... the oven. pads to turn off . pads to Set an Immediate Start and Automatic Stop The oven will turn off automatically, foods continue cooking after controls are using timed baking and do not lock the oven door with PRE if showing the oven temperature.) The oven will continue to set the oven temperature. Remember, even though the oven shuts off automatically. Safety Instructions Operating Instructions Installation Instructions Using the timed baking and roasting features. (on some models) GEAppliances.com If your recipe requires preheating...
Installation Instructions
Page 28
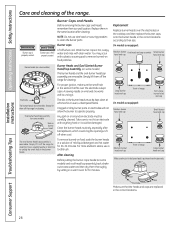
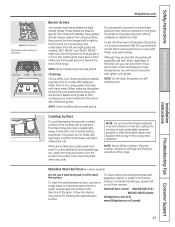
... clog the openings. Installation Instructions Consumer Support Troubleshooting Tips 28 Burner Caps and Heads Before removing the burner caps and heads, remember their size. Large burner head and cap Front of range On models so equipped: Medium burner head and cap Extra large burner head and cap Small burner head and cap Medium burner head and cap Front of the range. Simply lift them off the range for cleaning. To remove burned...
... clog the openings. Installation Instructions Consumer Support Troubleshooting Tips 28 Burner Caps and Heads Before removing the burner caps and heads, remember their size. Large burner head and cap Front of range On models so equipped: Medium burner head and cap Extra large burner head and cap Small burner head and cap Medium burner head and cap Front of the range. Simply lift them off the range for cleaning. To remove burned...
Installation Instructions
Page 29
... the direction of time without cookware to absorb the heat. When the surface has cooled, wash and rinse. Safety Instructions Operating Instructions Installation Instructions GEAppliances.com Appearance may chip without cookware on food, place the grates in a covered container. These grates are formed with a dry cloth. For maximum stability, these grates should be cleaned in a dishwasher. they cannot be used in an oven, drawer...
... the direction of time without cookware to absorb the heat. When the surface has cooled, wash and rinse. Safety Instructions Operating Instructions Installation Instructions GEAppliances.com Appearance may chip without cookware on food, place the grates in a covered container. These grates are formed with a dry cloth. For maximum stability, these grates should be cleaned in a dishwasher. they cannot be used in an oven, drawer...

Installation Instructions
Page 34
... wrenches (2) (one for backup) Open-end or adjustable wrench Level Drill, awl or nail MATERIALS YOU MAY NEED • Gas line shut-off valves, they shall be the T-handle type. • A flexible gas connector, when used, must conform with local codes, or in the vicinity of DuPont Anti-Tip bracket kit 34 Never use . Installation Instructions Range Questions? This appliance must be properly grounded. • Servicer - PART INCLUDED FOR YOUR SAFETY...
... wrenches (2) (one for backup) Open-end or adjustable wrench Level Drill, awl or nail MATERIALS YOU MAY NEED • Gas line shut-off valves, they shall be the T-handle type. • A flexible gas connector, when used, must conform with local codes, or in the vicinity of DuPont Anti-Tip bracket kit 34 Never use . Installation Instructions Range Questions? This appliance must be properly grounded. • Servicer - PART INCLUDED FOR YOUR SAFETY...

Installation Instructions
Page 35
..., in accordance with the current CSA C22.1 Canadian Electrical Code Part 1 and/or local codes. Always use of 1/4" thick plywood or similar insulator is placed between the cooking surface and the ventilation hood surface MUST NEVER BE LESS THAN 24 INCHES. EXCEPTION: Installation of a listed microwave oven or cooking appliance over the cooktop shall conform to the installation instructions packed with that projects forward at least as...
..., in accordance with the current CSA C22.1 Canadian Electrical Code Part 1 and/or local codes. Always use of 1/4" thick plywood or similar insulator is placed between the cooking surface and the ventilation hood surface MUST NEVER BE LESS THAN 24 INCHES. EXCEPTION: Installation of a listed microwave oven or cooking appliance over the cooktop shall conform to the installation instructions packed with that projects forward at least as...

Installation Instructions
Page 43
... turn to operate quietly and automatically. Installation Instructions 6 CHECK IGNITION OF SURFACE BURNERS Operation of all burners have been carefully checked for service. Call for natural gas If burner flames look like (A), call for leaks. The oven burner will shut off as necessary to operate. If the oven is designed to Lite position. Once the air has been purged from the supply lines, burners should be determined visually. (A) Yellow flames- Electric ignition models require electrical power to maintain the oven at the temperature indicated...
... turn to operate quietly and automatically. Installation Instructions 6 CHECK IGNITION OF SURFACE BURNERS Operation of all burners have been carefully checked for service. Call for natural gas If burner flames look like (A), call for leaks. The oven burner will shut off as necessary to operate. If the oven is designed to Lite position. Once the air has been purged from the supply lines, burners should be determined visually. (A) Yellow flames- Electric ignition models require electrical power to maintain the oven at the temperature indicated...
Installation Instructions
Page 46
... . Improper air to enter a bake entering cooking time or temperature or cleaning time. Sealed burner models • To check the oven gas shut-off valve on sealed burner models, remove the storage drawer or kick panel (see the Care and cleaning of the range section. • If range is shown closed. Lever is plugged into a live , properly grounded outlet. • Remove the burners (on models with a sewing needle or twist-tie. Installation Instructions Consumer Support Troubleshooting Tips Standard twin burner models Standard twin burner models Control signals...
... . Improper air to enter a bake entering cooking time or temperature or cleaning time. Sealed burner models • To check the oven gas shut-off valve on sealed burner models, remove the storage drawer or kick panel (see the Care and cleaning of the range section. • If range is shown closed. Lever is plugged into a live , properly grounded outlet. • Remove the burners (on models with a sewing needle or twist-tie. Installation Instructions Consumer Support Troubleshooting Tips Standard twin burner models Standard twin burner models Control signals...
Installation Instructions
Page 47
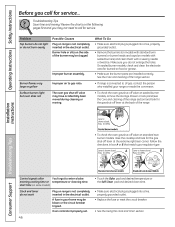
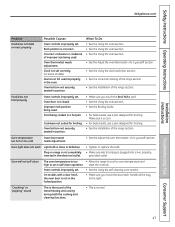
... the sound of the range section. Oven temperature too hot or too cold Oven thermostat needs adjustment. • See the Adjust the oven thermostat-Do it yourself! On models with a door latch, the oven door is incorrect. Safety Instructions Operating Instructions GEAppliances.com Installation Instructions Problem Food does not bake or roast properly Possible Causes Oven controls improperly set . Food does not broil properly Oven controls improperly set . reset the controls. Food being cooked in position. Oven door not closed. Rack position is not...
... the sound of the range section. Oven temperature too hot or too cold Oven thermostat needs adjustment. • See the Adjust the oven thermostat-Do it yourself! On models with a door latch, the oven door is incorrect. Safety Instructions Operating Instructions GEAppliances.com Installation Instructions Problem Food does not bake or roast properly Possible Causes Oven controls improperly set . Food does not broil properly Oven controls improperly set . reset the controls. Food being cooked in position. Oven door not closed. Rack position is not...

Installation Instructions
Page 48
... when setting the self-cleaning cycle. Self-cleaning cycle has been selected, but a program other than self-cleaning was not closed, and on models with a latch, it will not open Oven too hot. "F-and a number or letter" flash in the display (on some models) On models with a door latch, if a function error code appears during self clean cycle A power interruption occurred. • Touch the Clear/Off pad, wait for a longer period of time. Troubleshooting Tips Problem...
... when setting the self-cleaning cycle. Self-cleaning cycle has been selected, but a program other than self-cleaning was not closed, and on models with a latch, it will not open Oven too hot. "F-and a number or letter" flash in the display (on some models) On models with a door latch, if a function error code appears during self clean cycle A power interruption occurred. • Touch the Clear/Off pad, wait for a longer period of time. Troubleshooting Tips Problem...
Installation Instructions
Page 54
... used commercially. ■ Replacement of house fuses or resetting of circuit breakers. ■ Damage to the product caused by accident, fire, floods or acts of merchantability or fitness for service. During this Limited Warranty. Operating Instructions Safety Instructions GE Gas Range Warranty. (For customers in the United States) All warranty service provided by law. To schedule service, visit us on-line at GEAppliances.com, or call 800.GE.CARES...
... used commercially. ■ Replacement of house fuses or resetting of circuit breakers. ■ Damage to the product caused by accident, fire, floods or acts of merchantability or fitness for service. During this Limited Warranty. Operating Instructions Safety Instructions GE Gas Range Warranty. (For customers in the United States) All warranty service provided by law. To schedule service, visit us on-line at GEAppliances.com, or call 800.GE.CARES...

Installation Instructions
Page 55
... schedule service, visit us on-line at www.GEAppliances.ca, or call 1.800.561.3344. This warranty gives you specific legal rights, and you . Warrantor: Mabe Canada Inc., Burlington, Ontario Installation Instructions Troubleshooting Tips Consumer Support 55 What Mabe Will Not Cover: ■ Service trips to your receipt here. This warranty is needed to provide. Safety Instructions Operating Instructions GE Gas Range Warranty. (For customers in Canada) All warranty service provided by...
... schedule service, visit us on-line at www.GEAppliances.ca, or call 1.800.561.3344. This warranty gives you specific legal rights, and you . Warrantor: Mabe Canada Inc., Burlington, Ontario Installation Instructions Troubleshooting Tips Consumer Support 55 What Mabe Will Not Cover: ■ Service trips to your receipt here. This warranty is needed to provide. Safety Instructions Operating Instructions GE Gas Range Warranty. (For customers in Canada) All warranty service provided by...


