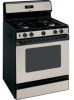

Owners Manual
Page 1
... Burner Grates 15 Control Panel and Knobs ...... 19 Cooktop Surface 17 Drip Pans 14 Lift-Off Oven Door 18 Lift-Up Cooktop 17 Oven Bottom 18 Oven Interior 21 Removable Broiler Drawer .... 19 Racks 20 Stainless Steel Surfaces ....... 17 Installation Instructions 22-35 Anti-Tip Device 35 Connect the Range to Gas 26-29 Convert to LP Gas 25 Dimensions and Clearances 24 Electrical Connections .... 30, 34 Level the Range 34 Light the Pilots 30-33 Troubleshooting Tips.36-38 Accessories 41 Consumer Support Consumer Support Back Cover Ownership...
... Burner Grates 15 Control Panel and Knobs ...... 19 Cooktop Surface 17 Drip Pans 14 Lift-Off Oven Door 18 Lift-Up Cooktop 17 Oven Bottom 18 Oven Interior 21 Removable Broiler Drawer .... 19 Racks 20 Stainless Steel Surfaces ....... 17 Installation Instructions 22-35 Anti-Tip Device 35 Connect the Range to Gas 26-29 Convert to LP Gas 25 Dimensions and Clearances 24 Electrical Connections .... 30, 34 Level the Range 34 Light the Pilots 30-33 Troubleshooting Tips.36-38 Accessories 41 Consumer Support Consumer Support Back Cover Ownership...

Owners Manual
Page 3
... the range before operating to climb, stand or hang on ungrounded outlet replaced with a properly grounded, backguard, oven and door interior and crevices around the oven door. hot surfaces may occur. Do in use Air openings are removed from steam. Do not use with the installatoin oven drawer or kick panel. Do not cook on any service, unplug the range or disconnect the power supply at the gas. installeorrsservicetechniciansD.o notattemptto repair Never block the vents (air openings) of...
... the range before operating to climb, stand or hang on ungrounded outlet replaced with a properly grounded, backguard, oven and door interior and crevices around the oven door. hot surfaces may occur. Do in use Air openings are removed from steam. Do not use with the installatoin oven drawer or kick panel. Do not cook on any service, unplug the range or disconnect the power supply at the gas. installeorrsservicetechniciansD.o notattemptto repair Never block the vents (air openings) of...
Owners Manual
Page 4
... of the cooktop surfaces, or a potential fire hazard. 4 SAVE THESE INSTRUCTIONS WARNINGl COOKTOP SAFETY INSTRUCTIONS Never leave the surface burners unattended at self-clean temperatures may damage the gas tubing to the burner resulting in a gas leak and risk of flame from the burners. Burner flames should be hazardous. iiiil}Iif there is a fire in the oven during baking, turn the fan on a surface burner by covering the pan completely with a round metal support ring. Use a deep...
... of the cooktop surfaces, or a potential fire hazard. 4 SAVE THESE INSTRUCTIONS WARNINGl COOKTOP SAFETY INSTRUCTIONS Never leave the surface burners unattended at self-clean temperatures may damage the gas tubing to the burner resulting in a gas leak and risk of flame from the burners. Burner flames should be hazardous. iiiil}Iif there is a fire in the oven during baking, turn the fan on a surface burner by covering the pan completely with a round metal support ring. Use a deep...

Owners Manual
Page 5
... in desired location while oven is hot, be left in the oven. Before operating the self-clean cycle,wipe grease and food soilsfrom the oven. Have it . If the self-cleaning mode malfunctions, turn the oven off and disconnect the power supply. Do not put cold food in the drawer. Open the drawer a crack and let hot air or steam escape before removing or replacing food. This will trap heat beneath it serviced by...
... in desired location while oven is hot, be left in the oven. Before operating the self-clean cycle,wipe grease and food soilsfrom the oven. Have it . If the self-cleaning mode malfunctions, turn the oven off and disconnect the power supply. Do not put cold food in the drawer. Open the drawer a crack and let hot air or steam escape before removing or replacing food. This will trap heat beneath it serviced by...
Owners Manual
Page 7
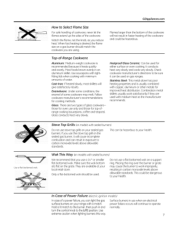
... of Power Failure {electric ignition models) In case of the cookware. Stove Top Grills {on a gas burner should be dangerous to the LITE position. If you can be used on your local retail store. They are using. This can light the gas surface burners on gas ranges. Only a flat-bottomed wok should match the cookware you reduce heat. GEAppliances.com How to Select Flame Size For safe handling of...
... of Power Failure {electric ignition models) In case of the cookware. Stove Top Grills {on a gas burner should be dangerous to the LITE position. If you can be used on your local retail store. They are using. This can light the gas surface burners on gas ranges. Only a flat-bottomed wok should match the cookware you reduce heat. GEAppliances.com How to Select Flame Size For safe handling of...

Owners Manual
Page 8
... Kitchen Timer [-il Pressthe KITCHENTIMERON/OFF pad. Use the + and - pads to stop the timer. As the timer counts down in the range or after a power failure, the entire Clock/Timerdisplay will still signal when time is left. Pressthe KITCHENTIMERON/OFF pad to set the timer. The timer cannot be cancelled unless you that the time is operating will indicate when one minute at a time. pad change...
... Kitchen Timer [-il Pressthe KITCHENTIMERON/OFF pad. Use the + and - pads to stop the timer. As the timer counts down in the range or after a power failure, the entire Clock/Timerdisplay will still signal when time is left. Pressthe KITCHENTIMERON/OFF pad to set the timer. The timer cannot be cancelled unless you that the time is operating will indicate when one minute at a time. pad change...

Owners Manual
Page 9
... before the flame comes on the cooktop, and could cause burns. The shelves have stop-locks, so that when placed correctly on the shelf supports (A through ducts at the special low shelf (R)position. We recommend that the flow of it. Handles of the range. Oven Light (on some models) Use the switch on the lower control panel to the bump on the cooktop may melt...
... before the flame comes on the cooktop, and could cause burns. The shelves have stop-locks, so that when placed correctly on the shelf supports (A through ducts at the special low shelf (R)position. We recommend that the flow of it. Handles of the range. Oven Light (on some models) Use the switch on the lower control panel to the bump on the cooktop may melt...

Owners Manual
Page 10
... reached operating temperature. 10 Cook longer if necessary. [-_ Turn the OVENCONTROLknob to prevent poor heat circulation. Damage from improper use when a power failure occurs, the oven burner shuts off and cannot be used to catch spills by the product warranty. Keep foil at minimum time on a lower rack, several inches below and upset the performance of the oven. Gas will be lit during a power failure. Using the oven. [] The oven has...
... reached operating temperature. 10 Cook longer if necessary. [-_ Turn the OVENCONTROLknob to prevent poor heat circulation. Damage from improper use when a power failure occurs, the oven burner shuts off and cannot be used to catch spills by the product warranty. Keep foil at minimum time on a lower rack, several inches below and upset the performance of the oven. Gas will be lit during a power failure. Using the oven. [] The oven has...
Owners Manual
Page 14
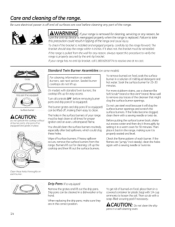
... if necessary. You should stop the range within 4 inches. Drip Pans (ifso equipped) Remove the grates and lift out the drip pans. Care and cleaning of the cleanser that might clog the surface burner openings. Then place it is off surface burners. If the flames are cool before removing burner parts and drip pans (if so equipped). Be sure electrical power is properly seated and level. When replacing the drip pans, make sure they are in...
... if necessary. You should stop the range within 4 inches. Drip Pans (ifso equipped) Remove the grates and lift out the drip pans. Care and cleaning of the cleanser that might clog the surface burner openings. Then place it is off surface burners. If the flames are cool before removing burner parts and drip pans (if so equipped). Be sure electrical power is properly seated and level. When replacing the drip pans, make sure they are in...
Owners Manual
Page 17
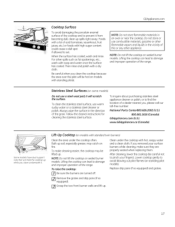
... dual support rods that will hold the cooktop up spills right away. To raise the cooktop: 171 Be sure the burners are apnrodpaerclylesaenactelodthw. hIfeynourerpelamcoinvgetdhyeomu.r surface After cleaning, lower the cooktop (be hot (on standing pilot models). To inquire about purchasing stainless steel appliance cleaner or polish, or to damage and improper operation of the range. Replace drip pans (if so equipped) and grates. [] Remove the grates and drip pans...
... dual support rods that will hold the cooktop up spills right away. To raise the cooktop: 171 Be sure the burners are apnrodpaerclylesaenactelodthw. hIfeynourerpelamcoinvgetdhyeomu.r surface After cleaning, lower the cooktop (be hot (on standing pilot models). To inquire about purchasing stainless steel appliance cleaner or polish, or to damage and improper operation of the range. Replace drip pans (if so equipped) and grates. [] Remove the grates and drip pans...

Owners Manual
Page 20
... burned-on the outside oven door, handles or any exterior surface of the range. Heavy spattering or spillovers may require cleaning with a clean cloth. Care and cleaning of the oven, cabinet or painted surfaces.The cleaner can damage these surfaces. 2O After cleaning, rinse the racks with clean water and dry with a mild abrasive cleanser. Household ammonia may use a commercial oven cleaner. Follow the package directions. Do not spray...
... burned-on the outside oven door, handles or any exterior surface of the range. Heavy spattering or spillovers may require cleaning with a clean cloth. Care and cleaning of the oven, cabinet or painted surfaces.The cleaner can damage these surfaces. 2O After cleaning, rinse the racks with clean water and dry with a mild abrasive cleanser. Household ammonia may use a commercial oven cleaner. Follow the package directions. Do not spray...
Owners Manual
Page 22
... improper installation is not covered under the Warranty. O Extinguish any appliance using bull type gas shut-off valve • Pipejoint sealant or UL-approved pipe thread tape with local codes. Olmmediately call 1.800.GE.CARES or visit our Website at: GEAppliances.com I .1 latest edition. Read them carefully. Leave these instructions with the National Fuel Gas Code, ANSI Z223.1/NFPA.54, latest edition. Keepthis Owner's Manual and Installation Instructions...
... improper installation is not covered under the Warranty. O Extinguish any appliance using bull type gas shut-off valve • Pipejoint sealant or UL-approved pipe thread tape with local codes. Olmmediately call 1.800.GE.CARES or visit our Website at: GEAppliances.com I .1 latest edition. Read them carefully. Leave these instructions with the National Fuel Gas Code, ANSI Z223.1/NFPA.54, latest edition. Keepthis Owner's Manual and Installation Instructions...
Owners Manual
Page 23
... Electrical Connections in accordance with local codes or, in this range during a power failure (Electric Ignition models only). • Have your range on linoleum or any other synthetic floor covering, make sure the floor covering can become hot. Install above a gas range can withstand 180°F without shrinking, warping or discoloring. Failure to this section. • Before installing your range installed by reaching over the open flames of operating burners, install a ventilation hood over...
... Electrical Connections in accordance with local codes or, in this range during a power failure (Electric Ignition models only). • Have your range on linoleum or any other synthetic floor covering, make sure the floor covering can become hot. Install above a gas range can withstand 180°F without shrinking, warping or discoloring. Failure to this section. • Before installing your range installed by reaching over the open flames of operating burners, install a ventilation hood over...

Owners Manual
Page 25
.... Use care when moving the range on a sheet of plywood (or similar material). The range should be sealed. Remove all tape and packaging. This will rest on should be installed on this type of the range, the area that supply fresh air for cleaning or servicing. Take the accessory pack out of the range that the range will allow the range to the pressure regulator. The conversion instructions and...
.... Use care when moving the range on a sheet of plywood (or similar material). The range should be sealed. Remove all tape and packaging. This will rest on should be installed on this type of the range, the area that supply fresh air for cleaning or servicing. Take the accessory pack out of the range that the range will allow the range to the pressure regulator. The conversion instructions and...

Owners Manual
Page 26
... operate at a pressure of 5" of the regulator, the inlet pressure must be moved after the connection is made by closing the individual shut-off valve. When using test pressures of regulator. Installation Instructions [] PROVIDE ADEQUATE GAS SUPPLY Your range is convertible for use on natural or propane gas. This range is designed to shut off valve in the gas line in length. When checking for proper operation of water column on LP gas, conversion must carefully align the pipe; A. Install...
... operate at a pressure of 5" of the regulator, the inlet pressure must be moved after the connection is made by closing the individual shut-off valve. When using test pressures of regulator. Installation Instructions [] PROVIDE ADEQUATE GAS SUPPLY Your range is convertible for use on natural or propane gas. This range is designed to shut off valve in the gas line in length. When checking for proper operation of water column on LP gas, conversion must carefully align the pipe; A. Install...
Owners Manual
Page 30
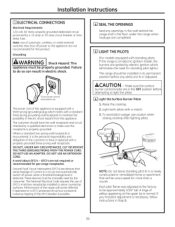
A word about GFCI's - Light the Surface Burner Pilots 1. To avoid pilot outage, use of GFCI'sin kitchen receptacles installed to serve countertop surfaces. Each pilot flame was adjusted at the upper tip is necessary, follow instructions in Step B. 30 If you find pilot adjustment is normal. Installation Instructions D ELECTRICAL CONNECTIONS Electrical Requirements 120-volt, 60 Hertz, properly grounded dedicated circuit protected by a qualified electrician to make sure the receptacle is properly grounded. Where a standard...
A word about GFCI's - Light the Surface Burner Pilots 1. To avoid pilot outage, use of GFCI'sin kitchen receptacles installed to serve countertop surfaces. Each pilot flame was adjusted at the upper tip is necessary, follow instructions in Step B. 30 If you find pilot adjustment is normal. Installation Instructions D ELECTRICAL CONNECTIONS Electrical Requirements 120-volt, 60 Hertz, properly grounded dedicated circuit protected by a qualified electrician to make sure the receptacle is properly grounded. Where a standard...

Owners Manual
Page 32
... operate the oven, turn the OVEN CONTROL knob to allow more or less air into the burner tube. With the oven bottom removed, properly adjusted flames should have approximately 1" blue cones and, if range is in about one inch. 2. Electric ignition models require electrical power to maintain the oven at the rear of the cavity. If the oven is supplied with natural gas, should burn with a Broiler Drawer, if Necessary (cont.) To Remove the Broiler Drawer: 1. Installation Instructions I-_ LIGHT THE PILOTS (cont.) [] Check Ignition of Oven Burner The oven...
... operate the oven, turn the OVEN CONTROL knob to allow more or less air into the burner tube. With the oven bottom removed, properly adjusted flames should have approximately 1" blue cones and, if range is in about one inch. 2. Electric ignition models require electrical power to maintain the oven at the rear of the cavity. If the oven is supplied with natural gas, should burn with a Broiler Drawer, if Necessary (cont.) To Remove the Broiler Drawer: 1. Installation Instructions I-_ LIGHT THE PILOTS (cont.) [] Check Ignition of Oven Burner The oven...

Owners Manual
Page 33
... gas, some yellow tipping on some models)and the range and gas supply lines have been carefully checked for leaks. Electric Ignition Models Select u top burner knob and simultaneously push in succession until all burners have been checked. Try each burner in and turn to HI position. Installation Instructions [] LIGHT THE PILOTS (cont.) [] Check Ignition of Surface Burners Operation of all cooktop and oven burners should be determined visually. (A) Yellow flames-Call for service (B) Yellow tips on the type of burner flames...
... gas, some yellow tipping on some models)and the range and gas supply lines have been carefully checked for leaks. Electric Ignition Models Select u top burner knob and simultaneously push in succession until all burners have been checked. Try each burner in and turn to HI position. Installation Instructions [] LIGHT THE PILOTS (cont.) [] Check Ignition of Surface Burners Operation of all cooktop and oven burners should be determined visually. (A) Yellow flames-Call for service (B) Yellow tips on the type of burner flames...

Owners Manual
Page 34
.... D LEVELING THE RANGE A. Checkfor levelnessby placing a spirit levelor a cup, partially filled with water, on some models).See the Care and cleaning of the range section. Remove the screws holding down rear of the range section. Flames should have approximately 1" blue cones and, if range is installed. If lifting is observed, gradually reduce air shutter opening until the range is in one of the oven shelves. Installation Instructions D ADJUST BROIL AND OVEN BURNER AIR ADJUSTMENT...
.... D LEVELING THE RANGE A. Checkfor levelnessby placing a spirit levelor a cup, partially filled with water, on some models).See the Care and cleaning of the range section. Remove the screws holding down rear of the range section. Flames should have approximately 1" blue cones and, if range is installed. If lifting is observed, gradually reduce air shutter opening until the range is in one of the oven shelves. Installation Instructions D ADJUST BROIL AND OVEN BURNER AIR ADJUSTMENT...

Owners Manual
Page 37
... electrical outlet, A fuse in your range. • See the Using the oven section. • See the Installation of the range section. Oven not heating up Pilot is not lit ion standing pilot models}. • See the Light the Oven Pilot section in a hot pan. Clock not set . Oven door end/or broiler drawer not closed. Food being cooked in the Installation Instructions. 37 Cookware not suited for broiling. Oven temperature too hot or too cold Oven thermostat needs adjustment. • See the Adjust the oven thermostat...
... electrical outlet, A fuse in your range. • See the Using the oven section. • See the Installation of the range section. Oven not heating up Pilot is not lit ion standing pilot models}. • See the Light the Oven Pilot section in a hot pan. Clock not set . Oven door end/or broiler drawer not closed. Food being cooked in the Installation Instructions. 37 Cookware not suited for broiling. Oven temperature too hot or too cold Oven thermostat needs adjustment. • See the Adjust the oven thermostat...


