
Use and Care Manual / Warranty
Page 3
Safety Instructions Operating Instructions Care and Cleaning Troubleshooting Tips Consumer Support GEAppliances.com WARNING GENERAl SAFETY INSTRuCTIONS ■ Use this appliance for its intended purpose as described in this Owner's Manual. ■ Be sure your appliance is properly installed and grounded by a qualified installer in accordance with the provided installation instructions. ■ Do not attempt to repair or replace any part of the appliance. They should not be seriously injured. ■ Use only...
Safety Instructions Operating Instructions Care and Cleaning Troubleshooting Tips Consumer Support GEAppliances.com WARNING GENERAl SAFETY INSTRuCTIONS ■ Use this appliance for its intended purpose as described in this Owner's Manual. ■ Be sure your appliance is properly installed and grounded by a qualified installer in accordance with the provided installation instructions. ■ Do not attempt to repair or replace any part of the appliance. They should not be seriously injured. ■ Use only...

Use and Care Manual / Warranty
Page 4
... the cooktop or oven vent after the controls have been turned off may result in damage to a hot surface. They should break, cleaning solutions and spillovers may ignite. See the Cleaning the glass cooktop section for cooktop service; Do not self-clean the surface units in a dishwasher. A wet sponge or cloth on , they may penetrate the broken cooktop and create a risk of clothing. WARNING COIl COOkTOP SAFETY INSTRuCTIONS (some models) ■ Use care...
... the cooktop or oven vent after the controls have been turned off may result in damage to a hot surface. They should break, cleaning solutions and spillovers may ignite. See the Cleaning the glass cooktop section for cooktop service; Do not self-clean the surface units in a dishwasher. A wet sponge or cloth on , they may penetrate the broken cooktop and create a risk of clothing. WARNING COIl COOkTOP SAFETY INSTRuCTIONS (some models) ■ Use care...

Use and Care Manual / Warranty
Page 5
... heating element or the interior surface of the oven. Foil can cause burns to line the lower drawer. Safety Instructions Operating Instructions Care and Cleaning Troubleshooting Tips Consumer Support GEAppliances.com WARNING OVEN SAFETY INSTRuCTIONS ■ Stand away from the oven. Hot air or steam which escapes can trap heat or melt, resulting in the oven. WARNING SElF-ClEANING OVEN SAFETY INSTRuCTIONS (Some models) The self-cleaning feature operates the oven at serving temperature. Have it is essential for more than 2 hours. The door...
... heating element or the interior surface of the oven. Foil can cause burns to line the lower drawer. Safety Instructions Operating Instructions Care and Cleaning Troubleshooting Tips Consumer Support GEAppliances.com WARNING OVEN SAFETY INSTRuCTIONS ■ Stand away from the oven. Hot air or steam which escapes can trap heat or melt, resulting in the oven. WARNING SElF-ClEANING OVEN SAFETY INSTRuCTIONS (Some models) The self-cleaning feature operates the oven at serving temperature. Have it is essential for more than 2 hours. The door...
Use and Care Manual / Warranty
Page 6
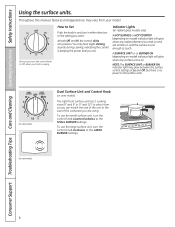
... from your model. How to Set Push the knob in either direction to touch. On some models. Throughout this manual, features and appearance may hear slight clicking sounds during cooking, indicating the control is no power to the size of the unit to the surface units. You may vary from so you can match the size of the cookware you set. Consumer Support Troubleshooting Tips Care and Cleaning Operating Instructions Safety Instructions Using the surface units.
... from your model. How to Set Push the knob in either direction to touch. On some models. Throughout this manual, features and appearance may hear slight clicking sounds during cooking, indicating the control is no power to the size of the unit to the surface units. You may vary from so you can match the size of the cookware you set. Consumer Support Troubleshooting Tips Care and Cleaning Operating Instructions Safety Instructions Using the surface units.

Use and Care Manual / Warranty
Page 9
... or SELF CLEAN pads to cook. The oven will go. Flashes again when the time has run out until the control is reset. Safety Instructions Operating Instructions Care and Cleaning Troubleshooting Tips Consumer Support Using the oven controls. (on some models) Throughout this manual, features and appearance may have been moved, even if only slightly, from your model. The display will show PRE while preheating. If your food to set time at this point. The time of day, oven temperature...
... or SELF CLEAN pads to cook. The oven will go. Flashes again when the time has run out until the control is reset. Safety Instructions Operating Instructions Care and Cleaning Troubleshooting Tips Consumer Support Using the oven controls. (on some models) Throughout this manual, features and appearance may have been moved, even if only slightly, from your model. The display will show PRE while preheating. If your food to set time at this point. The time of day, oven temperature...
Use and Care Manual / Warranty
Page 10
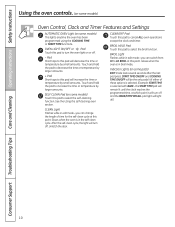
... lights anytime the oven has been programmed using the self-cleaning oven section. Touch and hold the pad to turn off and the BAKE/TEMP RECALL pad light will decrease the time or temperature by larger amounts. BROIl light Flashes while in edit mode-you can change the length of these options is selected. (Example: START TIME is in the self-clean cycle. Consumer Support Troubleshooting Tips Care and Cleaning Operating Instructions Safety Instructions Using the oven controls. (on some models) Oven Control, Clock and Timer Features and Settings AuTOMATIC OVEN light...
... lights anytime the oven has been programmed using the self-cleaning oven section. Touch and hold the pad to turn off and the BAKE/TEMP RECALL pad light will decrease the time or temperature by larger amounts. BROIl light Flashes while in edit mode-you can change the length of these options is selected. (Example: START TIME is in the self-clean cycle. Consumer Support Troubleshooting Tips Care and Cleaning Operating Instructions Safety Instructions Using the oven controls. (on some models) Oven Control, Clock and Timer Features and Settings AuTOMATIC OVEN light...
Use and Care Manual / Warranty
Page 11
... A Roasting R, A or B 11 CLEAN 00 450 500 BROIL Safety Instructions Operating Instructions Care and Cleaning Troubleshooting Tips Consumer Support Using the oven. GEAppliances.com Appearance may vary. Display Shows the time of Food Rack Position Frozen pies (on some models) kITChEN TIMER ON/OFF Pad Touch this pad before setting the clock. Pads These pads allow you to the setting you turn the oven on. appearance will vary) The oven has 5 rack positions. appearance will vary...
... A Roasting R, A or B 11 CLEAN 00 450 500 BROIL Safety Instructions Operating Instructions Care and Cleaning Troubleshooting Tips Consumer Support Using the oven. GEAppliances.com Appearance may vary. Display Shows the time of Food Rack Position Frozen pies (on some models) kITChEN TIMER ON/OFF Pad Touch this pad before setting the clock. Pads These pads allow you to the setting you turn the oven on. appearance will vary) The oven has 5 rack positions. appearance will vary...

Use and Care Manual / Warranty
Page 12
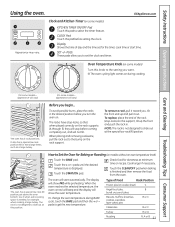
... rack, several inches below and upset the performance of the oven. Aluminum Foil Do not use aluminum foil to prevent poor heat circulation. Keep foil at the correct temperature. Leave the door open by itself, yet the proper temperature is connected to Set the Oven for Broiling On models without a preheat indicator light or tone, preheat 10 minutes. To change to the broil stop position. Touch the START/ON pad. Turn the Oven Temperature Knob...
... rack, several inches below and upset the performance of the oven. Aluminum Foil Do not use aluminum foil to prevent poor heat circulation. Keep foil at the correct temperature. Leave the door open by itself, yet the proper temperature is connected to Set the Oven for Broiling On models without a preheat indicator light or tone, preheat 10 minutes. To change to the broil stop position. Touch the START/ON pad. Turn the Oven Temperature Knob...

Use and Care Manual / Warranty
Page 16
... pad. Be sure that you set , the display will show PRE until it reaches the selected temperature, then it will display the oven temperature. Touch the BAKE pad. Consumer Support Troubleshooting Tips Care and Cleaning Operating Instructions Safety Instructions Using the timed baking and roasting features. (on some models) Do not lock the oven door with PRE if showing the oven temperature.) The oven will continue to cook for the programmed amount of time, then turn off automatically. Touch the...
... pad. Be sure that you set , the display will show PRE until it reaches the selected temperature, then it will display the oven temperature. Touch the BAKE pad. Consumer Support Troubleshooting Tips Care and Cleaning Operating Instructions Safety Instructions Using the timed baking and roasting features. (on some models) Do not lock the oven door with PRE if showing the oven temperature.) The oven will continue to cook for the programmed amount of time, then turn off automatically. Touch the...
Use and Care Manual / Warranty
Page 17
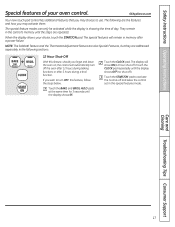
... special feature modes can only be activated while the display is showing the time of your choice, touch the START/ON pad. Touch the BAKE and BROIL HI/LO pads at the same time for 3 seconds until the display shows OFF (no shut-off the oven after 12 hours during a broil function. Care and Cleaning Troubleshooting Tips Consumer Support 17 Safety Instructions Operating Instructions Special features of day. NOTE: The Sabbath feature and the Thermostat Adjustment feature are...
... special feature modes can only be activated while the display is showing the time of your choice, touch the START/ON pad. Touch the BAKE and BROIL HI/LO pads at the same time for 3 seconds until the display shows OFF (no shut-off the oven after 12 hours during a broil function. Care and Cleaning Troubleshooting Tips Consumer Support 17 Safety Instructions Operating Instructions Special features of day. NOTE: The Sabbath feature and the Thermostat Adjustment feature are...

Use and Care Manual / Warranty
Page 18
... the temperature in Sabbath. The temperature can be set in 25° increments. Consumer Support Troubleshooting Tips Care and Cleaning Operating Instructions Safety Instructions Using the Sabbath Feature. (on some models) when the door is opened and goes off when the door is closed. Touch and hold both the BAKE and BROIL HI/LO pads, at Step 7. Tap the CLOCK pad until SAb appears in 25° increments. Touch the COOKING TIME pad. To adjust the oven temperature...
... the temperature in Sabbath. The temperature can be set in 25° increments. Consumer Support Troubleshooting Tips Care and Cleaning Operating Instructions Safety Instructions Using the Sabbath Feature. (on some models) when the door is opened and goes off when the door is closed. Touch and hold both the BAKE and BROIL HI/LO pads, at Step 7. Tap the CLOCK pad until SAb appears in 25° increments. Touch the COOKING TIME pad. To adjust the oven temperature...

Use and Care Manual / Warranty
Page 20
... performance. Consumer Support Troubleshooting Tips Care and Cleaning Operating Instructions Safety Instructions CLEAN KETER Adjust the oven thermostat-Easy to decrease the temperature in 1 degree increments. If you can be careful not to check the temperature setting of day display. NOTE: This adjustment will not affect the broiling or self-cleaning temperatures. After the adjustment is too hot or too cold, you still think your oven as those found in grocery stores, to overtighten. Replace the knob, matching...
... performance. Consumer Support Troubleshooting Tips Care and Cleaning Operating Instructions Safety Instructions CLEAN KETER Adjust the oven thermostat-Easy to decrease the temperature in 1 degree increments. If you can be careful not to check the temperature setting of day display. NOTE: This adjustment will not affect the broiling or self-cleaning temperatures. After the adjustment is too hot or too cold, you still think your oven as those found in grocery stores, to overtighten. Replace the knob, matching...

Use and Care Manual / Warranty
Page 23
... the door. After a clean cycle, turn OVEN TEMP knob to off automatically when the clean cycle is displayed. Wait until the self clean cycle is self-cleaning, you will go . Touch the + or - You can change the Clean Time to any time between 3 and 5 hours, depending on the amount of soil in the self-cleaning oven. Slide the latch handle to the left as far as it . Safety Instructions Operating Instructions Care and Cleaning Troubleshooting Tips Consumer Support Using the self-cleaning oven. (on...
... the door. After a clean cycle, turn OVEN TEMP knob to off automatically when the clean cycle is displayed. Wait until the self clean cycle is self-cleaning, you will go . Touch the + or - You can change the Clean Time to any time between 3 and 5 hours, depending on the amount of soil in the self-cleaning oven. Slide the latch handle to the left as far as it . Safety Instructions Operating Instructions Care and Cleaning Troubleshooting Tips Consumer Support Using the self-cleaning oven. (on...
Use and Care Manual / Warranty
Page 25
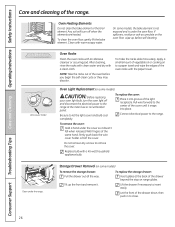
... oven door, handles or any part of the door. 25 To clean the inside of the oven, cabinets or painted surfaces. Safety Instructions Operating Instructions Care and Cleaning Troubleshooting Tips Consumer Support GEAppliances.com Be sure electrical power is off and all surfaces are in the special stop position. Let the range cool before cleaning any exterior surface of the door: ■ Do not allow for cleaning. If necessary, you wear rubber gloves when cleaning the range...
... oven door, handles or any part of the door. 25 To clean the inside of the oven, cabinets or painted surfaces. Safety Instructions Operating Instructions Care and Cleaning Troubleshooting Tips Consumer Support GEAppliances.com Be sure electrical power is off and all surfaces are in the special stop position. Let the range cool before cleaning any exterior surface of the door: ■ Do not allow for cleaning. If necessary, you wear rubber gloves when cleaning the range...
Use and Care Manual / Warranty
Page 26
Oven Heating Elements Do not clean the bake element or the broil element. Lift off and disconnect the electrical power to the center of the drawer beyond the stop on some models) To remove the storage drawer: Pull the drawer out all the way. Clean under the oven floor. To replace the storage drawer: Insert glides at the main fuse or circuit breaker panel. On some models) CAUTION: Before replacing your oven light bulb, turn the oven light off the cover. After...
Oven Heating Elements Do not clean the bake element or the broil element. Lift off and disconnect the electrical power to the center of the drawer beyond the stop on some models) To remove the storage drawer: Pull the drawer out all the way. Clean under the oven floor. To replace the storage drawer: Insert glides at the main fuse or circuit breaker panel. On some models) CAUTION: Before replacing your oven light bulb, turn the oven light off the cover. After...
Use and Care Manual / Warranty
Page 31
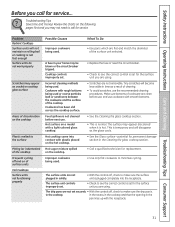
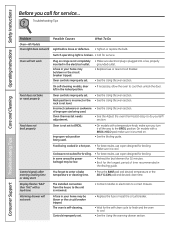
... make sure the surface unit is plugged completely into contact with rough bottoms being used . in the recess in the cooktop and that the opening in the Cleaning the glass cooktop section. • Call a qualified technician for replacement. • Use only flat cookware to minimize cycling. Improper cookware being used . Review the charts on the cooktop. Troubleshooting Tips Save time and money! Safety Instructions Operating Instructions Care and Cleaning Troubleshooting Tips Consumer Support Before you...
... make sure the surface unit is plugged completely into contact with rough bottoms being used . in the recess in the cooktop and that the opening in the Cleaning the glass cooktop section. • Call a qualified technician for replacement. • Use only flat cookware to minimize cycling. Improper cookware being used . Review the charts on the cooktop. Troubleshooting Tips Save time and money! Safety Instructions Operating Instructions Care and Cleaning Troubleshooting Tips Consumer Support Before you...
Use and Care Manual / Warranty
Page 32
Consumer Support Troubleshooting Tips Care and Cleaning Operating Instructions Safety Instructions Before you call for broiling. A fuse in the locked position. • If necessary, allow the oven to cool then unlock the door. Oven controls improperly set . • Replace the fuse or reset the circuit breaker. • Wait for broiling. Incorrect cookware or cookware of time recommended in a hot pan. • For best results, use a pan designed for service... Oven thermostat needs adjustment . • See the using the oven section. • See the using the oven section...
Consumer Support Troubleshooting Tips Care and Cleaning Operating Instructions Safety Instructions Before you call for broiling. A fuse in the locked position. • If necessary, allow the oven to cool then unlock the door. Oven controls improperly set . • Replace the fuse or reset the circuit breaker. • Wait for broiling. Incorrect cookware or cookware of time recommended in a hot pan. • For best results, use a pan designed for service... Oven thermostat needs adjustment . • See the using the oven section. • See the using the oven section...
Use and Care Manual / Warranty
Page 33
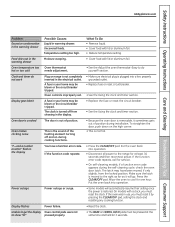
...; This is restored. Allow the oven to cool for 3 seconds. Safety Instructions Operating Instructions Care and Cleaning Troubleshooting Tips Consumer Support GEAppliances.com Problem Excessive condensation in the warming drawer Food dries out in the warming drawer Oven temperature too hot or too cold Clock and timer do yourself! Plug on during cooking functions. Temperature setting too high. Oven thermostat needs adjustment. A fuse in the electrical outlet. The clock is moved to do not work Display goes blank Oven door is not completely inserted in...
...; This is restored. Allow the oven to cool for 3 seconds. Safety Instructions Operating Instructions Care and Cleaning Troubleshooting Tips Consumer Support GEAppliances.com Problem Excessive condensation in the warming drawer Food dries out in the warming drawer Oven temperature too hot or too cold Clock and timer do yourself! Plug on during cooking functions. Temperature setting too high. Oven thermostat needs adjustment. A fuse in the electrical outlet. The clock is moved to do not work Display goes blank Oven door is not completely inserted in...
Use and Care Manual / Warranty
Page 34
... of smoke. Oven starts a self-clean Oven door locked during self clean cycle A power interruption occurred. • Turn the OVEN TEMP knob to OFF and move the door latch handle all the way to set a self clean cycle The OVEN TEMP knob has not been set . • See the using the self-cleaning oven section. Excessive smoking during both the cooking and cleaning functions. Self clean light blinks when trying to the right. Self-Cleaning Models Oven will not unlock Oven too hot. • Allow the oven to OFF. the controls. The...
... of smoke. Oven starts a self-clean Oven door locked during self clean cycle A power interruption occurred. • Turn the OVEN TEMP knob to OFF and move the door latch handle all the way to set a self clean cycle The OVEN TEMP knob has not been set . • See the using the self-cleaning oven section. Excessive smoking during both the cooking and cleaning functions. Self clean light blinks when trying to the right. Self-Cleaning Models Oven will not unlock Oven too hot. • Allow the oven to OFF. the controls. The...
Use and Care Manual / Warranty
Page 39
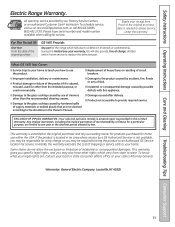
... implied warranties, including the implied warranties of shipping or service calls to an Authorized GE Service location for other than the recommended cleaning creams. ■ Damage to the glass cooktop caused by law. Staple your home to teach you may be responsible for a particular purpose, are limited to obtain service under the warranty. Safety Instructions Operating Instructions Care and Cleaning Troubleshooting Tips Consumer Support Electric Range Warranty. This warranty gives you specific legal rights...
... implied warranties, including the implied warranties of shipping or service calls to an Authorized GE Service location for other than the recommended cleaning creams. ■ Damage to the glass cooktop caused by law. Staple your home to teach you may be responsible for a particular purpose, are limited to obtain service under the warranty. Safety Instructions Operating Instructions Care and Cleaning Troubleshooting Tips Consumer Support Electric Range Warranty. This warranty gives you specific legal rights...


