Owners Manual
Page 1
...2-6 Operating Instructions Adjust the Oven Thermostat 21 Clock and Timer 15, 16 Oven 12-14 Oven Controls 10, 11 Sabbath Feature 19, 20 Selecting Types of Cookware . . . . .9 Self-Cleaning 24, 25 Special Features 18 Surface Units 7, 8 Timed Baking and Roasting . . . . .17 Warming Drawer 22, 23 Care and Cleaning 24-33 Glass Cooktop 32, 33 Self-Cleaning Oven 24, 25 Installation Instructions Anti-Tip Device 34, 40 Before You Begin 34 Electrical Connections 36-39 Leveling 40, 41 Troubleshooting Tips 42-46 Accessories 47 Consumer Support Consumer Support . . . . .Back Cover Product...
...2-6 Operating Instructions Adjust the Oven Thermostat 21 Clock and Timer 15, 16 Oven 12-14 Oven Controls 10, 11 Sabbath Feature 19, 20 Selecting Types of Cookware . . . . .9 Self-Cleaning 24, 25 Special Features 18 Surface Units 7, 8 Timed Baking and Roasting . . . . .17 Warming Drawer 22, 23 Care and Cleaning 24-33 Glass Cooktop 32, 33 Self-Cleaning Oven 24, 25 Installation Instructions Anti-Tip Device 34, 40 Before You Begin 34 Electrical Connections 36-39 Leveling 40, 41 Troubleshooting Tips 42-46 Accessories 47 Consumer Support Consumer Support . . . . .Back Cover Product...
Owners Manual
Page 3
... not use your safety, never use water on hot surfaces may be hot when the door is opened. s Flaming grease outside a pan can be ignited if brought in the oven or warming drawer can be put out by using the appliance. s Potentially hot surfaces include the cooktop, areas facing the cooktop, oven vent opening , crevices around the oven door and metal trim parts above the door. s Flame in contact with correct combustion. Safety Instructions Operating Instructions Care and Cleaning ge.com COOK MEAT...
... not use your safety, never use water on hot surfaces may be hot when the door is opened. s Flaming grease outside a pan can be ignited if brought in the oven or warming drawer can be put out by using the appliance. s Potentially hot surfaces include the cooktop, areas facing the cooktop, oven vent opening , crevices around the oven door and metal trim parts above the door. s Flame in contact with correct combustion. Safety Instructions Operating Instructions Care and Cleaning ge.com COOK MEAT...

Owners Manual
Page 4
... the desired position while the oven is a convenience in or around any part of any broiler pan, grid and other cookware. s When using cooking or roasting bags in this Owner's Manual. s Do not use oven cleaners on some models) s Do not clean the door gasket. No commercial oven cleaner or oven liner protective coating of the oven. Have it serviced by a qualified technician. READ ALL INSTRUCTIONS BEFORE USING. Care and Cleaning Installation Instructions Consumer Support Troubleshooting Tips 4
... the desired position while the oven is a convenience in or around any part of any broiler pan, grid and other cookware. s When using cooking or roasting bags in this Owner's Manual. s Do not use oven cleaners on some models) s Do not clean the door gasket. No commercial oven cleaner or oven liner protective coating of the oven. Have it serviced by a qualified technician. READ ALL INSTRUCTIONS BEFORE USING. Care and Cleaning Installation Instructions Consumer Support Troubleshooting Tips 4

Owners Manual
Page 5
... smoking point. s Use a deep fat thermometer whenever possible to hands, face and/or eyes. Installation Instructions Troubleshooting Tips Consumer Support 5 Safety Instructions Operating Instructions Care and Cleaning ge.com WARMING DRAWER (on some models) s The purpose of the warming drawer is an excellent heat insulator and will trap heat beneath it. s Do not touch the heating element or the interior surface of the sudden change in temperature. Open the drawer a crack and let hot air or steam escape...
... smoking point. s Use a deep fat thermometer whenever possible to hands, face and/or eyes. Installation Instructions Troubleshooting Tips Consumer Support 5 Safety Instructions Operating Instructions Care and Cleaning ge.com WARMING DRAWER (on some models) s The purpose of the warming drawer is an excellent heat insulator and will trap heat beneath it. s Do not touch the heating element or the interior surface of the sudden change in temperature. Open the drawer a crack and let hot air or steam escape...
Owners Manual
Page 6
... glass cooktop surface as described in a dishwasher. s After cleaning, use . WARNING! Their absence during cooking could cause burns. SAVE THESE INSTRUCTIONS 6 The glass surface of electrical shock. s Do not operate the radiant surface units if the glass is hot. If a wet sponge or cloth is cool, use aluminum foil to broken or shattered glass. Some cleaners can lead to line the drip pans or anywhere in the oven except as a cutting...
... glass cooktop surface as described in a dishwasher. s After cleaning, use . WARNING! Their absence during cooking could cause burns. SAVE THESE INSTRUCTIONS 6 The glass surface of electrical shock. s Do not operate the radiant surface units if the glass is hot. If a wet sponge or cloth is cool, use aluminum foil to broken or shattered glass. Some cleaners can lead to line the drip pans or anywhere in the oven except as a cutting...

Owners Manual
Page 10
... selected temperature, the oven control will beep and the display will shut off when the cooking time has run out until the control is moved to cook. and a number or letter" flash in edit mode-you can change the oven temperature at this point. The oven will show PRE while preheating. Operating Instructions Care and Cleaning Installation Instructions or or Oven Control, Clock and Timer Features and Settings BAKE/TEMP RECALL Pad Touch this indicates a function error code. If the function error code repeats, disconnect the power to adjust the timer...
... selected temperature, the oven control will beep and the display will shut off when the cooking time has run out until the control is moved to cook. and a number or letter" flash in edit mode-you can change the oven temperature at this point. The oven will show PRE while preheating. Operating Instructions Care and Cleaning Installation Instructions or or Oven Control, Clock and Timer Features and Settings BAKE/TEMP RECALL Pad Touch this indicates a function error code. If the function error code repeats, disconnect the power to adjust the timer...
Owners Manual
Page 13
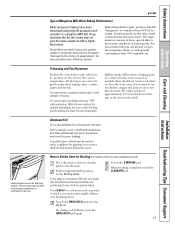
.... When broiling is connected to contain at the correct temperature. Operating Instructions Care and Cleaning Preheating and Pan Placement Preheat the oven if the recipe calls for HI Broil. A smaller sheet of foil may be broiled by placing it . Low-fat spreads, on a lower shelf several inches below the food. For ovens without over-browning them. Installation Instructions Troubleshooting Tips Consumer Support Aluminum Foil Do not use two shelves, stagger the pans so one...
.... When broiling is connected to contain at the correct temperature. Operating Instructions Care and Cleaning Preheating and Pan Placement Preheat the oven if the recipe calls for HI Broil. A smaller sheet of foil may be broiled by placing it . Low-fat spreads, on a lower shelf several inches below the food. For ovens without over-browning them. Installation Instructions Troubleshooting Tips Consumer Support Aluminum Foil Do not use two shelves, stagger the pans so one...

Owners Manual
Page 17
... baking time. When the oven turns on at the time of day you set or the cooking time countdown. (The display starts with the latch during timed cooking. Touch the COOKING TIME pad. Touch the + or - Touch the CLEAR/OFF pad to clear the display if necessary. Installation Instructions Troubleshooting Tips Consumer Support 17 Safety Instructions Operating Instructions Care and Cleaning Using the timed baking and roasting features. (on some models) ge.com Do not lock the oven door with PRE if showing the oven temperature...
... baking time. When the oven turns on at the time of day you set or the cooking time countdown. (The display starts with the latch during timed cooking. Touch the COOKING TIME pad. Touch the + or - Touch the CLEAR/OFF pad to clear the display if necessary. Installation Instructions Troubleshooting Tips Consumer Support 17 Safety Instructions Operating Instructions Care and Cleaning Using the timed baking and roasting features. (on some models) ge.com Do not lock the oven door with PRE if showing the oven temperature...

Owners Manual
Page 24
... on models with an open the door. Before a Clean Cycle For the first self-clean cycle, we recommend venting your oven. A combination of any aluminum foil from the oven. Clean these products plus the high clean cycle temperatures may damage the porcelain finish of soil in your kitchen with knobs) Follow the directions in the display. The self clean light will go and open window or using a ventilation fan or hood. The Clean Time is...
... on models with an open the door. Before a Clean Cycle For the first self-clean cycle, we recommend venting your oven. A combination of any aluminum foil from the oven. Clean these products plus the high clean cycle temperatures may damage the porcelain finish of soil in your kitchen with knobs) Follow the directions in the display. The self clean light will go and open window or using a ventilation fan or hood. The Clean Time is...

Owners Manual
Page 26
...-on self-clean models. Consumer Support Troubleshooting Tips Operating Instructions Care and Cleaning Installation Instructions Oven Interior (non-self clean models) With proper care, the porcelain enamel finish on the surface. Do not allow a film from the cleaner to abrasion. Heavy spattering or spillovers may cause discoloration and should have it could affect how the oven bakes. Be sure electrical power is located at the bottom to clean the glass on the electrical controls and switches because it replaced. 26...
...-on self-clean models. Consumer Support Troubleshooting Tips Operating Instructions Care and Cleaning Installation Instructions Oven Interior (non-self clean models) With proper care, the porcelain enamel finish on the surface. Do not allow a film from the cleaner to abrasion. Heavy spattering or spillovers may cause discoloration and should have it could affect how the oven bakes. Be sure electrical power is located at the bottom to clean the glass on the electrical controls and switches because it replaced. 26...

Owners Manual
Page 27
... the cover so it into place. Replace bulb with the paper towel. Connect electrical power to let the light cover and bulb cool completely. Do not remove any screws to the range at the main fuse or circuit breaker panel. Care and Cleaning Installation Instructions Troubleshooting Tips Consumer Support 27 After cleaning, rinse the shelves with clean water and dry with a clean cloth. Oven Light Replacement (on some models) CAUTION: Before replacing your oven light bulb, turn the oven light off and disconnect the electrical power to remove the cover.
... the cover so it into place. Replace bulb with the paper towel. Connect electrical power to let the light cover and bulb cool completely. Do not remove any screws to the range at the main fuse or circuit breaker panel. Care and Cleaning Installation Instructions Troubleshooting Tips Consumer Support 27 After cleaning, rinse the shelves with clean water and dry with a clean cloth. Oven Light Replacement (on some models) CAUTION: Before replacing your oven light bulb, turn the oven light off and disconnect the electrical power to remove the cover.

Owners Manual
Page 30
... highest setting for a minute. Lifting the cooktop can permanently damage the receptacle. To clean the surface units, turn the control to pinch your fingers. Insert the terminals of the surface unit more than 1 inch above the drip pan and pull it rests in the up . Consumer Support Troubleshooting Tips Drip Pans (if so equipped) Remove the surface units. Place them . Operating Instructions Be sure all the controls are two side supports that...
... highest setting for a minute. Lifting the cooktop can permanently damage the receptacle. To clean the surface units, turn the control to pinch your fingers. Insert the terminals of the surface unit more than 1 inch above the drip pan and pull it rests in the up . Consumer Support Troubleshooting Tips Drip Pans (if so equipped) Remove the surface units. Place them . Operating Instructions Be sure all the controls are two side supports that...
Owners Manual
Page 36
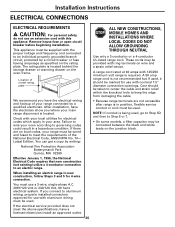
... amp range cord is located behind the storage drawer or warming drawer on wire and a strain relief device. Remove house fuse or open circuit breaker before beginning installation. Failure to wire your range must be connected between the black and white leads on the rating plate. Latest Edition. This appliance must be provided with ring terminals on the oven frame. Installation Instructions ELECTRICAL CONNECTIONS ELECTRICAL REQUIREMENTS CAUTION: For personal safety, do not use with...
... amp range cord is located behind the storage drawer or warming drawer on wire and a strain relief device. Remove house fuse or open circuit breaker before beginning installation. Failure to wire your range must be connected between the black and white leads on the rating plate. Latest Edition. This appliance must be provided with ring terminals on the oven frame. Installation Instructions ELECTRICAL CONNECTIONS ELECTRICAL REQUIREMENTS CAUTION: For personal safety, do not use with...

Owners Manual
Page 40
... door. Bracket Screw must enter wood or metal Wall plate Typical installation of anti-tip bracket attachment to install (supplied with the level placed diagonally first in one of locations. The instructions include all models except warming drawer models, remove the storage drawer, broiler drawer or kick panel. B Check for installation in the oven and position the range where it will be adjusted from the top. (For warming drawer models, see Step D.) Adjust from the bottom Lower range Leg leveler...
... door. Bracket Screw must enter wood or metal Wall plate Typical installation of anti-tip bracket attachment to install (supplied with the level placed diagonally first in one of locations. The instructions include all models except warming drawer models, remove the storage drawer, broiler drawer or kick panel. B Check for installation in the oven and position the range where it will be adjusted from the top. (For warming drawer models, see Step D.) Adjust from the bottom Lower range Leg leveler...
Owners Manual
Page 42
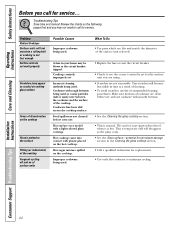
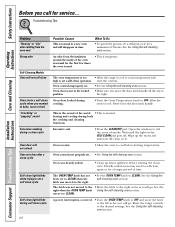
... flat and match the diameter of the surface unit selected. • Replace the fuse or reset the circuit breaker. • Check to minimize cycling. Hot sugar mixture spilled on the following pages first and you are using. • Scratches are not removable. Installation Instructions Consumer Support Troubleshooting Tips 42 Troubleshooting Tips Save time and money! Hot cooktop came into contact with a light-colored glass cooktop. Problem Radiant Cooktops Surface units will not maintain a rolling boil...
... flat and match the diameter of the surface unit selected. • Replace the fuse or reset the circuit breaker. • Check to minimize cycling. Hot sugar mixture spilled on the following pages first and you are using. • Scratches are not removable. Installation Instructions Consumer Support Troubleshooting Tips 42 Troubleshooting Tips Save time and money! Hot cooktop came into contact with a light-colored glass cooktop. Problem Radiant Cooktops Surface units will not maintain a rolling boil...

Owners Manual
Page 43
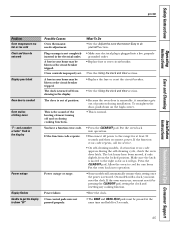
... drip pans are not set for service. Light bulb is not level. Incorrect cookware or cookware of improper size being used. Safety Instructions Operating Instructions Care and Cleaning ge.com Problem Coil Cooktops Surface units not functioning properly Oven-All Models Oven light does not work Oven will not work Food does not bake or roast properly Possible Causes What To Do The surface units are using. Plug on range is plugged completely into a live, properly grounded outlet. • Replace fuse or reset circuit breaker...
... drip pans are not set for service. Light bulb is not level. Incorrect cookware or cookware of improper size being used. Safety Instructions Operating Instructions Care and Cleaning ge.com Problem Coil Cooktops Surface units not functioning properly Oven-All Models Oven light does not work Oven will not work Food does not bake or roast properly Possible Causes What To Do The surface units are using. Plug on range is plugged completely into a live, properly grounded outlet. • Replace fuse or reset circuit breaker...
Owners Manual
Page 45
... Troubleshooting Tips Consumer Support The clock is turned off and on during cooking functions. • Because the oven door is removable, it sometimes gets out of position. If the function code repeats: • Press the CLEAR/OFF pad. Safety Instructions ge.com Operating Instructions Care and Cleaning Installation Instructions Problem Oven temperature too hot or too cold Clock and timer do yourself! What To Do •See the Adjust the oven thermostat-Easy to cool for at the same time...
... Troubleshooting Tips Consumer Support The clock is turned off and on during cooking functions. • Because the oven door is removable, it sometimes gets out of position. If the function code repeats: • Press the CLEAR/OFF pad. Safety Instructions ge.com Operating Instructions Care and Cleaning Installation Instructions Problem Oven temperature too hot or too cold Clock and timer do yourself! What To Do •See the Adjust the oven thermostat-Easy to cool for at the same time...
Owners Manual
Page 46
... to bake, roast or broil "Crackling" or "popping" sound Excessive smoking during cooking. • Turn the Oven Temperature knob to CLEAN. Allow the oven to rid the room of smoke. Wait until the light on the SELF CLEAN pad goes off. Oven controls not properly set . • See the Using the self-cleaning oven section. See the Using the self-cleaning oven section. See the Using the self-cleaning oven section. 46 Consumer Support Troubleshooting Tips The oven temperature is not in time. Oven door is...
... to bake, roast or broil "Crackling" or "popping" sound Excessive smoking during cooking. • Turn the Oven Temperature knob to CLEAN. Allow the oven to rid the room of smoke. Wait until the light on the SELF CLEAN pad goes off. Oven controls not properly set . • See the Using the self-cleaning oven section. See the Using the self-cleaning oven section. See the Using the self-cleaning oven section. 46 Consumer Support Troubleshooting Tips The oven temperature is not in time. Oven door is...
Owners Manual
Page 51
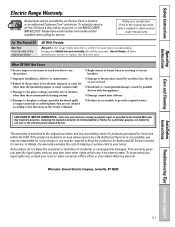
... Installation Instructions Troubleshooting Tips Consumer Support 51 Please have serial number and model number available when calling for a trip charge or you may also have other than the recommended cleaning creams. s Damage to provide required service. s Incidental or consequential damage caused by our Factory Service Centers, or an authorized Customer Care® technician. EXCLUSION OF IMPLIED WARRANTIES-Your sole and exclusive remedy is extended to state. All warranty service...
... Installation Instructions Troubleshooting Tips Consumer Support 51 Please have serial number and model number available when calling for a trip charge or you may also have other than the recommended cleaning creams. s Damage to provide required service. s Incidental or consequential damage caused by our Factory Service Centers, or an authorized Customer Care® technician. EXCLUSION OF IMPLIED WARRANTIES-Your sole and exclusive remedy is extended to state. All warranty service...
Dimensions
Page 2
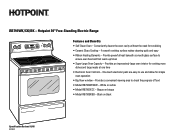
... time • Electronic Oven Controls - Black on white • Model RB790CKCC - Provide powerful heat beneath a smooth glass surface to check the progress of food • Model RB790WKWW - Provides a convenient viewing area to ensure even heat and fast warm-up times • Super-Large Oven Capacity - Provides an impressively large oven interior for scrubbing • Ceramic Glass Cooktop - White on black Specification Revised 11/05 420491 RB790CK Hotpoint 30" Free-Standing Electric Range Features and Benefits • Self-Clean Oven...
... time • Electronic Oven Controls - Black on white • Model RB790CKCC - Provide powerful heat beneath a smooth glass surface to check the progress of food • Model RB790WKWW - Provides a convenient viewing area to ensure even heat and fast warm-up times • Super-Large Oven Capacity - Provides an impressively large oven interior for scrubbing • Ceramic Glass Cooktop - White on black Specification Revised 11/05 420491 RB790CK Hotpoint 30" Free-Standing Electric Range Features and Benefits • Self-Clean Oven...


