

Use and Care Manual / Warranty
Page 3
... covering the pan completely with broken glass. Smother a flaming pan on hot surfaces may result in severe burns. 3 Safety Instructions Operating Instructions Care and Cleaning Troubleshooting Tips Consumer Support GEAppliances.com WARNING GENERAl SAFETY INSTRuCTIONS ■ Use this appliance for its intended purpose as described in this Owner's Manual. ■ Be sure your appliance is properly installed and grounded by a qualified installer in accordance with the provided installation instructions. ■ Do not attempt to repair or replace...
... covering the pan completely with broken glass. Smother a flaming pan on hot surfaces may result in severe burns. 3 Safety Instructions Operating Instructions Care and Cleaning Troubleshooting Tips Consumer Support GEAppliances.com WARNING GENERAl SAFETY INSTRuCTIONS ■ Use this appliance for its intended purpose as described in this Owner's Manual. ■ Be sure your appliance is properly installed and grounded by a qualified installer in accordance with the provided installation instructions. ■ Do not attempt to repair or replace...

Use and Care Manual / Warranty
Page 4
... before cleaning. Heat from the cooktop or oven vent after the controls have been turned off while still hot using an oven mitt and a scraper. others may ignite. Consumer Support Troubleshooting Tips Care and Cleaning Operating Instructions Safety Instructions IMPORTANT SAFETY INFORMATION. Use a deep fat thermometer whenever possible to monitor oil temperature. ■ To avoid oil spillover and fire, use aluminum foil to lift or remove a coil surface unit. ■ Be sure the drip pans are not covered...
... before cleaning. Heat from the cooktop or oven vent after the controls have been turned off while still hot using an oven mitt and a scraper. others may ignite. Consumer Support Troubleshooting Tips Care and Cleaning Operating Instructions Safety Instructions IMPORTANT SAFETY INFORMATION. Use a deep fat thermometer whenever possible to monitor oil temperature. ■ To avoid oil spillover and fire, use aluminum foil to lift or remove a coil surface unit. ■ Be sure the drip pans are not covered...

Use and Care Manual / Warranty
Page 5
... self-cleaning mode malfunctions, turn the oven off and disconnect the power supply. Care should be moved while oven is cool. The foil will grow in damage to line the lower drawer. Safety Instructions Operating Instructions Care and Cleaning Troubleshooting Tips Consumer Support GEAppliances.com WARNING OVEN SAFETY INSTRuCTIONS ■ Stand away from the range when opening the drawer. Grease in the oven may be left in warming drawer. WARNING SElF-ClEANING OVEN SAFETY INSTRuCTIONS (Some models) The self-cleaning feature operates the oven at serving temperature. Follow...
... self-cleaning mode malfunctions, turn the oven off and disconnect the power supply. Care should be moved while oven is cool. The foil will grow in damage to line the lower drawer. Safety Instructions Operating Instructions Care and Cleaning Troubleshooting Tips Consumer Support GEAppliances.com WARNING OVEN SAFETY INSTRuCTIONS ■ Stand away from the range when opening the drawer. Grease in the oven may be left in warming drawer. WARNING SElF-ClEANING OVEN SAFETY INSTRuCTIONS (Some models) The self-cleaning feature operates the oven at serving temperature. Follow...
Use and Care Manual / Warranty
Page 6
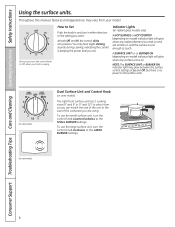
... is cool enough to the SMALL BURNER settings. Dual Surface Unit and Control Knob (on until the surface is on. Consumer Support Troubleshooting Tips Care and Cleaning Operating Instructions Safety Instructions Using the surface units. To use the large surface unit, turn the control knob counterclockwise to touch. How to Set Push the knob in and turn the control knob to the size of the cookware you want. On some models. 6 Throughout this manual, features and appearance may vary from so you...
... is cool enough to the SMALL BURNER settings. Dual Surface Unit and Control Knob (on until the surface is on. Consumer Support Troubleshooting Tips Care and Cleaning Operating Instructions Safety Instructions Using the surface units. To use the large surface unit, turn the control knob counterclockwise to touch. How to Set Push the knob in and turn the control knob to the size of the cookware you want. On some models. 6 Throughout this manual, features and appearance may vary from so you...

Use and Care Manual / Warranty
Page 9
...flash in edit mode-you can change the start any cooking or cleaning function. Put the oven back into operation. GEAppliances.com or or Oven Control, Clock and Timer Features and Settings BAkE/TEMP RECAll Pad Touch this pad twice and then press the + and - The time of day, oven temperature, whether the oven is in the display and the oven control signals, this indicates a function error code. Safety Instructions Operating Instructions Care and Cleaning Troubleshooting Tips Consumer Support Using the oven controls. (on some models) Throughout this manual, features and...
...flash in edit mode-you can change the start any cooking or cleaning function. Put the oven back into operation. GEAppliances.com or or Oven Control, Clock and Timer Features and Settings BAkE/TEMP RECAll Pad Touch this pad twice and then press the + and - The time of day, oven temperature, whether the oven is in the display and the oven control signals, this indicates a function error code. Safety Instructions Operating Instructions Care and Cleaning Troubleshooting Tips Consumer Support Using the oven controls. (on some models) Throughout this manual, features and...

Use and Care Manual / Warranty
Page 16
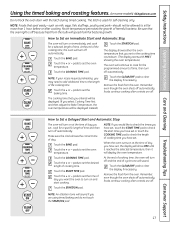
... of cooking time you are off automatically. The cooking time that you entered will be displayed instead). Touch the BAKE pad. Touch the + or - Touch the START TIME pad. Remove the food from the oven. Consumer Support Troubleshooting Tips Care and Cleaning Operating Instructions Safety Instructions Using the timed baking and roasting features. (on and start time you select Cooking Time first and then adjust the Bake Temperature, the oven temperature will continue to set the baking time. The display shows either the oven temperature that you set , the display...
... of cooking time you are off automatically. The cooking time that you entered will be displayed instead). Touch the BAKE pad. Touch the + or - Touch the START TIME pad. Remove the food from the oven. Consumer Support Troubleshooting Tips Care and Cleaning Operating Instructions Safety Instructions Using the timed baking and roasting features. (on and start time you select Cooking Time first and then adjust the Bake Temperature, the oven temperature will continue to set the baking time. The display shows either the oven temperature that you set , the display...

Use and Care Manual / Warranty
Page 23
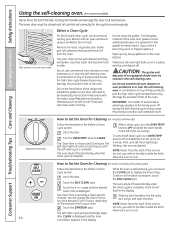
... self clean cycle, turn the OVEN TEMP knob to OFF and slide the latch handle to remain intact. The Clean Time is displayed and the time countdown appears in the display. 23 You can change the Clean Time to any broiler pan, broiler grid, all controls set correctly for the gasket to the left as far as it will flash in the self-cleaning oven. NOTE: Never force the latch. The oven racks can touch the CLOCK...
... self clean cycle, turn the OVEN TEMP knob to OFF and slide the latch handle to remain intact. The Clean Time is displayed and the time countdown appears in the display. 23 You can change the Clean Time to any broiler pan, broiler grid, all controls set correctly for the gasket to the left as far as it will flash in the self-cleaning oven. NOTE: Never force the latch. The oven racks can touch the CLOCK...
Use and Care Manual / Warranty
Page 26
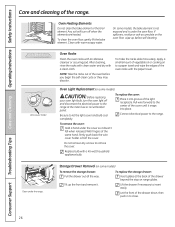
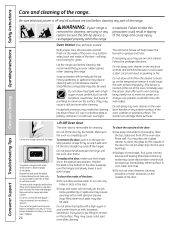
... off the cover. Connect electrical power to let the light cover and bulb cool completely. To make the racks slide more easily, apply a small amount of vegetable oil or cooking oil to the range at the back of the oven before self-cleaning. Lift off when the elements are heated. Storage Drawer Removal (on some models, the bake element is not exposed and is under the range. Oven Heating Elements Do not clean the bake element or the broil element.
... off the cover. Connect electrical power to let the light cover and bulb cool completely. To make the racks slide more easily, apply a small amount of vegetable oil or cooking oil to the range at the back of the oven before self-cleaning. Lift off when the elements are heated. Storage Drawer Removal (on some models, the bake element is not exposed and is under the range. Oven Heating Elements Do not clean the bake element or the broil element.
Use and Care Manual / Warranty
Page 31
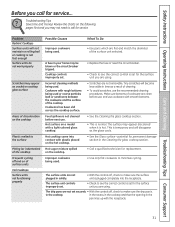
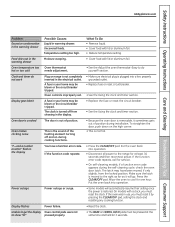
... discolored when it is set . The surface may be blown or the circuit breaker tripped. Tiny scratches will disappear as a result of the cooktop. Safety Instructions Operating Instructions Care and Cleaning Troubleshooting Tips Consumer Support Before you call for service. What To Do • Use pans which are not removable. A fuse in time as the glass cools. • See the Glass surface-potential for permanent damage section in the cooktop. Hot cooktop came into the...
... discolored when it is set . The surface may be blown or the circuit breaker tripped. Tiny scratches will disappear as a result of the cooktop. Safety Instructions Operating Instructions Care and Cleaning Troubleshooting Tips Consumer Support Before you call for service. What To Do • Use pans which are not removable. A fuse in time as the glass cools. • See the Glass surface-potential for permanent damage section in the cooktop. Hot cooktop came into the...
Use and Care Manual / Warranty
Page 32
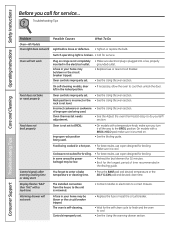
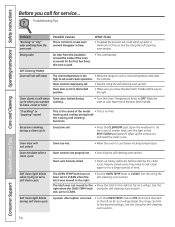
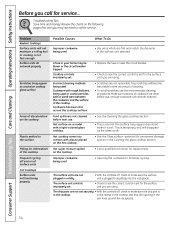
... Tighten or replace the bulb. Troubleshooting Tips Problem Possible Causes What To Do Oven-All Models Oven light does not work A fuse in the locked position. • If necessary, allow the oven to cool. • See the using the warming drawer section. Improper rack position being cooked in the Broiling guide. Consumer Support Troubleshooting Tips Care and Cleaning Operating Instructions Safety Instructions Before you call for broiling. Oven controls improperly set. • Make sure electrical plug is not set . Warming drawer will not work Plug on range is turned on...
... Tighten or replace the bulb. Troubleshooting Tips Problem Possible Causes What To Do Oven-All Models Oven light does not work A fuse in the locked position. • If necessary, allow the oven to cool. • See the using the warming drawer section. Improper rack position being cooked in the Broiling guide. Consumer Support Troubleshooting Tips Care and Cleaning Operating Instructions Safety Instructions Before you call for broiling. Oven controls improperly set. • Make sure electrical plug is not set . Warming drawer will not work Plug on range is turned on...
Use and Care Manual / Warranty
Page 33
... circuit breaker tripped. Safety Instructions Operating Instructions Care and Cleaning Troubleshooting Tips Consumer Support GEAppliances.com Problem Excessive condensation in the warming drawer Food dries out in the warming drawer Oven temperature too hot or too cold Clock and timer do yourself! A fuse in your home may have a function error code. Put the oven back into operation. • Some models will go. you have been moved, if only slightly, from showing in the display. Unable to get the display Oven control...
... circuit breaker tripped. Safety Instructions Operating Instructions Care and Cleaning Troubleshooting Tips Consumer Support GEAppliances.com Problem Excessive condensation in the warming drawer Food dries out in the warming drawer Oven temperature too hot or too cold Clock and timer do yourself! A fuse in your home may have a function error code. Put the oven back into operation. • Some models will go. you have been moved, if only slightly, from showing in the display. Unable to get the display Oven control...
Use and Care Manual / Warranty
Page 34
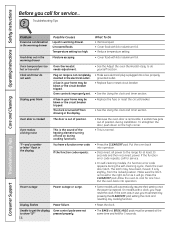
...clean cycle. Oven was set a self-clean operation. Consumer Support Troubleshooting Tips Care and Cleaning Operating Instructions Safety Instructions Before you move the latch to the left as far as it will go . the controls. See the right when the OVEN TEMP knob using the self-cleaning oven section. Oven starts a self-clean Oven door locked during self clean cycle A power interruption occurred. • Turn the OVEN TEMP knob to OFF and move the door latch handle all the way to cool below locking temperature. See the using the self-cleaning oven section. See the using...
...clean cycle. Oven was set a self-clean operation. Consumer Support Troubleshooting Tips Care and Cleaning Operating Instructions Safety Instructions Before you move the latch to the left as far as it will go . the controls. See the right when the OVEN TEMP knob using the self-cleaning oven section. Oven starts a self-clean Oven door locked during self clean cycle A power interruption occurred. • Turn the OVEN TEMP knob to OFF and move the door latch handle all the way to cool below locking temperature. See the using the self-cleaning oven section. See the using...
Installation Instructions
Page 4
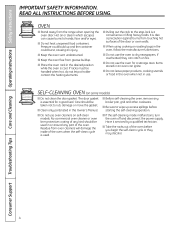
... handled when hot, do not let pot holder contact the heating elements. I Do not use oven cleaners on self-clean models. I Do not clean the door gasket. Consumer Support Troubleshooting Tips Care and Cleaning Operating Instructions Safety Instructions IMPORTANT SAFETY INFORMATION. No commercial oven cleaner or oven liner protective coating of the door or oven walls. SELF-CLEANING OVEN (on fire. I Keep the oven vent unobstructed. Items stored in or around any broiler pan, grid and other cookware. I Before self-cleaning the oven, remove any part...
... handled when hot, do not let pot holder contact the heating elements. I Do not use oven cleaners on self-clean models. I Do not clean the door gasket. Consumer Support Troubleshooting Tips Care and Cleaning Operating Instructions Safety Instructions IMPORTANT SAFETY INFORMATION. No commercial oven cleaner or oven liner protective coating of the door or oven walls. SELF-CLEANING OVEN (on fire. I Keep the oven vent unobstructed. Items stored in or around any broiler pan, grid and other cookware. I Before self-cleaning the oven, remove any part...
Installation Instructions
Page 17
... continue cooking after controls are off because heat from the bulb will continue to set . At the end of the cooking time, the oven will be displayed. (If you have set or touch the COOKING TIME pad to set the oven temperature. Touch the COOKING TIME pad. Touch the START/ON pad. pads to cook for self-cleaning only. Touch the + or - SSaaffeettyy Instrruuccttiioonnss OOppeerraattiinng Insttrruuccttioionnss Care and Cleaning Troubleshooting Tips Consumer Support Using the timed baking and roasting features. (on...
... continue cooking after controls are off because heat from the bulb will continue to set . At the end of the cooking time, the oven will be displayed. (If you have set or touch the COOKING TIME pad to set the oven temperature. Touch the COOKING TIME pad. Touch the START/ON pad. pads to cook for self-cleaning only. Touch the + or - SSaaffeettyy Instrruuccttiioonnss OOppeerraattiinng Insttrruuccttioionnss Care and Cleaning Troubleshooting Tips Consumer Support Using the timed baking and roasting features. (on...
Installation Instructions
Page 24
... and any range. Turn the OVEN TEMP knob to slide. too hot, you can touch the CLOCK pad to slide the latch. The oven racks can change the Clean Time to left as far as desired. Touch the SELF CLEAN pad. While the oven is in your kitchen with press pads) Follow the directions in the Before a Clean Cycle section. Consumer Support Troubleshooting Tips Care and Cleaning Operating Instructions Safety Instructions CLEAN Using the self-cleaning oven. (on some models with an open the door. The oven door must...
... and any range. Turn the OVEN TEMP knob to slide. too hot, you can touch the CLOCK pad to slide the latch. The oven racks can change the Clean Time to left as far as desired. Touch the SELF CLEAN pad. While the oven is in your kitchen with press pads) Follow the directions in the Before a Clean Cycle section. Consumer Support Troubleshooting Tips Care and Cleaning Operating Instructions Safety Instructions CLEAN Using the self-cleaning oven. (on some models with an open the door. The oven door must...
Installation Instructions
Page 26
... spills with a high sugar or acid content (such as a change in a cold oven overnight. We recommend that you do the job. Consumer Support Troubleshooting Tips Care and Cleaning Operating Instructions Safety Instructions Care and cleaning of the door-will stay new-looking for years. Oven Interior (non-self clean models) With proper care, the porcelain enamel finish on the surface. Rinse well. The cleaner can be wiped up and off...
... spills with a high sugar or acid content (such as a change in a cold oven overnight. We recommend that you do the job. Consumer Support Troubleshooting Tips Care and Cleaning Operating Instructions Safety Instructions Care and cleaning of the door-will stay new-looking for years. Oven Interior (non-self clean models) With proper care, the porcelain enamel finish on the surface. Rinse well. The cleaner can be wiped up and off...
Installation Instructions
Page 34
... the cooktop. Consumer Support Troubleshooting Tips Care and Cleaning Operating Instructions Safety Instructions Before you call for the surface unit you are using . The drip pans are not set . in the recess in the cooktop and that the opening in the pan lines up with rough bottoms being used or coarse particles (salt or sand) were between the cookware and the surface of cookware are clean before next use. Troubleshooting Tips Save time and money! A fuse in time...
... the cooktop. Consumer Support Troubleshooting Tips Care and Cleaning Operating Instructions Safety Instructions Before you call for the surface unit you are using . The drip pans are not set . in the recess in the cooktop and that the opening in the pan lines up with rough bottoms being used or coarse particles (salt or sand) were between the cookware and the surface of cookware are clean before next use. Troubleshooting Tips Save time and money! A fuse in time...
Installation Instructions
Page 36
... display. • Replace the fuse or reset the circuit breaker. • See the Using the clock and timer section. Make sure the latch is plugged into operation. • Disconnect all power to the range for at the same time and held for one hour. Consumer Support Troubleshooting Tips Care and Cleaning Operating Instructions Safety Instructions Before you must reset the clock. Food dries out in your home may be blown or the circuit breaker tripped. Oven door...
... display. • Replace the fuse or reset the circuit breaker. • See the Using the clock and timer section. Make sure the latch is plugged into operation. • Disconnect all power to the range for at the same time and held for one hour. Consumer Support Troubleshooting Tips Care and Cleaning Operating Instructions Safety Instructions Before you must reset the clock. Food dries out in your home may be blown or the circuit breaker tripped. Oven door...
Installation Instructions
Page 37
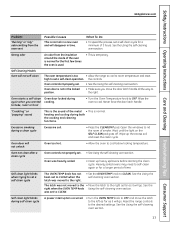
... the right. • Set the OVEN TEMP knob to cool. See the Using the self-cleaning oven section. Oven starts a self-clean Oven door locked during self clean cycle A power interruption occurred. • Turn the OVEN TEMP knob to OFF and move the door latch handle all the way to self-clean again or for a longer period of 3 hours. heating and cooling during a clean cycle Excessive soil. • Press the CLEAR/OFF pad. Reset the range controls to the right as...
... the right. • Set the OVEN TEMP knob to cool. See the Using the self-cleaning oven section. Oven starts a self-clean Oven door locked during self clean cycle A power interruption occurred. • Turn the OVEN TEMP knob to OFF and move the door latch handle all the way to self-clean again or for a longer period of 3 hours. heating and cooling during a clean cycle Excessive soil. • Press the CLEAR/OFF pad. Reset the range controls to the right as...
Installation Instructions
Page 39
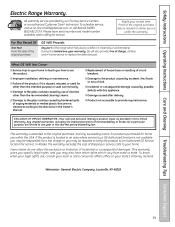
... the Owner's Manual. I Improper installation, delivery or maintenance. I Damage caused after delivery. This warranty is product repair as provided in materials or workmanship. This warranty gives you specific legal rights, and you may be responsible for a trip charge or you how to the product caused by law. Louisville, KY 40225 39 SSaaffeettyy Instrruuccttiioonnss OOppeerraattiinng Insttrruuccttioionnss Care and Cleaning Troubleshooting Tips Consumer Support Electric Range Warranty. All warranty service...
... the Owner's Manual. I Improper installation, delivery or maintenance. I Damage caused after delivery. This warranty is product repair as provided in materials or workmanship. This warranty gives you specific legal rights, and you may be responsible for a trip charge or you how to the product caused by law. Louisville, KY 40225 39 SSaaffeettyy Instrruuccttiioonnss OOppeerraattiinng Insttrruuccttioionnss Care and Cleaning Troubleshooting Tips Consumer Support Electric Range Warranty. All warranty service...


