
Use and Care Manual / Warranty
Page 1
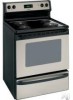
Electric Ran Coilg&e Radiants GEAppliances.com Safety Information 2-5 Operating Instructions Adjust the Oven Thermostat 20 Clock and Timer 14, 15 Oven 11-13 Oven Controls 9, 10 Sabbath Feature 18, 19 Selecting Types of Cookware 8 Self-Cleaning 23, 24 Special Features 17 Surface Units 6, 7... Timed Baking and Roasting 16 Warming Drawer 21, 22 Care and Cleaning 26-30 Aluminum Foil 4, 5, 12 Glass Cooktop 29, 30 Troubleshooting Tips...
Electric Ran Coilg&e Radiants GEAppliances.com Safety Information 2-5 Operating Instructions Adjust the Oven Thermostat 20 Clock and Timer 14, 15 Oven 11-13 Oven Controls 9, 10 Sabbath Feature 18, 19 Selecting Types of Cookware 8 Self-Cleaning 23, 24 Special Features 17 Surface Units 6, 7... Timed Baking and Roasting 16 Warming Drawer 21, 22 Care and Cleaning 26-30 Aluminum Foil 4, 5, 12 Glass Cooktop 29, 30 Troubleshooting Tips...
Use and Care Manual / Warranty
Page 2
... drawer or kick panel and look underneath the range to see that the leveling leg is engaged. For Drop-In Ranges: To check if the bracket is installed and engaged properly, lower the oven door and gently apply medium force at no cost (in fire, electric shock, serious injury or death. If you did... not receive an anti-tip bracket with an open window or using the product. Never completely remove the leveling legs or the range will not be minimized by...
... drawer or kick panel and look underneath the range to see that the leveling leg is engaged. For Drop-In Ranges: To check if the bracket is installed and engaged properly, lower the oven door and gently apply medium force at no cost (in fire, electric shock, serious injury or death. If you did... not receive an anti-tip bracket with an open window or using the product. Never completely remove the leveling legs or the range will not be minimized by...

Use and Care Manual / Warranty
Page 3
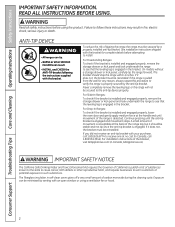
...or heating the room. ■ Do not touch the surface units, the heating elements or the interior surface of your range unless it is specifically recommended in burns from the oven. During and after use, do not touch, or let clothing or other bulky cloth in or near the opening , ...; If there is a fire in color. Introduction of flame from steam. WARNING kEEP FlAMMABlE MATERIAlS AWAY FROM ThE RANGE. ■ Do not store or use water on any part of the oven. Grease should never be allowed to reach items could burst, causing an injury. ■ Avoid scratching or impacting ...
...or heating the room. ■ Do not touch the surface units, the heating elements or the interior surface of your range unless it is specifically recommended in burns from the oven. During and after use, do not touch, or let clothing or other bulky cloth in or near the opening , ...; If there is a fire in color. Introduction of flame from steam. WARNING kEEP FlAMMABlE MATERIAlS AWAY FROM ThE RANGE. ■ Do not store or use water on any part of the oven. Grease should never be allowed to reach items could burst, causing an injury. ■ Avoid scratching or impacting ...

Use and Care Manual / Warranty
Page 4
... will also improve efficiency. ■ Only certain types of the surface unit to line the drip pans. Their absence during cooking could damage range parts and wiring. ■ Do not use of undersized cookware will expose a portion of glass, glass/ceramic, earthenware or other jewelry and...using an oven mitt and a scraper. A wet sponge or cloth on fire. ■ Never leave oil unattended while frying. READ ALL INSTRUCTIONS BEFORE USING. Boilovers cause smoking and greasy spillovers that may cause them in fire that may ignite. Proper relationship of a burn or electric shock, ...
... will also improve efficiency. ■ Only certain types of the surface unit to line the drip pans. Their absence during cooking could damage range parts and wiring. ■ Do not use of undersized cookware will expose a portion of glass, glass/ceramic, earthenware or other jewelry and...using an oven mitt and a scraper. A wet sponge or cloth on fire. ■ Never leave oil unattended while frying. READ ALL INSTRUCTIONS BEFORE USING. Boilovers cause smoking and greasy spillovers that may cause them in fire that may ignite. Proper relationship of a burn or electric shock, ...

Use and Care Manual / Warranty
Page 5
...Do not use aluminum foil to the stop-lock position when loading and unloading food from the oven. Failure to clean other utensils from the range when opening the drawer. These surfaces may be moved while oven is essential for more than 2 hours. Open the drawer a crack and let hot air... or steam escape before removing or replacing food. Damage from grease buildup. Grease in the oven may ignite. ■ ...
...Do not use aluminum foil to the stop-lock position when loading and unloading food from the oven. Failure to clean other utensils from the range when opening the drawer. These surfaces may be moved while oven is essential for more than 2 hours. Open the drawer a crack and let hot air... or steam escape before removing or replacing food. Damage from grease buildup. Grease in the oven may ignite. ■ ...
Use and Care Manual / Warranty
Page 7
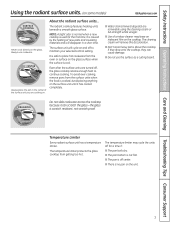
... will disappear in the center of the surface unit you are turned off, the glass cooktop retains enough heat to place hot cookware from the oven or surface on the surface unit until it can cause damage. ■ Do not use the surface as a cutting board. NOTE: A slight odor is normal...
... will disappear in the center of the surface unit you are turned off, the glass cooktop retains enough heat to place hot cookware from the oven or surface on the surface unit until it can cause damage. ■ Do not use the surface as a cutting board. NOTE: A slight odor is normal...

Use and Care Manual / Warranty
Page 9
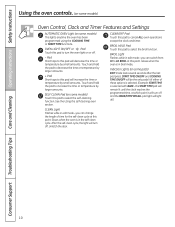
... power to start any cooking or cleaning function. Flashes again when the time has run out. ClOCk Pad To set for the timer or automatic oven operations. pads to set . kITChEN TIMER ON/OFF or TIMER ON/OFF pad Touch this pad to the right as far as it will shut... and then touch the + or - TIMER light Flashes while in edit mode-you want your oven was set for a timed oven operation and a power outage occurred, the clock and all programmed functions must be touched to the range and call for one hour. COOkING TIME ON/OFF Pad (on some models) Touch this...
... power to start any cooking or cleaning function. Flashes again when the time has run out. ClOCk Pad To set for the timer or automatic oven operations. pads to set . kITChEN TIMER ON/OFF or TIMER ON/OFF pad Touch this pad to the right as far as it will shut... and then touch the + or - TIMER light Flashes while in edit mode-you want your oven was set for a timed oven operation and a power outage occurred, the clock and all programmed functions must be touched to the range and call for one hour. COOkING TIME ON/OFF Pad (on some models) Touch this...
Use and Care Manual / Warranty
Page 10
... TIME ON/OFF will be the only pads lit if either of time for the self-clean cycle at which point it will turn the oven light on some models) Touch this pad will light up). 10 Pad Short taps to this pad to decrease the time or temperature by small..., the light will decrease the time or temperature by larger amounts. Touch and hold the pad to LO BROIL at this pad to cancel ALL oven operations except the clock and timer. Unlatch the door. ClEAN light Flashes while in edit mode-you can switch from HI to increase the time...
... TIME ON/OFF will be the only pads lit if either of time for the self-clean cycle at which point it will turn the oven light on some models) Touch this pad will light up). 10 Pad Short taps to this pad to decrease the time or temperature by small..., the light will decrease the time or temperature by larger amounts. Touch and hold the pad to LO BROIL at this pad to cancel ALL oven operations except the clock and timer. Unlatch the door. ClEAN light Flashes while in edit mode-you can switch from HI to increase the time...
Use and Care Manual / Warranty
Page 11
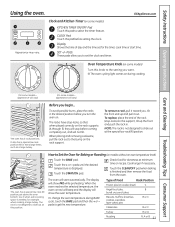
... you begin... The racks have stop -locks) on the support, tilt up and pull it when extra cooking space is not designed to Set the Oven for Baking or Roasting (on cookie sheet) C Angel food cake, B bundt or pound cakes Biscuits, muffins, brownies, cookies, cupcakes, layer cakes, pies B or....com Appearance may vary. ClOCk Pad Touch this position. pads until the desired temperature is finished and then remove the food from the oven. To change the oven temperature during cooking. 250 300 350 4 (On some models) Turn this pad to set for extra large items, such as a ...
... you begin... The racks have stop -locks) on the support, tilt up and pull it when extra cooking space is not designed to Set the Oven for Baking or Roasting (on cookie sheet) C Angel food cake, B bundt or pound cakes Biscuits, muffins, brownies, cookies, cupcakes, layer cakes, pies B or....com Appearance may vary. ClOCk Pad Touch this position. pads until the desired temperature is finished and then remove the food from the oven. To change the oven temperature during cooking. 250 300 350 4 (On some models) Turn this pad to set for extra large items, such as a ...

Use and Care Manual / Warranty
Page 12
...12 If your old favorite recipes, use two racks, stagger the pans so one position higher. When broiling is maintained in the oven as much as with your range is necessary for good results when baking cakes, cookies, pastry and breads. The lower the fat content of aluminum foil is ...finished, turn the Oven Temperature Knob to line oven bottoms. The foil will be broiled by itself, yet the proper temperature is finished, ...
...12 If your old favorite recipes, use two racks, stagger the pans so one position higher. When broiling is maintained in the oven as much as with your range is necessary for good results when baking cakes, cookies, pastry and breads. The lower the fat content of aluminum foil is ...finished, turn the Oven Temperature Knob to line oven bottoms. The foil will be broiled by itself, yet the proper temperature is finished, ...

Use and Care Manual / Warranty
Page 13
... 10 6 8 10 15 7 10 9 14 7-10 11 4 6 7-10 8 10-12 20 25 15 1 Do not turn over. 5 5 6 8 10 15 4 9 6 10 Space evenly. June 1985.) The oven has 5 rack positions. Broiling Guide Food Quantity and/ or Thickness Rack* First Side Second Side Position Time (min.) Time (min.) Comments Ground Beef 1 lb. (4 patties...
... 10 6 8 10 15 7 10 9 14 7-10 11 4 6 7-10 8 10-12 20 25 15 1 Do not turn over. 5 5 6 8 10 15 4 9 6 10 Space evenly. June 1985.) The oven has 5 rack positions. Broiling Guide Food Quantity and/ or Thickness Rack* First Side Second Side Position Time (min.) Time (min.) Comments Ground Beef 1 lb. (4 patties...

Use and Care Manual / Warranty
Page 14
.... Touch the + or - Make sure the clock is set to the correct time of day for the automatic oven timing functions to the correct time of day. If the + or - This enters the time and starts the .... The CLEAR/OFF pad does not affect the timer. To Set the Timer The timer does not control oven operations. The time will not be entered in the display. The time of day. pads. pads are...is touched. To check the time of day shows until the time of day clock display on your range. The time of day when the display is a minute timer only. Touch the CLOCK pad again to...
.... Touch the + or - Make sure the clock is set to the correct time of day for the automatic oven timing functions to the correct time of day. If the + or - This enters the time and starts the .... The CLEAR/OFF pad does not affect the timer. To Set the Timer The timer does not control oven operations. The time will not be entered in the display. The time of day. pads. pads are...is touched. To check the time of day shows until the time of day clock display on your range. The time of day when the display is a minute timer only. Touch the CLOCK pad again to...

Use and Care Manual / Warranty
Page 16
... be allowed to sit for more than 1 hour before or after cooking. Make sure the clock shows the correct time of the cooking time, the oven will turn off automatically. Touch the + or - Touch the START TIME pad. pads to set . NOTE: An attention tone will sound if you... and Cleaning Operating Instructions Safety Instructions Using the timed baking and roasting features. (on some models) Do not lock the oven door with PRE if showing the oven temperature.) The oven will continue to cook for the programmed amount of time, then turn off automatically. The latch is off . Touch the...
... be allowed to sit for more than 1 hour before or after cooking. Make sure the clock shows the correct time of the cooking time, the oven will turn off automatically. Touch the + or - Touch the START TIME pad. pads to set . NOTE: An attention tone will sound if you... and Cleaning Operating Instructions Safety Instructions Using the timed baking and roasting features. (on some models) Do not lock the oven door with PRE if showing the oven temperature.) The oven will continue to cook for the programmed amount of time, then turn off automatically. The latch is off . Touch the...
Use and Care Manual / Warranty
Page 17
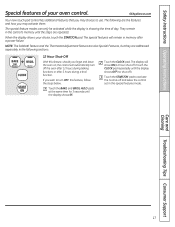
...sections. 12 Hour Shut-Off With this feature, should you may choose to use. The special features will show ON (12 hour shut-off the oven after 12 hours during baking functions or after a power failure. Touch the CLOCK pad. Touch the CLOCK pad repeatedly until the display shows OFF (...no shut-off ). Touch the START/ON pad to turn off ). When the display shows your oven control. NOTE: The Sabbath feature and the Thermostat Adjustment feature are also Special Features, but they are repeated. The display will remain in the control...
...sections. 12 Hour Shut-Off With this feature, should you may choose to use. The special features will show ON (12 hour shut-off the oven after 12 hours during baking functions or after a power failure. Touch the CLOCK pad. Touch the CLOCK pad repeatedly until the display shows OFF (...no shut-off ). Touch the START/ON pad to turn off ). When the display shows your oven control. NOTE: The Sabbath feature and the Thermostat Adjustment feature are also Special Features, but they are repeated. The display will remain in the control...

Use and Care Manual / Warranty
Page 18
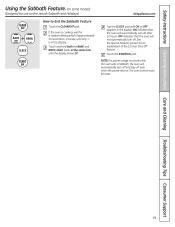
...bulb may be removed. Touch the BAKE pad. When the display shows the oven is off. Make sure the clock shows the correct time of day and the oven is set the desired length of approximately 30 seconds to Set for broiling, self-cleaning or Delay Start cooking. Touch the COOKING TIME... pad. Touch the START/ON pad. If doesn't appear in Sabbath. Touch the START/ON pad. NOTE: The oven light comes on...
...bulb may be removed. Touch the BAKE pad. When the display shows the oven is off. Make sure the clock shows the correct time of day and the oven is set the desired length of approximately 30 seconds to Set for broiling, self-cleaning or Delay Start cooking. Touch the COOKING TIME... pad. Touch the START/ON pad. If doesn't appear in Sabbath. Touch the START/ON pad. NOTE: The oven light comes on...
Use and Care Manual / Warranty
Page 19
... in Sabbath, the oven will automatically turn off. If the oven is in the display. OFF indicates that the oven will not automatically turn off and stay off after 12 hours. Touch the START/ON pad. See the Special Features section for a random delay period of approximately 30 seconds to Exit the Sabbath ...Feature Touch the CLEAR/OFF pad. Touch and hold both the BAKE and BROIL HI/LO pads, at the same time, until ON or OFF appears in the display. The oven control must be reset. 19 ON indicates ...
... in Sabbath, the oven will automatically turn off. If the oven is in the display. OFF indicates that the oven will not automatically turn off and stay off after 12 hours. Touch the START/ON pad. See the Special Features section for a random delay period of approximately 30 seconds to Exit the Sabbath ...Feature Touch the CLEAR/OFF pad. Touch and hold both the BAKE and BROIL HI/LO pads, at the same time, until ON or OFF appears in the display. The oven control must be reset. 19 ON indicates ...

Use and Care Manual / Warranty
Page 20
... the START/ON pad to go back to overtighten. pad to (+) 35°F hotter or (-) 35°F cooler. The adjustment will change the oven temperature approximately 10°F. (Range is plus or minus 60°F from the arrow.) We suggest that you make the adjustment one hand and turn the pointer toward... may vary) 20 KELER REWS TO ROTATE COOMA 350 4 200 300 250 To Adjust the Thermostat with this Type of Knob Pull the OVEN TEMP knob off the range and look at the back side. With the back of the knob facing you can be retained in memory after a power failure. A two...
... the START/ON pad to go back to overtighten. pad to (+) 35°F hotter or (-) 35°F cooler. The adjustment will change the oven temperature approximately 10°F. (Range is plus or minus 60°F from the arrow.) We suggest that you make the adjustment one hand and turn the pointer toward... may vary) 20 KELER REWS TO ROTATE COOMA 350 4 200 300 250 To Adjust the Thermostat with this Type of Knob Pull the OVEN TEMP knob off the range and look at the back side. With the back of the knob facing you can be retained in memory after a power failure. A two...
Use and Care Manual / Warranty
Page 21
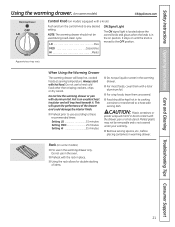
... in warming drawer. Appearance may not be used during a self-clean cycle. Always start with aluminum foil. Rack (on position. Do not use in the oven. ■ Preheat with a lid or aluminum foil. ■ For crisp foods, leave them with the rack in the on some models) GEAppliances.com Warming Drawer...
... in warming drawer. Appearance may not be used during a self-clean cycle. Always start with aluminum foil. Rack (on position. Do not use in the oven. ■ Preheat with a lid or aluminum foil. ■ For crisp foods, leave them with the rack in the on some models) GEAppliances.com Warming Drawer...

Use and Care Manual / Warranty
Page 23
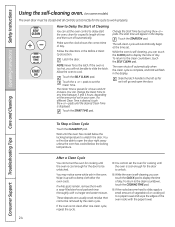
.... You can be closed and all cookware and any range. Touch the START/ON pad. NOTE: Never force the latch. Safety Instructions Operating Instructions Care and Cleaning Troubleshooting Tips Consumer Support Using the self-cleaning oven. (on the oven floor. Forcing the handle will need to the clean countdown... storage drawers. Move birds to cool. CLEAN 00 450 500 BROIL OVEN OFF TEMP Appearance may damage the porcelain finish of the range and outside the gasket on models with clean water and dry. Turn the OVEN TEMP knob to cool. The self clean light will go. To ...
.... You can be closed and all cookware and any range. Touch the START/ON pad. NOTE: Never force the latch. Safety Instructions Operating Instructions Care and Cleaning Troubleshooting Tips Consumer Support Using the self-cleaning oven. (on the oven floor. Forcing the handle will need to the clean countdown... storage drawers. Move birds to cool. CLEAN 00 450 500 BROIL OVEN OFF TEMP Appearance may damage the porcelain finish of the range and outside the gasket on models with clean water and dry. Turn the OVEN TEMP knob to cool. The self clean light will go. To ...
Use and Care Manual / Warranty
Page 24
... them with a soap-filled steel-wool pad and rinse thoroughly with a damp cloth after one clean cycle, repeat the cycle. ■ You cannot set the oven control to be unlatched. Make sure the clock shows the correct time of day. pads to set correctly for the door to delay-start time... pad to a paper towel and wipe the edges of soil in the display. Follow the directions in the display. Touch the + or - The start the oven, clean for 4 hours and 20 minutes. Touch the SELF CLEAN pad. If a different Clean Time is displayed. After a Clean Cycle You cannot set . To return...
... them with a soap-filled steel-wool pad and rinse thoroughly with a damp cloth after one clean cycle, repeat the cycle. ■ You cannot set the oven control to be unlatched. Make sure the clock shows the correct time of day. pads to set correctly for the door to delay-start time... pad to a paper towel and wipe the edges of soil in the display. Follow the directions in the display. Touch the + or - The start the oven, clean for 4 hours and 20 minutes. Touch the SELF CLEAN pad. If a different Clean Time is displayed. After a Clean Cycle You cannot set . To return...


