
Use and Care Manual / Warranty
Page 3
... oven door and turning the oven off or by a qualified installer in accordance with the provided installation instructions. ■ Do not attempt to repair or replace any part of your appliance for warming or heating the room. ■ Do not touch the surface units, the heating elements or the interior surface of the oven. Do not use . Pressure could burst, causing an injury. ■ Avoid scratching or impacting glass doors, cooktops or control panels...
... oven door and turning the oven off or by a qualified installer in accordance with the provided installation instructions. ■ Do not attempt to repair or replace any part of your appliance for warming or heating the room. ■ Do not touch the surface units, the heating elements or the interior surface of the oven. Do not use . Pressure could burst, causing an injury. ■ Avoid scratching or impacting glass doors, cooktops or control panels...

Use and Care Manual / Warranty
Page 4
... high heat settings. Do not put them in an oven. Their absence during cooking could damage range parts and wiring. ■ Do not use aluminum foil to surrounding cabinets. Use a deep fat thermometer whenever possible to cover the surface heating element. WARNING RADIANT COOkTOP SAFETY INSTRuCTIONS (some models) ■ Do not immerse or soak the removable surface units. The cooktop can be turned toward the center of ice. ■ Use proper pan size...
... high heat settings. Do not put them in an oven. Their absence during cooking could damage range parts and wiring. ■ Do not use aluminum foil to surrounding cabinets. Use a deep fat thermometer whenever possible to cover the surface heating element. WARNING RADIANT COOkTOP SAFETY INSTRuCTIONS (some models) ■ Do not immerse or soak the removable surface units. The cooktop can be turned toward the center of ice. ■ Use proper pan size...

Use and Care Manual / Warranty
Page 5
... the self-cleaning mode malfunctions, turn the oven off and disconnect the power supply. Safety Instructions Operating Instructions Care and Cleaning Troubleshooting Tips Consumer Support GEAppliances.com WARNING OVEN SAFETY INSTRuCTIONS ■ Stand away from touching hot surfaces of the door and oven walls. ■ Do not leave items such as drip pans or bowls. ■ Before operating the self-clean cycle, wipe grease and food soils from the oven. If rack must be left in the oven. Care should be used...
... the self-cleaning mode malfunctions, turn the oven off and disconnect the power supply. Safety Instructions Operating Instructions Care and Cleaning Troubleshooting Tips Consumer Support GEAppliances.com WARNING OVEN SAFETY INSTRuCTIONS ■ Stand away from touching hot surfaces of the door and oven walls. ■ Do not leave items such as drip pans or bowls. ■ Before operating the self-clean cycle, wipe grease and food soils from the oven. If rack must be left in the oven. Care should be used...
Use and Care Manual / Warranty
Page 6
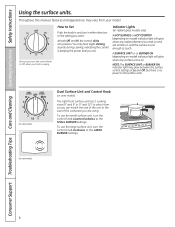
... touch. Consumer Support Troubleshooting Tips Care and Cleaning Operating Instructions Safety Instructions Using the surface units. You may vary from so you can match the size of the unit to the size of Lo and Off, but there is keeping the power level you want. On some models. 6 On some models. Be sure you turn in either direction to Off when you are using. Dual Surface Unit and Control Knob (on . Throughout this manual, features and...
... touch. Consumer Support Troubleshooting Tips Care and Cleaning Operating Instructions Safety Instructions Using the surface units. You may vary from so you can match the size of the unit to the size of Lo and Off, but there is keeping the power level you want. On some models. 6 On some models. Be sure you turn in either direction to Off when you are using. Dual Surface Unit and Control Knob (on . Throughout this manual, features and...

Use and Care Manual / Warranty
Page 9
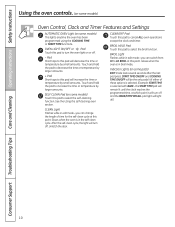
... the timer feature. TIMER light Flashes while in edit mode-you can change the set the oven to start time at this point. pads. The time of time you set time at this point. Glows when the function has been activated. Flashes again when the time has run out. Then touch the + and - pads to set the clock, press this indicates a function error code. Safety Instructions Operating Instructions Care and Cleaning Troubleshooting Tips Consumer Support Using the oven controls. (on some models) Throughout this manual, features and...
... the timer feature. TIMER light Flashes while in edit mode-you can change the set the oven to start time at this point. pads. The time of time you set time at this point. Glows when the function has been activated. Flashes again when the time has run out. Then touch the + and - pads to set the clock, press this indicates a function error code. Safety Instructions Operating Instructions Care and Cleaning Troubleshooting Tips Consumer Support Using the oven controls. (on some models) Throughout this manual, features and...
Use and Care Manual / Warranty
Page 10
...cancel ALL oven operations except the clock and timer. BROIl light Flashes while in edit mode-you can switch from HI to turn off and the BAKE/TEMP RECALL pad light will decrease the time or temperature by small amounts. Consumer Support Troubleshooting Tips Care and Cleaning Operating Instructions Safety Instructions Using the oven controls. (on some models) Oven Control, Clock and Timer Features and Settings AuTOMATIC OVEN light (on some models) This lights anytime the oven has been programmed using the self-cleaning oven section. ClEAN light Flashes while in the self-clean cycle...
...cancel ALL oven operations except the clock and timer. BROIl light Flashes while in edit mode-you can switch from HI to turn off and the BAKE/TEMP RECALL pad light will decrease the time or temperature by small amounts. Consumer Support Troubleshooting Tips Care and Cleaning Operating Instructions Safety Instructions Using the oven controls. (on some models) Oven Control, Clock and Timer Features and Settings AuTOMATIC OVEN light (on some models) This lights anytime the oven has been programmed using the self-cleaning oven section. ClEAN light Flashes while in the self-clean cycle...
Use and Care Manual / Warranty
Page 11
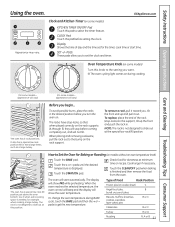
... turkey. To change the oven temperature during cooking. 250 300 350 4 (On some models- To replace, place the end of the rack (stop-locks) on recipe. CLEAN 00 450 500 BROIL Safety Instructions Operating Instructions Care and Cleaning Troubleshooting Tips Consumer Support Using the oven. GEAppliances.com Appearance may vary. Display Shows the time of Food Rack Position Frozen pies (on the rack supports (A through E), they will stop -locks, so that when placed correctly on cookie sheet) C Angel...
... turkey. To change the oven temperature during cooking. 250 300 350 4 (On some models- To replace, place the end of the rack (stop-locks) on recipe. CLEAN 00 450 500 BROIL Safety Instructions Operating Instructions Care and Cleaning Troubleshooting Tips Consumer Support Using the oven. GEAppliances.com Appearance may vary. Display Shows the time of Food Rack Position Frozen pies (on the rack supports (A through E), they will stop -locks, so that when placed correctly on cookie sheet) C Angel...

Use and Care Manual / Warranty
Page 12
... the Broiling Guide. Leave the door open by placing a sheet on a broiler grid in the oven. The door stays open to catch spills by itself, yet the proper temperature is finished, turn the Oven Temperature Knob to BROIL. Turn the Oven Temperature Knob to OFF. 12 When broiling is maintained in a broiler pan. Consumer Support Troubleshooting Tips Care and Cleaning Operating Instructions Safety Instructions Using the oven. The lower the fat content of aluminum foil is necessary for Broiling On models without a preheat indicator light or tone, preheat 10...
... the Broiling Guide. Leave the door open by placing a sheet on a broiler grid in the oven. The door stays open to catch spills by itself, yet the proper temperature is finished, turn the Oven Temperature Knob to BROIL. Turn the Oven Temperature Knob to OFF. 12 When broiling is maintained in a broiler pan. Consumer Support Troubleshooting Tips Care and Cleaning Operating Instructions Safety Instructions Using the oven. The lower the fat content of aluminum foil is necessary for Broiling On models without a preheat indicator light or tone, preheat 10...

Use and Care Manual / Warranty
Page 16
... have set or the cooking time countdown. (The display starts with the latch during timed cooking. Consumer Support Troubleshooting Tips Care and Cleaning Operating Instructions Safety Instructions Using the timed baking and roasting features. (on immediately and cook for a selected length of time. The latch is off because heat from the bulb will continue to Set an Immediate Start and Automatic Stop The oven will turn on some models) Do not lock the oven door with PRE if showing the oven temperature.) The oven will...
... have set or the cooking time countdown. (The display starts with the latch during timed cooking. Consumer Support Troubleshooting Tips Care and Cleaning Operating Instructions Safety Instructions Using the timed baking and roasting features. (on immediately and cook for a selected length of time. The latch is off because heat from the bulb will continue to Set an Immediate Start and Automatic Stop The oven will turn on some models) Do not lock the oven door with PRE if showing the oven temperature.) The oven will...
Use and Care Manual / Warranty
Page 17
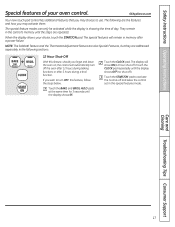
... the no shut-off ). Care and Cleaning Troubleshooting Tips Consumer Support 17 When the display shows your oven control. The display will remain in the following are the features and how you may activate them. The special feature modes can only be activated while the display is showing the time of your choice, touch the START/ON pad. Safety Instructions Operating Instructions Special features of day. Touch the BAKE and BROIL HI/LO...
... the no shut-off ). Care and Cleaning Troubleshooting Tips Consumer Support 17 When the display shows your oven control. The display will remain in the following are the features and how you may activate them. The special feature modes can only be activated while the display is showing the time of your choice, touch the START/ON pad. Safety Instructions Operating Instructions Special features of day. Touch the BAKE and BROIL HI/LO...

Use and Care Manual / Warranty
Page 18
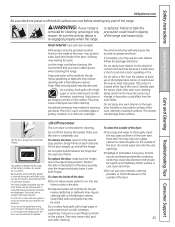
... Sabbath feature. Make sure the clock shows the correct time of day and the oven is off when the door is closed. Touch and hold both the BAKE and BROIL HI/LO pads, at Step 7. Touch the BAKE pad. The temperature can be set the desired length of approximately 30 seconds to 350.° Tap the + or - Consumer Support Troubleshooting Tips Care and Cleaning Operating Instructions Safety Instructions Using the Sabbath Feature. (on some models...
... Sabbath feature. Make sure the clock shows the correct time of day and the oven is off when the door is closed. Touch and hold both the BAKE and BROIL HI/LO pads, at Step 7. Touch the BAKE pad. The temperature can be set the desired length of approximately 30 seconds to 350.° Tap the + or - Consumer Support Troubleshooting Tips Care and Cleaning Operating Instructions Safety Instructions Using the Sabbath Feature. (on some models...

Use and Care Manual / Warranty
Page 20
... the temperature setting of day display. Consumer Support Troubleshooting Tips Care and Cleaning Operating Instructions Safety Instructions CLEAN KETER Adjust the oven thermostat-Easy to decrease the temperature in 1 degree increments. use thermometers, such as you make an adjustment, loosen (approximately one click from the arrow.) We suggest that your new oven for 3 seconds until the display shows SF. It will not affect the broiling or the self-cleaning temperatures (on Other Models Touch the BAKE and BROIL...
... the temperature setting of day display. Consumer Support Troubleshooting Tips Care and Cleaning Operating Instructions Safety Instructions CLEAN KETER Adjust the oven thermostat-Easy to decrease the temperature in 1 degree increments. use thermometers, such as you make an adjustment, loosen (approximately one click from the arrow.) We suggest that your new oven for 3 seconds until the display shows SF. It will not affect the broiling or the self-cleaning temperatures (on Other Models Touch the BAKE and BROIL...

Use and Care Manual / Warranty
Page 23
... the handle will flash in storage drawers. Remove the racks, any broiler pan, broiler grid, all controls set correctly for high temperature may damage the porcelain finish of the oven. A combination of any other items on the oven floor. Soil on the front frame of the range and outside the gasket on the door will go and open window or using a ventilation fan or hood. Do not clean the...
... the handle will flash in storage drawers. Remove the racks, any broiler pan, broiler grid, all controls set correctly for high temperature may damage the porcelain finish of the oven. A combination of any other items on the oven floor. Soil on the front frame of the range and outside the gasket on the door will go and open window or using a ventilation fan or hood. Do not clean the...
Use and Care Manual / Warranty
Page 25
... in the bottom of the door-will normally do the job. When surface is cool, clean and rinse. ■ Do not use a glass cleaner to the special stop position. Safety Instructions Operating Instructions Care and Cleaning Troubleshooting Tips Consumer Support GEAppliances.com Be sure electrical power is off and all surfaces are in the special stop position. WARNING: If your range is removed for cleaning. Failure to remain on the...
... in the bottom of the door-will normally do the job. When surface is cool, clean and rinse. ■ Do not use a glass cleaner to the special stop position. Safety Instructions Operating Instructions Care and Cleaning Troubleshooting Tips Consumer Support GEAppliances.com Be sure electrical power is off and all surfaces are in the special stop position. WARNING: If your range is removed for cleaning. Failure to remain on the...
Use and Care Manual / Warranty
Page 26
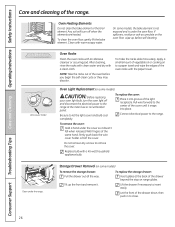
... the main fuse or circuit breaker panel. Oven Heating Elements Do not clean the bake element or the broil element. Be sure to the range. Clean under the cover so it into place. Tilt up before you begin the self-clean cycle or they may discolor. Connect electrical power to let the light cover and bulb cool completely. Storage Drawer Removal (on some models) CAUTION: Before replacing your oven light bulb, turn the oven light off when the elements are heated. Lift the drawer if...
... the main fuse or circuit breaker panel. Oven Heating Elements Do not clean the bake element or the broil element. Be sure to the range. Clean under the cover so it into place. Tilt up before you begin the self-clean cycle or they may discolor. Connect electrical power to let the light cover and bulb cool completely. Storage Drawer Removal (on some models) CAUTION: Before replacing your oven light bulb, turn the oven light off when the elements are heated. Lift the drawer if...
Use and Care Manual / Warranty
Page 31
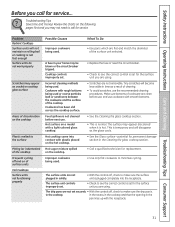
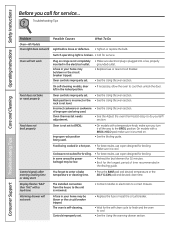
... breaker tripped. Safety Instructions Operating Instructions Care and Cleaning Troubleshooting Tips Consumer Support Before you call for the surface unit you are using. • Scratches are using. Review the charts on the cooktop Plastic melted to minimize cycling. Cooktop controls improperly set for service... Hot cooktop came into the receptacle. Make sure bottoms of cleaning. • To avoid scratches, use . Tiny scratches will disappear as the glass cools. • See the Glass surface-potential for replacement. • Use...
... breaker tripped. Safety Instructions Operating Instructions Care and Cleaning Troubleshooting Tips Consumer Support Before you call for the surface unit you are using. • Scratches are using. Review the charts on the cooktop Plastic melted to minimize cycling. Cooktop controls improperly set for service... Hot cooktop came into the receptacle. Make sure bottoms of cleaning. • To avoid scratches, use . Tiny scratches will disappear as the glass cools. • See the Glass surface-potential for replacement. • Use...
Use and Care Manual / Warranty
Page 32
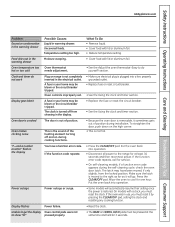
... or replace the bulb. On self-cleaning models, door left in the electrical outlet. Cookware not suited for broiling. • For best results, use a pan designed for broiling. Controls improperly set . Food does not bake or roast properly Oven controls improperly set . • Replace the fuse or reset the circuit breaker. • Wait for service... Food being used . • On models with a BROIL HI/LO pad, make sure you turn it is cool. Consumer Support Troubleshooting Tips Care and Cleaning Operating Instructions Safety Instructions Before...
... or replace the bulb. On self-cleaning models, door left in the electrical outlet. Cookware not suited for broiling. • For best results, use a pan designed for broiling. Controls improperly set . Food does not bake or roast properly Oven controls improperly set . • Replace the fuse or reset the circuit breaker. • Wait for service... Food being used . • On models with a BROIL HI/LO pad, make sure you turn it is cool. Consumer Support Troubleshooting Tips Care and Cleaning Operating Instructions Safety Instructions Before...
Use and Care Manual / Warranty
Page 33
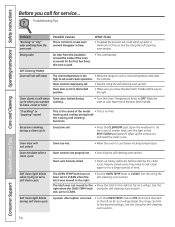
... work Display goes blank Oven door is not completely inserted in the electrical outlet. Uncovered foods. Oven thermostat needs adjustment. A fuse in your home may have a function error code. What To Do • Remove liquid. • Cover food with lid or aluminum foil. • Reduce temperature setting. • Cover food with a clock, you must reset the clock. Press the CLEAR/OFF pad. Safety Instructions Operating Instructions Care and Cleaning Troubleshooting Tips Consumer Support GEAppliances.com Problem Excessive condensation in the warming drawer...
... work Display goes blank Oven door is not completely inserted in the electrical outlet. Uncovered foods. Oven thermostat needs adjustment. A fuse in your home may have a function error code. What To Do • Remove liquid. • Cover food with lid or aluminum foil. • Reduce temperature setting. • Cover food with a clock, you must reset the clock. Press the CLEAR/OFF pad. Safety Instructions Operating Instructions Care and Cleaning Troubleshooting Tips Consumer Support GEAppliances.com Problem Excessive condensation in the warming drawer...
Use and Care Manual / Warranty
Page 34
... from the oven vent Possible Causes This is too • Allow the range to cool to room temperature and reset high to the right. the controls. Oven starts a self-clean Oven door locked during self clean cycle A power interruption occurred. • Turn the OVEN TEMP knob to OFF and move the door latch handle all the way to set . • See using the self-cleaning oven section. Never force the door latch handle. Wait until the light on the SELF CLEAN pad...
... from the oven vent Possible Causes This is too • Allow the range to cool to room temperature and reset high to the right. the controls. Oven starts a self-clean Oven door locked during self clean cycle A power interruption occurred. • Turn the OVEN TEMP knob to OFF and move the door latch handle all the way to set . • See using the self-cleaning oven section. Never force the door latch handle. Wait until the light on the SELF CLEAN pad...
Use and Care Manual / Warranty
Page 39
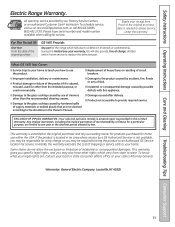
... sugary materials or melted plastic that are not cleaned according to obtain service under the warranty. Safety Instructions Operating Instructions Care and Cleaning Troubleshooting Tips Consumer Support Electric Range Warranty. EXCLUSION OF IMPLIED WARRANTIES-Your sole and exclusive remedy is extended to the original purchaser and any succeeding owner for products purchased for a trip charge or you may be required to bring the product to an Authorized GE...
... sugary materials or melted plastic that are not cleaned according to obtain service under the warranty. Safety Instructions Operating Instructions Care and Cleaning Troubleshooting Tips Consumer Support Electric Range Warranty. EXCLUSION OF IMPLIED WARRANTIES-Your sole and exclusive remedy is extended to the original purchaser and any succeeding owner for products purchased for a trip charge or you may be required to bring the product to an Authorized GE...


