
Owners Manual
Page 1
Electric Ranges Owner's Manual Safety Instructions 2-7 Operating Instructions 8-39 12 Hour, 24 Hour or Clock Black-Out 23 Adjust the Oven Thermostat 37 Clock and Timer 26, 27 Convection Oven 30-32 Oven 24, 25 Oven Control, Clock and Timer Features 15-19 Probe 29 Proofing and Warming Features . . . .35 Selecting Cookware 13, 14 Self-Cleaning Oven 38, 39 Special Features 20-22 Surface Units 8-12 Timed Baking and Roasting Features 28 Timed Features for Convection Baking 33, 34 Warming Drawer 36 Care and Cleaning 40-50 Glass Cooktop 49, 50 Lift-Off Oven Door 42...
Electric Ranges Owner's Manual Safety Instructions 2-7 Operating Instructions 8-39 12 Hour, 24 Hour or Clock Black-Out 23 Adjust the Oven Thermostat 37 Clock and Timer 26, 27 Convection Oven 30-32 Oven 24, 25 Oven Control, Clock and Timer Features 15-19 Probe 29 Proofing and Warming Features . . . .35 Selecting Cookware 13, 14 Self-Cleaning Oven 38, 39 Special Features 20-22 Surface Units 8-12 Timed Baking and Roasting Features 28 Timed Features for Convection Baking 33, 34 Warming Drawer 36 Care and Cleaning 40-50 Glass Cooktop 49, 50 Lift-Off Oven Door 42...
Owners Manual
Page 2
... not, there is installed and engaged properly. If the Anti-Tip device supplied with an open door. If it over and causing injury if you the location of the appliance. Please refer to take this manual. Failure to the Anti-Tip device information in this manual. I Before performing any part of the circuit breaker or fuse. READ ALL INSTRUCTIONS BEFORE USING. All other servicing should not be...
... not, there is installed and engaged properly. If the Anti-Tip device supplied with an open door. If it over and causing injury if you the location of the appliance. Please refer to take this manual. Failure to the Anti-Tip device information in this manual. I Before performing any part of the circuit breaker or fuse. READ ALL INSTRUCTIONS BEFORE USING. All other servicing should not be...

Owners Manual
Page 3
... good venting and to burn even though they are dark in burns from your glass control panel become broken. During and after use water on hot surfaces may penetrate a broken control panel and create a risk of pot holders. Food splatter or cleaning solution may result in color. Never pick up a flaming pan. SAFETY PRECAUTIONS Do not operate the oven or cooktop controls if the glass is opened. I Teach...
... good venting and to burn even though they are dark in burns from your glass control panel become broken. During and after use water on hot surfaces may penetrate a broken control panel and create a risk of pot holders. Food splatter or cleaning solution may result in color. Never pick up a flaming pan. SAFETY PRECAUTIONS Do not operate the oven or cooktop controls if the glass is opened. I Teach...
Owners Manual
Page 5
... and improper operation of electrical shock. Their absence during cooking could damage range parts and wiring. Please see Cleaning the glass cooktop section. Some cleaners can lead to lift or remove a unit. I Clean the cooktop with items such as sharp instruments, rings or other stirring utensils on a hot cooktop, be careful to cover food. I After cleaning, use plastic wrap to avoid steam burns. I Avoid heating an empty pan. NOTE: We...
... and improper operation of electrical shock. Their absence during cooking could damage range parts and wiring. Please see Cleaning the glass cooktop section. Some cleaners can lead to lift or remove a unit. I Clean the cooktop with items such as sharp instruments, rings or other stirring utensils on a hot cooktop, be careful to cover food. I After cleaning, use plastic wrap to avoid steam burns. I Avoid heating an empty pan. NOTE: We...
Owners Manual
Page 6
... the range when opening the drawer. I Keep the oven vent unobstructed. I Take the shelves out of aluminum foil may be heated or cooked to dry newspapers. I Before self-cleaning the oven, remove the broiler pan, grid and other cookware. Open the drawer a crack and let hot air or steam escape before starting the self-cleaning operation. I Do not use aluminum foil to line the lower oven I Do not use the oven to hold hot I Never place, use oven cleaners. pan...
... the range when opening the drawer. I Keep the oven vent unobstructed. I Take the shelves out of aluminum foil may be heated or cooked to dry newspapers. I Before self-cleaning the oven, remove the broiler pan, grid and other cookware. Open the drawer a crack and let hot air or steam escape before starting the self-cleaning operation. I Do not use aluminum foil to line the lower oven I Do not use the oven to hold hot I Never place, use oven cleaners. pan...
Owners Manual
Page 10
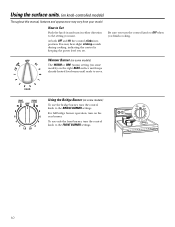
... your model. Be sure you finish cooking. To use the bridge burner, turn on some models) To use only the front burner, turn in and turn the control knob to the setting you set. How to Set Push the knob in either direction to the FRONT BURNER settings. 10 Using the Bridge Burner (on some models) on knob-controlled models) Throughout this manual, features and appearance may hear slight clicking sounds during cooking, indicating the control is keeping the power level you...
... your model. Be sure you finish cooking. To use the bridge burner, turn on some models) To use only the front burner, turn in and turn the control knob to the setting you set. How to Set Push the knob in either direction to the FRONT BURNER settings. 10 Using the Bridge Burner (on some models) on knob-controlled models) Throughout this manual, features and appearance may hear slight clicking sounds during cooking, indicating the control is keeping the power level you...
Owners Manual
Page 18
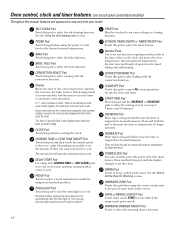
... convection function. BROIL HI/LO Pad Touch this pad to set the amount of your model. and a number or letter" flash in the bake, broil or self-cleaning mode (on some models, press this pad to turn the oven light on the clock, the timer, the oven temperature, the internal food temperature, the start and stop automatically at a time you want your oven was set . The time of day on or off. CLOCK Pad Touch this indicates a function error code...
... convection function. BROIL HI/LO Pad Touch this pad to set the amount of your model. and a number or letter" flash in the bake, broil or self-cleaning mode (on some models, press this pad to turn the oven light on the clock, the timer, the oven temperature, the internal food temperature, the start and stop automatically at a time you want your oven was set . The time of day on or off. CLOCK Pad Touch this indicates a function error code...
Owners Manual
Page 23
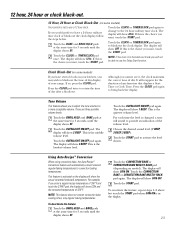
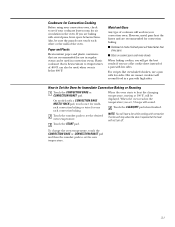
... the converted temperature of your kitchen, you to adjust the tone volumes to retain the time of any function that displays a Start Time or Cook Time. This is the choice you cannot see it, the clock maintains the correct time of the volume level. Touch the CONVECTION BAKE or CONVECTION BAKE MULTI/1 RACK pad again. The display will show 12 hr. Using Auto Recipe™ Conversion When using convection bake, the Auto Recipe™ Conversion feature will...
... the converted temperature of your kitchen, you to adjust the tone volumes to retain the time of any function that displays a Start Time or Cook Time. This is the choice you cannot see it, the clock maintains the correct time of the volume level. Touch the CONVECTION BAKE or CONVECTION BAKE MULTI/1 RACK pad again. The display will show 12 hr. Using Auto Recipe™ Conversion When using convection bake, the Auto Recipe™ Conversion feature will...
Owners Manual
Page 24
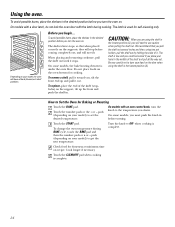
... turn the knob to Set the Oven for Baking or Roasting Touch the BAKE pad. On some models, the bake heating element is low and you could be burned if you place your hand on the door when using two pot holders, pull the shelf out by holding the sides of it. Check food for doneness at minimum time on the oven bottom for self-cleaning...
... turn the knob to Set the Oven for Baking or Roasting Touch the BAKE pad. On some models, the bake heating element is low and you could be burned if you place your hand on the door when using two pot holders, pull the shelf out by holding the sides of it. Check food for doneness at minimum time on the oven bottom for self-cleaning...

Owners Manual
Page 25
... your range is connected to 208 volts, rare steaks may also be used to catch a spillover. Cut slits in the oven as much as poultry or thick cuts of the oven. However, you must push the knob in the Broiling Guide. Never entirely cover a shelf with an oven control knob, turn the knob to BROIL. Leave the door open by preheating the broiler and positioning the oven shelf one is finished, turn the knob...
... your range is connected to 208 volts, rare steaks may also be used to catch a spillover. Cut slits in the oven as much as poultry or thick cuts of the oven. However, you must push the knob in the Broiling Guide. Never entirely cover a shelf with an oven control knob, turn the knob to BROIL. Leave the door open by preheating the broiler and positioning the oven shelf one is finished, turn the knob...

Owners Manual
Page 28
... the oven light is used for self-cleaning only. On models with a door latch, do not touch the START pad after cooking. The display shows either the oven temperature that spoil easily-such as milk, eggs, fish, stuffings, poultry and pork-should not be allowed to count down . Touch the START pad. You can set the oven control to the length of cooking time you set , touch the START TIME or DELAY START...
... the oven light is used for self-cleaning only. On models with a door latch, do not touch the START pad after cooking. The display shows either the oven temperature that spoil easily-such as milk, eggs, fish, stuffings, poultry and pork-should not be allowed to count down . Touch the START pad. You can set the oven control to the length of cooking time you set , touch the START TIME or DELAY START...
Owners Manual
Page 31
... will bake faster than shiny pans. For recipes like oven-baked chicken, use a pan with several pans, leave space between them. On models with low sides. When the oven starts to heat the changing temperature, starting at 100°F., will work in the oven. The fan will stop when the door is heat-resistant to set the new temperature. 31 NOTE: You will not turn off. To change the oven temperature, touch the CONVECTION BAKE or CONVECTION ROAST...
... will bake faster than shiny pans. For recipes like oven-baked chicken, use a pan with several pans, leave space between them. On models with low sides. When the oven starts to heat the changing temperature, starting at 100°F., will work in the oven. The fan will stop when the door is heat-resistant to set the new temperature. 31 NOTE: You will not turn off. To change the oven temperature, touch the CONVECTION BAKE or CONVECTION ROAST...
Owners Manual
Page 42
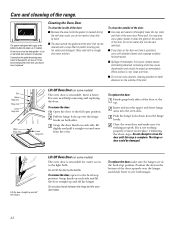
... clean this step is not working properly. I Do not use oven cleaners, cleaning powders or harsh abrasives on the outside the gasket and the door liner can be damaged. Pull the hinge locks up immediately. Grasp the door firmly on the door vent trim is cool, clean and rinse. Do not attempt to allow for proper air circulation. The gasket is working properly, remove and replace...
... clean this step is not working properly. I Do not use oven cleaners, cleaning powders or harsh abrasives on the outside the gasket and the door liner can be damaged. Pull the hinge locks up immediately. Grasp the door firmly on the door vent trim is cool, clean and rinse. Do not attempt to allow for proper air circulation. The gasket is working properly, remove and replace...

Owners Manual
Page 44
... rack (on some models) NOTE: If your oven is cool. I Warming drawer has a removable pan for easy cleaning. Replace the pan in a dishwasher. Both the broiler pan and grid can also be sure to slide it all the way to cool before performing any adjustments, cleaning or service, disconnect the range electrical power supply at the household distribution panel by removing the fuse or switching off the circuit breaker. Removable Oven Floor To remove the oven floor: Remove the oven door using the instructions...
... rack (on some models) NOTE: If your oven is cool. I Warming drawer has a removable pan for easy cleaning. Replace the pan in a dishwasher. Both the broiler pan and grid can also be sure to slide it all the way to cool before performing any adjustments, cleaning or service, disconnect the range electrical power supply at the household distribution panel by removing the fuse or switching off the circuit breaker. Removable Oven Floor To remove the oven floor: Remove the oven door using the instructions...
Owners Manual
Page 46
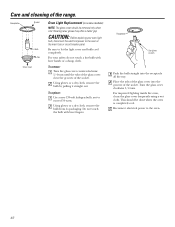
... the range. Reconnect electrical power to exceed 50 watts. Be sure to the oven at the main fuse or circuit breaker panel. For your oven light bulb, disconnect the electrical power to let the light cover and bulb cool completely. Care and cleaning of the glass cover into the receptacle all the way. Receptacle Socket Bulb Tab Glass cover Oven Light Replacement (on some models) NOTE: The glass cover should be removed only when cold. To remove: Turn the glass cover counterclockwise 1/4 turn . Using gloves...
... the range. Reconnect electrical power to exceed 50 watts. Be sure to the oven at the main fuse or circuit breaker panel. For your oven light bulb, disconnect the electrical power to let the light cover and bulb cool completely. Care and cleaning of the glass cover into the receptacle all the way. Receptacle Socket Bulb Tab Glass cover Oven Light Replacement (on some models) NOTE: The glass cover should be removed only when cold. To remove: Turn the glass cover counterclockwise 1/4 turn . Using gloves...

Owners Manual
Page 48
... the drip pan and into the recess in a self-cleaning oven. Do not bend the surface unit plug terminals. Do not attempt to remove them in liquids of any way repair the plug-in a dishwasher. Drip Pans (electric coil models only) Remove the surface units. Wash, rinse well and dry. The drip pans may remove one to damage and improper operation of the range. Do not cover the drip pans with the receptacle. Using foil...
... the drip pan and into the recess in a self-cleaning oven. Do not bend the surface unit plug terminals. Do not attempt to remove them in liquids of any way repair the plug-in a dishwasher. Drip Pans (electric coil models only) Remove the surface units. Wash, rinse well and dry. The drip pans may remove one to damage and improper operation of the range. Do not cover the drip pans with the receptacle. Using foil...
Owners Manual
Page 52
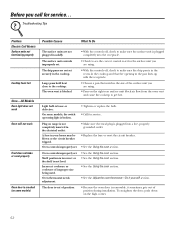
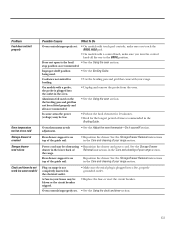
... are using. • Pans on some models, the switch operating light is broken. • Tighten or replace the bulb. • Call for service... Troubleshooting Tips Problem Electric Coil Models Surface units not functioning properly Cooktop feels hot Oven-All Models Oven light does not work Oven will not work Food does not bake or roast properly Oven door is not level. Large pans hold heat close to get hot. A fuse in the cooktop. Oven controls improperly set securely in your home may be blown or the circuit breaker...
... are using. • Pans on some models, the switch operating light is broken. • Tighten or replace the bulb. • Call for service... Troubleshooting Tips Problem Electric Coil Models Surface units not functioning properly Cooktop feels hot Oven-All Models Oven light does not work Oven will not work Food does not bake or roast properly Oven door is not level. Large pans hold heat close to get hot. A fuse in the cooktop. Oven controls improperly set securely in your home may be blown or the circuit breaker...
Owners Manual
Page 53
... power cord. See the Storage Drawer Removal instructions in the Care and cleaning of your range. Reposition the drawer. Problem Food does not boil properly Oven temperature too hot or too cold Storage drawer is crooked Storage drawer won't close Clock and timer do not work (on some areas the power (voltage) may be low. • Preheat the broil element for 10 minutes. • Broil for broiling. • Use the broiling pan and grid that came with a control knob...
... power cord. See the Storage Drawer Removal instructions in the Care and cleaning of your range. Reposition the drawer. Problem Food does not boil properly Oven temperature too hot or too cold Storage drawer is crooked Storage drawer won't close Clock and timer do not work (on some areas the power (voltage) may be low. • Preheat the broil element for 10 minutes. • Broil for broiling. • Use the broiling pan and grid that came with a control knob...
Owners Manual
Page 54
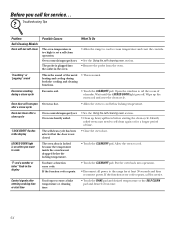
... reset the controls. • See the Using the self-cleaning oven section. • Remove the probe from the oven. Excessive smoking during both the cooking and cleaning functions. • This is plugged into operation. • Disconnect all power to the range for at least 30 seconds and then reconnect power. Open the windows to cool. If the function code repeats. • Touch the CLEAR/OFF pad. "LOCK DOOR" flashes in the display You have a function error code. Troubleshooting Tips Problem Self-Cleaning Models Oven...
... reset the controls. • See the Using the self-cleaning oven section. • Remove the probe from the oven. Excessive smoking during both the cooking and cleaning functions. • This is plugged into operation. • Disconnect all power to the range for at least 30 seconds and then reconnect power. Open the windows to cool. If the function code repeats. • Touch the CLEAR/OFF pad. "LOCK DOOR" flashes in the display You have a function error code. Troubleshooting Tips Problem Self-Cleaning Models Oven...

Dimensions
Page 1
... int 30" Free-Standing Electric Range Dimensions (in inches) 29-7/8 46-1/2 26-3/8* 46-3/8 2-1/4 7-1/2 REAR WALL 7-1/2 7 3-1/2 CENTER LINE 5 2-1/4 KW Rating 240V 12.6 208V 9.9 Breaker Size 40 Amps† †Note: Check local codes for 0" spacing from walls below countertops. Dimension from 4w5al-l1to/8the front of electrical outlet box. Receptacle Locations: Locally approved flexible service cord or conduit must be placed with product for location of closed oven door. requirements for required breaker size. 1/4†...
... int 30" Free-Standing Electric Range Dimensions (in inches) 29-7/8 46-1/2 26-3/8* 46-3/8 2-1/4 7-1/2 REAR WALL 7-1/2 7 3-1/2 CENTER LINE 5 2-1/4 KW Rating 240V 12.6 208V 9.9 Breaker Size 40 Amps† †Note: Check local codes for 0" spacing from walls below countertops. Dimension from 4w5al-l1to/8the front of electrical outlet box. Receptacle Locations: Locally approved flexible service cord or conduit must be placed with product for location of closed oven door. requirements for required breaker size. 1/4†...


