
Installation Instructions
Page 1
... * Inspect the dwer exhaust outlet and metal (semi-rigid or foil-D,pe ) duct is Clean (see secdon 1) and Meets Attached Installation Specifications (see secdon 6). in accordance with the instructions fbt]nd in a Location Where They Will Be Noticed By the Owner. Move the D_Ter to the outdoors. Step 11 Place the Owners Manual and the Installation Instructions in "Connecting Tile Dryer To House Vent" on or...
... * Inspect the dwer exhaust outlet and metal (semi-rigid or foil-D,pe ) duct is Clean (see secdon 1) and Meets Attached Installation Specifications (see secdon 6). in accordance with the instructions fbt]nd in a Location Where They Will Be Noticed By the Owner. Move the D_Ter to the outdoors. Step 11 Place the Owners Manual and the Installation Instructions in "Connecting Tile Dryer To House Vent" on or...

Installation Instructions
Page 2
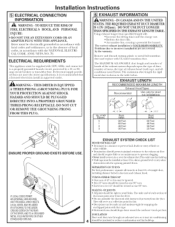
... 3 fL * Connect flexible metal connector * Open shut-off within 6 fL oL and in . WALL / INTERNADLUCT OPENING CHECKTHATEXHAUST HOODDAMPEROPENS ANDCLOSEFSREELY. Installation instructions Minimum Clearance Other Than Alcove or Closet Installation Minimum clearance m combustible surfhces and for air opening are: 0 in . NEVER REUSE OLD FLEXIBLE CONNECTORS. National Pipe Taper thread plugged rapping, accessible for use with UL listed transition duct. The length of test pressme equal to dryer and gas supply. 2 rigid...
... 3 fL * Connect flexible metal connector * Open shut-off within 6 fL oL and in . WALL / INTERNADLUCT OPENING CHECKTHATEXHAUST HOODDAMPEROPENS ANDCLOSEFSREELY. Installation instructions Minimum Clearance Other Than Alcove or Closet Installation Minimum clearance m combustible surfhces and for air opening are: 0 in . NEVER REUSE OLD FLEXIBLE CONNECTORS. National Pipe Taper thread plugged rapping, accessible for use with UL listed transition duct. The length of test pressme equal to dryer and gas supply. 2 rigid...

Installation Instructions
Page 3
... GAS CONNECTIONS! If leaks are not to be connected directly to the brass fittings. Check alt connections for leaks with soapg solution or equivalent. Installation Instructions [] RECONNECTING GAS Listed connector ANSI Z21.24 / CSA 6.10 NEW METAL FLEXIBLEGAS LINECONNECTOR ADAPTER 3/8" NPT ELBOW ITEMSNOT SUPPLIED 118" NPT PIPE PLUG FOR GAS INLET PRESSURE SHUT-OFF PIPE SIZE AT LEAST 1/2" Note: The connector and fittings are designed for use...
... GAS CONNECTIONS! If leaks are not to be connected directly to the brass fittings. Check alt connections for leaks with soapg solution or equivalent. Installation Instructions [] RECONNECTING GAS Listed connector ANSI Z21.24 / CSA 6.10 NEW METAL FLEXIBLEGAS LINECONNECTOR ADAPTER 3/8" NPT ELBOW ITEMSNOT SUPPLIED 118" NPT PIPE PLUG FOR GAS INLET PRESSURE SHUT-OFF PIPE SIZE AT LEAST 1/2" Note: The connector and fittings are designed for use...
Installation Instructions
Page 4
...- DO NOT USE DUCT LONGER THAN SPECIFIED IN THE EXHAUST LENGTH TABLE. No. Duct joints can be supplied with the opening pointed down toward the outdoors _½inch per feot iNSULATION Duct work that a licensed electrician install an approved outlet. _WARNING - amp circuit breaker or time-delay fi_se. Remove and discard existing plastic or metal foil transition duct and replace with d t_ct rope. Installation instructions [] ELECTRICAL CONNECTION iNFORMATiON WARNING- TO...
...- DO NOT USE DUCT LONGER THAN SPECIFIED IN THE EXHAUST LENGTH TABLE. No. Duct joints can be supplied with the opening pointed down toward the outdoors _½inch per feot iNSULATION Duct work that a licensed electrician install an approved outlet. _WARNING - amp circuit breaker or time-delay fi_se. Remove and discard existing plastic or metal foil transition duct and replace with d t_ct rope. Installation instructions [] ELECTRICAL CONNECTION iNFORMATiON WARNING- TO...

Installation Instructions
Page 5
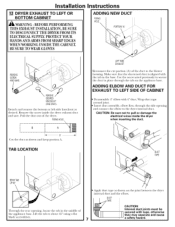
... REAR EXHAUST {Vented at least once a year. Installation instructions [_ EXHAUST CONNECTION _ WARNING - These fasteners can accumulate lint, creating a potential fire hazard. * Never install a screen in the exhaust length ruble. THiS DRYER COMES READY FOR REAR EXHAUSTING. NOTE: ELBOWS WiLL PREVENT DUCT KiNKiNG AND COLLAPSING. CSA(AGAA) PPROVED NEWFLEXIBLGEAS LINECONNECTOR GAS EXTERNALINLET DUCT OPENING DUCTTAPEOR DUCTCLAMP 4" METALDUCT (CUTTOPROPER LENGTH) DUCTTAPEOR DUCTCLAMP NOTEW: ESTRONGLRYECOMMENSDOLIDMETALEXHAUSDTUCTING. e Use only 4" rigid metal or Ui,-listed flexible...
... REAR EXHAUST {Vented at least once a year. Installation instructions [_ EXHAUST CONNECTION _ WARNING - These fasteners can accumulate lint, creating a potential fire hazard. * Never install a screen in the exhaust length ruble. THiS DRYER COMES READY FOR REAR EXHAUSTING. NOTE: ELBOWS WiLL PREVENT DUCT KiNKiNG AND COLLAPSING. CSA(AGAA) PPROVED NEWFLEXIBLGEAS LINECONNECTOR GAS EXTERNALINLET DUCT OPENING DUCTTAPEOR DUCTCLAMP 4" METALDUCT (CUTTOPROPER LENGTH) DUCTTAPEOR DUCTCLAMP NOTEW: ESTRONGLRYECOMMENSDOLIDMETALEXHAUSDTUCTING. e Use only 4" rigid metal or Ui,-listed flexible...

Installation Instructions
Page 6
... not use sheet metal screws or other surf:does is approved for Clothes Dwer Transition Duct Subject 2158A" shall be necessai T to connect the dwer to overhead cabinets, ceiling, etc. If0-] BATHROOM OR BEDROOM INSTALLATION e The dryer MUST be vented to the outdoors with a clamp. 3. MOBILE OR MANUFACTURED HOME INSTALLATION e Installa/ion must conform with the NATIONAL FUEL GAS CODE, ANSI...
... not use sheet metal screws or other surf:does is approved for Clothes Dwer Transition Duct Subject 2158A" shall be necessai T to connect the dwer to overhead cabinets, ceiling, etc. If0-] BATHROOM OR BEDROOM INSTALLATION e The dryer MUST be vented to the outdoors with a clamp. 3. MOBILE OR MANUFACTURED HOME INSTALLATION e Installa/ion must conform with the NATIONAL FUEL GAS CODE, ANSI...
Installation Instructions
Page 7
... the electrical wires inside the dwer exhaust duct and save. CAUTION: Be sure not to secure the duct in place through the side opening , locate the tab in the base. BE SURE TO WEAR GLOVES Instructions ADDING NEW DUCT FIXING HOLE PORTIO"NA" REMOVE SCREW ANDSAVE. Remove the screw inside the dryer when inserting the duct, J_ DUCT // TAPE BENDTAB UP450 Through the real" opening and connect...
... the electrical wires inside the dwer exhaust duct and save. CAUTION: Be sure not to secure the duct in place through the side opening , locate the tab in the base. BE SURE TO WEAR GLOVES Instructions ADDING NEW DUCT FIXING HOLE PORTIO"NA" REMOVE SCREW ANDSAVE. Remove the screw inside the dryer when inserting the duct, J_ DUCT // TAPE BENDTAB UP450 Through the real" opening and connect...
Installation Instructions
Page 8
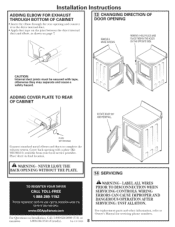
...-626-2000 (US) or 500A436P006 1-800-561-3344 (Canada). and dryer connect internal [_ CHANGING DIRECTION OF DOOR OPENING REMOV4E HINGESCREWS. ADDING COVER PLATE TO REAR OF CABINET ROTATDEOOR1800 ANDREINSTALL. LABEL ALL WIRES PRIOR TO DISCONNECTION WHEN SERVICING CONTROLS. Installation Instructions ADDING ELBOW FOR EXHAUST THROUGH BOTTOM OF CABINET . Insert die elbow dn'ough the rear opening with tape, otherwise they may separate and cause a safety hazard...
...-626-2000 (US) or 500A436P006 1-800-561-3344 (Canada). and dryer connect internal [_ CHANGING DIRECTION OF DOOR OPENING REMOV4E HINGESCREWS. ADDING COVER PLATE TO REAR OF CABINET ROTATDEOOR1800 ANDREINSTALL. LABEL ALL WIRES PRIOR TO DISCONNECTION WHEN SERVICING CONTROLS. Installation Instructions ADDING ELBOW FOR EXHAUST THROUGH BOTTOM OF CABINET . Insert die elbow dn'ough the rear opening with tape, otherwise they may separate and cause a safety hazard...


