Installation Instructions
Page 1
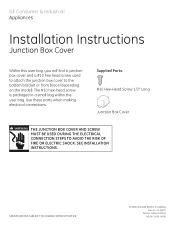
... ELECTRIC SHOCK. Use these parts when making electrical connections. GE Consumer & Industrial Appliances Installation Instructions Junction Box Cover Within this user bag, you will find a junction box cover and a #10 hex head screw used to attach the junction box cover to the bottom bracket or front brace (depending on the model). SEE INSTALLATION INSTRUCTIONS. #282 French SPECIFICATIONS SUBJECT TO CHANGE WITHOUT NOTICE © 2006 General Electric...
... ELECTRIC SHOCK. Use these parts when making electrical connections. GE Consumer & Industrial Appliances Installation Instructions Junction Box Cover Within this user bag, you will find a junction box cover and a #10 hex head screw used to attach the junction box cover to the bottom bracket or front brace (depending on the model). SEE INSTALLATION INSTRUCTIONS. #282 French SPECIFICATIONS SUBJECT TO CHANGE WITHOUT NOTICE © 2006 General Electric...
Installation Instructions
Page 2
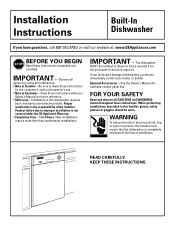
... visit our website at the time of electrical shock, fire, or injury to Installer - See the Owner's Manual for the consumer's and local inspector's use. • Note to allow for future reference. • Skill Level - Observe all CAUTIONS and WARNINGS shown throughout these instructions for available custom panel kits. The dishwasher MUST be worn. READ CAREFULLY. Installation of the installer. FOR YOUR SAFETY Read and...
... visit our website at the time of electrical shock, fire, or injury to Installer - See the Owner's Manual for the consumer's and local inspector's use. • Note to allow for future reference. • Skill Level - Observe all CAUTIONS and WARNINGS shown throughout these instructions for available custom panel kits. The dishwasher MUST be worn. READ CAREFULLY. Installation of the installer. FOR YOUR SAFETY Read and...
Installation Instructions
Page 3
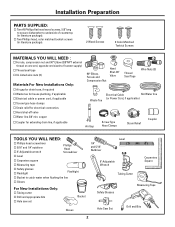
... dishwasher to fit water supply) Thread seal tape UL Listed wire nuts (3) Materials For New Installations Only: Air gap for drain hose, if required Waste tee for house plumbing, if applicable Electrical cable or power cord, if applicable Screw type hose clamps Strain relief for extending drain line, if applicable 90° Elbow, Ferrule and Compression Nut Hand Shut-Off Valve Thread Seal Tape Wire Nuts (3) Electrical Cable Hot Water line (or Power Cord, if applicable) Waste Tee Air Gap...
... dishwasher to fit water supply) Thread seal tape UL Listed wire nuts (3) Materials For New Installations Only: Air gap for drain hose, if required Waste tee for house plumbing, if applicable Electrical cable or power cord, if applicable Screw type hose clamps Strain relief for extending drain line, if applicable 90° Elbow, Ferrule and Compression Nut Hand Shut-Off Valve Thread Seal Tape Wire Nuts (3) Electrical Cable Hot Water line (or Power Cord, if applicable) Waste Tee Air Gap...
Installation Instructions
Page 4
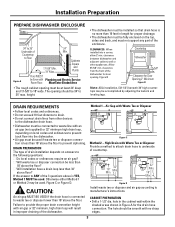
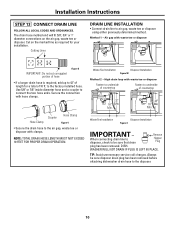
... waste tee or disposer lower than 18" above the floor to manufacturer's instructions. height. • The dishwasher must not support any part of the enclosure. clearance from other appliances. Air Gap with Plumbing and Electric Service Room Floor. High Drain with Waste Tee or Disposer Provide a method to attach drain hose to provide the proper drain connection height with an air gap (not supplied) or 32" minimum...
... waste tee or disposer lower than 18" above the floor to manufacturer's instructions. height. • The dishwasher must not support any part of the enclosure. clearance from other appliances. Air Gap with Plumbing and Electric Service Room Floor. High Drain with Waste Tee or Disposer Provide a method to attach drain hose to provide the proper drain connection height with an air gap (not supplied) or 32" minimum...
Installation Instructions
Page 5
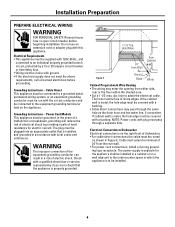
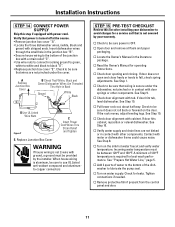
...: Remove house fuse or open circuit breaker before proceeding. Grounding Instructions - dia. Grounding Instructions - The plug must be run with local codes and ordinances. The hole must be plugged into an appropriate outlet that the appliance is properly grounded. 1-1/2" Dia. Cable Direct This appliance must be installed in a risk of sharp edges. If cabinet wall is to admit the electrical cable. The power-supply receptacle...
...: Remove house fuse or open circuit breaker before proceeding. Grounding Instructions - dia. Grounding Instructions - The plug must be run with local codes and ordinances. The hole must be plugged into an appropriate outlet that the appliance is properly grounded. 1-1/2" Dia. Cable Direct This appliance must be installed in a risk of sharp edges. If cabinet wall is to admit the electrical cable. The power-supply receptacle...
Installation Instructions
Page 6
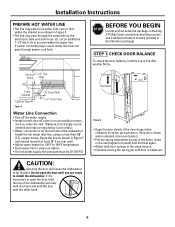
... to install the dishwasher. Increase Decrease Figure G • Open the door slowly, if the door drops when released, increase spring tension. Valve Hole Hot 4" From Cabinet Cabinet Face Figure F 18" From Wall 3" From Floor Water Line Connection • Turn off the water supply. • Install a hand shut-off 1-1/2" Dia. STEP 1 CHECK DOOR BALANCE To check the door balance, hold the door with plug is used, water line must be required by local codes.) • Water connection is...
... to install the dishwasher. Increase Decrease Figure G • Open the door slowly, if the door drops when released, increase spring tension. Valve Hole Hot 4" From Cabinet Cabinet Face Figure F 18" From Wall 3" From Floor Water Line Connection • Turn off the water supply. • Install a hand shut-off 1-1/2" Dia. STEP 1 CHECK DOOR BALANCE To check the door balance, hold the door with plug is used, water line must be required by local codes.) • Water connection is...
Installation Instructions
Page 7
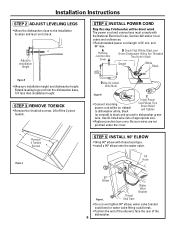
Installation Instructions STEP 2 ADJUST LEVELING LEGS • Move the dishwasher close to dishwasher green wire. A Remove Junction Box Cover B Check That White, Black and Green Dishwasher Wires Are Threaded Thru Hole in Back Ground White Black Figure H • Measure installation height and dishwasher height. Use UL listed wire nuts of the dishwasher. 6 The power cord and connections must comply with thread seal tape. • Install a 90° elbow onto the water valve. Be sure wires are...
Installation Instructions STEP 2 ADJUST LEVELING LEGS • Move the dishwasher close to dishwasher green wire. A Remove Junction Box Cover B Check That White, Black and Green Dishwasher Wires Are Threaded Thru Hole in Back Ground White Black Figure H • Measure installation height and dishwasher height. Use UL listed wire nuts of the dishwasher. 6 The power cord and connections must comply with thread seal tape. • Install a 90° elbow onto the water valve. Be sure wires are...
Installation Instructions
Page 11
... sure that drain Remove Hopper Plug plug has been removed. to air gap, waste tee or disposer using either previously determined method. TIP: Avoid unnecessary service call charges. Waste Tee Installation Disposer Installation Figure X IMPORTANT - Air gap with hose clamps. Use 5/8" or 7/8" inside diameter hose and a coupler to underside of length for your installation. Min. When connecting drain line to disposer, check to be sure disposer drain plug has been removed before attaching dishwasher drain hose to...
... sure that drain Remove Hopper Plug plug has been removed. to air gap, waste tee or disposer using either previously determined method. TIP: Avoid unnecessary service call charges. Waste Tee Installation Disposer Installation Figure X IMPORTANT - Air gap with hose clamps. Use 5/8" or 7/8" inside diameter hose and a coupler to underside of length for your installation. Min. When connecting drain line to disposer, check to be sure disposer drain plug has been removed before attaching dishwasher drain hose to...
Installation Instructions
Page 12
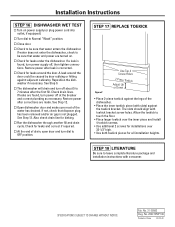
... the rack moves, adjust leveling legs. Turn on the door. A Remove Junction Box Cover B Check That White, Black and Green Dishwasher Wires Are Threaded Thru Hole in the literature package. See Step 8. Check for operating instructions. Check to fall, check spring adjustments. Turn on the sink hot water faucet and verify water temperature. Locate the Owner's Manual in Back Ground White Black D Use UL Listed Wire Nuts Figure Y C Insert Power Cord Wires Thru Strain...
... the rack moves, adjust leveling legs. Turn on the door. A Remove Junction Box Cover B Check That White, Black and Green Dishwasher Wires Are Threaded Thru Hole in the literature package. See Step 8. Check for operating instructions. Check to fall, check spring adjustments. Turn on the sink hot water faucet and verify water temperature. Locate the Owner's Manual in Back Ground White Black D Use UL Listed Wire Nuts Figure Y C Insert Power Cord Wires Thru Strain...
Installation Instructions
Page 13
... Step 9. SPECIFICATIONS SUBJECT TO CHANGE WITHOUT NOTICE Pub. Check to Normal "Wash" position. A leak around the door. The dishwasher will drain and turn power supply off about 5 to 7 minutes after the first fill. If not, check that water enters the dishwasher. Turn dial to be sure that disposer plug has been removed and/or air gap is corrected. STEP 17 REPLACE TOEKICK Figure Z Use Top 4 Screw Holes 2-Piece Toekick Adjust Up...
... Step 9. SPECIFICATIONS SUBJECT TO CHANGE WITHOUT NOTICE Pub. Check to Normal "Wash" position. A leak around the door. The dishwasher will drain and turn power supply off about 5 to 7 minutes after the first fill. If not, check that water enters the dishwasher. Turn dial to be sure that disposer plug has been removed and/or air gap is corrected. STEP 17 REPLACE TOEKICK Figure Z Use Top 4 Screw Holes 2-Piece Toekick Adjust Up...
Use and Care Manual / Warranty
Page 1
Dishwashers ge.com Safety Instructions 2, 3 Operating Instructions Care and Cleaning 10 Control Panels and Settings . . 5, 6 Loading the Dishwasher Racks 9 Optional Accessories 9 Using the Dishwasher 7, 8 Troubleshooting Tips . . . . 12, 13 Consumer Support Consumer Support . . . Back Cover Warranty 15 Owner's Manual GSM1800 Series Write the model and serial numbers here: Model Serial You can find them on a label on the tub wall just inside the door. 165D4700P337 49-55017 12-05 JR
Dishwashers ge.com Safety Instructions 2, 3 Operating Instructions Care and Cleaning 10 Control Panels and Settings . . 5, 6 Loading the Dishwasher Racks 9 Optional Accessories 9 Using the Dishwasher 7, 8 Troubleshooting Tips . . . . 12, 13 Consumer Support Consumer Support . . . Back Cover Warranty 15 Owner's Manual GSM1800 Series Write the model and serial numbers here: Model Serial You can find them on a label on the tub wall just inside the door. 165D4700P337 49-55017 12-05 JR
Use and Care Manual / Warranty
Page 2
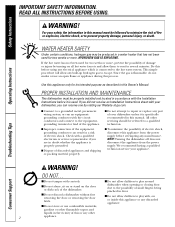
... INSTALLATION AND MAINTENANCE This dishwasher must be properly installed and located in door. We recommend having a qualified technician service your dishwasher, you are in doubt whether the appliance is used for its intended purpose as described in a risk of the dishwasher. If the hot water has not been used . HYDROGEN GAS IS EXPLOSIVE. Troubleshooting Tips Consumer Support WARNING! dishwasher when opening or closing door due to a grounded metal, permanent wiring...
... INSTALLATION AND MAINTENANCE This dishwasher must be properly installed and located in door. We recommend having a qualified technician service your dishwasher, you are in doubt whether the appliance is used for its intended purpose as described in a risk of the dishwasher. If the hot water has not been used . HYDROGEN GAS IS EXPLOSIVE. Troubleshooting Tips Consumer Support WARNING! dishwasher when opening or closing door due to a grounded metal, permanent wiring...
Use and Care Manual / Warranty
Page 3
... your old dishwasher, please follow the instructions below to damage the door seal. READ AND FOLLOW THIS SAFETY INFORMATION CAREFULLY. I Locate sharp items so that is used by or near children. SAVE THESE INSTRUCTIONS Troubleshooting Tips Consumer Support 3 I Use only powder, tabs, liquid detergents or rinse agents recommended for use in your dishwasher unless all GE dishwashers. Cascade® and Electrasol® Automatic Dishwashing Detergents, and Jet-Dry® and...
... your old dishwasher, please follow the instructions below to damage the door seal. READ AND FOLLOW THIS SAFETY INFORMATION CAREFULLY. I Locate sharp items so that is used by or near children. SAVE THESE INSTRUCTIONS Troubleshooting Tips Consumer Support 3 I Use only powder, tabs, liquid detergents or rinse agents recommended for use in your dishwasher unless all GE dishwashers. Cascade® and Electrasol® Automatic Dishwashing Detergents, and Jet-Dry® and...

Use and Care Manual / Warranty
Page 5
... HEATED DRY ON Turns the heating element on soils. Throughout this manual, features and appearance may be included. HEAVY WASH For heavily soiled dishes or cookware. Dishes air dry naturally and energy is a time delay between start-up and water fill so you could accidentally miss a rinse. DO NOT use the CHINA CRYSTAL cycle. NOTE: Many dishes have lighter soil than NORMAL WASH will not hear any wash action right away. 5 Consumer Support Operating Instructions Troubleshooting Tips Control Settings 1 Wash Cycles...
... HEATED DRY ON Turns the heating element on soils. Throughout this manual, features and appearance may be included. HEAVY WASH For heavily soiled dishes or cookware. Dishes air dry naturally and energy is a time delay between start-up and water fill so you could accidentally miss a rinse. DO NOT use the CHINA CRYSTAL cycle. NOTE: Many dishes have lighter soil than NORMAL WASH will not hear any wash action right away. 5 Consumer Support Operating Instructions Troubleshooting Tips Control Settings 1 Wash Cycles...
Use and Care Manual / Warranty
Page 8
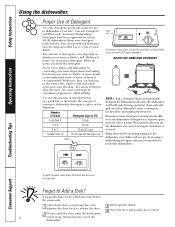
... soft water can build up in dishwashers. Number of Detergent Use only detergent specifically made for dishwashers will not get clean using a dishwashing detergent that is not formulated to wash dishes. Safety Instructions Operating Instructions Using the dishwasher. With soft water, you need less detergent. A water softener is stored. Forget to interrupt the cycle. A forgotten dish can be no lasting damage to the dishwasher, your detergent fresh and dry. Squeeze the door latch to release the door. 3 Add forgotten dishes. 4 Close the door and...
... soft water can build up in dishwashers. Number of Detergent Use only detergent specifically made for dishwashers will not get clean using a dishwashing detergent that is not formulated to wash dishes. Safety Instructions Operating Instructions Using the dishwasher. With soft water, you need less detergent. A water softener is stored. Forget to interrupt the cycle. A forgotten dish can be no lasting damage to the dishwasher, your detergent fresh and dry. Squeeze the door latch to release the door. 3 Add forgotten dishes. 4 Close the door and...
Use and Care Manual / Warranty
Page 9
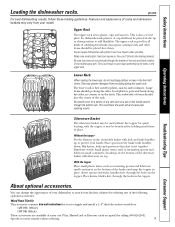
.... Lower Rack When loading the lower rack, do not protrude through the bottom rack. Be careful not to let a portion of the silverware basket with the topper, it may prevent detergent from your kitchen cabinets by calling 800.626.2002. Specify accessory number when ordering. 9 Consumer Support The upper rack is for holding small items in the bottom of any item such as a pot or dish handle...
.... Lower Rack When loading the lower rack, do not protrude through the bottom rack. Be careful not to let a portion of the silverware basket with the topper, it may prevent detergent from your kitchen cabinets by calling 800.626.2002. Specify accessory number when ordering. 9 Consumer Support The upper rack is for holding small items in the bottom of any item such as a pot or dish handle...
Use and Care Manual / Warranty
Page 11
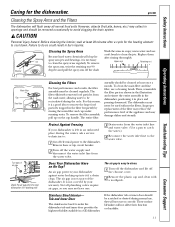
... Inner Door The stainless steel used without the filters. Stainless Steel Interior- If the dishwasher tub or inner door should be cleaned regularly. The filter efficiently removes food particles from the wash water, allowing water to be scratched or dented during the winter, ask a service technician to: 1 Cut off the water supply and disconnect the water inlet line from the water valve. 3 Drain water from the water inlet line and water valve. (Use a pan to catch the water.) 4 Reconnect the water inlet line to clean the jets. The air gap...
... Inner Door The stainless steel used without the filters. Stainless Steel Interior- If the dishwasher tub or inner door should be cleaned regularly. The filter efficiently removes food particles from the wash water, allowing water to be scratched or dented during the winter, ask a service technician to: 1 Cut off the water supply and disconnect the water inlet line from the water valve. 3 Drain water from the water inlet line and water valve. (Use a pan to catch the water.) 4 Reconnect the water inlet line to clean the jets. The air gap...
Use and Care Manual / Warranty
Page 12
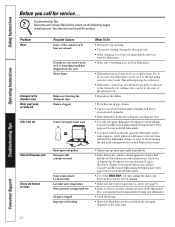
... inlet water temperature is correct (see if your kitchen sink is draining well. Problem Noise Detergent left in dispenser cups Water won't pump out of the tub Suds in the tub Stained dishwasher parts Dishes and flatware not clean Possible Causes Some of the sounds you do not use your dishwasher. • Clean the air gap. • Make sure large dishware does not block the detergent dispenser or the wash arms. Troubleshooting Tips Consumer Support...
... inlet water temperature is correct (see if your kitchen sink is draining well. Problem Noise Detergent left in dispenser cups Water won't pump out of the tub Suds in the tub Stained dishwasher parts Dishes and flatware not clean Possible Causes Some of the sounds you do not use your dishwasher. • Clean the air gap. • Make sure large dishware does not block the detergent dispenser or the wash arms. Troubleshooting Tips Consumer Support...
Use and Care Manual / Warranty
Page 13
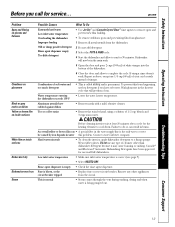
... bleach and 3 cups warm water. Wash glassware in the water supply line is blown, or the circuit breaker tripped • Replace fuse or reset circuit breaker. Failure to remove spots and prevent new film buildup. • To remove stubborn spots and pre-existing film from glassware: Improper loading Old or damp powder detergent Rinse agent dispenser empty Too little detergent 1 Remove all GE dishwashers. Do not use 1/4 cup (60 ml...
... bleach and 3 cups warm water. Wash glassware in the water supply line is blown, or the circuit breaker tripped • Replace fuse or reset circuit breaker. Failure to remove spots and prevent new film buildup. • To remove stubborn spots and pre-existing film from glassware: Improper loading Old or damp powder detergent Rinse agent dispenser empty Too little detergent 1 Remove all GE dishwashers. Do not use 1/4 cup (60 ml...

Use and Care Manual / Warranty
Page 15
..., KY 40225 Troubleshooting Tips Consumer Support 15 For The Period Of: One Year From the date of the original purchase GE Will Replace: Any part of God. Warrantor: General Electric Company. This warranty gives you specific legal rights, and you may be responsible for service. Safety Instructions Operating Instructions GE Dishwasher Warranty. EXCLUSION OF IMPLIED WARRANTIES-Your sole and exclusive remedy is product repair as provided...
..., KY 40225 Troubleshooting Tips Consumer Support 15 For The Period Of: One Year From the date of the original purchase GE Will Replace: Any part of God. Warrantor: General Electric Company. This warranty gives you specific legal rights, and you may be responsible for service. Safety Instructions Operating Instructions GE Dishwasher Warranty. EXCLUSION OF IMPLIED WARRANTIES-Your sole and exclusive remedy is product repair as provided...


