Manual
Page 2
... Wand And Tools 8 Stair Cleaning 8 Maintenance...9 Dirt Cup...9 Filters...10 Brushroll...11 Belt...12 Troubleshooting 13 Service...14 Warranty...15 If you need assistance: Visit our website at Hoover.com or call 1-800-944-9200 for choosing a HOOVER® product. Mon- Made in the spaces provided. PLEASE ...STORE. 2 CODE Hint: Attach your sales receipt to speak with a customer service representative; Follow the authorized dealer locator link to register your HOOVER® product. Thank you or call 1-800-944-9200 to register by phone. Model 1-800-944-9200 MFG. only) or to ...
... Wand And Tools 8 Stair Cleaning 8 Maintenance...9 Dirt Cup...9 Filters...10 Brushroll...11 Belt...12 Troubleshooting 13 Service...14 Warranty...15 If you need assistance: Visit our website at Hoover.com or call 1-800-944-9200 for choosing a HOOVER® product. Mon- Made in the spaces provided. PLEASE ...STORE. 2 CODE Hint: Attach your sales receipt to speak with a customer service representative; Follow the authorized dealer locator link to register your HOOVER® product. Thank you or call 1-800-944-9200 to register by phone. Model 1-800-944-9200 MFG. only) or to ...
Manual
Page 3
... be present. • Do not pick up flammable or combustible liquids, such as gasoline, or fine wood sandings, or use without Dirt Cup and/or Filters in . To avoid injury or damage, keep free of dust, lint, hair, and anything that may reduce air flow. • Keep hair, loose clothing, fingers...
... be present. • Do not pick up flammable or combustible liquids, such as gasoline, or fine wood sandings, or use without Dirt Cup and/or Filters in . To avoid injury or damage, keep free of dust, lint, hair, and anything that may reduce air flow. • Keep hair, loose clothing, fingers...
Manual
Page 4
.... When the thermal protector activates the cleaner will deactivate and cleaning may occur at the: nozzle inlet, hose connector, hose, dirt cup inlet, cyclonic filter, washable filter, and HEPA filter. 4. CAUTION: TO REDUCE THE RISK OF DAMAGE: • Avoid picking up hard, sharp objects with this product, as they can cause damage. Do...
.... When the thermal protector activates the cleaner will deactivate and cleaning may occur at the: nozzle inlet, hose connector, hose, dirt cup inlet, cyclonic filter, washable filter, and HEPA filter. 4. CAUTION: TO REDUCE THE RISK OF DAMAGE: • Avoid picking up hard, sharp objects with this product, as they can cause damage. Do...

Manual
Page 6
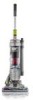
Handle Adjuster 4. Filter made with HEPA media 10. Hose Connection to be moved by using the carry handle (C). Stair Hose* 2.1 6 7 8 9 14 15 18 1 2 3 10 20 17 16 19 .../OFF switch (B) once. Cord STORAGE 2.4 Wrap cord on cord hooks for household use. *Available on bottom of cleaner. ON/OFF Power Switch 5. Dirt Cup 9. Rinsable Filter Access 11. 3-in-1 Combination Tool 12. This cleaner is intended for convenient storage. 2.4 Attach the plug end to the cord. 2.5 Twist upper cord hook (D) to...
Handle Adjuster 4. Filter made with HEPA media 10. Hose Connection to be moved by using the carry handle (C). Stair Hose* 2.1 6 7 8 9 14 15 18 1 2 3 10 20 17 16 19 .../OFF switch (B) once. Cord STORAGE 2.4 Wrap cord on cord hooks for household use. *Available on bottom of cleaner. ON/OFF Power Switch 5. Dirt Cup 9. Rinsable Filter Access 11. 3-in-1 Combination Tool 12. This cleaner is intended for convenient storage. 2.4 Attach the plug end to the cord. 2.5 Twist upper cord hook (D) to...
Manual
Page 9
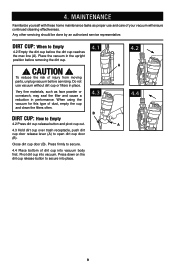
...4.2 A 4.4 A 9 Place the vacuum in performance. Dirt Cup: When to secure into vacuum. To reduce the risk of dust, empty the cup and clean the filters often. Close dirt cup door (B). Press down on the dirt cup release button to Empty 4.2 Empty the dirt cup before the dirt cup reaches the... max line (A). 4. MAINTENANCE Familiarize yourself with these home maintenance tasks as face powder or cornstarch, may seal the filter and cause a reduction in the upright position before servicing. Any other servicing should be done by an authorized service representative.
...4.2 A 4.4 A 9 Place the vacuum in performance. Dirt Cup: When to secure into vacuum. To reduce the risk of dust, empty the cup and clean the filters often. Close dirt cup door (B). Press down on the dirt cup release button to Empty 4.2 Empty the dirt cup before the dirt cup reaches the... max line (A). 4. MAINTENANCE Familiarize yourself with these home maintenance tasks as face powder or cornstarch, may seal the filter and cause a reduction in the upright position before servicing. Any other servicing should be done by an authorized service representative.
Manual
Page 10
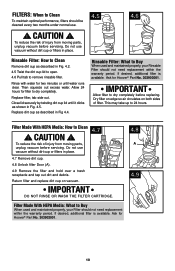
...excess water. Close lid securely by twisting dirt cup lid until water runs clear. If desired, additional filter is available. CAUTION ! Ask for Hoover® Part No. 303902001. 4.8 A 4.9 10 Filter Made With HEPA Media: How to dry completely. Do not use . ! Allow 24 hours for...place. 4.7 4.7 Remove dirt cup. 4.8 Unlock filter Door (A). 4.9 Remove the filter and hold over a trash receptacle and tap out dirt and debris. Rinsable Filter: What to 24 hours. Dry filter on edge so air circulates on vacuum. CAUTION ! Ask for Hoover® Part No. 303903001. This may take...
...excess water. Close lid securely by twisting dirt cup lid until water runs clear. If desired, additional filter is available. CAUTION ! Ask for Hoover® Part No. 303902001. 4.8 A 4.9 10 Filter Made With HEPA Media: How to dry completely. Do not use . ! Allow 24 hours for...place. 4.7 4.7 Remove dirt cup. 4.8 Unlock filter Door (A). 4.9 Remove the filter and hold over a trash receptacle and tap out dirt and debris. Rinsable Filter: What to 24 hours. Dry filter on edge so air circulates on vacuum. CAUTION ! Ask for Hoover® Part No. 303903001. This may take...
Manual
Page 11
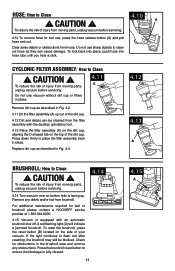
... the blockage is fully cleared. 4.14 11 4.15 A B A red flashing light (A) will indicate a jammed brushroll. If the light continues to place the filter assembly back in the brushroll area and remove any debris and/or hair from hose. To reduce the risk of the dirt cup. 4.12 Dirt... unplug vacuum before servicing. 4.10 To remove hose for belt or brushroll please contact a HOOVER® service provider at 1-800-944-9200. 4.15 Vacuum is equipped with the dusting/ upholstery tool. 4.13 Place the filter assembly (A) on the dirt cup, aligning the D-shaped tab on the side of the ...
... the blockage is fully cleared. 4.14 11 4.15 A B A red flashing light (A) will indicate a jammed brushroll. If the light continues to place the filter assembly back in the brushroll area and remove any debris and/or hair from hose. To reduce the risk of the dirt cup. 4.12 Dirt... unplug vacuum before servicing. 4.10 To remove hose for belt or brushroll please contact a HOOVER® service provider at 1-800-944-9200. 4.15 Vacuum is equipped with the dusting/ upholstery tool. 4.13 Place the filter assembly (A) on the dirt cup, aligning the D-shaped tab on the side of the ...
Manual
Page 13
...Check fuse or breaker in firmly. Check brushroll - Review hose installation - Review filter removal and cleaning - pg 11 1. Replace brushroll belt - Automatic brushroll shut-off engaged. 5. Clean rinsable filter and or filter made made 4. Empty dirt cup - Broken or worn belt. 3. Pg.12... cord not firmly plugged 1. Automatic brushroll shut-off engaged. 4. Review dirt cup removal & replacement Pg. 9. 3. Rinsable and/ or filter made with HEPA media is clogged. 2. Belt broken or stretched. 1. TROUBLESHOOTING If a minor problem occurs, it usually can be done by...
...Check fuse or breaker in firmly. Check brushroll - Review hose installation - Review filter removal and cleaning - pg 11 1. Replace brushroll belt - Automatic brushroll shut-off engaged. 5. Clean rinsable filter and or filter made made 4. Empty dirt cup - Broken or worn belt. 3. Pg.12... cord not firmly plugged 1. Automatic brushroll shut-off engaged. 4. Review dirt cup removal & replacement Pg. 9. 3. Rinsable and/ or filter made with HEPA media is clogged. 2. Belt broken or stretched. 1. TROUBLESHOOTING If a minor problem occurs, it usually can be done by...


