Manual
Page 1
... stairs 7 Maintenance 8-10 Emptying dirt cup 8 Filters 9 Lubrication 11 Clearing blockages 12-13 Agitator brushroll 11 Agitator brushroll belt 9-10 Service 12 If you have a problem 12 Warranty 13 Thank You for choosing HOOVER®! PLEASE DO NOT RETURN THIS PRODUCT TO THE STORE. THIS PRODUCT IS INTENDED FOR HOUSEHOLD USE ONLY...
... stairs 7 Maintenance 8-10 Emptying dirt cup 8 Filters 9 Lubrication 11 Clearing blockages 12-13 Agitator brushroll 11 Agitator brushroll belt 9-10 Service 12 If you have a problem 12 Warranty 13 Thank You for choosing HOOVER®! PLEASE DO NOT RETURN THIS PRODUCT TO THE STORE. THIS PRODUCT IS INTENDED FOR HOUSEHOLD USE ONLY...
Manual
Page 3
...LISTED SERIAL NO./NUMERSOER./ÚNMERO DE SERIE XXXX When using an electrical appliance, always follow basic precautions, incSlAuMdPiLnE g the following: HOOVER NEWTON, IOAW 50208 Made in . Do not use with any object into water, take it to this appliance before connecting or .../ASPIRADORA MODEL/MODÈLE/MODEOL U5180-900 SERIES/ÉSRIE/SERIE ZC12.0 7 19881 15677 4 120 V. 60 Hz. . 12.0 A BELT/COURROIE/CROERA 38528040 FILTERS/FILTROS/FIL9T3R0E0S1633 C U® L US HOUSEHOLD TYPE/TYPE MENAGER/TIPO DOMESTICO LISTED SERIAL NO./NUMERSOER./ÚNMERO DE SERIE XXXX...
...LISTED SERIAL NO./NUMERSOER./ÚNMERO DE SERIE XXXX When using an electrical appliance, always follow basic precautions, incSlAuMdPiLnE g the following: HOOVER NEWTON, IOAW 50208 Made in . Do not use with any object into water, take it to this appliance before connecting or .../ASPIRADORA MODEL/MODÈLE/MODEOL U5180-900 SERIES/ÉSRIE/SERIE ZC12.0 7 19881 15677 4 120 V. 60 Hz. . 12.0 A BELT/COURROIE/CROERA 38528040 FILTERS/FILTROS/FIL9T3R0E0S1633 C U® L US HOUSEHOLD TYPE/TYPE MENAGER/TIPO DOMESTICO LISTED SERIAL NO./NUMERSOER./ÚNMERO DE SERIE XXXX...
Manual
Page 9
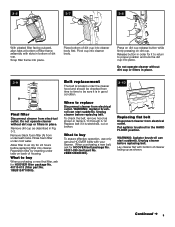
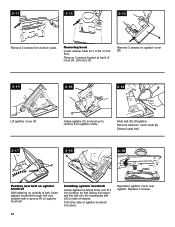
... a new final filter, ask for it to return to buy To assure effective operation, use only genuine HOOVER belts with slots in good condition. Unplug cleaner before replacing belt. Place bottom of cleaner facing up as shown. Remove dirt cup as shown in Fig. 3-2. Reposition filter...When to replace Disconnect cleaner from time to time to air dry for HOOVER belt package No. 40201-280 (belt part No. 2BEB120800300). 3-10 Replacing flat belt Disconnect cleaner from underneath tabs. Unplug cleaner before replacing belt. Lay cleaner flat with bottom of dirt cup into cleaner. Do not...
... a new final filter, ask for it to return to buy To assure effective operation, use only genuine HOOVER belts with slots in good condition. Unplug cleaner before replacing belt. Place bottom of cleaner facing up as shown. Remove dirt cup as shown in Fig. 3-2. Reposition filter...When to replace Disconnect cleaner from time to time to air dry for HOOVER belt package No. 40201-280 (belt part No. 2BEB120800300). 3-10 Replacing flat belt Disconnect cleaner from underneath tabs. Unplug cleaner before replacing belt. Lay cleaner flat with bottom of dirt cup into cleaner. Do not...
Manual
Page 10
... agitator (C) and pull up to remove from bottom plate. Discard used belt. 3-17 3-18 G F 3-19 Position new belt on agitator brushroll With lettering on outside of belt, insert agitator brushroll through belt and position belt in groove (F) on side of cleaner. Installing agitator brushroll Grasp agitator .... 10 Removing hood Lower cleaner base so it into position by first sliding end opposite the belt into place. E Slide belt (D) off . Remove belt from motor shaft (E). Remove 2 screws on the floor. Lift hood off agitator. Reposition agitator cover over agitator.
... agitator (C) and pull up to remove from bottom plate. Discard used belt. 3-17 3-18 G F 3-19 Position new belt on agitator brushroll With lettering on outside of belt, insert agitator brushroll through belt and position belt in groove (F) on side of cleaner. Installing agitator brushroll Grasp agitator .... 10 Removing hood Lower cleaner base so it into position by first sliding end opposite the belt into place. E Slide belt (D) off . Remove belt from motor shaft (E). Remove 2 screws on the floor. Lift hood off agitator. Reposition agitator cover over agitator.
Manual
Page 11
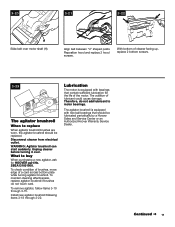
... and Service Center or an Authorized Hoover Warranty Service Dealer. Reposition hood and replace 2 hood screws. Continued ➜ 11 Therefore, do not touch card. 3-20 3-21 3-22 H Slide belt over . To remove agitator, follow Items 3-10 through 3-22. The agitator brushroll is equipped with two ball bearings that contain sufficient lubrication for...
... and Service Center or an Authorized Hoover Warranty Service Dealer. Reposition hood and replace 2 hood screws. Continued ➜ 11 Therefore, do not touch card. 3-20 3-21 3-22 H Slide belt over . To remove agitator, follow Items 3-10 through 3-22. The agitator brushroll is equipped with two ball bearings that contain sufficient lubrication for...
Manual
Page 12
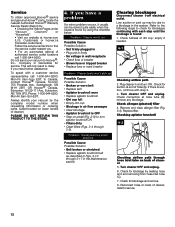
... found by using the checklist below. Low suction or pick up Problem: Smoky Possible Cause Possible Solution • Broken or worn belt • Replace belt • Agitator brushroll worn • Replace agitator brushroll • Dirt cup full • Empty dirt cup • Blockage ...Disconnect cleaner from hose inlet tube (C). 7. Remove and clean allergen filter (Fig. 3-4). Turn cleaner OFF and unplug. 6. Check connection at hoover.com (U.S. Reconnect hose on lower handle of authorized service outlet locations Do call 1-800-944-9200; Mon-Fri contact H8aomov-7erp®m ...
... found by using the checklist below. Low suction or pick up Problem: Smoky Possible Cause Possible Solution • Broken or worn belt • Replace belt • Agitator brushroll worn • Replace agitator brushroll • Dirt cup full • Empty dirt cup • Blockage ...Disconnect cleaner from hose inlet tube (C). 7. Remove and clean allergen filter (Fig. 3-4). Turn cleaner OFF and unplug. 6. Check connection at hoover.com (U.S. Reconnect hose on lower handle of authorized service outlet locations Do call 1-800-944-9200; Mon-Fri contact H8aomov-7erp®m ...

